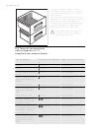
Страница 3 из 81 ENGLISH 1. 3 SAFETY INSTRUCTIONS In the interest of your safety and to ensure the correct use, before installing and first using the appliance, read this user manual carefully, including its hints and warnings. To avoid unnecessary mistakes and accidents, it is important to ensure that all people
Страница 4 из 81 4 www.aeg.com 2. • • • • Make sure that the power plug is not squashed or damaged by the back of the appliance. A squashed or damaged power plug may overheat and cause a fire. 3. Make sure that you can come to the mains plug of the appliance. 4. Do not pull the mains cable. 5. If the power plug
Страница 5 из 81 ENGLISH 5 ant circuit or insulation materials. The appliance shall not be discarded together with the urban refuse and rubbish. The insulation foam contains flammable gases: the appliance shall be disposed according to the applicable regulations to obtain from your local authorities. Avoid damaging
Страница 6 из 81 6 www.aeg.com 2.3 Switching off To switch off the appliance do these steps: 1. Press the ON/OFF button for 5 seconds. 2. The display switches off. 3. To disconnect the appliance from the power disconnect the mains plug from the power socket. 2.4 Temperature regulation The set temperature of the
Страница 7 из 81 ENGLISH 2.8 Door open alarm An acoustic alarm will sound if the door is left open for a few minutes. The door open alarm conditions are indicated by: • flashing Alarm indicator 7 • acoustic buzzer When normal conditions are restored (door closed), the alarm will stop. During the alarm, the buzzer
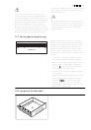
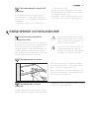
Страница 8 из 81 8 www.aeg.com 3.4 Positioning the sliding box The sliding box can be placed at different heights. Do make these adjustments proceed as follow: 1. lift the shelf with the sliding box upwards and out of the holders in the door 2. remove the retaining bracket out of the guide under the shelf 3.
Страница 9 из 81 ENGLISH 9 3.7 Humidity control Both drawers can be used according to the desired storage conditions independently of each other with lower or higher humidity. Regulation for each drawer is separate and is controlled using the slide valve at the front of the drawer. • „Dry“: low air humidity - up to
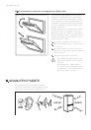
Страница 10 из 81 10 www.aeg.com The wire shelves inside the drawers permit that air can circulate freely and consequently a better conservation of foods. The compartment has stops to prevent the drawers from falling out when fully extended. To remove the drawers (e.g. for cleaning purposes), pull them out as far as
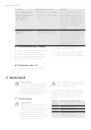
Страница 11 из 81 ENGLISH Type of food Air humidity adjustment 11 Storage time Spring onions, radishes, asparagus, spinach “humid” up to 7 days Fruit (The riper the fruit, the shorter the storage time) Pears, dates (fresh), strawberries, peaches “humid” up to 1 month Plums (The riper the fruit, the shorter the
Страница 12 из 81 12 www.aeg.com ture will improve the texture and flavour. 4. HELPFUL HINTS AND TIPS 4.1 Hints for energy saving 4.3 Hints for refrigeration • Do not open the door frequently or leave it open longer than absolutely necessary. • If the ambient temperature is high and the Temperature Regulator is set
Страница 13 из 81 ENGLISH Clean the condenser (black grill) and the compressor at the back of the appliance with a brush. This operation will improve the performance of the appliance and save electricity consumption. The lowest shelf, dividing the cooler compartment from the LONGFRESH 0°C compartment can be removed
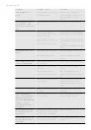
Страница 14 из 81 14 www.aeg.com Problem Possible cause Solution The appliance is noisy The appliance is not supported properly Check if the appliance stands stable (all the four feet should be on the floor) The appliance does not operate. The lamp does not operate. The appliance is switched Switch on the appliance.
Страница 15 из 81 ENGLISH Problem Possible cause Solution The door is not closed correctly. Refer to "Closing the door". The product temperature is too high. 15 Let the product temperature decrease to room temperature before storage. Many products are stored Store less products at the at the same time. same time.
Страница 16 из 81 16 www.aeg.com The appliance shall have the plug accessible after installation. Install this appliance at a location where the ambient temperature corresponds to the climate class indicated on the rating plate of the appliance: Climate class Ambient temperature SN +10°C to + 32°C N +16°C to + 32°C
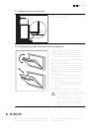
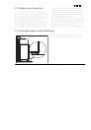
Страница 17 из 81 ENGLISH 17 7.4 Installation of the carbon air filter 1 2 The carbon air filter is an active carbon filter which absorbs bad odors and permits to maintain the best flavour and aroma for all foodstuffs without risk of odor cross contamination. On delivery the carbon filter is in a plastic bag to
Страница 19 из 81 ENGLISH 9. TECHNICAL DATA Dimension of the recess Height 1855 mm Width 545 mm Depth 575 mm Voltage 230-240 V Frequency 50 Hz The technical information are situated in the rating plate on the internal left side of the appliance and in the energy label. 10. ENVIRONMENT CONCERNS Recycle the materials
Страница 21 из 81 ITALIANO 1. 21 ISTRUZIONI DI SICUREZZA Per garantire un impiego corretto e sicuro dell'apparecchio, prima dell'installazione e del primo utilizzo leggere con attenzione il libretto istruzioni, inclusi i suggerimenti e le avvertenze. Per evitare errori e incidenti, è importante garantire che tutte
Страница 22 из 81 22 www.aeg.com AVVERTENZA! Tutti i componenti elettrici (cavo di alimentazione, spina, compressore) devono essere sostituiti da un tecnico certificato o da personale d'assistenza qualificato al fine di evitare di correre rischi. 1. • • • • Non collegare prolunghe al cavo di alimentazione. 2.
Страница 23 из 81 ITALIANO • Attorno all'apparecchio vi deve essere un'adeguata circolazione dell'aria, altrimenti si può surriscaldare. Per ottenere una ventilazione sufficiente seguire le istruzioni di installazione. • Se possibile il retro dell'apparecchio dovrebbe essere posizionato contro una parete per evitare
Страница 24 из 81 24 www.aeg.com 2.2 Accensione 2.5 Funzione Minute Minder Per accendere l'apparecchiatura procedere come segue: 1. Inserire la spina nella presa di alimentazione. 2. Premere il tasto ON/OFF se il display è spento. 3. Il segnale acustico d'allarme potrebbe attivarsi dopo alcuni secondi. Per resettare
Страница 25 из 81 ITALIANO Viene visualizzato l'indicatore Sicurezza Bambini. Per disattivare la funzione: 1. Premere il tasto Mode fino a quando l'indicatore Sicurezza Bambini non lampeggia. 2. Premere il tasto OK per confermare. 3. L'indicatore Sicurezza Bambini si spegne. 2.7 Funzione COOLMATIC Se occorre
Страница 26 из 81 26 www.aeg.com 3.2 Ripiani mobili Le guide presenti sulle pareti del frigorifero permettono di posizionare i ripiani a diverse altezze. Per un migliore sfruttamento dello spazio, i semiripiani anteriori possono essere collocati sopra a quelli posteriori. 3.3 Posizionamento delle mensole possono
Страница 27 из 81 ITALIANO FRESH 0°C , dove dureranno almeno il triplo del tempo con una qualità superiore rispetto a quella dei normali scomparti del frigorifero. Ciò consente di conservare una maggiore quantità di alimenti freschi. Il sapore, il grado di freschezza, la qualità e i valori nutrizionali (vitamine e
Страница 28 из 81 28 www.aeg.com Le griglie all'interno degli scomparti consentono la libera circolazione dell'aria e quindi una migliore conservazione degli alimenti. Lo scomparto presenta dei fermi che impediscono ai cassetti di fuoriuscire quando vengono estratti completamente. Per rimuovere i cassetti (ad
Страница 29 из 81 ITALIANO Tipo di alimento 29 Regolazione dell'umidi- Tempo di conservazione tà Piselli, rapa "umido" fino a 10 giorni Cipollotti, ravanelli, asparagi, spinaci "umido" fino a 7 giorni Frutta(A un maggiore grado di maturazione della frutta corrispondono tempi di conservazione più brevi) Pere, datteri
Страница 30 из 81 30 www.aeg.com • Occorre sempre confezionare o avvolgere alimenti, frutta o verdure prima della loro conservazione. • Gli alimenti di origine animale devono essere sempre conservati confezionati e asciutti. • Gli alimenti ad alto tenore proteico si deteriorano più rapidamente. I frutti di mare, ad
Страница 31 из 81 ITALIANO effettuate esclusivamente da tecnici autorizzati. 5.1 Pulizia periodica L'apparecchio deve essere pulito regolarmente: • Lavare l'interno e gli accessori con acqua tiepida e sapone neutro. • Ispezionare regolarmente le guarnizioni dello sportello ed eliminare con un panno umido tracce di
Страница 32 из 81 32 www.aeg.com 6. COSA FARE SE… AVVERTENZA! Prima di eseguire la ricerca guasti, estrarre la spina dalla presa di alimentazione. Le operazioni di ricerca guasti, non descritte nel presente manuale, devono essere eseguite esclusivamente da elettricisti qualificati o da personale competente. Problema
Страница 33 из 81 ITALIANO Problema 33 Possibile causa Soluzione La temperatura ambiente è troppo alta. Abbassare la temperatura ambiente. Il compressore non si Ciò è normale, non si è avvia immediataverificato alcun errore. mente dopo avere premuto il tasto COOLMATIC , oppure dopo aver cambiato la temperatura. Il
Страница 34 из 81 34 www.aeg.com 6.1 Sostituzione della lampadina L'apparecchiatura è dotata di una lampadina interna a LED a lunga durata. Solo al servizio assistenza è permesso sostituire l'impianto d'illuminazione. Contattare il Centro di assistenza locale. 2. Se necessario, regolare la porta. Vedere
Страница 35 из 81 ITALIANO 35 7.3 Requisiti di ventilazione 5 cm Il flusso d'aria dietro l'apparecchiatura deve essere sufficiente. min. 200 cm2 min. 200 cm2 7.4 Installazione del filtro dell'aria al carbone 1 2 Il filtro dell'aria al carbone è un filtro al carbone attivo che assorbe i cattivi odori e permette a
Страница 36 из 81 36 www.aeg.com SSS RRR ! HISSS! OK U BL SSSRRR! HISSS! BLUBB! SSSRRR! HISSS! BLUBB! BB IC CL K! BRRR! ! CLICK! BRRR! CRACK! CR AC K! CLICK! BRRR! CRACK!
Страница 37 из 81 ITALIANO 37 9. DATI TECNICI Nicchia di incasso Altezza 1855 mm Larghezza 545 mm Profondità 575 mm Tensione 230-240 V Frequenza Le informazioni tecniche sono riportate sulla targhetta sul lato sinistro interno 50 Hz dell'apparecchio e sull'etichetta dei valori energetici. 10. CONSIDERAZIONI
Страница 39 из 81 DEUTSCH 1. 39 SICHERHEITSHINWEISE Lesen Sie zu Ihrer Sicherheit und für die optimale Geräteanwendung vor der Installation und dem Gebrauch des Gerätes die vorliegende Benutzerinformation aufmerksam durch, einschließlich der Ratschläge und Warnungen. Es ist wichtig, dass zur Vermeidung von Fehlern
Страница 40 из 81 40 www.aeg.com WARNUNG! Elektrische Bauteile (Netzkabel, Stecker, Kompressor) dürfen zur Vermeidung von Gefahren nur vom Kundendienst oder einer Fachkraft ausgewechselt werden. 1. • • • • Das Netzkabel darf nicht verlängert werden. 2. Vergewissern Sie sich, dass der Netzstecker nicht von der
Страница 41 из 81 DEUTSCH • • • • falls besteht Überhitzungsgefahr. Halten Sie sich für die Belüftung an die Installationsanweisungen. Das Gerät sollte zur Vermeidung von Verbrennungen durch Berührung von heißen Bauteilen (Kompressor, Kondensator) möglichst mit der Rückseite gegen eine Wand aufgestellt werden. Das
Страница 42 из 81 42 www.aeg.com 2.2 Einschalten des Geräts Gehen Sie wie folgt vor, um das Gerät einzuschalten: 1. Stecken Sie den Netzstecker in die Netzsteckdose. 2. Drücken Sie die Taste ON/OFF, wenn das Display ausgeschaltet ist. 3. Nach ein paar Sekunden ertönt möglicherweise ein akustisches Alarmsignal. Wie
Страница 43 из 81 DEUTSCH Die Anzeige „Kindersicherung“ leuchtet. Zum Ausschalten der Funktion: 1. Drücken Sie die Taste Mode, bis die Anzeige „Kindersicherung“ blinkt. 2. Drücken Sie zur Bestätigung die Taste OK. 3. Die Anzeige „Kindersicherung“ erlischt. 2.7 Funktion COOLMATIC Wenn Sie zum Beispiel nach einem
Страница 44 из 81 44 www.aeg.com 3.2 Verstellbare Ablagen Die Wände des Kühlschranks sind mit einer Reihe von Führungsschienen ausgestattet, die verschiedene Möglichkeiten für das Einsetzen der Ablagen bieten. Zur besseren Raumnutzung können die vorderen Hälften der Ablagen auf die hinteren Hälften gelegt werden.
Страница 45 из 81 DEUTSCH Sie können daher eine Vielfalt von frischen Lebensmitteln im LONGFRESH 0°C Fach lagern, in dem die Lebensmittel bis zu 3 Mal länger ohne Qualitätseinbußen im Vergleich zu den normalen Kühlschrankfächern halten. Auf diese Weise können Sie mehr frische Lebensmittel einlagern. Der Geschmack,
Страница 46 из 81 46 www.aeg.com Dank der Gitterablagen in den Schubladen kann die Luft ungehindert zirkulieren und somit die Lebensmittel besser frisch halten. Die Anschläge im Fach verhindern ein Herausfallen der Schubladen, wenn diese vollständig herausgezogen werden. Zum Entfernen der Schubladen (z.B. zur
Страница 47 из 81 DEUTSCH Lebensmittel Einstellung der Luftfeuchtigkeit 47 Lagerzeit Erbsen, Kohlrabi „feucht“ bis zu 10 Tagen Frühlingszwiebeln, Radieschen, Spargel, Spinat „feucht“ bis zu 7 Tagen Obst (Je reifer die Frucht, desto kürzer die Lagerzeit) Birnen, (frische) Datteln, Erdbeeren, Pfirsiche „feucht“ bis zu
Страница 48 из 81 48 www.aeg.com • Lebensmittel, Obst oder Gemüse müssen vor der Einlagerung immer in Behälter oder Folie verpackt werden. • Tiernahrung ist immer verpackt und trocken zu lagern. • Proteinreiche Lebensmittel verderben schneller. So verderben Meeresfrüchte schneller als Fisch und dieser schneller als
Страница 49 из 81 DEUTSCH 49 5. REINIGUNG UND PFLEGE VORSICHT! Ziehen Sie bitte vor jeder Reinigungsarbeit immer den Netzstecker aus der Steckdose. Der Kältekreis des Gerätes enthält Kohlenwasserstoffe; Wartungsarbeiten und Nachfüllen von Kältemittel dürfen daher nur durch vom Hersteller autorisiertes Fachpersonal
Страница 50 из 81 50 www.aeg.com • Tauen Sie das Gerät ab (sofern vorgesehen). Reinigen Sie den Innenraum und das gesamte Zubehör. • lassen Sie die Türen offen/angelehnt, um das Entstehen unangenehmer Gerüche zu vermeiden. Möchten Sie bei einer längeren Abwesenheit den Gefrierschrank weiter laufen lassen, bitten Sie
Страница 51 из 81 DEUTSCH 51 Problem Mögliche Ursache Abhilfe Der Kompressor arbeitet ständig. Die Temperatur ist nicht richtig eingestellt. Stellen Sie eine höhere Temperatur ein. Die Tür ist nicht richtig geschlossen. Siehe hierzu „Schließen der Tür“. Die Tür wurde zu häufig geöffnet. Lassen Sie die Tür nicht
Страница 52 из 81 52 www.aeg.com Problem Mögliche Ursache Die Temperaturanzeige zeigt oben oder unten ein Quadrat an. Beim Messen der Tempe- Bitte wenden Sie sich an ratur ist ein Fehler aufge- Ihren Kundendienstmitartreten. beiter (das Kühlsystem hält zwar die eingelagerten Lebensmittel weiterhin kühl, doch eine
Страница 53 из 81 DEUTSCH 7.2 Elektrischer Anschluss Kontrollieren Sie vor der ersten Benutzung des Gerätes, ob die Netzspannung und -frequenz Ihres Hausanschlusses mit den auf dem Typenschild angegebenen Anschlusswerten übereinstimmen. Das Gerät muss geerdet sein. Zu diesem Zweck ist die Netzkabelsteckdose mit
Страница 54 из 81 54 www.aeg.com 7.4 Einsetzen des Kohlefilters 1 2 Der Kohlefilter ist ein Aktivkohlefilter, der schlechte Gerüche aufsaugt und so den Geschmack und das Aroma der Lebensmittel ohne Risiko von Geruchsübertragung optimal aufrecht erhält. Der Filter wird mit einer Plastikumhüllung geliefert, die seine
Страница 56 из 81 56 www.aeg.com 9. TECHNISCHE DATEN Abmessungen der Einbaunische Höhe 1855 mm Breite 545 mm Tiefe 575 mm Spannung 230-240 V Frequenz 50 Hz Die technischen Daten befinden sich auf dem Typenschild im Innern des Gerätes auf der linken Seite sowie auf der Energieplakette. 10. UMWELTTIPPS Recyceln Sie
Страница 58 из 81 58 www.aeg.com 1. УКАЗАНИЯ ПО БЕЗОПАСНОСТИ Для обеспечения собственной безо‐ пасности и правильной эксплуатации прибора, перед его установкой и пер‐ вым использованием внимательно прочитайте данное руководство, не пропуская рекомендации и предупре‐ ждения. Чтобы избежать нежелатель‐ ных ошибок и
Страница 59 из 81 РУССКИЙ – тщательно проветрите помеще‐ ние, в котором установлен при‐ бор. • Изменение характеристик прибора и внесение изменений в его конструк‐ цию сопряжено с опасностью. Лю‐ бое повреждение кабеля может при‐ вести к короткому замыканию, воз‐ никновению пожара и/или пораже‐ нию электрическим
Страница 60 из 81 60 www.aeg.com 1.5 Установка Для подключения к электросе‐ ти тщательно следуйте ин‐ струкциям, приведенным в со‐ ответствующих параграфах. • Распакуйте изделие и проверьте, нет ли повреждений. Не подключай‐ те к электросети поврежденный прибор. Немедленно сообщите о повреждениях продавцу прибора. В
Страница 61 из 81 РУССКИЙ 61 2. ПАНЕЛЬ УПРАВЛЕНИЯ 1 6 5 1 Дисплей 3 2 Если на дисплее высветилось со‐ общение "dEMo", значит, прибор находится в деморежиме. См. «Что делать, если...» 5. На индикаторах температуры от‐ ображаются значения температу‐ ры, заданные по умолчанию. Как выбрать другую температуру, см. в
Страница 62 из 81 62 www.aeg.com 2.5 Функция Minute Minder Функция Minute Minder может исполь‐ зоваться для подачи звукового сигна‐ ла в нужное время. Это может ока‐ заться полезным, например, когда по рецепту требуется охлаждать тесто в течение определенного времени. Включение режима 1. Нажимайте на кнопку Mode,
Страница 63 из 81 РУССКИЙ 2.8 Сигнализация открытой дверцы Если дверь остается открытой не‐ сколько минут, раздается звуковой сигнал. На то, что дверца не закрыта, указывает: • мигание сигнального индикатора; 63 • звуковой сигнал. После восстановления нормальных условий (дверца закрыта) звуковой сигнал выключается.
Страница 64 из 81 64 www.aeg.com 3.4 Выбор высоты выдвижного ящика Выдвижной ящик может быть устано‐ влен на различной высоте. Для выполнения этой операции дей‐ ствуйте следующим образом: 1. поднимите полку с выдвижным ящиком вверх и снимите с держа‐ телей дверцы 2. снимите опорный кронштейн ящи‐ ка с направляющих
Страница 65 из 81 РУССКИЙ 65 3.7 Контроль влажности Оба ящика можно использовать в со‐ ответствии с требуемыми условиями хранения независимо друг от друга при разных уровнях влажности. Регулирование параметров каждого ящика выполняется независимо, при помощи подвижного клапана в пере‐ дней части ящика. • «Сухо»:
Страница 66 из 81 66 www.aeg.com Решетки внутри ящиков позволяют воздуху свободно циркулировать, что обеспечивает лучшую сохранность продуктов. Отделение оснащено ограничителя‐ ми, которые предотвращают выпаде‐ ние ящиков, когда они полностью вы‐ двинуты. Для извлечения ящиков (например, для чистки) вытяните их до
Страница 67 из 81 РУССКИЙ Вид продуктов Установка влажности воздуха 67 Срок хранения Брокколи, пекинская капуста, листовая ка‐ пуста, кочанная капу‐ ста, редис, савойская капуста «влажно» до 14 дней Горох, кольраби «влажно» до 10 дней Зеленый лук, редис, спаржа, шпинат «влажно» до 7 дней Фрукты(чем более спе‐ лыми
Страница 68 из 81 68 www.aeg.com Уровень влажности воздуха в ящиках зависит от содержания влаги в хранимых продуктах, овощах и фруктах, а также от частоты открывания дверцы. Отделение «Длительная све‐ жесть 0°C» также можно ис‐ пользовать для медленного размораживания продуктов. В таком случае размороженные продукты
Страница 69 из 81 РУССКИЙ Фрукты и овощи: должны быть тща‐ тельно очищенными; их следует поме‐ щать в специально предусмотренные для их хранения ящики. Сливочное масло и сыр: должны по‐ мещаться в специальные воздухоне‐ проницаемые контейнеры или быть обернуты алюминиевой фольгой или полиэтиленовой пленкой, чтобы
Страница 70 из 81 70 www.aeg.com 5.2 Замена угольного фильтра Для обеспечения оптимальной рабо‐ ты угольного воздушного фильтра, его следует ежегодно заменять. Новые активные воздушные фильтры можно приобрести у местного постав‐ щика. Инструкции см. в разделе «Установка угольного воздушного фильтра». Воздушный
Страница 71 из 81 РУССКИЙ Неисправность 71 Подключите к этой сете‐ вой розетке другой элек‐ троприбор. Обратитесь к квалифици‐ рованному электрику. Лампа находится в ре‐ жиме ожидания. Закройте и снова открой‐ те дверцу. Лампа перегорела. См. «Замена лампы». Неправильно задана температура. Задайте более высокую
Страница 72 из 81 72 www.aeg.com Неисправность Возможная причина Способ устранения Температура в холо‐ Внутри прибора отсут‐ дильнике слишком ствует циркуляция хо‐ высокая. лодного воздуха. Убедитесь, что внутри прибора циркулирует хо‐ лодный воздух. Сверху или снизу на дисплее температу‐ ры отображается квадрат.
Страница 73 из 81 РУССКИЙ Клима‐ Температура окружаю‐ тиче‐ щей среды ский класс ST от +16°C до + 38°C T от +16°C до + 43°C 7.2 Подключение к электросети Перед включением прибора в сеть удостоверьтесь, что напряжение и ча‐ стота, указанные в табличке техниче‐ ских данных, соответствуют парамет‐ рам вашей домашней
Страница 74 из 81 74 www.aeg.com 7.4 Установка угольного воздушного фильтра 1 2 Угольный воздушный фильтр пред‐ ставляет собой фильтр с активиро‐ ванным углем, поглощающий непри‐ ятные запахи и обеспечивающий со‐ хранение наилучшего вкуса и арома‐ та всех пищевых продуктов без сме‐ шения запахов. Чтобы обеспечить
Страница 75 из 81 РУССКИЙ SSSRRR! HISSS! BLUBB! SSSRRR! HISSS! BLUBB! CLICK! BRRR! CRACK! 75 CLICK! BRRR! CRACK!
Страница 76 из 81 76 www.aeg.com 9. ТЕХНИЧЕСКИЕ ДАННЫЕ Размеры ниши для встраивания Высота 1855 мм Ширина 545 мм Глубина 575 мм Напряжение 230-240 В Частота 50 Гц Технические данные указаны на та‐ бличке с техническими данными на левой стенке внутри прибора и на та‐ бличке энергопотребления. 10. ОХРАНА ОКРУЖАЮЩЕЙ