Доступность: Бесплатно как и все руководства на сайте. Без регистрации и SMS.
Дополнительно: Чтение инструкции онлайн
476496_a I 09/2015
Rasentraktor
Betriebsanleitung
Seitenauswurf
Страница: (1 из 69)
навигация
1
2
3
4
5
6
7
8
9
10
11
12
13
14
15
16
17
18
19
20
21
22
23
24
25
26
27
28
29
30
31
32
33
34
35
36
37
38
39
40
41
42
43
44
45
46
47
48
49
50
51
52
53
54
55
56
57
58
59
60
61
62
63
64
65
66
67
68
69
Оглавление инструкции
Страница 1 из 70 Rasentraktor Seitenauswurf Betriebsanleitung 476496_a I 09/2015
Страница 2 из 70 D Hersteller siehe Typenschild GB Manufacturer: see nameplate F Constructeur voir plaquette signalétique I Produttore: v. targhetta dati tecnici NL Fabrikant zie typeplaatje
Страница 3 из 70 g a f f: 20 Nm 2 e 90° d a c 1 b 1 d: Ø10,5 x Ø30 x 5 e: Ø10,5 x Ø19 f: M10x70 2 3 4 5 6 1 7 8 5 2 3
Страница 5 из 70 D Vor der Montage und Inbetriebnahme die Bedienungsanweisung unbedingt lesen und beachten. VERWENDUNG ALS MULCHMÄHER Dieser Rasentraktor ist sowohl als Mulchmäher, sowie auch als Rasentraktor mit Seitenauswurf-Funktion einsetzbar. Was ist mulchen ? Durch das speziell geformte Mähmesser wird das
Страница 6 из 70 D SICHERHEITSHINWEISE 1. Allgemeine Hinweise 3. Hinweise zur Handhabung 1.1 3.1 1.7 1.8 Bedienungsanleitung sorgfältig durchlesen. Machen Sie sich mit dem richtigen Gebrauch des Gerätes vertraut. Jugendliche unter 16 Jahren oder Personen, welche die Bedienungsanleitung nicht kennen, dürfen das
Страница 7 из 70 D 4. Wartungs- und Lagerhinweise RASENTRAKTOR AUSPACKEN Der Rasentraktor wird auf einer soliden Holzpalette geliefert. 4.1 Achten Sie bei den Muttern, Bolzen und Schrauben auf festen Sitz. 4.2 Vorsicht bei Einstellarbeiten - Verletzungsgefahr! Finger nicht zwischen Gehäuse und Schneidwerk
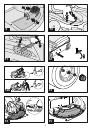
Страница 8 из 70 D Montage Auswurfklappe an Mähdeck MONTAGE Folgende Montagearbeiten müssen vor der Erstinbetriebnahme durchgeführt werden: 3 1. Einbau des Lenkrades 2. Einbau des Fahrersitzes 3. Montage Auswurfklappe an Mähdeck 4 Achtung! Eine Inbetriebnahme (auch Testbetrieb) ohne vollständige Montage ist
Страница 9 из 70 D 6 ERSTINBETRIEBNAHME Der Rasentraktor darf erst dann in Betrieb genommen werden, wenn die Montage vollständig durchgeführt wurde. 7 Sicherheitssysteme Der Rasentraktor ist mit 2 Sicherheitskontakten ausgerüstet, die durch a) den Fahrersitz b) das Fusspedal betätigt werden. Einfüllen von Motoröl
Страница 10 из 70 D 9 BEDIENELEMENTE 8 Gashebel Mit dem Gashebel wird die Motorendrehzahl reguliert. Um möglichst effektiv zu mähen, sollte der Gashebel auf gestellt werden. Lichtschalter Zündschloß 10 Zum Starten des Motors Zündschlüssel in das Zündschloß stecken und nach rechts auf Position "II" drehen.
Страница 11 из 70 D Fahren mit dem Rasentraktor INBETRIEBNAHME Starten des Motors Achtung! Vor jeder Inbetriebnahme Ölstand überprüfen! Motorabgase enthalten Kohlenmonoxid, ein geruchloses und tödliches Gas. Deshalb den Motor nie in schlecht durchlüfteten oder geschlossenen Räumen starten. • Auf dem Fahrersitz Platz
Страница 12 из 70 D Abschalten des Mähwerkes • • Fahren an Hängen Mähwerkschalter auf Position "0" stellen. Das Mähwerk kann sowohl im Stillstand als auch während der Fahrt abgeschaltet werden. Beim Fahren an Hängen ist besondere Vorsicht geboten. Nachfolgende Hinweise bitte beachten: Achtung! Ein drehendes /
Страница 13 из 70 D Fachmännische Überprüfung ist erforderlich - nach Auffahren auf ein Hindernis - bei defektem Keilriemen - bei sofortigem Stillstand des Motors - bei Nachlassen der Bremsleistung - bei verbogenem Messer (kein Ausrichten) - bei Durchrutschen des Antriebsriemens - bei verbogener Messerwelle (kein
Страница 14 из 70 D Schmierplan Radwechsel 13 Um die Leichtgängigkeit der beweglichen Teile zu gewährleisten, empfehlen wir alle 10 Betriebsstunden folgende Stellen nachzuschmieren. Vorderachse: Achsschenkel rechts und links (Schmiernippel): - mit Mehrzweckfett; 1. Rasentraktor mit Feststellbremse arretieren und mit
Страница 15 из 70 D Laden der Starterbatterie Lagerung im Winter Nach Beendigung der Mähsaison das Gerät gründlich reinigen. Sicherheitshinweise • Vor Montage- und Servicearbeiten Bedienungsanleitung von Rasentraktor und Ladegerät beachten! • Montage- und Servicearbeiten nur bei abgezogenem Zündschlüssel und
Страница 16 из 70 D FEHLERSUCHPLAN FEHLER Motor springt nicht an MÖGLICHE URSACHE BESEITIGUNG Schlechter, verschmutzter Kraftstoff, alter Kraftstoff im Tank Verwenden Sie stets frischen Kraftstoff aus sauberen Behältern; Vergaser reinigen (Werkstatt) Kein Zündfunke Zündkerze reinigen, evtl. neue einsetzen, Zündkabel
Страница 17 из 70 D Von der Garantie ausgeschlossen sind: GARANTIE Etwaige Material- oder Herstellungsfehler am Gerät beseitigen wir während der gesetzlichen Verjährungsfrist für Mängelansprüche entsprechend unserer Wahl durch Reparatur oder Ersatzlieferung. Die Verjährungsfrist bestimmt sich jeweils nach dem
Страница 18 из 70 GB Use as a mulch mower Before assembly and start of operation, please read the operating instructions at all costs and comply with them. This lawn tractor can be used both as a mulch mower and as a lawn tractor with a lateral discharge function. What is mulching? The specially shaped mower blades
Страница 19 из 70 GB SAFETY PRECAUTIONS 1. General remarks 1.1 1.7 1.8 Read the operating instructions carefully. Familiarise yourself with the proper use of the machine. People under 16 or people who have not read the operating instructions are not allowed to use the machine. Do not operate the machine when there
Страница 20 из 70 GB 4. Unpacking Lawntractor Instructions for maintenance and storage The lawntractor will be delivered on a solid wood pallet. 4.1 4.2 Make sure that the nuts, bolts and screws are tight. Be careful when adjusting - danger of injuries. Do not trap your fingers between the housing and the blade.
Страница 21 из 70 GB Assembly of the discharge flap on the blades ASSEMBLY The following assembly work must be carried out before the first operation: 1. Installation of the steering wheel. 2. Installation of the driver's seat. 3. Assembly of the discharge flap on the blades 3 Attention! Putting into operation (even
Страница 22 из 70 GB 6 FIRST OPERATION The lawn tractor may only be put into operation when the assembly has been completed. 7 Safety systems The lawn tractor is fitted with 2 safety contacts which are operated by a) the driver's seat b) the pedal. Filling with engine oil and fuel. Opening the bonnet: 1. Put your
Страница 23 из 70 GB 9 OPERATING ELEMENTS 8 Gas lever The engine speed is regulated with the gas lever. In order to mow as effectively as possible, the gas lever should be switched to . Light switch Ignition lock 10 Foot pedals (for hydrostat drive) Possible transmission positions: As soon as the engine is
Страница 24 из 70 GB Driving with the lawn tractor START OF OPERATION Starting the engine Attention! Check the oil level before each start of operation. Engine exhaust fumes contain carbon monoxide, a non-odorous and lethal gas! For this reason, never start the engine in enclosed or badly ventilated rooms. • Sit
Страница 25 из 70 GB Switching the mowing appliance off • Put the mowing appliance switch onto position "0". • The mowing appliance can be switched off both at a standstill and also during movement. Attention! A rotating / slowing blade can cut hands and feet. Therefore, keep your hands and feet away from the
Страница 26 из 70 GB Checking by a qualified service agent is necessary: - after impact with an obstacle - if the V-belt is defective - if the engine comes to an immediate standstill - if the brake performance drops - if the blade is bent (do not straighten) - if the drive belt slips - if the blade shaft is bent (do
Страница 27 из 70 GB Lubrication plan In order to ensure the ease of movement of the moving parts, we recommend lubricating the following parts after 10 hours of operation. Wheel change 13 Front axle: Steering swivel right and left (lubrication nipple): - with multi-purpose grease 3. Push the securing shim off with
Страница 28 из 70 GB Charging the starter battery Safety instructions • Before starting any assembly or service work, observe the operating instructions of the riding mower and the battery charger! • Carry out assembly and service work only with the ignition key removed and only when the motor has cooled down! • Use
Страница 29 из 70 GB FAULT LOCATION PLAN FAULT Engine does not start POSSIBLE CAUSES REMEDY Bad, contaminated fuel, old fuel in the tank Always use fresh fuel from clean containers, clean the car burettor (workshop) Lack of fuel Air filter contaminated Clean the air filter (see operating instructions for the engi
Страница 30 из 70 GB GUARANTEE During the legal guarantee period, we will remedy any faults due to faulty materials or manufacture at our discretion by repair or by the supply of spare parts. The guarantee period is subject to the current law of the country in which the machine was purchased. The guarantee ist only
Страница 31 из 70 F Utilisation comme mulcheuse Il est impératif de lire et de tenir compte de la notice d'utilisation avant de procéder au montage et à la mise en route. Cette tondeuse autoportée peut aussi bien être utilisée comme tondeuse de mulching que comme tondeuse autoportée avec éjection latérale. Qu'est-ce
Страница 32 из 70 F CONSIGNES DE SÉCURITÉ 1. Consignes générales 1.1 1.8 Lisez attentivement la notice d'utilisation. Familiarisez-vous avec l'utilisation adéquate de la tondeuse. Ne confiez pas l'utilisation de la tondeuse à des jeunes de moins de 16 ans ou à des personnes qui ne maîtrisent pas la notice
Страница 33 из 70 F 4. Consignes d'entretien et de remisage DÉSEMBALLAGE DE LA TONDEUSE AUTOPORTÉE 4.1 Veillez à ce que les écrous, les boulons et les vis soient bien serrés. 4.2 Attention lors des travaux de réglage - Risque de blessures ! N'insérez jamais les doigts entre le carter et les lames. Portez des gants
Страница 34 из 70 F Montage de la trappe d'éjection sur le plateau de lames MONTAGE Les travaux de montage suivants doivent être effectués avant la première mise en service : 1. Montage du volant 2. Montage du siège de conducteur 3. Montage de la trappe d'éjection sur le plateau de lames Attention ! Il est
Страница 35 из 70 F 6 PREMIÈRE MISE EN SERVICE La tondeuse autoportée ne doit être mise en service que lorsque le montage a été effectué intégralement. 7 Systèmes de sécurité La tondeuse est équipée de 2 contacts de sécurité actionnés par a) le siège du conducteur b) la pédale. Remplissage de l'huile moteur et du
Страница 36 из 70 F 9 ÉLÉMENTS DE COMMANDE 8 Accélérateur L'accélérateur permet de régler le régime du moteur. Pour tondre de la façon la plus efficace, réglez sur . Commutateur des phares Serrure de contact 10 Pour démarrer le moteur, insérez la clé de contact dans la serrure et tournez à droite en position "
Страница 37 из 70 F Se déplacer avec la tondeuse MISE EN SERVICE Démarrage du moteur Attention ! Vérifiez le niveau d'huile avant chaque mise en service ! Les gaz d'échappement contiennent du monoxyde de carbone, un gaz inodore et mortel. Ne démarrez jamais le moteur dans un local fermé ou mal aéré. • Prenez place
Страница 38 из 70 F Débrayage des lames • • Déplacement sur les pentes Mettre le commutateur des lames en position " 0 ". On peut aussi bien débrayer les lames en déplacement qu'à l'arrêt. Des précautions particulières s'imposent lorsqu'on roule en pente.Tenez compte des observations ci-dessous : Attention ! La lame
Страница 39 из 70 F Il faut faire appel à un spécialiste - lorsque la tondeuse a heurté un obstacle - en cas de défectuosité de la courroie trapézoïdale - en cas d'arrêt spontané du moteur - si le freinage laisse à désirer - si les lames sont voilées (ne pas les redresser) - en cas de patinage de la courroie
Страница 40 из 70 F Plan de graissage Changement des roues 13 Nous conseillons de lubrifier les points suivants après 10 heures d'utilisation afin de garantir le bon fonctionnement des parties mobiles. Essieu avant : Fusées d'essieu gauche et droite (raccord de graissage) : - avec de la graisse universelle ; Tout
Страница 41 из 70 F Charge de la batterie Hivernage Nettoyez la tondeuse à fond à la fin de la saison de tonte. Consignes de sécurité • Observer les instructions de service de la tondeuse à gazon autoportée et du chargeur de batterie avant les travaux de montage ou de maintenance ! • N'effectuer les travaux de
Страница 42 из 70 F AIDE AU DÉPANNAGE ANOMALIES Le moteur ne démarre pas CAUSES POSSIBLES DÉPANNAGE Réservoir à essence vide Remplir le réservoir, vérifier la ventilation du réservoir, vérifier le filtre à carburant Carburant de mauvaise qualité, encrassé ou ancien dans le réservoir Utilisez toujours du carburant
Страница 43 из 70 F Sont exclus de la garantie: GARANTIE Durant le délai de garantie légal, nous rémédions aux défauts de matériel et de construction de l'appareil en réparant ou en remplaçant, à notre convenance.Le délai de garantie est fonction de la législation respective du pays dans lequel l'appareil a été
Страница 44 из 70 I Impiego come falciatrice per pacciame Leggere le istruzioni per l'uso prima della messa in funzione. Questo trattore tagliaerba è utilizzabile sia come falciatrice per pacciame che come trattore tagliaerba con scarico laterale. Che cosa è la pacciamatura? Grazie alla speciale forma della lama
Страница 45 из 70 I 3. AVVERTENZE SULLA SICUREZZA 1. Avvertenze generali 1.1 1.8 Seguire accuratamente le operazioni indicate nelle istruzioni per l'uso e familiarizzarsi con il corretto impiego dell'apparecchio. Non devono utilizzare questo apparecchio minori di 16 anni o persone non familiarizzate con le
Страница 46 из 70 I 4. Avvertenze sullo stoccaggio e la manutenzione DISIMBALLO DEL TRATTORINO TAGLIAERBA 4.1 4.2 Badate che i dadi, i perni e le viti siano ben fissati. Attenzione durante i lavori di regolazione - Pericolo di lesioni! Non rimanere con le dita incastrate tra il corpo e il gruppo falciatore. Portate
Страница 47 из 70 I Montaggio dello sportello di espulsione sul gruppo falciatore MONTAGGIO I seguenti lavori di montaggio devono essere eseguiti prima della messa in funzione iniziale: 1. montaggio del volante 2. montaggio del posto per il conducente 3. montaggio dello sportello di espulsione sul gruppo falciatore
Страница 48 из 70 I 6 MESSA IN FUNZIONE INIZIALE Il trattore tagliaerba deve essere messo in funzione solo al termine del montaggio. 7 Sistemi di sicurezza Aprire il cofano del motore: 1. Mettere le mani nelle fessure di aerazione del cofano. 2. Tirare il cofano lievemente in direzione del volante e ribaltarlo fino
Страница 49 из 70 I 9 ELEMENTI DI COMANDO 8 Levetta Con la levetta si regola la velocità di regime del motore. Per falciare nel modo più efficace possibile si dovrebbe portare la leva nella posizione contrassegnata dal coniglietto. Interruttore della luce Interruttore di accensione 10 Per avviare il motore
Страница 50 из 70 I Guida con il trattore tagliaerba MESSA IN FUNZIONE Avviamento del motore Attenzione! Controllare il livello dell'olio prima di ogni messa in funzione! Il gas di scarico del motore contiene monossido di carbonio, un gas inodore e letale. Per questo motivo non si deve mai avviare il motore
Страница 51 из 70 I Disattivazione del gruppo falciatore • • Guida su pendii Portare il selettore del gruppo falciatore in posizione "0". Il gruppo falciatore può essere disattivato sia durante l'inattività che durante il movimento del trattore tagliaerba. Guidando su pendii si deve stare particolarmente attenti. Si
Страница 52 из 70 I E' necessario il controllo da parte di un tecnico specializzato: - dopo aver tamponato un ostacolo - se la cinghia trapezoidale è difettosa - all'arresto immediato del motore - all'allentarsi della tubazione del freno - se la lama è deformata (non allineabile) - allo scivolare della cinghia di
Страница 53 из 70 I Piano di lubrificazione Cambio delle ruote Per garantire la scorrevolezza delle parti mobili si consiglia di lubrificare i seguenti punti ogni 10 ore di funzionamento. 13 Asse anteriore: fuso destro e sinistro (nippli di lubrificazione): - con grasso universale; 1. Bloccare il trattore tagliaerba
Страница 54 из 70 I Ricarica della batteria di avviamento Stoccaggio durante l'inverno Al termine della stagione di falciatura dell'erba pulire l'apparecchio accuratamente. Avvertenze per la sicurezza • Prima di ogni lavoro di montaggio e di servizio osservare il manuale di servizio del trattore tagliaerba e
Страница 55 из 70 I AIDE AU DÉPANNAGE ERRORE Il motore non si avvia ELIMINAZIONE CAUSA POSSIBILE Riempire il serbatoio, controllare l'aerazione del serbatoio, controllare il filtro del carburante Mancanza di carburante Il serbatoio contiene carburante scadente, sporco, vecchio Impiegate sempre carburante fresco
Страница 56 из 70 I Sono esclusi dalla garanzia: GARANZIA Danni alla vernice attribuibili a normale usura. Particoari di rapida usura contrassegnati sulla scheda ricambi con una cornice XXX XXX (X) Motori a combustione, per i quali sono valide le condizioni di garanzia a parte dei rispettivi produttori. Qualsiasi
Страница 57 из 70 NL Gebruik als mulch-maaimachine Vóór de montage en ingebruikneming absoluut de handleiding lezen en opvolgen. Deze gazontractor is als mulch-maaimachine en tevens als gazontractor met zijwaartse uitworpfunctie te gebruiken. Wat is mulchen? Door het speciaal gevormde maaimes wordt het gras
Страница 58 из 70 NL VEILIGHEIDSINSTRUCTIES 3. Instructies m.b.t. het gebruik 3.1 De verbrandingsmotor mag niet in gesloten ruimtes lopen waarin gevaarlijke uitlaatgassen zich kunnen ophopen - Gevaar voor vergiftiging! Maai alleen maar bij daglicht of bij een goede verlichting. Let ook op de door de gemeente
Страница 59 из 70 NL 4. Onderhouds- en opslaginstructies GAZONTRACTOR UITPAKKEN De gazontractor wordt op een stevige houten pallet geleverd. 4.1 4.2 Let erop dat moeren, bouten en schroeven stevig vastzitten. Wees voorzichtig bij afstelwerkzaamheden - gevaar voor verwondingen! Klem geen vingers tussen de behuizing
Страница 60 из 70 NL Montage uitworpklep op maaidek MONTAGE 3 De volgende montagewerkzaamheden moeten worden uitgevoerd vóór de eerste ingebruikneming. 1. Montage van het stuurwiel 2. Montage van de chauffeursstoel 3. Montage uitworpklep op maaidek Attentie ! Een ingebruikneming (ook een proefrit) zonder volledige
Страница 61 из 70 NL DE EERSTE INGEBRUIKNEMING De gazontractor mag pas in gebruik worden genomen als de montage volledig is uitgevoerd. Veiligheidssystemen De gazontractor is uitgerust met 2 veiligheidscontacten, die door a) de chauffeurstoel b) het voetpedaalworden gebruikt. 6 Het vullen met motorolie en brandstof
Страница 62 из 70 NL BEDIENINGSELEMENTEN 8 9 Gashendel Via de gashendel wordt het toerental van de motor geregeld. Om zo effectief mogelijk te kunnen maaien moet de gashendel open worden gedraaid. Lichtschakelaar Contactslot 10 Voor het starten van de motor de contactsleutel in het contactslot doen en naar
Страница 63 из 70 NL Het rijden met de gazontractor INGEBRUIKNEMING Het starten van de motor Attentie ! Controleer het oliepeil elke keer voordat u de machine gebruikt! Uitlaatgassen van de motor bevatten koolmonoxide, een reukloos en dodelijk gas. Start daarom de motor niet in slecht geventileerde of gesloten
Страница 64 из 70 NL Het uitschakelen van het maaimes • • Maaimesschakelaar in stand "0" zetten. Het maaimes kan zowel bij stilstand maar ook tijdens het rijden worden uitgeschakeld. Attentie ! Een draaiend / uitlopend maaimes kan handen en voeten stuksnijden. Houdt daarom handen en voeten uit de buurt van de
Страница 65 из 70 NL Controle door een deskundige is vereist - nadat tegen een hindernis is aangereden - bij defecte V-snaren - als de motor onmiddellijk stilstaat - als het remvermogen afneemt - bij verbogen messen (niet uitrichten) - bij het doorglijden van de aandrijfriem - bij een verbogen motoras (niet
Страница 66 из 70 NL Smeerschema 13 Om te garanderen dat de bewegende delen licht blijven lopen, adviseren wij na 10 bedrijfsuren de volgende plaatsen bij te smeren. Vooras: 3. Beveiligingsschijf met schroevendraaier eraf duwen en afstandsschijf eraf halen. 4. Wiel van de as aftreken. Voor- / achterwielen: Rollager
Страница 67 из 70 NL Het laden van de startaccu Veiligheidsaanwijzingen • Veiligheidsaanwijzingen • Vóór montage- en servicewerkzaamheden de gebruiksaanwijzing van maaimachine en acculader in acht nemen! • Montage- en servicewerkzaamheden alleen bij uitgetrokken contactsleutel en afgekoelde motor uitvoeren! •
Страница 68 из 70 NL SCHEMA VOOR OPSPOREN DEFECTEN DEFECT Motor springt niet aan OPHEFFING MOGELIJKE OORZAAK Brandstoftekort Slechte, vervuilde brandstof, oude brandstof in de tankl Geen bougievonken Door meerdere startpogingen ,, motor verzopen" lege of zwakke startaccu Veiligheidsschakelaar op de chauffeursstoel
Страница 69 из 70 NL Van de garantie zijn uitgesloten: GARANTIE Eventuele materiaal- of productiefouten in het apparaat verhelpen wij tijdens de wettelijke garantietermijn naar onze eigen keuze door reparatie of vervangende levering. De garantietermijn wordt telkens bepaald volgens het recht van het land waarin het