2
1
3
4
5
6
7
8
9
10
Your mobile
1
.....................
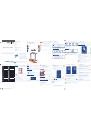
Keys and connectors
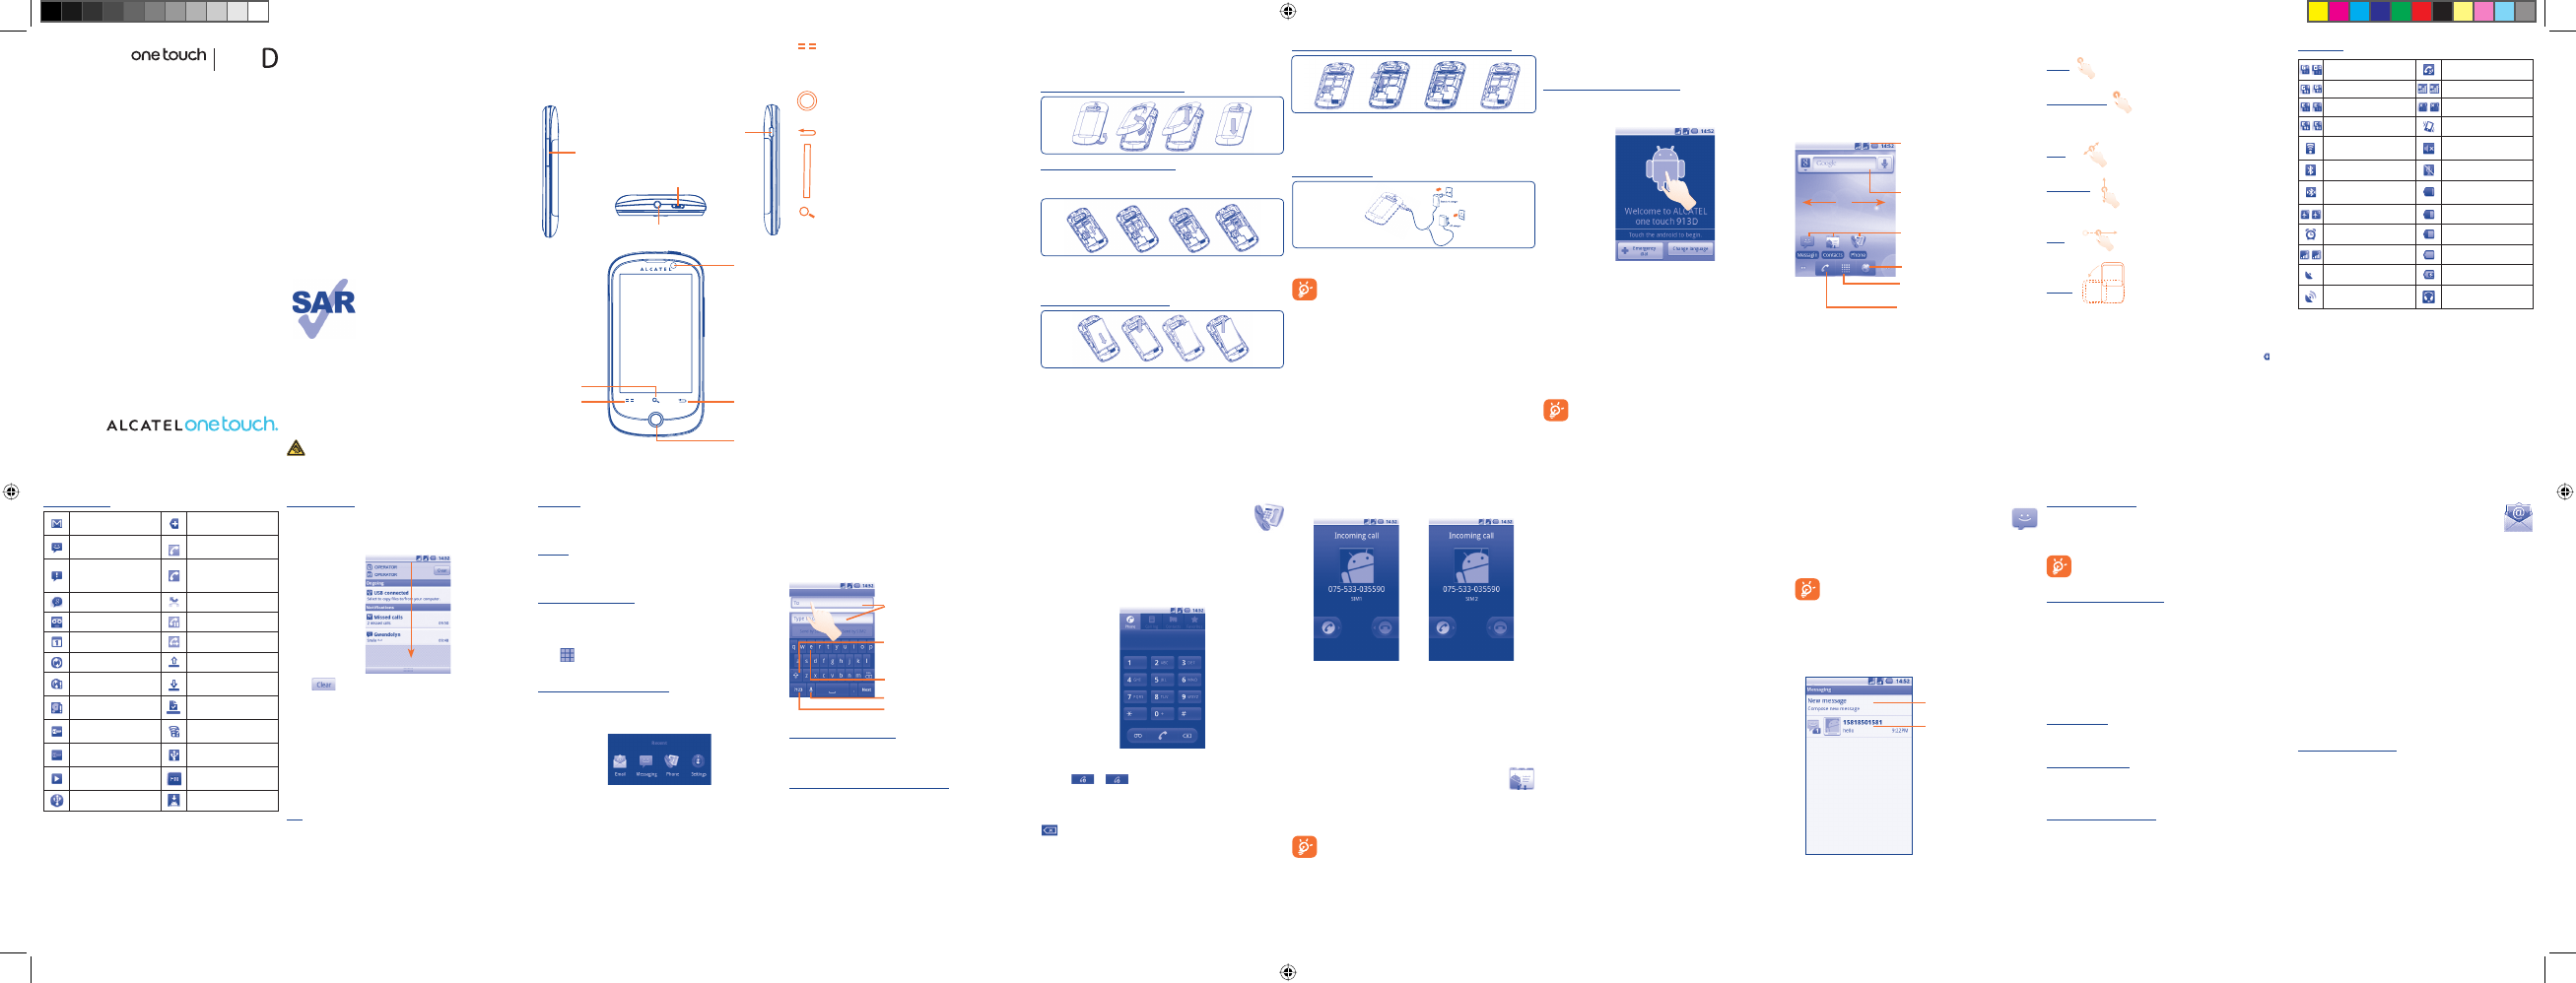
1.1
Status icons
GPRS connected
Speakerphone is on
GPRS in use
Roaming
EDGE connected
No signal
EDGE in use
Vibrate mode
Connected to a Wi-Fi
network
Ringer is silenced
Bluetooth is on
Phone microphone is mute
Connected to a Bluetooth
device
Battery is very low
Airplane mode
Battery is low
Alarm is set
Battery is partially drained
Signal strength
Battery is full
GPS is on
Battery is charging
Receiving location data
from GPS
Headset connected
English - CJB14P1ALAAA
On Home screen, press to quick access to
•
Settings
menu or
Notification panel; to launch quick search; to customize your
Home screen by adding applications or changing wallpaper.
On other screens, press to view options list.
•
Short press: Return to the Home screen or back to the
central Home screen if it is extended.
Long press: Enter the recently used applications list.
Go back to the previous menu or screen.
Press to adjust the Volume (in call/media playing mode)
Open Search bar for searching within an application, the
phone or web.
Notification icons
New Gmail message
More notifications are
hidden
New text or multimedia
message
Call in progress (green)
Problem with text or
multimedia message
delivery
Call in progress using
Bluetooth headset (blue)
New Google Talk message
Missed call
New voicemail
Call on hold
Upcoming event
Call forwarding is on
Data is synchronizing
Uploading data
Problem with sign-in or
synchronization
Downloading data
microSD card is full
Download finished
Connected to VPN
An open Wi-Fi network is
available
Disconnected from VPN
Phone is connected via
USB cable
Song is playing
Radio is on
USB tethering is on
System update available
Getting started
1.2
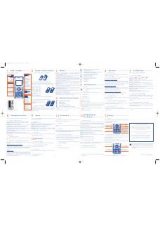
Set-up
1.2.1
Removing or installing the back cover
Inserting or removing the SIM card
You must insert your SIM card to make phone calls. Please power off your
phone and remove battery before inserting or removing the SIM card.
Place the SIM card with the chip facing downwards and slide it into its
housing. Make sure that it is correctly inserted. To remove the card, press
and slide it out.
Installing or removing the battery
Insert and click the battery into place, then close the phone cover.
•
Unclip the cover, then remove the battery.
•
Reposition
Touch and hold the item to be repositioned to activate the Move mode,
drag the item to desired position, then release. Hold the icon on the left or
right edge of the screen to drag the item to another Home screen page.
Remove
Touch and hold the item to be removed to activate the Move mode,
drag the item to the top of the Application tab, which will then turn red,
and release.
Wallpaper customization
Touch and hold an empty area or press
Menu
key and touch
Wallpaper
on the Home screen to customize wallpaper.
Application tab
1.3.6
Touch
from Home screen to enter applications list.
To return to the Home screen, press
Home
key.
Consult recently-used applications
To consult recently-used applications, you can press and hold the
Home
key from Home screen. Touch an icon in the window to open the related
application.
Volume adjustment
1.3.7
You can set ringer, media and phone ringtone volume to your preference
by
Volume up/down
key while related application is running, or
Settings
menu.
Installing and removing the memory card (MicroSD card)
To release the microSD card holder, slide it in the direction of the
arrow and lift it. Then insert the microSD card with the golden contact
downward. Finally, turn down the microSD holder and slide it in the
opposite direction to lock it.
Charging the battery
Connect the battery charger to your phone and mains socket
respectively.
To reduce power consumption and energy waste, when battery
is fully charged, disconnect your charger from the plug; switch off
Wi-Fi, GPS, Bluetooth or background-running applications when
not in use; reduce the backlight time, etc.
Text input
2
........................
Using Onscreen Keyboard
2.1
Onscreen keyboard will display automatically when a program requires
entering text or numbers.
Touch to lock in capital letter input mode.
Touch to switch to symbol and numeric
keyboard.
Long press to enter an accent of the letter
Touch to enter text or numbers, touch
and hold for one or two seconds to
select input method.
Onscreen keyboard settings
Press
Menu
key from Home screen, select
Settings
\
Language &
keyboard
\
Android keyboard
, a series of settings are available for
your selection.
Adjust the onscreen keyboard orientation
Turn the phone sideways or upright to adjust the onscreen keyboard
orientation. You can mark/unmark
Auto-rotate screen
check box
in
Settings
to adjust. (Press
Menu
key on Home screen\
Settings
\
Display
).
Text editing
2.2
You can edit the text you have entered.
Touch and hold text you have entered
•
Options list pops up
•
Select the operation you need (
•
Select all
,
Select text
,
Cut all
,
Copy all
, etc.)
Power on your phone
1.2.2
Hold down the
End
key until the phone powers on. It will take some
seconds before the screen lights up.
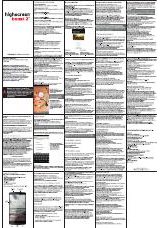
Set up your phone for the first time
The first time you power on the phone, you are required to touch
the Android logo to begin and then sign into your Google account to
synchronize email, contacts, calendar and other Google applications
(1)
.
Enter your user name and password, then touch
•
Sign in
. If you forget
your password, you can go to http://www.google.com/ to retrieve it. If
you don’t own a Google Account, you are prompted to create one by
touching
Create
.
Read the setup information on the screen
•
.
Mark/Unmark the check box to choose whether you want to take
•
advantage of Google's location service, then touch
Next
.
Mark/Unmark the check box to choose whether you want to back up
•
data with your Google account, then touch
Next
.
Set up the date and time, then touch
•
Next
.
Touch
•
Finish setup
.
This initial set up can be skipped and enabled via
Settings\
Accounts & sync
.
In power on screen without SIM card inserted, you can also connect
to a Wi-Fi network to sign into your Google account and to use some
features.
Phone call
3
..................
Placing a call
3.1
User can easily launch a call using
Phone.
Enter this menu using one of
the following two ways:
Touch Application tab from Home screen and select
•
Phone.
Press
•
Call
key, then select
Phone
tab.
Enter the desired number from keyboard directly or select a contact from
Contacts
,
Call log
or
Favorites
by touching tabs, then press
Call
key
or touch
or
to place the call. When you place a call by press
Call
key, the default SIM card will perform the action
(1)
. The number you
entered can be saved to
Contacts
by pressing
Menu
key and touching
Add to Contacts
.
If you make a mistake, you can delete the incorrect digits by touching
.
To hang up a call, press
End
key.
Power off your phone
1.2.3
Hold down the
End
key from the Home screen until the phone options
appear, select
Power off
.
Home screen
1.3
You can bring all the items (applications, shortcuts, folders and widgets)
you love or use most frequently to your home screen for quick access.
Press
Home
key to switch to Home screen.
Status bar
Status/Notification indicators
•
Touch and Drag down to open notification
•
panel.
Search bar
Touch
n
to enter text search screen.
Touch
o
to enter voice search screen.
Touch
p
to enter Search options: All,
Web, Apps, Contacts, etc.
Application tab
Touch to open applications list.
Touch to access
Call log
if you have
missed call(s), or access the tab you
exit last time.
Touch to access
Browser
.
Touch an icon to open an application,
folder, etc.
n
o
Home screen is provided in an extended format to allow more space for
adding applications, shortcuts etc. Slide the Home screen horizontally left
and right to get a complete view of the Home screen. Small dots at the
lower left and right of the screen indicate which screen you are viewing.
Touch & hold the small dots or application tab can display the thumbnails
of extended home screen, touch the thumbnail to open it. Press
Back
key
or touch an empty area to return to Home screen.
Answering or rejecting a call
3.2
When you receive an incoming call, drag the green phone icon to the
right to answer. Hang up the call by dragging the red phone to left or
pressing
Back
key.
Consulting your call memory
3.3
You can access your call memory by pressing the
Call
key from the Home
screen and touching
Call log
tab to view call history in categories of
Missed call, Dialed call
and
Received call.
Contacts
4
.....................
You can view and create contacts on your phone or both SIMs and
synchronize these with your Gmail contacts or other applications on the
web or on your phone.
When using
Contacts
for the first time you are required to
add new contacts to phone, import contacts from SIM card
to phone, or synchronize contacts from other application
accounts to phone.
Using the touchscreen
1.3.1
Touch
To access an application, touch it with your finger.
Touch and Hold
To enter the available options for an item, touch and hold the item. For
example, select a contact in Contacts, touch and hold this contact, options
list will then appear on screen.
Drag
Place your finger on the screen to drag an object to another location.
Slide/Swipe
Slide the screen to scroll up and down the applications, images, web
pages… at your convenience.
Flick
Similar to swiping, but flicking makes it move quicker.
Rotate
Automatically change the screen orientation from portrait to landscape by
turning the phone sideways to have a better screen view.
Status bar
1.3.2
From status bar you can view both phone status (to the right side) and
notification information (to the left side). When the status bar is full, “ ” icon
will appear, touch to display hidden icons.
Adding a contact
4.1
Touch
Application tab
on the Home screen, select
Contacts
, then
press
Menu
key from contacts list screen and touch
New contact
.
Importing and exporting contacts
4.2
From Contacts screen, press
Menu
key to open contacts list option menu,
touch
Import/Export
, then select
Import from SIM1/SIM2
,
Import
from SD card
or
Export to SD card
.
To import a single contact from SIM card, touch the contact you want
to import.
To import all contacts from SIM card, press
Menu
key and touch
Import
all
to confirm.
Synchronizing contacts in multiple
4.3
accounts
Contacts, data or other information can be synchronized from multiple
accounts, depending on the applications installed on your phone.
Add to/remove from favorites
4.4
Touch and hold a contact , then touch
Add to favorites
. Or touch a
contact to view details then touch to add the contact to favorites (the
star will turn gold in color).
Select
Remove from favorites
on the contact’s option menu or touch
gold star on contact details screen.
Quick contact
4.5
Touch a contact’s picture to open Quick Contact, then touch the icon
for the way to connect. The icons available on Quick contact bar depend
on the information you have for the contact and the applications and
accounts on your phone.
Prolonged exposure to music at full volume on the music player
may damage the listener's hearing. Set your phone volume safely.
Use only headphones recommended by TCT Mobile Limited and
its affiliates.
Quick Start Guide
For more information about how to use the phone, please go to www.
alcatelonetouch.com to download complete user manual. Moreover, from
the website you can also consult FAQ, realize software upgrade , etc.
Table of contents
1 Your
mobile
................................................................................................3
2 Text
input
................................................................................................. 14
3 Phone
call
................................................................................................. 15
4 Contacts
................................................................................................... 16
5 Messaging.................................................................................................. 18
6 Email
.......................................................................................................... 20
7 Getting
connected
................................................................................. 21
8 Locate my location using GPS satellites ........................................... 23
9 Data
backup
............................................................................................. 24
10 Factory data reset .................................................................................. 24
11 Applications ............................................................................................. 25
12 Making the most of your phone ......................................................... 25
www.sar-tick.com
This product meets applicable national SAR
limits of 2.0 W/kg. The specific maximum
SAR values can be found on page 31 of
this user guide.
When carrying the product or using it while
worn on your body, either use an approved
accessory such as a holster or otherwise
maintain a distance of 1.5 cm from the body
to ensure compliance with RF exposure
requirements. Note that the product may
be transmitting even if you are not making
a phone call.
Notification panel
Touch and drag down the Status bar or press
Menu
key and touch
Notifications
to open the notification panel. Touch and drag up to close
it. From Notification panel, you can open items and other reminders
indicated by notification icons or view wireless service information.
Touch
to clear all event–based notifications (other ongoing
notifications will remain).
Search bar
1.3.3
The phone provides a Search function which can be used to locate
information within applications, the phone or the web.
Lock/Unlock your screen
1.3.4
To protect your phone and privacy, you can lock the phone screen by
creating a variety of patterns, PIN or password etc.
Personalize your home screen
1.3.5
Add
Touch and hold an empty area or press
Menu
key and touch
Add
on
the Home screen, you can add shortcuts, widgets or folders to the
Home screen.
20
12
11
13
14
15
16
17
18
19
Messaging
5
...................
You can create, edit and receive SMS and MMS with this mobile phone.
To access this feature, touch Application tab from Home screen, then
select
Messaging
.
All messages you receive or send out can only be saved in phone
memory. To consult messages stored in SIM card, press
Menu
key
from Messaging screen, then touch
Settings\Manage SIM card
messages
. For dual SIM model, touch either SIM1 or SIM2 on
the above tabs to complete the operation.
Write message
5.1
On message list screen, touch
New message
to write text/multimedia
messages.
Touch to create new message
Touch to view the whole
message thread
Sending a text message
Enter mobile phone number of the recipient on
To
bar or press
Menu
key then touch
Contacts
to add recipients, touch
Type to compose
bar
to enter the text of the message. When finished, touch
Send by SIM1
or
Send by SIM2
to send the text message.
An SMS of more than 160 characters will be charged as several
SMS. Specific letters (accent) will also increase the size of the
SMS, this may cause multiple SMS to be sent to your recipient.
Sending a multimedia message
MMS enables you to send video clips, images, photos, animations, slides and
sounds to other compatible mobiles and e-mail addresses.
An SMS will be converted to MMS automatically when media files (image,
video, audio, slides, etc.) are attached or Subject or email addresses
added.
Adjust message settings
5.2
Adjust message settings from Messaging application screen and press
Menu
key then touch
Settings
.
Storage settings
To manage messages quantities limit per conversation of text message
and multimedia message.
Text message settings
You can request a delivery report for each message you send while the
mark is green. Messages stored on SIM card can be delete or copy by
the management.
Multimedia message settings
Pressing the right mark to green, you can request a delivery report and
read report for each message you send, automatically retrieve messages.
You also can set the maximum message size.
6
........................
Besides your Gmail account, you can also set-up external POP3 or
IMAP email accounts in your phone.
To access this function, touch Application tab from Home screen, then
select
.
An email wizard will guide you through the steps to set-up an email
account.
Enter the email address and password of the account you want to
•
set-up.
Touch
•
Next
. If the account you entered is not provided by your
service provider in the phone, you will be prompted to go to the
email account settings screen to enter settings manually. Or you can
touch
Manual setup
to directly enter the incoming and outgoing
settings for the email account you are setting up.
Enter the account name and display name in outgoing emails.
•
Touch
•
Done
.
To add another email account, you can press
•
Menu
key and touch
Add account
to create.
To create and send emails
Press
•
Menu
key from Inbox screen, and touch
Compose
.
Enter recipient(s)’s email address in
•
To
field, and if necessary, press
Menu
key and touch
Add Cc/Bcc
to include a copy or a blind copy
to the message.
Enter the subject and content of the message.
•
Press
•
Menu
key, touch
Add attachment
to send an attachment
to the receiver.
Finally, touch
•
Send
.
If you do not want to send the mail right away, you can touch
•
Save
as draft
or press
Back
key to save a copy.
Volume key
Menu key
Search key
Back key
Front camera
Home key
Micro-USB connector
(1)
Application availability depends on country and operator.
913
p
Touch to enter Voice input.
(1)
The SIM setting will vary depending on the changes made to the
default settings in
Settings\Dual-SIM settings
.
Headset connector
Power key/Lock screen key
IP3700_913D_QG_Eng_GB_09_110816.indd 1
IP3700_913D_QG_Eng_GB_09_110816.indd 1
2011-8-16 Lynn 10:29:23
2011-8-16 Lynn 10:29:23