WL-167G V3
ASUS Wireless Adapter
EC Declaration of Conformity
We, the undersigned,
Manufacturer:
ASUSTek COMPUTER INC.
Address, City:
No. 150, LI-TE RD., PEITOU, TAIPEI 112, TAIWAN R.O.C.
Country:
TAIWAN
Authorized representative in Europe:
ASUS COMPUTER GmbH
Address, City:
HARKORT STR. 21-23, 40880 RATINGEN
Country:
GERMANY
declare the following apparatus:
Product name :
802.11b/g/n USB2.0 Adapter
Model name :
WL-167G V3
conform with the essential requirements of the following directives:
2004/108/EC-EMC Directive
EN 55022:2006/A1:2007
EN 61000-3-2:2006
EN 55013:2001+A1:2003+A2:2006
EN 61000-4-2:1995/A1:1998 /A2:2001
EN 61000-4-3: 1996 /A1:1998 /A2:2001
EN 61000-4-4: 1995 /A1:2000 /A2:2001
EN 55024:1998/A1:2001/A2:2003
EN 61000-3-3:1995+A1:2001+A2:2005
EN 55020:2007
EN 61000-4-5: 1995 /A1:2001
EN 61000-4-6: 1996 /A1:2001
EN 61000-4-11: 1994 /A1:2001
1999/5/EC-R &TTE Directive
EN 300 328 V1.7.1(2006-10)
EN 300 440-1 V1.4.1(2008-05)
EN 300 440-2 V1.2.1(2008-03)
EN 301 511 V9.0.2(2003-03)
EN 301 908-1 V3.2.1(2007-05)
EN 301 908-2 V3.2.1(2007-05)
EN 301 893 V1.4.1(2005-03)
ETSI EN 62311:2008
EN 50371:2002
EN 301 489-1 V1.8.1(2008-04)
EN 301 489-3 V1.4.1(2002-08)
EN 301 489-4 V1.3.1(2002-08)
EN 301 489-7 V1.3.1(2005-11)
EN 301 489-9 V1.4.1(2007-11)
EN 301 489-17 V2.1.1(2009-05)
EN 301 489-24 V1.4.1(2007-09)
EN 302 326-2 V1.2.2(2007-06)
EN 302 326-3 V1.3.1(2007-09)
2006/95/EC-LVD Directive
EN 60950-1:2001+A11:2004
EN 60950-1:2006
EN60065:2002+A1:2006
2005/32/EC-EuP Directive
Regulation (EC) No. 1275/2008
EN 62301:2005
Regulation (EC) No. 278/2009
EN 62301:2005
CE marking
Declaration Date: Mar. 25, 2010
Year to begin affixing CE marking:2010
Position : CEO
Name : Jerry Shen
Signature :
__________
(EC conformity marking)
Quick Start Guide
WL-167G V3
ASUS Wireless Adapter
NOTE: For more details and advanced configuration instructions, refer to the user
manual included in the support CD.
NOTE: If Autorun is disabled, run setup.exe from the root directory of the support CD.
®
!
Setting up a Home Network
English
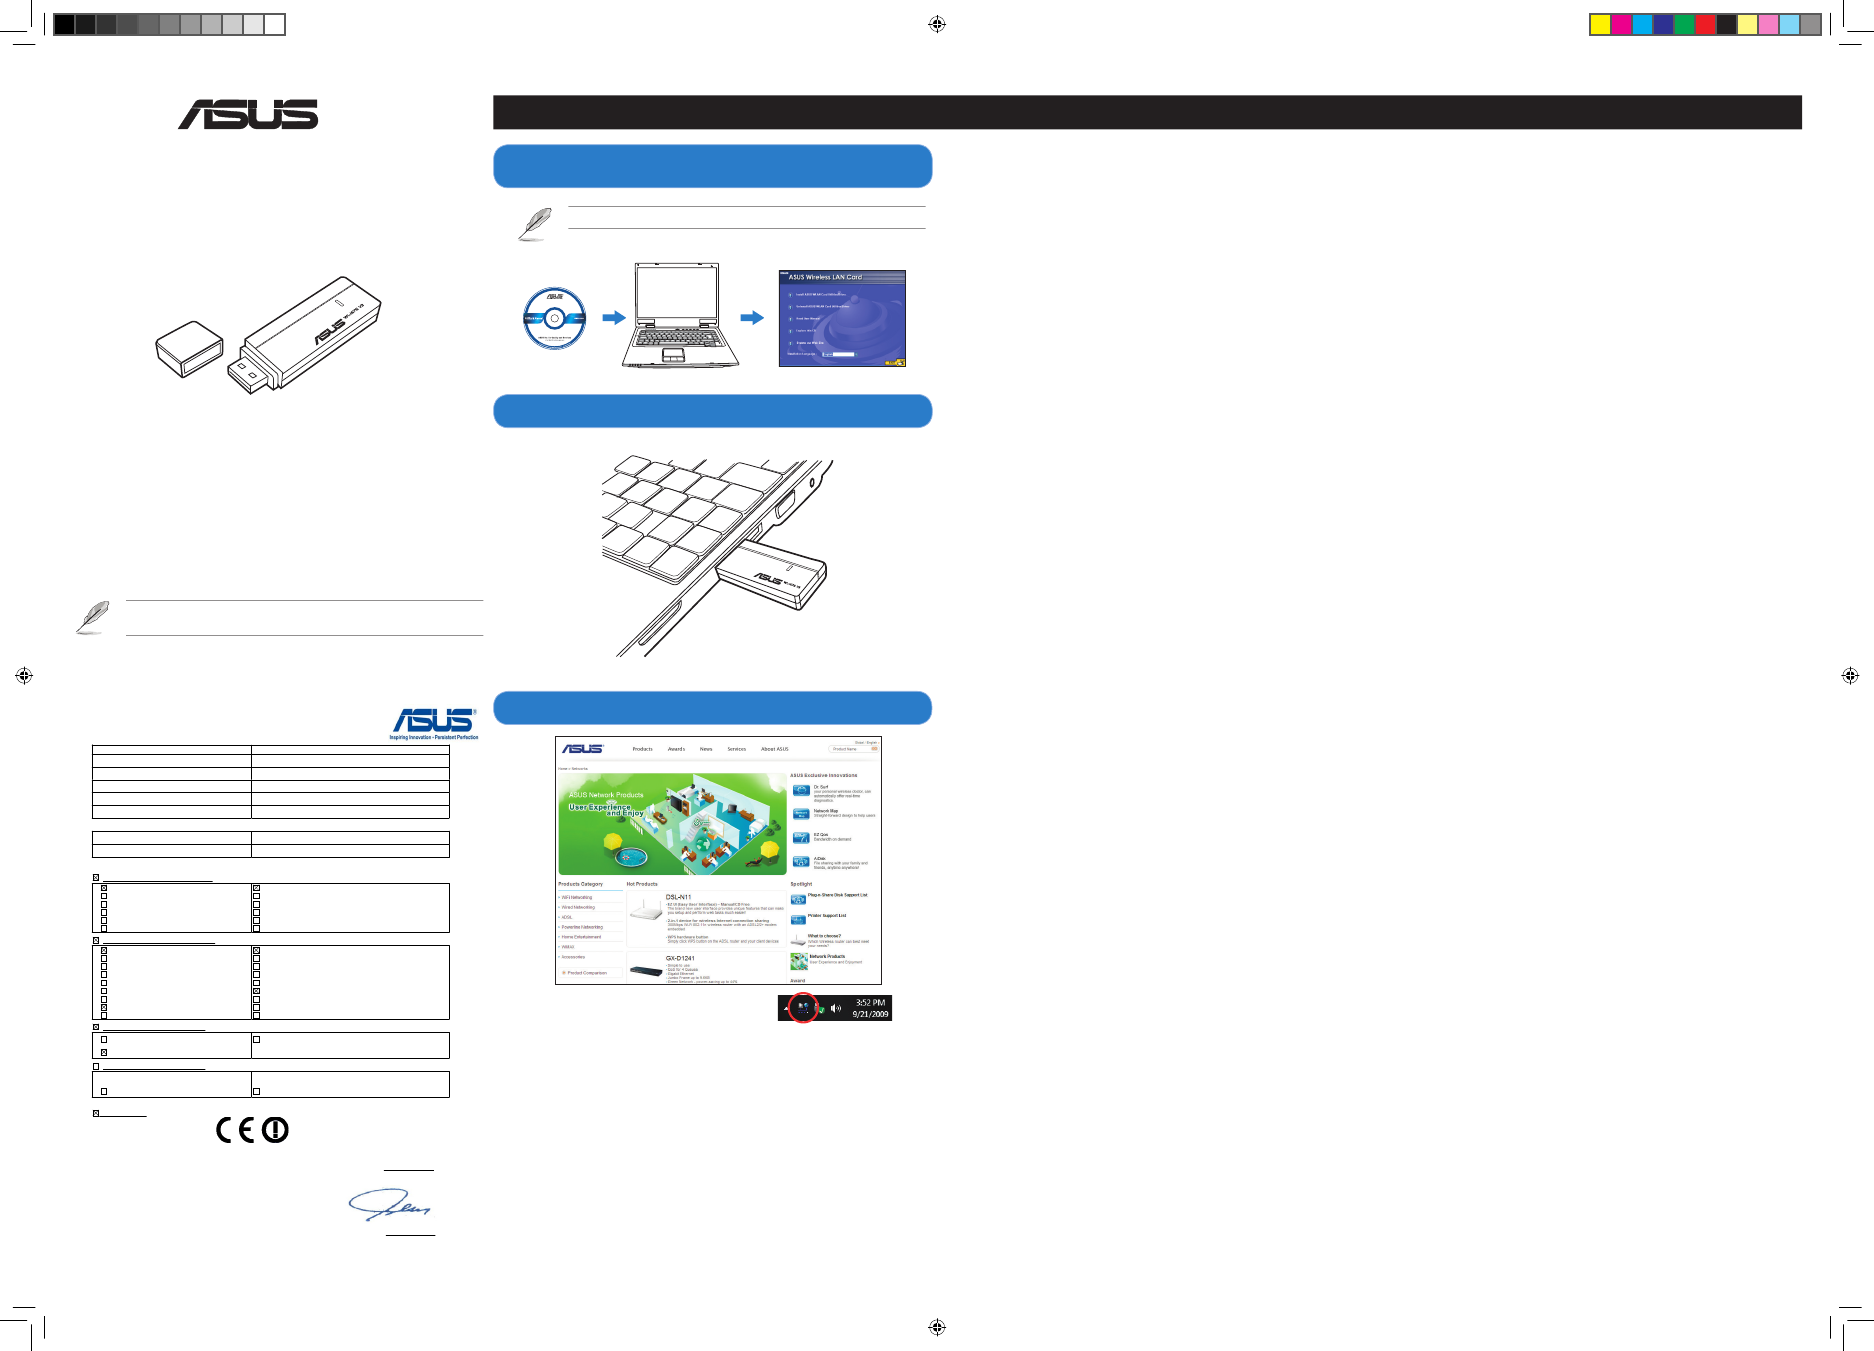
1. Insert the support CD into the optical drive and an autorun screen appears. Follow the
succeeding onscreen instructions to complete the installation.
NOTE: If Autorun is disabled, run setup.exe from the root directory of the support CD.
2. Plug the wireless adapter into your computer's USB port.
3. The installation program is completed.
NOTE: For more details and advanced configuration instructions, refer to the user
manual included in the support CD.
Deutsch
1. Legen Sie bitte die Support-CD in das optische Laufwerk ein. Es erscheint daraufhin
das Autorun-Fenster. Folgen Sie den Bildschirmanweisungen, um die Installation
fertigzustellen.
HINWEIS: Wenn Autorun nicht aktiviert ist, führen Sie die Datei setup.exe im
Hauptverzeichnis der Support-CD aus.
2. Stecken Sie den Wireless-Adapter in einen freien USB-Anschluss Ihres Computers.
3. Das Installationsprogramm ist fertig.
HINWEIS: Für mehr Details und die erweiterten Konfigurationsanweisungen beziehen
Sie sich bitte auf das in der Support-CD enthaltenen Benutzerhandbuch.
Italiano
1. Inserire il CD di supporto nell’unità ottica e apparirà la schermata di esecuzione
automatica.Seguire le istruzioni sullo schermo e completare l’installazione.
NOTA: Se la funzione di esecuzione automatica è disattivata, eseguire setup.exe dalla
directory principale del CD di supporto.
2. Inserire l’adattatore wireless nella porta USB del computer.
3. Il programma di installazione è stato completato.
NOTA: Per ulteriori informazioni e per le istruzioni sulla configurazione avanzata,
consultare il manuale utente nel CD di supporto.
Lietuvių
1. Įdėkite pagalbos kompaktinį diską (CD) į optinį diskasukį, ir bus rodomas automatinės
paleisties (Autorun) langas. Norėdami baigti įdiegimo procesą, vadovaukitės nuorodomis
ekrane.
PASTABA: Jei automatinė paleistis (Autorun) neaktyvi, paleiskite setup.exe iš pagalbos
kompaktinio disko (CD) šakninio katalogo.
2. Prijunkite bevielį adapterį prie savo kompiuterio USB prievado.
3. Diegimo programa baigta.
PASTABA: Jei reikia daugiau informacijos ir išplėstinės konfigūracijos instrukcijų, žr.
vartotojo vadovą, esantį pagalbos kompaktiniame diske (CD).
Latviski
1. Ievietojiet optiskajā diskdzinī atbalsta CD un parādīsies automātiskās palaišanas
ekrāns. Sekojiet instrukcijām uz ekrāna, lai pabeigtu instalēšanu.
PIEZĪME: Ja automātiskā palaišana ir atspējota, atbalsta CD saknes direktorijā palaidiet
setup.exe.
2. Pievienojiet bezvadu adapteru datora USB portam.
3. Instalēšanas programma ir pabeigta.
PIEZĪME: Detalizētāku informāciju un uzlabotās konfigurācijas instrukcijas meklējiet
atbalsta CD esošajā lietotāja rokasgrāmatā.
Português
1. Introduza o CD de suporte na unidade óptica e será exibido o ecrã de execução
automática. Siga as instruções apresentadas no ecrã para concluir a instalação.
NOTA: Se a Execução automática estiver desactivada, execute o ficheiro setup.exe no
directório raiz do CD de suporte.
2. Ligue o adaptador de rede sem fios à porta USB do seu computador.
3. A instalação do programa está concluída.
NOTA: Para obter mais detalhes e instruções de configuração avançada, consulte o
manual do utilizador incluído no CD de suporte.
Română
1. Introduceţi CD-ul de asistenţă în unitatea optică şi apare un ecran de executare
automată. Urmaţi instrucţiunile de pe ecran pentru a încheia procesul de instalare.
NOTĂ: Dacă opţiunea Autorun (Executare automată) este dezactivată, executaţi setup.
exe din directorul rădăcină de pe CD-ul de asistenţă.
2. Introduceţi adaptorul wireless în portul USB al computerului dvs.
3. Programul de instalare este finalizat.
NOTĂ: Pentru mai multe detalii şi instrucţiuni de configurare complexă, consultaţi
manualul inclus pe CD-ul de asistenţă.
Polski
1. Włożyć płytę CD z oprogramowaniem do napędu optycznego; powinien zostać
automatycznie wyświetlony ekran instalacyjny. W celu skutecznego zakończenia
instalacji postępować zgodnie z instrukcjami na ekranie.
UWAGA: Jeśli funkcja automatycznego uruchamiania jest wyłączona, uruchomić
program setup.exe w katalogu głównym na płycie CD z oprogramowaniem.
2. Włóż kartę bezprzewodową do gniazda USB komputera.
3. Pogram instalacyjny zakończył działanie.
UWAGA: Szczegółowe informacje oraz instrukcje dotyczące zaawansowanej
konfiguracji znajdują się w podręczniku użytkownika umieszczonym na płycie CD z
oprogramowaniem.
2. Plug the wireless adapter into your computer's USB port.
1. Insert the support CD into the optical drive and an autorun screen appears.
Follow the succeeding onscreen instructions to complete the installation.
Español
1. Inserte el CD de soporte en la unidad óptica. Al hacerlo, aparecerá una pantalla
de ejecución automática. Siga las instrucciones que se mostrarán a continuación
en la pantalla para llevar a cabo la instalación.
NOTA: Si la función Autorun (Ejecución automática) está deshabilitada, ejecute el
archivo setup.exe que encontrará en el directorio raíz del CD de soporte.
2. Conecte el adaptador inalámbrico a un puerto USB de su equipo.
3. El programa de instalación ha finalizado.
NOTA: Si desea obtener más información o instrucciones de configuración avanzada,
consulte el manual del usuario que incluye el CD de soporte.
Українська
1. Вставте компакт-диск підтримки до оптичного дисководу, і з’явиться екран
автозапуску. Виконуйте вказівки на наступних екранах, щоб завершити
інсталяцію.
ПРИМІТКА: Якщо Autorun (Автозапуск) вимкнено, запустіть setup.exe з
кореневої директорії на компакт-диску підтримки.
2. Вставте бездротовий адаптер до порту USB на комп’ютері.
3. Програма інсталяції завершена.
ПРИМІТКА: Більше подробиць та вказівки щодо високотехнологічних
конфігурацій Ви знайдете в керівництві користувача на компакт-диску
підтримки.
Français
1. Insérez le CD de support dans le lecteur optique. L’écran d’exécution automatique
apparaît. Suivez les instructions à l’écran pour terminer l’installation.
NOTE : si l’exécution automatique est désactivée sur votre ordinateur, localisez
puis ouvrez le fichier setup.exe situé dans le CD de support.
2. Connectez l’adaptateur réseau sans fil à un port USB de votre ordinateur.
3. L’installation est terminée.
NOTE : pour obtenir des instructions détaillées sur les configurations avancées,
consultez le manuel de l’utilisateur situé sur le CD de support.
Nederlands
1. Plaats de ondersteunings-cd in het optische station en het autorun-scherm verschijnt.
Volg de opeenvolgende instructies op het scherm om de installatie te voltooien.
OPMERKING: Als Autorun is uitgeschakeld, moet u setup.exe uitvoeren vanaf de
hoofdmap van de ondersteunings-cd.
2. Sluit de draadloze adapter aan op de USB-poort van uw computer.
3. Het installatieprogramma is voltooid.
OPMERKING: Raadpleeg de handleiding op de ondersteunings-cd voor meer
informatie en geavanceerde configuratierichtlijnen.
Ελληνικά
1. Εισάγετε το CD υποστήριξης στη μονάδα οπτικού δίσκου και θα εμφανιστεί
η οθόνη αυτόματης εκτέλεσης. Ακολουθήστε τις οδηγίες που θα
εμφανιστούν στην επόμενη οθόνη για να ολοκληρώσετε την εγκατάσταση.
ΣΗΜΕΙΩΣΗ: Αν η δυνατότητα Αυτόματης εκτέλεσης είναι απενεργοποιημένη,
εκτελέστε το αρχείο setup.exe στο ριζικό κατάλογο του CD υποστήριξης.
2. Συνδέστε τον ασύρματο προσαρμογέα στη θύρα USB του υπολογιστή.
3. Η εγκατάσταση ολοκληρώθηκε.
ΣΗΜΕΙΩΣΗ: Για περισσότερες λεπτομέρειες και οδηγίες διαμόρφωσης για
προχωρημένους, ανατρέξτε στο εγχειρίδιο χρήστη που παρέχεται στο CD
υποστήριξης.
Pyсский
1. Вставьте support CD в оптический привод Вашего компьютера, программа
запустится автоматически. Следуйте инструкциям на экране для
завершения установки.
ПРИМЕЧАНИЕ: Если автозапуск отключен, запустите setup.exe в корневой
директории компакт-диска.
2. Подключите беспроводный адаптер к USB порту Вашего компьютера.
3. Установка программы завершена.
ПРИМЕЧАНИЕ: Дополнительную информацию и инструкции смотрите в
руководстве пользователя на компакт-диске.
Eesti
1. Sisestades tugi-CD optilisse seadmesse, kuvatakse ekraan autorun. Installi
lõpetamiseks järgige edasisi ekraanijuhiseid.
MÄRKUS: Kui funktsioon autorun on keelatud, siis käivitage fail setup.exe tugi-CD
juurkataloogist.
2. Ühendage traadita adapter arvuti USB porti.
3. Installimine on lõpule viidud.
MÄRKUS: Täiendavat teavet ja täpsemaid konfigureerimisjuhiseid leiate
kasutusjuhendist, mis sisaldub seadmega kaasnenud tugi-CD-l.
Magyar
1. Helyezze be a támogató CD-lemezt az optikai meghajtóba, amire megjelenik az
automatikus futtatás képernyő. Kövesse a képernyőn megjelenő utasításokat a
telepítés befejezéséhez.
MEGJEGYZÉS: Ha az automatikus lejátszást letiltották, futtassa a setup.exe fájlt
a támogató CD gyökérkönyvtárában.
2. Csatlakoztassa a vezeték nélküli adaptert a számítógép USB-csatlakozójához.
3. A telepítés ezzel befejeződött.
MEGJEGYZÉS: A további részleteket és a speciális konfiguráció utasításait
illetően tekintse meg a támogató CD-n lévő felhasználói útmutatót.
3. The installation program is completed.
Q5391_WL-167G V3 QSG.indd 1
7/7/10 10:57:42 AM


