Страница 6 из 25 DE Multizyklon-Staubsauger SEHR GEEHRTER KUNDE! Herzlichen Glückwunsch zum Kauf des BORT-Gerätes im progressiven Design und hoher Qualität. Wir hoffen, dass unsere Produkte Sie über viele Jahre hinweg begleiten werden. Für die wirksame und sichere Verwendung des Gerätes lesen Sie bitte diese
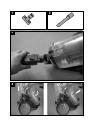
Страница 7 из 25 MONTAGEANLEITUNG 1. Vor Montage des Staubsaugers überprüfen Sie bitte anhand der Teileliste, ob Sie alle Teile und Komponenten des Staubsaugers erhalten haben. 2. Bitte achten Sie darauf, die Stromversorgung vor der Montage abzuschalten. MONTAGE DES SCHLAUCHS 1. Wie auf Abb. (3) dargestellt,
Страница 8 из 25 REINIGUNG DES STAUBZYLINDERS Entfernen Sie den Abfall regelmäßig aus dem Staubzylinder, um einen Ausfall des Staubsaugers zu vermeiden. 1. Reinigen Sie den Staubzylinder erst, nachdem Sie den Netzstecker gezogen haben; 2. Setzen Sie den Staubzylinder über den Staubsaugerbeutel, drücken Sie den
Страница 9 из 25 Vacuum Cleaner DEAR CUSTOMER! Congratulations on the purchase of BORT product, which has progressive design and high quality. We hope that our products will be your companion for many years. For the efficient and safe use of the product, please read this manual and save it for future reference.
Страница 10 из 25 handle is pressed down to the bottom, the dust barrel can be lifted to remove. ASSEMBLY OF METAL EXTENSION PIPE AND FLOOR BRUSH Insert the front end of the hose handle into the metal extension pipe according to Figure (5); then insert the other end of the metal extension pipe into the rounded inlet
Страница 11 из 25 Key Points: The power supply of the cleaner must be cut off before replacing any filter! FAULTS AND REPAIR In case of abnormality with this product, please treat it in the way as stated hereinafter; if the cleaner still refuses to work normally, please contact the stop from where this product was
Страница 12 из 25 Пылесос УВАЖАЕМЫЙ ПОКУПАТЕЛЬ! Поздравляем Вас с приобретением продукции BORT, которая отличается прогрессивным дизайном и высоким качеством исполнения. Мы надеемся, что наша продукция станет Вашим спутником на долгие годы. Для максимально безопасного и эффективного использования изделия,
Страница 13 из 25 ИНСТРУКЦИИ ПО СБОРКЕ 1. Перед началом сборки пылесоса просьба убедиться в том, что все составляющие части присутствуют в соответствии с прилагаемым перечнем аксессуаров и составных частей в данной инструкции. 2. Перед началом сборки пылесос должен быть отключен от источника питания. Подключение
Страница 14 из 25 ОЧИСТКА ПЕРЕДНЕГО ФИЛЬТРА МОТОРА: Предупреждение: перед началом следующих процедур следует убедиться в том, что питание от пылесоса отсоединено: 1. Выньте вилку шнура питания пылесоса из розетки источника питания. 2. Нажмите рукоятку контейнера для пыли для того, чтобы ее снять. Снимите далее
Страница 15 из 25 Недостатки Способ устранения Пылесос не работает 1. Убедитесь в том, что вилка шнура питания правильно подсоединена к розетке источника питания. Выньте вилку из розетки и снова вставьте ее в розетку. Попробуйте включить. 2. Убедитесь в наличии питания в розетке. 3. Убедитесь в том, что выключатель
Страница 17 из 25 Spare parts list No. Part Name 37 Electric motor 40 Switch DE KONFORMITÄTSERKLÄRUNG Wir erklären in alleiniger Verantwortung, daß dieses Produkt mit den folgenden Normen oder normativen Dokumenten übereinstimmt: EN60335-1, EN60335-2-29, EN61000-3-2, EN61000-3-3, EN55014, EN55104, gemäß den
Страница 18 из 25 DE Garantiebedingungen GB Warranty terms RU Условия гарантии
Страница 19 из 25 DE Das vorliegende Dokument beschränkt die gesetzlich festgelegten Verbraucherrechte nicht, sonst ergänzt und präzisiert die gesetzlich vorgesehenen Verbindlichkeiten, bei denen es sich um Abkommen bzw. Vertrag handelt. Machen Sie sich mit dem Garantieschein vertraulich und überprüfen Sie, dass er
Страница 20 из 25 GB This document does not restrict statutory rights of consumers; it clarifies the obligations stipulated by law, this document binds the proposed agreement between the parties in the contract. Carefully read the warranty and make sure it is completed correctly and has the stamp of the Seller. In
Страница 21 из 25 RU Настоящий документ не ограничивает определенные законом права потребителей, но дополняет и уточняет оговоренные законом обязательства, предполагающие соглашение сторон либо договор. Внимательно ознакомьтесь с гарантийным талоном и проследите, чтобы он был правильно заполнен и имел штамп