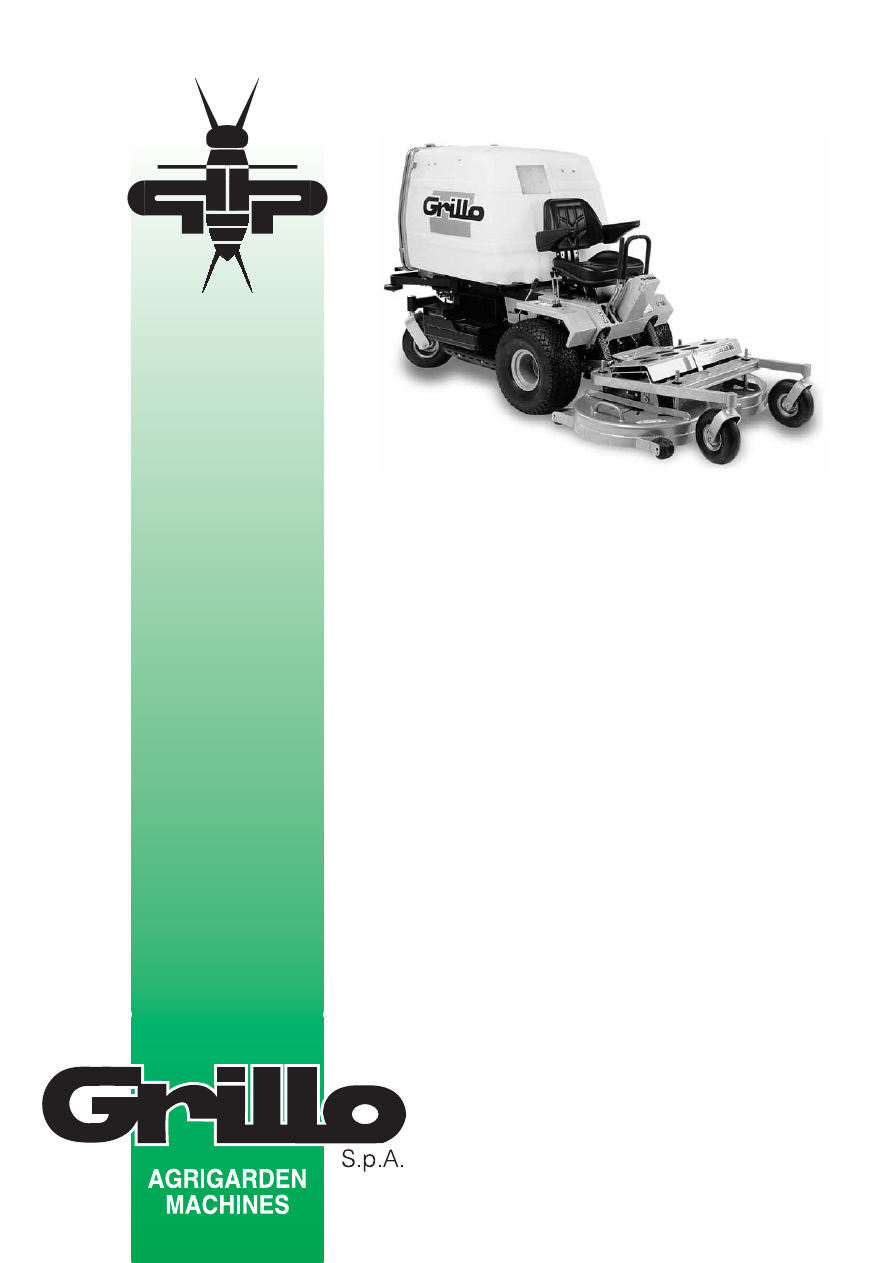
Инструкция для Grillo BEEFLY FD 300 D

(скачивание инструкции бесплатно)
Формат файла: PDF
Доступность: Бесплатно как и все руководства на сайте. Без регистрации и SMS.
Дополнительно: Чтение инструкции онлайн
background image

02132

®

®

FD300-700

BEE FLY

HYDROSTATIC LAWNMOWER
RASAERBA IDROSTATICO
TONDEUSE HYDROSTATIQUE
HYDROSTATISCHER GROSSFLÄCHENMÄHER
CORTACÉSPED HIDROSTÁTICO

EDIZIONE 2002

USE AND MAINTENANCE
USO E MANUTENZIONE
EMPLOI ET MAINTENANCE
GEBRAUCHS- UND WARTUNGSANLEITUNG
USO Y MANTENIMIENTO

1
2
3
4
5
6
7
8
9
10
11
12
13
14
15
16
17
18
19
20
21
22
23
24
25
26
27
28
29
30
31
32
33
34
35
36
37
38
39
40
41
42
43
44
45
46
47
48
49
50
51
52
53
54
55
56
57
58
59
60
61
62
63
64
65
66
67
68
69
70
71
72
73
74
75
76
77
78
79
Оглавление инструкции
  • Страница 1 из 80
    FD300-700 BEE FLY HYDROSTATIC LAWNMOWER RASAERBA IDROSTATICO TONDEUSE HYDROSTATIQUE HYDROSTATISCHER GROSSFLÄCHENMÄHER CORTACÉSPED HIDROSTÁTICO 02132 EDIZIONE 2002 USE AND MAINTENANCE USO E MANUTENZIONE EMPLOI ET MAINTENANCE GEBRAUCHS- UND WARTUNGSANLEITUNG USO Y MANTENIMIENTO ®
  • Страница 2 из 80
  • Страница 3 из 80
    INDEX / INDICE / CONTENU / INHALT / INDICE GB Safety regulations ............................................................................................................................... p. FD 300 - 700 hydrostatic lawnmower
  • Страница 4 из 80
    2
  • Страница 5 из 80
    3
  • Страница 6 из 80
    4
  • Страница 7 из 80
    Beware! Never touch moving universal joint. It can be very dangerous. Never maintenance making by running engine. Attenzione! Non toccare il giunto cardanico in rotazione, crea gravi danni alla persona. Non fare manutenzione con il motore in moto. Attention! Ne jamais toucher le joint de cardan en
  • Страница 8 из 80
    PTO BLADE ROTATION LEVER CHOKE LEVER (PETROL ENGINES ONLY) FOR USE WHEN ENGINE IS COLD LEVA STARTER (SOLO PER MOTORI A BENZINA) DA UTILIZZARE CON MOTORE FREDDO LEVIER STARTER (UNIQUEMENT POUR LES MOTEURS À ESSENCE) À UTILISER AVEC MOTEUR FROID STARTERHEBEL (NUR FÜR BENZINMOTOREN) FÜR KALTSTART
  • Страница 9 из 80
    • 150-cm (59’’) SIDE DISCHARGE CUTTING DECK • PIATTO RASAERBA SCARICO LATERALE, cm 150 • DISQUE TONDEUSE DE 150 cm A EVACUATION LATERALE • 150 CM RASENMÄHER MIT SEITLICHENAUSWURF • PLATO CORTACÉSPED CON DESCARGA LATERAL, cm 150 SAFETY RULES Pay attention to symbol DANGER! It points out all most
  • Страница 10 из 80
    Before removing the casings protecting the transmission belt you have to: • disconnect the PTO • rest the equipment on the ground • stop the engine • remove the key from the control panel • check and wait that tools are not running, not even by force of inertia. Rimuovere i carter di protezione
  • Страница 11 из 80
    HYDROSTATIC LAWNMOWER FD 300 - 700 Dear Customer, Thank you for having purchased our Grillo FD 300 - 700 we are confident that this machine will fully satisfy all your requirements. To use and maintain the mower at its best, we urge you to read and observe carefully the directions given in this
  • Страница 12 из 80
    31) Deformed or damaged blades must always be replaced, never just repaired. 32) Always use original Grillo spares and accessories. 33) Only work in sunlight or under effective artificial lighting. 34) Do not stop when working up or down slopes. 35) If the fuel tank has to be emptied, only do so
  • Страница 13 из 80
    TECHNICAL SPECIFICATIONS MODEL: hydrostatic mower with front deck ENGINE: BRIGGS & STRATTON 570 c.c. OHV twin cylinder combustion, 4 stroke, 18 HP. ENGINE: Kubota D 722 diesel, 3 cylinder water cooled, 20.5 HP. IGNITION: electric. 12v Battery. GEARBOX: hydrostatic transmission. CLUTCH: for P.T.O.
  • Страница 14 из 80
    – the speed presetting lever (fig. 1 no. 1) is in the stop position; – the PTO blade rotation lever is in the neutral position (fig. 1 no. 2); – the air filter is clean (fig. 2 - petrol engine; fig. 3 and 4 - diesel engine), to check the engine lift the machine casing; – the strainer inside the
  • Страница 15 из 80
    MOWING POSITION Use the 4 pins (fig. 1 no. 10) to adjust the cutting height. When working on terrain which is rough, has bumps or humps, it is best to use the deck in the highest cutting position to avoid impact with the blade. SLOPING GROUND Steep ground should be tackled in an up-and-down
  • Страница 16 из 80
    HYDRAULIC MOTORS Check the level in the expansion vessel with the engine cold, it must be up to the level marker (fig. 14); if more oil is needed, add OSO 68 (ISO L-HM68) or MOBIL DTE 18M. Clean the cooling fins on the hydraulic motors regularly; in summer, under dusty conditions, every 2 working
  • Страница 17 из 80
    ENGINE - PTO TRANSMISSION BELT These are self-adjusting and therefore need no adjustment, only the spring tension needs to be checked. To replace them release the tension spring (fig. 24). Remove the belt guide (fig. 25) and the two guide screws (fig. 26) for the PTO belt. On the petrol engine the
  • Страница 18 из 80
    PROBLEM CAUSE REMEDY With the key in the AVV. [ON] position the instrument panel remains off - DIESEL ENGINE – The battery is not providing any current – Check the connecting leads – Check the level of electrolyte – Recharge the battery – Replace the fuse The instrument panel comes on, but with the
  • Страница 19 из 80
    PROBLEM CAUSE REMEDY Vibration while working – Blades not balanced – Balance blades or replace them if damaged – Loose screws – Check and tighten the screws that retain the blades, the engine and the chassis Oil light comes on – Insufficient oil pressure – Check oil level and top up if necessary –
  • Страница 20 из 80
    CLEANING Clean the deck, the entry ducts, the turbine and the basket. Do not wash the engine compartment with water under pressure, use compressed air or a vacuum cleaner. STORAGE AND LACK OF USE FOR LONG PERIODS Store the machine in a dry environment, sheltered from the elements and, if possible,
  • Страница 21 из 80
    FRONT BLADE (FIG. 42) The dozer blade attachment is joined to deck mount arm on the machine and can be angled either to the left or to the right. It is recommended for shifting snow, for closing small excavations or for flattening heaps of sand or gravel. ROLLER BRUSH (FIG. 43) This is for clearing
  • Страница 22 из 80
    RASAERBA IDROSTATICO FD 300 - 700 Gentile Cliente, nel ringraziarla per la fiducia e la preferenza accordata al nostro Grillo FD300-700 confidiamo che l’uso di questa sua nuova macchina risponda pienamente alle sue esigenze. Per l’impiego ottimale e per la sua manutenzione nel tempo, la preghiamo
  • Страница 23 из 80
    31) 32) 33) 34) 35) 36) 37) 38) 39) 40) 41) 42) 43) I coltelli deformati o danneggiati devono essere sempre sostituiti, mai riparati. Usare sempre ricambi ed accessori originali Grillo. Lavorare solo con la luce del sole o con buona luce artificiale. Non fermarsi quando si lavora in salita o in
  • Страница 24 из 80
    CARATTERISTICHE TECNICHE MODELLO: rasaerba idrostatico con piatto frontale MOTORE: BRIGGS & STRATTON 570 c.c. OHV bicilindrico a scoppio, 4 tempi, 18 HP. MOTORE: Kubota D 722 diesel, 3 cilindri raffreddato ad acqua, 20,5 HP. AVVIAMENTO: elettrico. Batteria 12v. CAMBIO: trasmissione idrostatica.
  • Страница 25 из 80
    – che la leva preselezione velocità (fig. 1 n. 1) sia in posizione stop; – che la leva presa di forza sia in posizione folle (fig.1 n. 2); – che il filtro aria sia ben pulito (fig. 2 - motore a benzina; fig. 3 e 4 - motore diesel), per ispezionare il motore alzare la carenatura della macchina; –
  • Страница 26 из 80
    POSIZIONI DI TAGLIO Per regolare l’altezza di taglio si agisce sulle 4 spine (fig. 1 n. 10). In presenza di terreno accidentato, cunette o dossi, è conveniente operare con il piatto nella posizione di taglio più alta onde evitare urti da parte delle lame. TERRENI IN PENDENZA I terreni ripidi devono
  • Страница 27 из 80
    MOTORI IDRAULICI Controllare il livello nella vaschetta di espansione con i motori freddi, deve arrivare nella tacca di livello (fig. 14); se occorre aggiungere olio OSO 68 (ISO L-HM68) oppure MOBIL DTE 18M. Pulire frequentemente le alette di raffreddamento dei motori idraulici, in estate, in
  • Страница 28 из 80
    CINGHIA MOTORE - RINVIO PTO Sono autoregolanti, non hanno bisogno di nessuna regolazione, basta controllare la tensione della molla, per la loro sostituzione occorre sganciare la molla di tensione (fig. 24). Smontare il guidacinghia (fig. 25) e le due viti di guida (fig. 26) delle cinghie PTO. Per
  • Страница 29 из 80
    INCONVENIENTE CAUSA RIMEDIO Con la chiave in pos. AVV. Il cruscotto rimane spento - MOTORE DIESEL – La batteria non eroga corrente alcuna – Controllare i cavi di collegamento – Controllare il livello dell’elettrolito – Ricaricare la batteria – Sostituire il fusibile Il cruscotto si accende, ma con
  • Страница 30 из 80
    INCONVENIENTI CAUSA RIMEDIO Vibrazioni durante il funzionamento – Lame squilibrate – Equilibrare o sostituire le lame se danneggiate – Fissaggi allentati – Verificare e serrare le viti di fissaggio delle lame, delle viti di fissaggio del motore e del telaio Accensione della spia dell’olio –
  • Страница 31 из 80
    PULIZIA Lavare il piatto, le condutture di carico, la turbina e il cesto. Non lavare il vano motore con l’idropulitrice, utilizzare l’aria compressa oppure un aspiratore. RIMESSAGGIO E INATTIVITÀ PROLUNGATA Riporre la macchina in un ambiente asciutto, al riparo dalle intemperie e, possibilmente,
  • Страница 32 из 80
    Di serie viene fornito con zappette ad “Y” adatte per macinare anche piccoli rami di potatura, può essere dotato di palette erba per ottenere una qualità di taglio pari al rasaerba, oppure trasformato in scarificatore cambiando il rullo porta coltelli o semplicemente sostituendo le zappette con
  • Страница 33 из 80
    TONDEUSE HYDROSTATIQUE GRILLO FD 300 - 700 Cher Client, Nous vous remercions de la confiance et de la préférence que vous avez bien voulu accorder à notre Grillo FD 300 - 700. Nous sommes certains que l’utilisation de votre nouvelle tondeuse à gazon répondra entièrement à vos exigences. Pour un
  • Страница 34 из 80
    32) 33) 34) 35) 36) 37) 38) 39) 40) 41) 42) 43) Utiliser toujours des pièces détachées et des accessoires d’origine Grillo. Travailler uniquement avec la lumière du soleil ou avec une bonne lumière artificielle. Ne jamais s’arrêter lorsqu’on travaille en montée ou en descente. Effectuer le vidage
  • Страница 35 из 80
    CARACTERISTIQUES TECHNIQUES MODELE: tondeuse hydrostatique avec tondeuse frontale. MOTEUR: BRIGGS & STRATTON 570 C.C. OHV bicylindrique à explosion, 4 temps, 18 HP. MOTEUR: Kubota D 722 diesel, 3 cylindres refroidi par eau, 20,5 HP. DEMARRAGE: électrique. Batterie 12 V. CHANGEMENT DE VITESSES:
  • Страница 36 из 80
    – le filtre à air soit bien propre (fig. 2: moteur à essence; fig. 3 et 4: moteur diesel); pour inspecter le moteur soulever le carter de la machine; – la grille dans le bac soit bien propre (fig. 5); – le disque de la tondeuse, la turbine et les tuyauteries de chargement soient bien propres.
  • Страница 37 из 80
    POSITIONS DE COUPE Pour régler la hauteur de coupe intervenir sur les 4 goupilles (fig. 1 n° 10). En présence d’un terrain accidenté, de cassis ou de dos-d’âne, il convient d’agir avec la tondeuse dans la position de coupe la plus haute pour éviter les chocs des lames. TERRAINS EN PENTE Les
  • Страница 38 из 80
    MOTEURS HYDRAULIQUES Contrôler le niveau dans la cuve d’expansion avec les moteurs froids; il doit atteindre le repère de niveau (fig. 14); si nécessaire faire l’appoint d’huile OSO 68 (ISO L-HM68) ou bien MOBIL DTE 18M. Nettoyer fréquemment les ailettes de refroidissement des moteurs hydrauliques:
  • Страница 39 из 80
    REGLAGE DU PLATEAU DE COUPE Une bonne planéité de la tondeuse est essentielle pour obtenir un gazon uniformément tondu. Placer la tondeuse sur une surface plate, vérifier que la pression des pneus soit correcte, contrôler la tension des deux ressorts de flottaison, puis agir éventuellement sur la
  • Страница 40 из 80
    INCONVENIENT CAUSE REMEDE Le démarreur tourne, mais le moteur ne démarre pas – Absence du flux d’essence. – Contrôler que le starter soit actionné (si le moteur est froid). – Vérifier le niveau dans le réservoir. – Contrôler (et remplacer éventuellement) le filtre à essence. – Contrôler que le trou
  • Страница 41 из 80
    INCONVENIENT CAUSE REMEDE Coupe irrégulière et ramassage insuffisant – Plateau de coupe non parallèle au terrain. – Contrôler la pression des pneus. – Rétablir le parallélisme du plateau. – Inefficacité des lames. – Contrôler que le montage des lames soit correct. – Affûter ou remplacer les lames.
  • Страница 42 из 80
    INSTALLATION ELECTRIQUE L’installation électrique est protégée par des fusibles qui, si interrompus, provoquent l’inefficacité totale de ladite installation. Ces fusibles se trouvent sous la coque, près du moteur et dans le tableau de bord. Après avoir recherché et réparé la panne, remplacer le
  • Страница 43 из 80
    On l’applique de la même manière que les autres tondeuses; contrôler périodiquement l’état des lames, les affûter ou les remplacer si nécessaire. Contrôler l’huile dans le groupe transmission; vidanger toutes les 300 heures: 0,6 litre (75 W 90 synthétique). Ce plateau également possède des vis de
  • Страница 44 из 80
    HYDROSTATISCHER GROSSFLÄCHENMÄHER FD 300-700 Sehr geehrter Kunde! Wir danken Ihnen für Ihr Vertrauen, und beglückwünschen Sie zu Ihrem neuen Grillo FD 300 - 700. In diesem Handbuch finden Sie alles, was Sie wissen müssen, damit Ihr neuer Mäher perfekt funktioniert und lange hält. Lesen Sie es daher
  • Страница 45 из 80
    32) 33) 34) 35) 36) 37) 38) 39) 40) 41) 42) 43) Ausschließlich Original-Grillo-Ersatzteile und –Zubehör verwenden. Nur bei Tageslicht oder guter Beleuchtung arbeiten. Beim Auf- bzw. Abwärtsfahren niemals stehenbleiben. Den Treibstofftank immer nur im Freien entleeren. ACHTUNG: Um die Brandgefahr zu
  • Страница 46 из 80
    TECHNISCHE DATEN - PRODUKTBESCHREIBUNG MODELL: Hydrostatischer Rasenmäher mit Frontmäher MOTOR: BRIGGS & STRATTON 570 cm3 OHV Zweizylinder-Explosionsmotor, Viertakter, 18 PS MOTOR: Kubota D 722 Diesel, 3 Zylinder, wassergekühlt, 20,5 PS ANLASSEN: Elektrisch, 12V-Batterie GETRIEBE: Hydrostatisches
  • Страница 47 из 80
    – – – – – Den Ölstand im Motor kontrollieren Den Ölstand der Hydromotoren kontrollieren Der Geschwindigkeits-Vorwahlhebel (Abb. 1, Pos. 1) muss auf Stopp liegen Der Hebel zum Einkuppeln der Messer/Zapfwellen muss in Leerlaufposition liegen (Abb. 1, Pos. 2) Der Luftfilter muss sauber sein (Abb. 2 -
  • Страница 48 из 80
    17. Bei dem 126cm-Rasenmäher Professional können die vorgelochten Messerenden mit Weichstahlschrauben blockiert werden, so dass das Mähgut mit mehr Kraft in die Mähgutleitung gedrückt wird. 18. Vergewissern Sie sich, dass die Mähgutleitung richtig in die Turbine eingesetzt und korrekt ausgerichtet
  • Страница 49 из 80
    Den Luftfilter mindestens alle 4 Stunden kontrollieren, bei staubigen Bedingungen auch häufiger. Das Ansaugnetzgitter für die Motorkühlung kontrollieren. Das äußere und das innere Gitter des Motors immer sauber halten, damit die Luft ungehindert zum Kühler gelangen kann. Der Kühler muss ebenfalls
  • Страница 50 из 80
    Bei diesen zwei Rasenmähern muss der Kardan nicht ausgehängt werden; vor dem Anlassen der Maschine sollten Sie sich jedoch vergewissern, dass der Kardan gut angeschlossen ist und die Haltetaste vorsteht. ACHTUNG! Beschädigte oder verformte Messer nicht reparieren, sondern immer durch neue Messer
  • Страница 51 из 80
    STÖRUNG URSACHE ABHILFE Der Motor hat beim Starten Schwierigkeiten oder läuft unregelmäßig – Vergaserprobleme – Luftfilter reinigen oder auswechseln – Vergaser einstellen (siehe Motorhandbuch) – Schmutziger Treibstoff – Tank entleeren und frisches Benzin nachfüllen – Benzinfilter kontrollieren und
  • Страница 52 из 80
    STÖRUNG URSACHE ABHILFE Motorleistung fällt beim Mähen ab – Für die Schnitthöhe zu hohe Geschwindigkeit – Langsamer fahren – Rasenmäher etwas höher stellen Beim Einkuppeln der Messer stirbt der Motor ab – Zustimmung zum Einkuppeln fehlt – Mikroschalter Messer/Zapfwelle ein kontrollieren – Auf
  • Страница 53 из 80
    Die zwei Muttern (Pos. 1) ganz lockern. Den Geschwindigkeits-Vorwahlhebel auf Höchstgeschwindigkeit legen (Pos. 2). Die zwei Muttern leicht anziehen (Pos.1). Die mittlere Schraube auflegen, um das Laufende der zwei Hebeln zu erhalten (Pos. 3.,die mittlere Schraube nicht anziehen, weil die Räder
  • Страница 54 из 80
    3) Wartung des Mähdecks: a) Die Splinte und die seitlichen Zapfen abnehmen - Abb. 37. b) Das Kardangelenk vom Deck abkuppeln - dazu den Druckknopf drücken (Abb. 38). c) Das Deck von Hand anheben und am Haken auf dem Armaturenbrett einhängen - Abb. 39. d) Die Messer schleifen; stark abgenutzte
  • Страница 55 из 80
    CORTACÉSPED HIDROSTÁTICO GRILLO FD 300 - 700 Estimado Cliente: Le agradecemos por la confianza y por la preferencia concedida a nuestro Grillo FD 300 - 700, confiamos que el uso de esta nueva máquina responda plenamente a sus exigencias. Para un empleo óptimo y para su mantenimiento a través del
  • Страница 56 из 80
    32) 33) 34) 35) 36) 37) 38) 39) 40) 41) 42) 43) Utilice siempre los recambios originales Grillo. Trabaje sólo con la luz del sol o con una buena iluminación artificial. No se detenga cuando esté trabajando en subida o en bajada. Si tiene que vaciar el depósito de combustible realice la operación al
  • Страница 57 из 80
    CARACTERÍSTICAS TÉCNICAS MODELO: cortacésped hidrostático con plato frontal MOTOR: BRIGGS & STRATTON 570 c.c. OHV 2 cilindros de explosión, 4 tiempos, 18 HP. MOTOR: Kubota D 722 diesel, 3 cilindros refrigeración por agua, 20,5 HP. ARRANQUE: eléctrico. Batería 12v. CAMBIO: transmisión hidrostática.
  • Страница 58 из 80
    – – – – el aceite de los motores hidráulicos esté a nivel; la palanca de preselección velocidad (Fig. 1 no 1) esté en posición stop; la palanca de toma de fuerza esté en posición neutra (Fig.1 no 2); el filtro de aire esté bien limpio (Fig. 2 - motor a gasolina; Fig. 3 y 4 - motor diesel), para
  • Страница 59 из 80
    16. Controle que las cuchillas estén montadas correctamente. 17. En el plato de 126 cm Professional los terminales de las cuchillas que ya están preajustados con agujeros, se pueden bloquear con tornillos de acero blando. El terminal rígido imprime un empuje mayor a la hierba hacia el interior del
  • Страница 60 из 80
    Mantenga bien limpio el alojamiento del motor, utilice, de ser posible, una aspiradora. Controle el filtro de aire cada 4 horas o haga controles más frecuentes si el medio ambiente es muy polvoriento. Controle la rejilla con red de aspiración de la refrigeración del motor. Para no estropear el
  • Страница 61 из 80
    Para desmontar una cuchilla, tomarla sólidamente utilizando guantes de trabajo y destornillar el tornillo central. Atención: El tornillo central de fijación de la cuchilla derecha tiene el filete a izquierda (Fig. 21). Con estos dos platos no es necesario desenganchar el cardán, antes de poner en
  • Страница 62 из 80
    INCONVENIENTE CAUSA REPARACIÓN Puesta en marcha difícil o funcionamiento irregular del motor – Problemas de carburación – Limpie o sustituya el filtro de aire – Regule el carburador (siga el manual del motor) – Depósitos o impurezas en el combustible – Vacíe el depósito y emplee gasolina fresca –
  • Страница 63 из 80
    INCONVENIENTE CAUSA REPARACIÓN Activando las cuchillas, el motor se apaga – Falta el asenso a la activación – Controle el microinterruptor de activación cuchillas – Conductor sentado en el puesto de conducción Corte irregular y recolección insuficiente – Plato de corte no paralelo al terreno –
  • Страница 64 из 80
    Regule el punto muerto mediante el tirante central (no 4). Arrancar el motor con acelerador al mínimo y la palanca en punto muerto. Afloje la contratuerca y regule atornillando y desatornillando. Bloquee nuevamente la contratuerca. Para realizar esta operación es necesario remitirse a un centro de
  • Страница 65 из 80
    PLATO 110 CM MULCHING (FIG. 40) Sirve para cortar y destruir hierbas con 10/12 cm de altura. Es preferible realizar esta operación con la hierba seca porque la turbulencia interna del plato permite una trituración mejor. Se recomienda no detener la máquina al terminar el corte sino seguir por unos
  • Страница 66 из 80
    GRILLO FD300 -700 DIESEL / BENZINA 17 15 16 20 18 8 4 4 8A 1 5 3 4 19 14 9 Fig. 1 7 2 11 12 6 13 10 8 21 6 2 14 64
  • Страница 67 из 80
    GRILLO FD300 -700 DIESEL / BENZINA 1) SPEED PRESETTING LEVER 1) LEVA PRESELEZIONE VELOCITÀ 2) PTO BLADE ROTATION LEVER 2) LEVA INSERIMENTO ROTAZIONE LAME P.T.O. 2) LEVIER D’INSERTION DE LA ROTATION DES LAMES P.T.O. 3) CHOKE LEVER (PETROL ENGINES ONLY) FOR USE WHEN ENGINE IS COLD 3) LEVA STARTER
  • Страница 68 из 80
    Fig. 2 Fig. 3 Fig. 4 Fig. 5 Fig. 6 Fig. 7 Fig. 8 66
  • Страница 69 из 80
    Fig. 9 Fig. 10 Fig. 11 Fig. 12 Fig. 13 Fig. 14 Fig. 15 67
  • Страница 70 из 80
    Fig. 16 Fig. 17 Fig. 18 Fig. 19 Fig. 20 Fig. 21 Fig. 22 Fig. 23 68
  • Страница 71 из 80
    Fig. 24 Fig. 25 Fig. 26 Fig. 27 Fig. 28 Fig. 29 Fig. 30 Fig. 31 69
  • Страница 72 из 80
    Fig. 32 Fig. 34 Fig. 33 Fig.35 Fig. 36 Fig. 37 Fig. 38 70
  • Страница 73 из 80
    Fig. 39 Fig. 40 Fig. 41 Fig. 42 Fig. 43 Fig. 44 71
  • Страница 74 из 80
    72
  • Страница 75 из 80
    73
  • Страница 76 из 80
    74
  • Страница 77 из 80
    75
  • Страница 78 из 80
    WARNING! This arrow shows the hook-up points for lifting the machine. ATTENZIONE! Le frecce indicano i punti di aggancio per il sollevamento della macchina. ATTENTION! Cette flèche indique les points d’accrochage pour le levage de la machine. ACHTUNG! Mit dieser Pfeil sind die Punkte zum Anschlagen
  • Страница 79 из 80
  • Страница 80 из 80