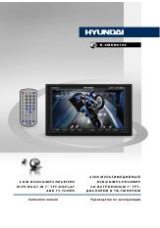
Страница 1 из 65 H-CMD7075 DVD/MP3/CD RECEIVER Instruction manual DVD/MP3/CD-
Страница 2 из 65 Dear customer! Thank you for purchasing our product. For safety, it is strongly recommended to read this manual carefully before connecting, operating and/or adjusting the product and keep the manual for reference in the future. Table of contents Table of
Страница 3 из 65 IMPORTANT SAFEGUARDS Using the device at temperature below -10º may cause the breakage of the device. BEFORE USING PLEASE HEAT UP THE PASSENGER COMPARTMENT TO THE RECOMMENDED TEMPERATURE! Read carefully through this manual to familiarize you with this high-quality sound system. Disconnect the
Страница 4 из 65 Installation/ Connections First complete the electrical connections, and then check them for correctness. Installation way (method 1) It is an anti-theft installation way. The chassis wear a metal sliding housing. Please have the wiring connection of the power supply, speakers and antenna as for
Страница 5 из 65 Installation way (method 2) Installation using the screw holes at both sides of the unit. 1. Select a position where the screw holes of the main unit are fitted for aligned, and tighten the screws at 2 positions at each side. Use either truss screws (5 x 8mm) or flush surface screws (4 x 8mm),
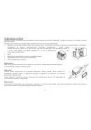
Страница 7 из 65 Using the ISO Connector 1. If your car is equipped with the ISO connector, then connect the ISO connectors as illustrated. 2. For connections without the ISO connectors, check the wiring in the vehicle carefully before connecting, incorrect connection may cause serious damage to this unit. Cut the
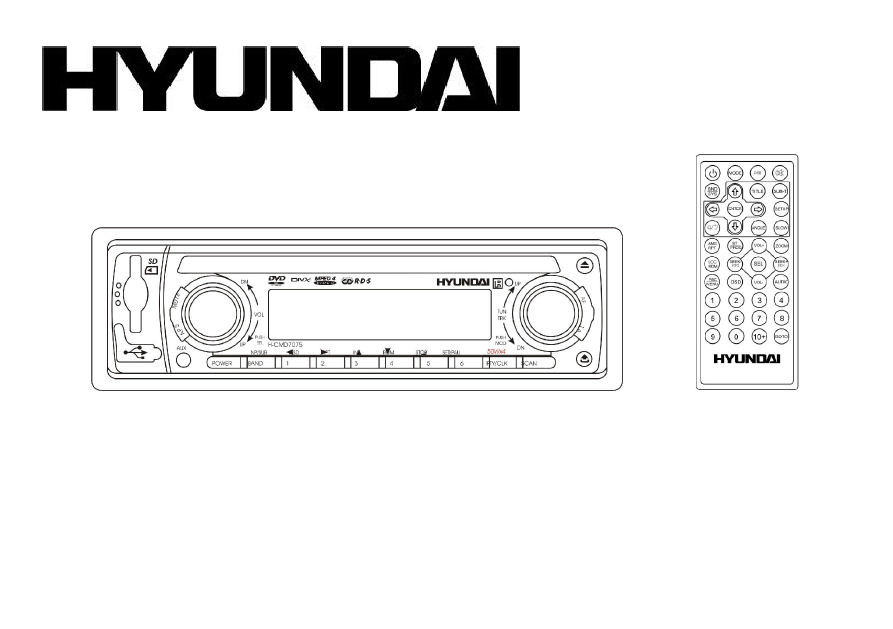
Страница 8 из 65 Controls description Front panel 1. 2. 3. 4. 5. 6. OPEN BUTTON Press it to remove the front panel. TA BUTTON In RADIO mode press it to active the TA function. SCAN BUTTON In RADIO mode press it to start preset stations scanning. PTY / CLK BUTTON Press it and hold for 2 seconds to set clock. In
Страница 9 из 65 7. 8. 9. 10. 11. 12. 13. 14. 15. 16. 17. 18. 19. / RPT BUTTON In menu use it to move to the right. During playback press it and hold for 2 seconds to start repeat playback. / INT BUTTON In menu use it to move upward. During playback press it and hold for 2 seconds to start intro playback (about 10
Страница 10 из 65 20. 21. 22. 23. 24. Rotate it clockwise to increase the volume level; rotate anticlockwise to decrease the volume level. Press it repeatedly to select the mode: VOL => BAS => TRE => BAL => FAD => LOUD => LOC => ST => EQ. Rotate VOL knob to adjust each mode. LCD (LIQUID CRYSTAL DISPLAY) Disc slot
Страница 11 из 65 Remote control 1. MODE BUTTON 2. POWER BUTTON 3. BND/TA/SYS BUTTON 4. ERROR BUTTONS 5. ENTER BUTTON 6. STOP/REVERSE BUTTON 7. AMS/RPT BUTTON 8. ST/PROG BUTTON 9. LOC/AF/RDM BUTTON 10. VOL +/- BUTTON 11. PBC BUTTON 12. OSD BUTTON 13. DIGIT AREA 14. PLAY/PAUSE BUTTON 15. MUTE BUTTON 16. TITLE BUTTON
Страница 12 из 65 General operations Reset the unit Operating the unit for the first time or after replacing the car battery, you must reset the unit. Press OPEN button and remove the panel, then press the RESET button to restore the unit to the original factory settings. Power button Press any button to turn the
Страница 13 из 65 Sound settings Press SEL button shortly and repeatedly to select the mode: VOL => BAS => TRE => BAL => FAD => LOUD => LOC => ST => EQ. Rotate the VOL knob or use VOL +/- buttons to adjust each mode. VOLUME: 00, 02,......, 44, 46 BASS/TREBLE: -6, -5,......, 0, +1, +2,......+5, +6 BALANCE: 12L,
Страница 14 из 65 Radio operations Note: RDS (Radio Data System) service availability varies with areas. Please understand if RDS service is not available in you area, the following service is not available, either. Band select Press the BAND button on the front panel or BND/SYS button on RC repeatedly to select
Страница 15 из 65 Auto memory store: press APS button on the panel for more than 2 seconds to enter auto store mode. The radio will automatically store the 6 strongest available stations to the 6 preset memories of the current band. To stop auto store, press this button again. Stereo/ Mono mode Press the ST/PROG
Страница 16 из 65 PTY (Program Type) 1. Press PTY/CLK button on the panel to activate the PTY function. The previous PTY type is shown. 2. Press PTY/CLK once again to enter the MUSIC type or press twice to enter the SPEECH type, then use buttons 1 - 6 to select the desired program type (see the following table). 3.
Страница 17 из 65 Discs operations Disc glossary PBC (PlayBack Control) PBC is a menu recorded on the disc with SVCD or VCD2.0 format. For the discs contained PBC, it can playback interactive software with the menu displayed on TV. And if the disc contains still images, it can playback high definition of still
Страница 18 из 65 Max. nested directory is 8 levels The max. album number is 99 The max. length of each track is 99 minutes 59 seconds Supported sampling frequency for MP3 disc: 8 KHz – 48 KHz (44.1 KHz preferably) Supported bit-rates of MP3 disc are: 32 - 320 kbps (128 kbps preferably). Following formats are NOT
Страница 19 из 65 Loading/ eject a disc Turn the power on. Insert the disc with the printed side facing upward into the slot. Press EJECT button on the panel to eject the disc. Inserting the SD/ MMC card/ USB device Insert the MMC/ SD card or USB device into MMC/ SD compartment or USB socket. Then the playing mode
Страница 20 из 65 Slow playback (for DVD/VCD) During DVD / VCD playback press the SLOW button on the RC to execute the SLOW function. With each consecutive pressing of the SLOW button, the playback speed decreases: X1/2 => X1/3 => X1/4 => X1/5 => X1/6 => X1/7 => Normal. During slow forward, press the PLAY/PAUSE
Страница 21 из 65 Changing angle (for DVD only) If DVD disc supports multi-angle playback, press ANGLE button on RC to play images in different camera angles. If discs doesn't support multi-angle playback, this function will not work. If no operation within 1 second, angle description will disappear. Selecting the
Страница 22 из 65 MP3 overview Notes on MP3 MP3 is short for MPEG Audio Layer 3 and refers to an audio compression technology standard. This product allows playback of MP3 files on CD-ROM, CD-R or CD-RW discs. The unit can read MP3 files written in the format compliant with ISO 9660. However it does not support the
Страница 23 из 65 System setup Press SETUP button on the RC to display setup screen, use Audio, Video, Digital. , ENTER buttons to select the desired item: System, Language, System setup TV system Select the TV system in the setting menu (PAL or NTSC). Screen saver The screen saver appears if disc stop last more
Страница 24 из 65 Language setup Setting the on-screen display language Select the language to be used for the on-screen display. Setting the audio language Select the language to be used for the audio. You can select a preferred audio from those included on the DVD video disk. (The screen on your player may have
Страница 25 из 65 Digital setup Output mode Select the output mode: LINE OUT: Compress the input signal. The volume is small. RF REMOD: The volume is large. Dynamic range When you select the compressed mode as “line out”, select it to adjust the compression proportion and get the different compressed effect. When
Страница 26 из 65 Anti-theft system This unit is equipped with a slide-down detachable and mask panel. Panel can be detached and taken with you, helping to deter theft. Detaching the front panel 1. Press the PWR button to turn the power off. 2. Press the OPEN button on the front panel. 3. Push the panel to the right
Страница 27 из 65 Cleaning Discs holding Dirty, scratched or warped discs may cause skip ping or noise. Handle the disc only by the edges. To keep clean do not touch its surface. Discs should be stored in their cases after use to avoid scratches. Do not expose discs to direct sunlight, high humidity, high
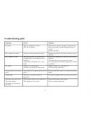
Страница 28 из 65 Troubleshooting guide Symptom Cause Solution No power. The car ignition is not on. The fuse is blown. If the power supply is properly connected to the car accessory switch the ignition key to “ACC”. Replace the fuse. Disc cannot be loaded. Presence of disc inside the player. Disc cannot be read.
Страница 29 из 65 Specification General. Power supply: Current consumption/Fuse: Maximum power output: Dimensions (W x H x D) Working temperature range: FM Stereo Radio. Frequency range: Usable sensitivity/ I.F. Frequency: AM Section. Frequency range: 12V DC 8A/ 10A & 1A 50Wx4 channels 178 x 51 x 178 mm -20º - +60º