Страница 2 из 29 Important Precautions This unit has been engineered and manufactured to ensure your personal safety, however improper use may result in potential electrical shock or fire hazards. In order to allow the proper operation of all safeguards incorporated in this display, observe the following basic
Страница 3 из 29 Important Precautions On Installation Do not allow anything to rest upon or roll over the power cord, and do not place the display where the power cord is subject to damage. Do not use this display near water such as near a bathtub, washbowl, kitchen sink, laundry tub, in a wet basement, or near a
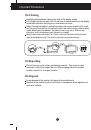
Страница 4 из 29 Important Precautions On Cleaning Unplug the display before cleaning the face of the display screen. Use a slightly damp (not wet) cloth. Do not use an aerosol directly on the display screen because over-spraying may cause electrical shock. When cleaning the product, unplug the power cord and scrub
Страница 5 из 29 Accessories !!! Thank for selecting LGE products !!! Please make sure the following items are included with your monitor. If any items are missing, contact your dealer. Power Cord User's Guide/Cards 15-pin D-Sub Signal Cable (To set it up, this signal cable may be attached to this product before
Страница 6 из 29 Connecting the Display Before setting up the monitor, ensure that the power to the monitor, the computer system, and other attached devices is turned off. Connecting the stand 1. Place the monitor with its front facing downward on a soft cloth. 3. Assemble the Stand Base(Front, Rear) into the Stand
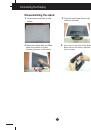
Страница 7 из 29 Connecting the Display Disassembling the stand 2. Place the monitor face Down on the 1. Put a cushion or soft cloth on aflat cushion or soft cloth. surface. 3. Remove the Stand Body and Stand 4. Base from product in correct direction as shown in the picture. 6 Use a coin on the back of the Stand
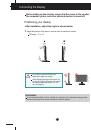
Страница 8 из 29 Connecting the Display Before setting up the monitor, ensure that the power to the monitor, the computer system, and other attached devices is turned off. Positioning your display -After installation, adjust the angle as shown below. 1. Adjust the position of the panel in various ways for maximum
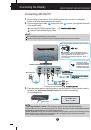
Страница 9 из 29 Connecting the Display E2241V/E2341V/E2341VG/E2441V Connecting with the PC 1. Before setting up the monitor, ensure that the power to the monitor, the computer system, and other attached devices is turned off. and power cord of the signal cable. A Connect DVI-D(Digital signal) Cable B Connect
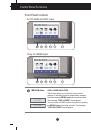
Страница 10 из 29 Control Panel Functions Front Panel Controls For D-SUB and DVI input Only for HDMI input MENU Button OSD LOCKED/UNLOCKED This function allows you to lock the current control settings, so that they cannot be inadvertently changed. Press and hold the MENU button for several seconds. The message "OSD
Страница 11 из 29 Control Panel Functions SUPER ENERGY Use this button to enter SUPER ENERGY SAVING SAVING Button menus.For more information, refer to page 15 . (For D-SUB and DVI input) E2241V/E2341V/E2341VG/E2441V:1920 x 1080 (Only for HDMI input) INPUT Button Use this button to select source from input. (SOURCE
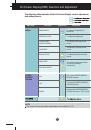
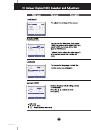
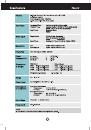
Страница 13 из 29 On Screen Display(OSD) Selection and Adjustment The following table indicates all the On Screen Display control, adjustment, and setting menus. Main menu MENU Sub-menu Supported input BRIGHTNESS To adjust the brightness of the screen ORIGINAL RATIO To adjust the image size COLOR TEMP (PRESET/USER)
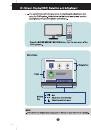
Страница 17 из 29 Turn on the SUPER ENERGY SAVING function. Turn off the SUPER ENERGY SAVING function. Now the monitor is LED SAVING function. Clear the TOTAL POWER REDUCTION and TOTAL CO2 REDUCTION values. 16
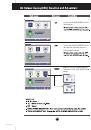
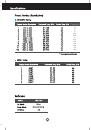
Страница 18 из 29 SAVING DATA(W/h) : 22 inch 23 inch 24 inch Saving Data depends on the Panel. So, those values should be different from each panel and panel vendor. LG accumulate those values using integrated function with 10 minutes broadcast video signal. LED Saving means that how much power can be saved using
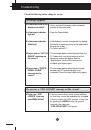
Страница 19 из 29 Troubleshooting Check the following before calling for service. No image appears ● Is the power cord of the • Check and see if the power cord is connected properly to the power outlet. display connected? ● Is the power indicator light on? • Press the Power button. ● Is the power indicator
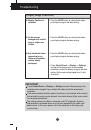
Страница 20 из 29 Troubleshooting Display image is incorrect ● Display Position is incorrect. • Press the AUTO button to automatically adjust your display image to the ideal setting. ● On the screen background, vertical bars or stripes are visible. • Press the AUTO button to automatically adjust your display image
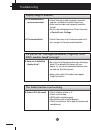
Страница 21 из 29 Troubleshooting Display image is incorrect ● The screen color is mono or abnormal. • Check if the signal cable is properly connected and use a screwdriver to fasten if necessary. • Make sure the video card is properly inserted in the slot. • Set the color setting higher than 24 bits (true color) at
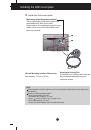
Страница 26 из 29 Installing the Wall mount plate This monitor satisfies the specifications of the Wall mount plate or the interchange device. 1. Place the monitor with its front facing downward on a soft cloth. 2. Remove the Stand Body and Stand Base from product in correct direction as shown in the picture. 25
Страница 27 из 29 Installing the Wall mount plate 3. Install the Wall mount plate. Wall mount plate(Separate purchase) This is stand-type or wall mount type and is connectable with Wall mount plate. Please refer to the installation guide for more details, which is provided when Wall mount plate is purchased. <Screw
Страница 28 из 29 Make sure to read the Safety Precautions before using the product. Keep the OWNER’S MANUAL(CD) in an accessible place for furture reference. The model and serial number of the SET is located on the back or one side of the SET. Record it below should you ever need service. MODEL SERIAL ENERGY STAR