~ E
XPLANATION
~
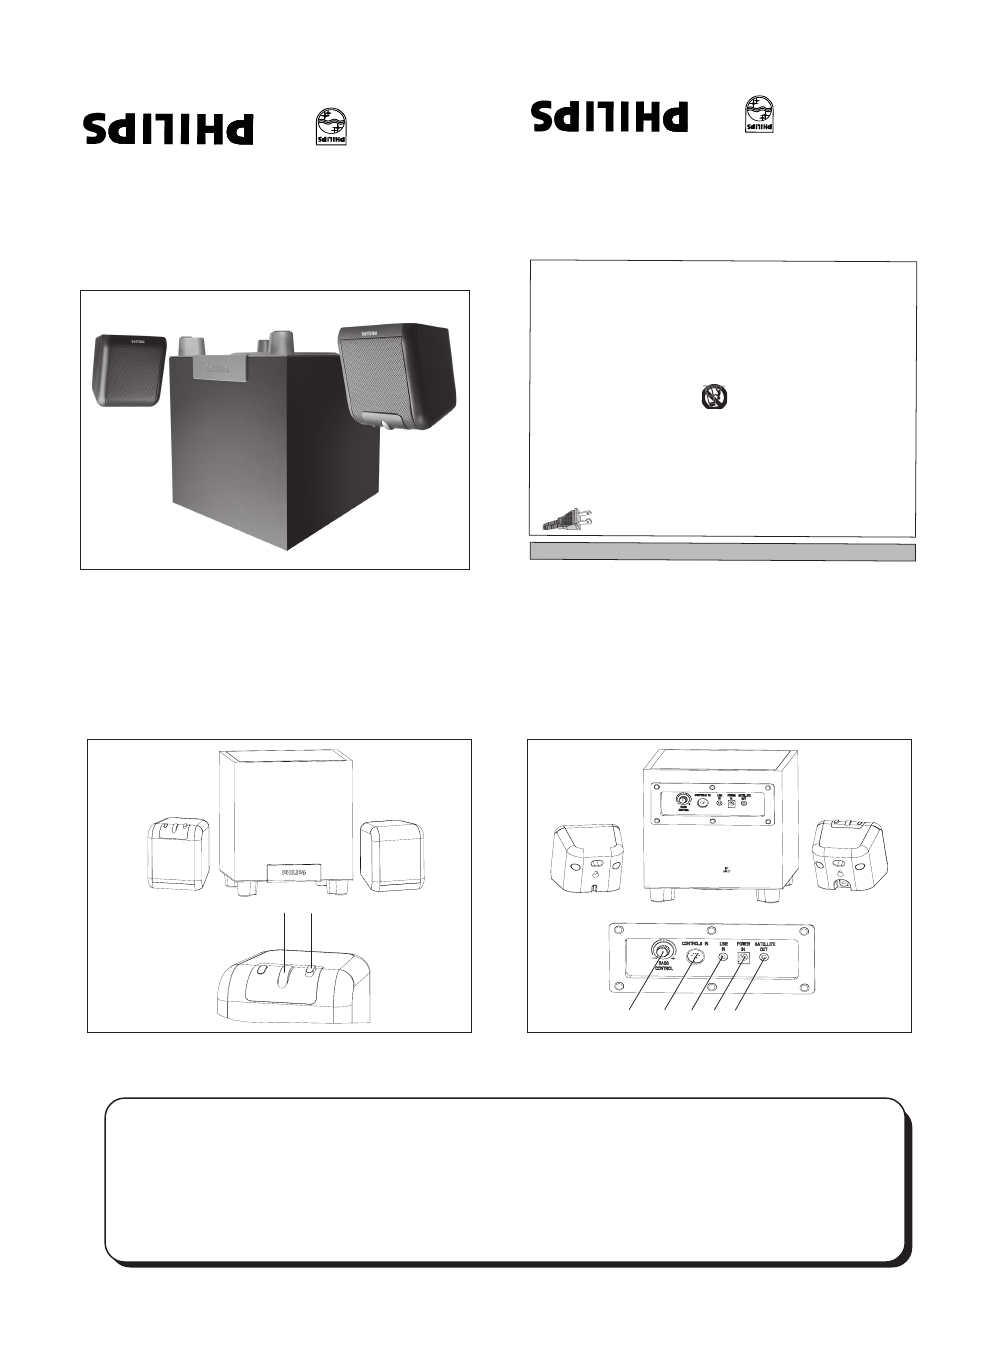
➀
Rotary Volume Control
To adjust the volume higher or lower
➁
Power On/Off
To switch on or off power (Green LED
indicates that the power is On)
➂
Bass Control
To adjust bass level to desired volume
➃
Control In
Plug in the mini DIN connector
➄
Line In
To connect the Line In cable from the sound
card/sound source.
➅
Power In
To connect the adapter
http://www.pcstuff
.philips.com
http://www.pcsound.philips
.com
4399 294
60201
This product was designed and man
ufactured to meet
str
ict quality and safety standards
. There
are, ho
wev
er,
some installation and operation precautions which y
ou
should be particular
ly aw
are of.
1.
Read these instructions - All the saf
ety and
operating instr
uctions should be read before the
appliance is operated.
2.
Keep these instructions -
The safety and oper
ating
instructions should be retained f
or future reference
.
3.
Heed all warnings - All w
arnings on the appliance
and in the operating instr
uctions should be adhered
to.
4.
Follow all instructions -
All operating and use
instructions should be f
ollow
ed.
5.
Do not use this apparatus near water - for
example
,
near a bathtub, w
ashbowl, kitchen sink, laundr
y tub,
in a wet basement or near a s
wimming pool, etc.
6.
Clean only with a damp c
loth. The appliance
should be cleaned only as recommended by the
ma
nu
facturer
.
7.
Install in accordance with the man
ufacturers
Instructions. Do not b
lo
ck an
y of the ventilation
openings. F
or e
xample, the appliance should not
be situated on a bed, sofa, r
ug, or similar surface
or placed in a built-in installation, such as a
bookcase or cabinet that may impede the flo
w of
air through the ventilation openings
.
IMPORT
ANT SAFETY INSTRUCTIONS -
Read before operating equipment
For US/Canada only
8.
Do not Install near any heat
sources
such as radiators
, heat
registers,
sto
ves, or other appar
atus
(including amplifiers) that produce
heat.
9.
Do not defeat the saf
ety purpose of the polar
ized or
grounding-type plug.
A polariz
ed plug has two b
lades with
one wider than the other. Match wide b
lade of Plug to wide
slot, fully insert. A g
rounding type plug has two b
lades and
a third grounding prong.
The wide b
lade or the third prong
are provided f
or your saf
ety
. When the pro
vided plug does
not fit into your outlet, consult an electr
ician for replacement
of the obsolete outlet.
10
.P
rotect the po
wer cord
from being walk
ed on or
pinched particular
y at plugs, con
ve
nience receptacles,
and the point where they e
xit from the apparatus.
12. Use onl
y with a cart,
stand, tripod, br
ack
et, or table
specified by the man
ufacturer
, or sold with the apparatus
.
When a cart is used, use caution when mo
ving the cart/
apparatus combination to a
void injur
y from tip-ove
r.
13
.Unplug this apparatus
during lightning stor
ms or when
unused for long per
iods of time.
14
.Ref
er all servicing
to qualified service personnel.
Servicing
is required when the apparatus has been damaged in an
y
way
, such as po
wer-supply cord or plug is damaged, liquid
has been spilled or objects have
fallen into the appar
atus,
the apparatus has been e
xposed to rain or moisture
, does
not operate nor
mally , or
has been dropped.
15
.W
arning! T
o reduce the r
isk of fire or electric shoc
k, do
not expose this appliance to r
ain or moisture.
EL 4562-E004: 99/3
AC
Polarized Plug
11. Only use attachments/accessories
specified
by
the manu
facturer
.
Multimedia Speaker System
A
2.310 / MMS213
Deep Bass, crisp highs and great looks!
The Rhythmic
Wa
ve
310 includes a pow
erful, down-fir
ing wooden
subwoof
er with bass reflex system, to add unbelie
va
ble depth to lo
w
frequencies. The system is optimiz
ed to produce superb sound quality
across the whole frequency range. Connected to PC's
,
CD/MP3 players, game consoles and e
ven
TV's it adds realism to your
music and br
ings games and web-sites to lif
e! Ideal with a stereo
soundcard.
Æ
Satellite Out
To connect the satellite speakers
Á
À
Â Ã Ä Å Æ