Specifications are subject to change without notice
© 2015 Koninklijke Philips N.V.
All rights reserved.
HD3197_UM_EEU_v2.0
HD3197
Мультиварка
Мультипісіргіш
Register your product and get support at
www.philips.com/welcome
Always there to help you
Question?
Contact
Philips
English
1
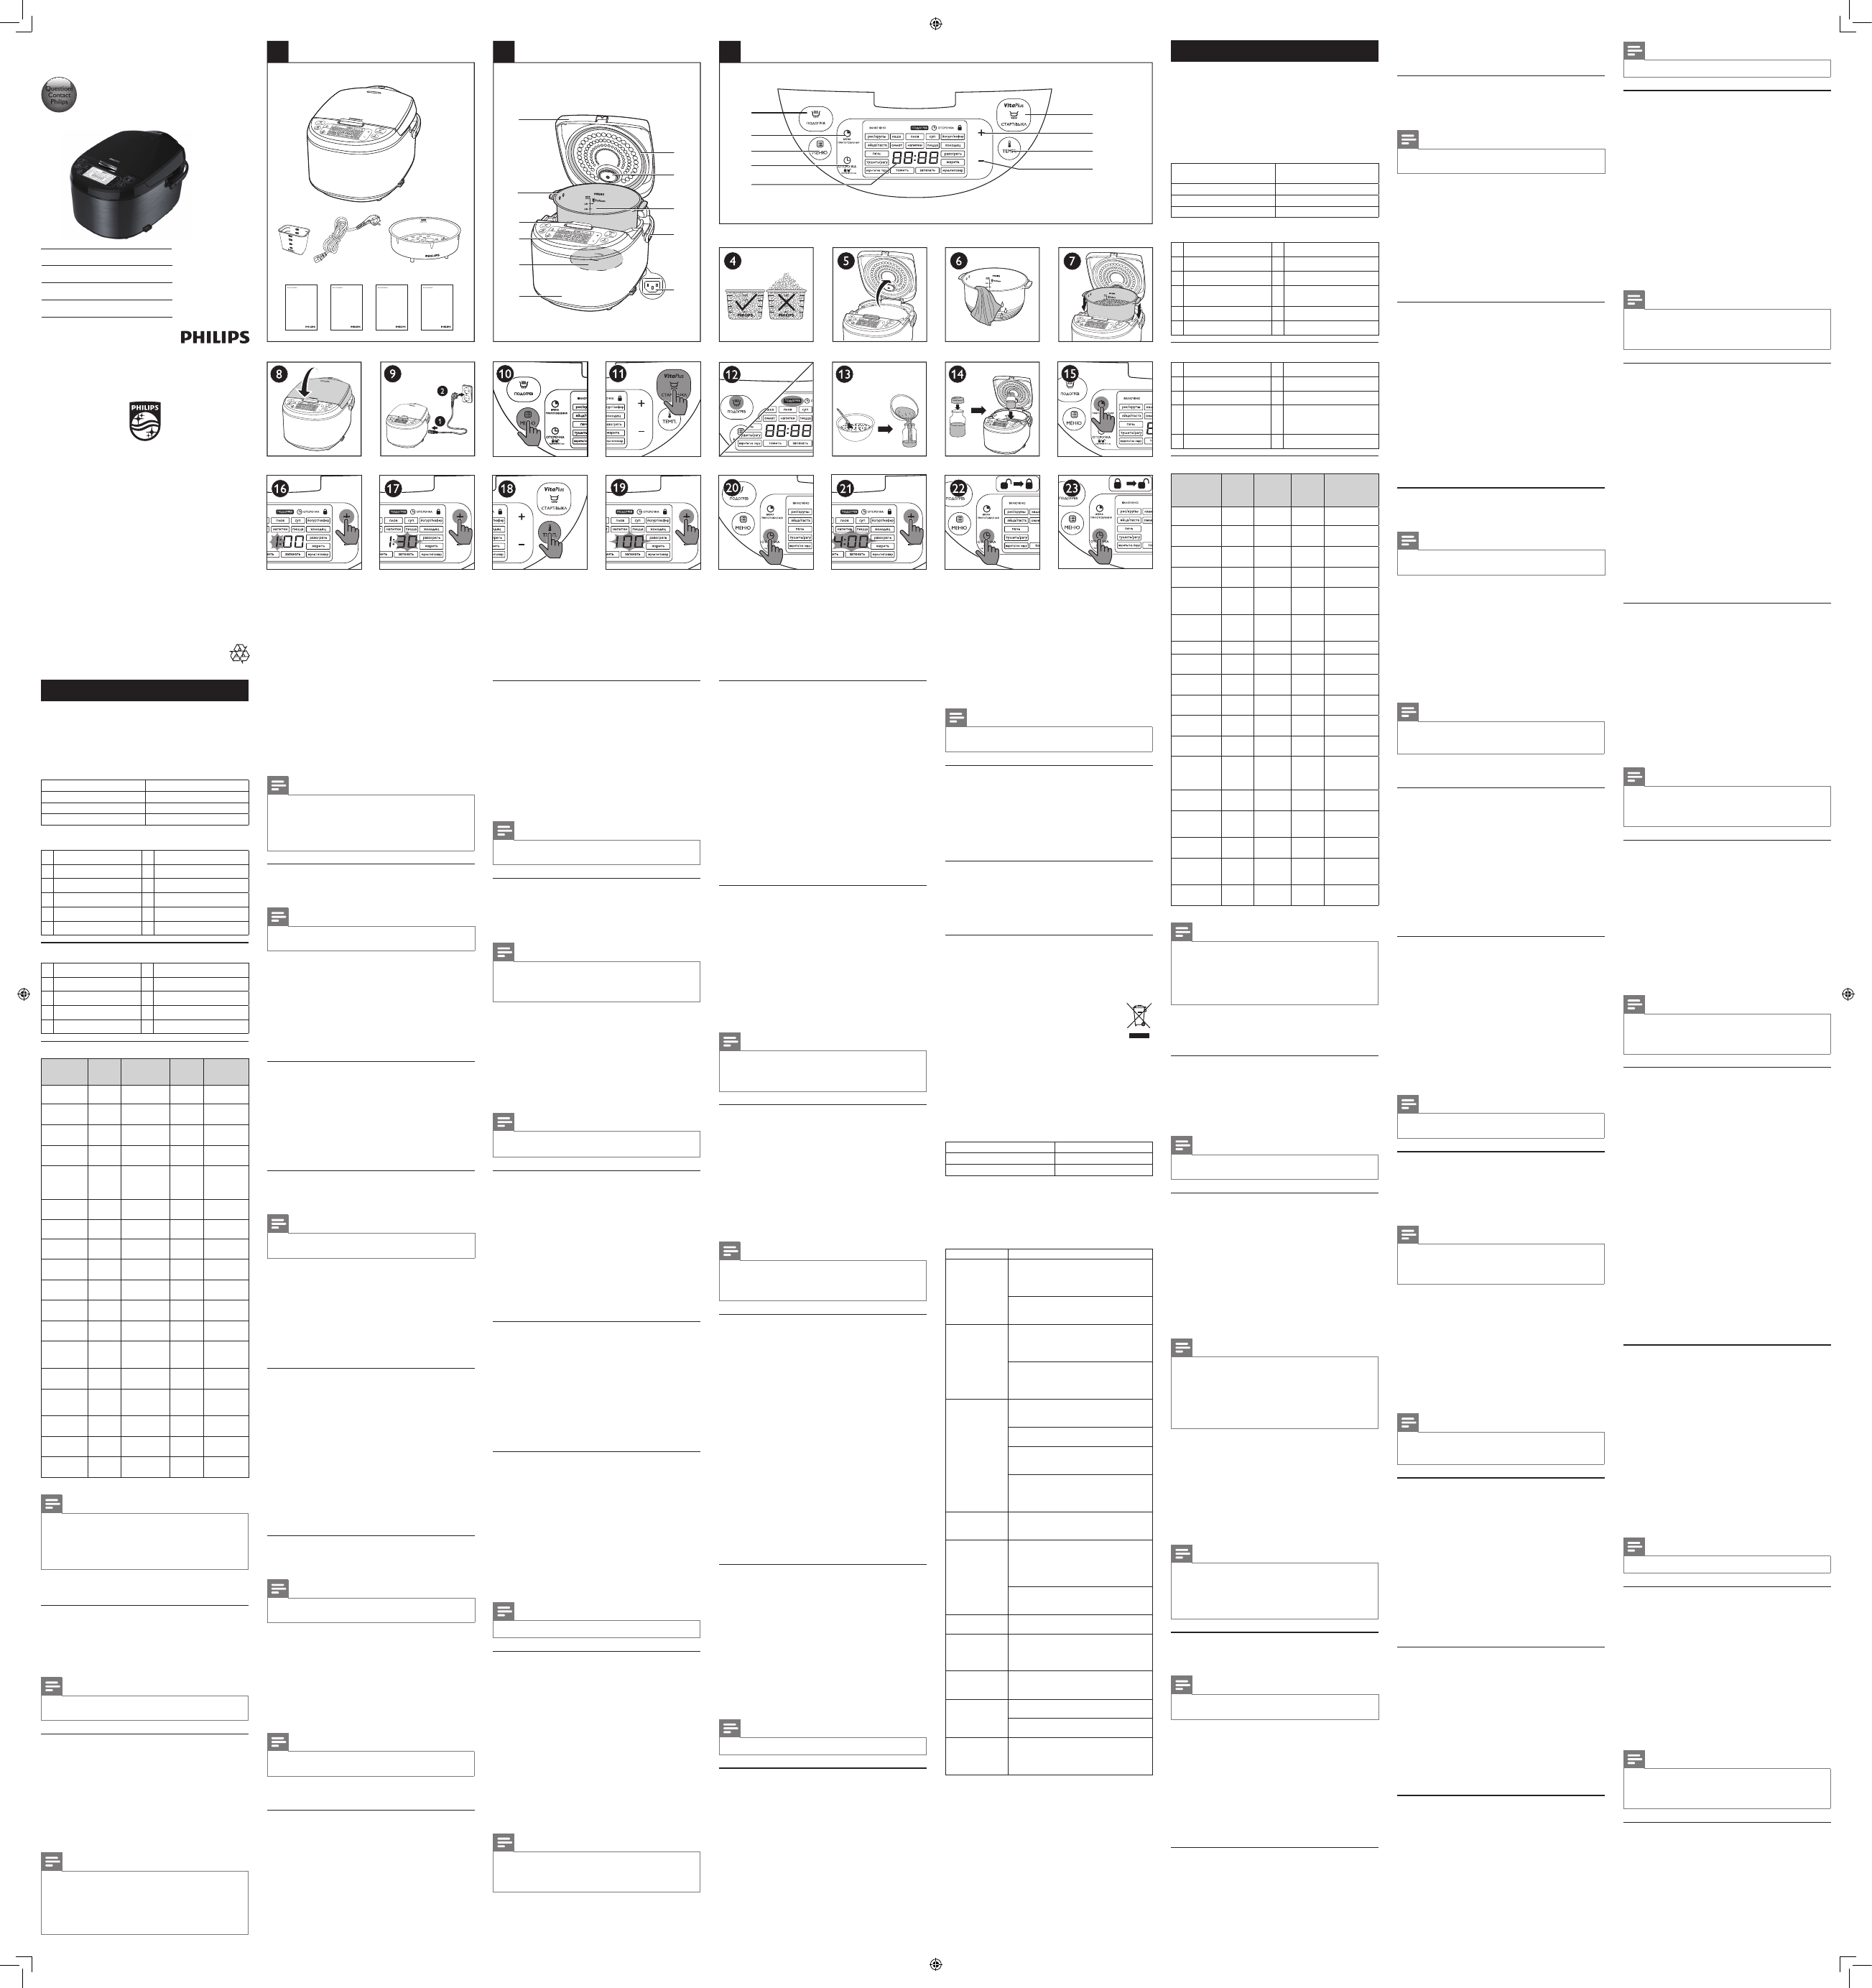
Your multicooker
Congratulations on your purchase, and welcome to Philips!
To fully benefit from the support that Philips offers, register your
product at www.philips.com/welcome.
2
What’s in the box (fig. 1)
Multicooker main unit
Measuring cup
Power cord
Steam rack
User manual
Recipe
Safety leaflet
Warranty card
3
Overview (fig. 2)
a
Top lid
g
Power socket
b
Inner pot
h
Cooker handle
c
Lid release button
i
Water level indications
d
Control panel
j
Detachable steam vent cap
e
Heating element
k
Sealing ring
f
Main body
Controls overview (fig. 3)
l
Keep-warm button
q
Decrease button
m
Cooking time button
r
Temperature button
n
Menu button
s
Increase button
o
Preset/child lock button
t
Start/Cancel button
p
Display screen
Functions overview
Functions
Default
cooking
time
Cooking time
regulating
range
Preset
time
Default
cooking
temperature
Rice/grain
(рис/крупы)
30-40
min
/
1-24 hr
130-140
°C
Porridge
(каша)
10 min
5 min - 2 hr
1-24 hr
90-100°C
Plov
(плов)
40 min
/
1-24 hr
130-140
°C
Soup
(суп)
1 hr
20 min-4 hr
1-24 hr
90-100°C
Yogurt/Sour
milk
(йогурт/
кефир)
8 hr
6-12 hr
1-24 hr
40±3°C
Egg/Pasta
(яйца/паста )
4 min
1-15 min
/
100
°C
Omelette
(Омлет)
10 min
5-20 min
/
120
°C
Drinks
(напитки)
10 min
5-40 min
1-24 hr
100°C
Pizza
(пиццa)
35 min
10-60 min
/
130
°C
Jelly meat
(холодец)
6 hr
4-10 hr
1-24 hr
90-100°C
Bake
(печь)
45 min
20 min - 2 hr
/
130°C
Reheat
(разогреть)
25 min
5-60 min
/
85°C
Stew/Ragout
(тушить/
рагу)
1 hr
20 min - 10 hr 1-24 hr
90°C
Fry
(жарить)
15 min
5-60 min
/
145-160°C
Boil/Steam
(варить/на
пару)
20 min
5 min - 2 hr
1-24 hr
100°C
Slow cook
(томить)
5 hr
1-15 hr
1-24 hr
80°C
Roast
(Запекать)
1 hr
/
/
130
°C
Manual
(мультиовар)
2 hr
5 min - 10 hr
1-24 hr
100
°C
Note
•
You can adjust the cooking temperature for the baking and manual
functions. For baking, the temperature is available from 40°C to 160°C; for
the manual function, the temperature is available from 30°C to 160°C.
•
After the cooking has started, you can press the Start/Cancel button
(
СТАРТ/ВЫКЛ
) to deactivate the current cooking process, and the
multicooker will switch to the standby mode.
4
Using the multicooker
Before first use
1
Take out all the accessories from the inner pot, and remove the
packaging material of the inner pot.
2
Clean all parts of the multicooker thoroughly before using it for
the first time (see chapter ‘Cleaning and Maintenance’).
Note
•
Make sure all parts are completely dry before you start using the
multicooker.
Cooking rice/grain
1
Measure the rice/grain using the measuring cup provided (fig. 4).
2
Wash the rice/grain thoroughly.
3
Put the pre-washed rice/grain in the inner pot.
4
Add water to the level indicated on the scale inside the inner pot
and smooth the rice/grain surface.
5
Press the lid release button to open the lid (fig. 5).
6
Wipe the outside of the inner pot dry (fig. 6), and then put the
inner pot in the multicooker (fig. 7).
Note
•
Make sure that the inner pot is in proper contact with the heating
element.
•
For details about the ratio of rice/grain and water, see the recipe.
•
The level marked inside the inner pot is just an indication. You can always
adjust the water level for different types of rice and your own preference.
•
Make sure that the outside of the inner pot is clean and dry, and that
there is no foreign residue on the heating element or the magnetic switch.
7
Close the lid of the multicooker (fig. 8), and put the plug in the
power socket (fig. 9).
8
Press the menu button (МЕНЮ) once or repeatedly until the
cooking function you need is selected (fig. 10).
9
Press the start button (СТАРТ/ВЫКЛ) to start cooking (fig. 11).
10
When the cooking is finished, you will hear 4 beeps. The
multicooker will be in keep-warm mode automatically.
»
The keep-warm indicator lights up (fig. 12).
Note
•
If the voltage is unstable at the area you live, it is possible that the
multicooker overflows.
•
After the cooking is finished, stir the rice/grain and loosen it immediately
to release excessive moisture for fluffy rice/grain.
•
Depending on the cooking conditions, the bottom portion of the rice/
grain may become slightly browned.
Cooking porridge
1
Put the food and ingredients for the porridge in the inner pot.
Note
•
Do not exceed the maximum water level indicated in the inner pot, as this
may cause the multicooker to overflow.
2
Follow steps 6 and 7 in “Preparations before cooking”.
3
Press the menu button (
МЕНЮ
) once or repeatedly until the
cooking function you need is selected (fig. 10).
»
To set a different cooking time, refer to chapter “Adjusting the
cooking time and temperature”.
4
Press the start button (
СТАРТ/ВЫКЛ
) to start cooking (fig.11).
5
When the cooking is finished, you will hear 4 beeps. The
multicooker will be in keep-warm mode automatically.
»
The keep-warm indicator lights up (fig.12).
Making plov
1
Put the food and ingredients for the plov into the inner pot.
2
Follow steps 6 and 7 in “Preparations before cooking”.
3
Press the menu button (
МЕНЮ
) once or repeatedly until the
cooking function you need is selected (fig. 10).
4
Press the start button (
СТАРТ/ВЫКЛ
) to start cooking (fig.11).
5
When the cooking is finished, you will hear 4 beeps. The
multicooker will be in keep-warm mode automatically.
»
The keep-warm indicator lights up (fig.12).
Making soup/drinks/jelly meat & Slow cooking
1
Put ingredients and water into the inner pot.
Note
•
Do not exceed the maximum water level indicated in the inner pot, as this
may cause the multicooker to overflow.
2
Follow steps 6 and 7 in “Preparations before cooking”.
3
Press the menu button (
МЕНЮ
) once or repeatedly until the
cooking function you need is selected (fig. 10).
»
To set a different cooking time, refer to chapter “Adjusting the
cooking time and temperature”.
4
Press the start button (
СТАРТ/ВЫКЛ
) to start cooking (fig.11).
5
When the cooking is finished, you will hear 4 beeps. The
multicooker will be in keep-warm mode automatically.
»
The keep-warm indicator lights up (fig.12).
Making yogurt
1
Whisk the ingredients for the yogurt well and put them in a glass
container (fig.13).
2
Put the glass container in the inner pot (fig.14). Make sure that
the container is properly sealed.
3
Pour some water in the inner pot. Make sure that half of the
container is immersed in water.
4
Follow steps 6 and 7 in “Preparations before cooking”.
5
Press the menu button (
МЕНЮ
) once or repeatedly until the
cooking function you need is selected (fig. 10).
»
To set a different cooking time, refer to chapter “Adjusting the
cooking time and temperature”.
6
Press the start button (
СТАРТ/ВЫКЛ
) to start cooking (fig.11).
7
When the cooking is finished, you will hear 4 beeps. The
multicooker will be in standby mode automatically.
Cooking egg/pasta
1
Put some water into the inner pot.
Note
•
Do not exceed the maximum water level indicated in the inner pot, as this
may cause the multicooker to overflow.
2
Follow steps 6 and 7 in “Preparations before cooking”.
3
Press the menu button (
МЕНЮ
) once or repeatedly until the
cooking function you need is selected (fig. 10).
»
To set a different cooking time, refer to chapter “Adjusting the
cooking time and temperature”.
4
Press the start button (
СТАРТ/ВЫКЛ
) to start cooking (fig.11).
5
When the water is brought to boil, the multicooker beeps.
6
Put the eggs/pasta into the inner pot.
Note
•
When cooking pasta, keep the lid open after the pasta is put in the inner
pot. Constantly stir the pasta so that it doesn’t stick together.
7
When the cooking is finished, you will hear 2 beeps. The
multicooker will be in standby mode automatically.
Making omelette
1
Put the ingredients for the omelette in the inner pot.
2
Follow steps 6 and 7 in “Preparations before cooking”.
3
Press the menu button (
МЕНЮ
) once or repeatedly until the
cooking function you need is selected (fig. 10).
»
To set a different cooking time, refer to chapter “Adjusting the
cooking time and temperature”.
4
Press the start button (
СТАРТ/ВЫКЛ
) to start cooking (fig.11).
5
When the cooking is finished, you will hear 4 beeps. The
multicooker will be in keep-warm mode automatically.
»
The keep-warm indicator lights up. (fig.12)
Making pizza
1
Put the ingredients for the pizza in the inner pot.
2
Follow steps 6 and 7 in “Preparations before cooking”.
3
Press the menu button (
МЕНЮ
) once or repeatedly until the
cooking function you need is selected (fig. 10).
»
To set a different cooking time, refer to chapter “Adjusting the
cooking time and temperature”.
4
Press the start button (
СТАРТ/ВЫКЛ
) to start cooking (fig.11).
5
When the cooking is finished, you will hear 4 beeps. The
multicooker will be in keep-warm mode automatically.
»
The keep-warm indicator lights up (fig.12)
Note
•
If you cook with frozen pizza, you can adjust the cooking time according to
your own preference. The pizza gets browner as the cooking time increases.
Baking
1
Put the food and ingredients to bake in the inner pot.
2
Follow step 6 in “Preparations before cooking”.
3
Put the plug in the power socket (fig. 9).
Note
•
When baking cake, keep the lid closed during cooking. Baking cake at
130°C and by 45 minutes usually delivers best cooking result.
•
If you are baking other food, keep the lid open during cooking when you
set a temperature above 130°C.
4
Press the menu button (
МЕНЮ
) once or repeatedly until the
cooking function you need is selected (fig. 10).
»
To set a different cooking time or temperature, refer to
chapter “Adjusting the cooking time and temperature”.
5
Press the start button (
СТАРТ/ВЫКЛ
) to start cooking (fig. 11).
6
When the cooking is finished, you will hear 4 beeps. The
multicooker will be in keep-warm mode automatically.
»
The keep-warm indicator lights up. (fig. 12)
Note
•
When removing the inner pot from the multicooker after cooking, use a
kitchen glove or a cloth, as the inner pot will be very hot.
Reheating
1
Loosen the cooled food and evenly distribute it in the inner pot.
2
Pour some water onto the food to prevent it from becoming too
dry. The quantity of the water depends on the amount of food.
3
Follow steps 6 and 7 in “Preparations before cooking”.
4
Press the menu button (
МЕНЮ
) once or repeatedly until the
cooking function you need is selected (fig. 10).
»
To set a different cooking time, refer to chapter “Adjusting the
cooking time and temperature”.
5
Press the start button (
СТАРТ/ВЫКЛ
) to start cooking (fig. 11).
6
When the cooking is finished, you will hear 4 beeps. The
multicooker will be in keep-warm mode automatically.
»
The keep-warm indicator lights up (fig. 12).
Stewing/cooking ragout
1
Put the food and ingredients in the inner pot.
2
Follow steps 6 and 7 in “Preparations before cooking”.
3
Press the menu button (
МЕНЮ
) once or repeatedly until the
cooking function you need is selected. (fig. 10)
»
To set a different cooking time, refer to chapter “Adjusting the
cooking time and temperature”.
4
Press the start button (
СТАРТ/ВЫКЛ
) to start cooking (fig. 11).
5
When the cooking is finished, you will hear 4 beeps. The
multicooker will be in keep-warm mode automatically.
»
The keep-warm indicator lights up (fig. 12).
Frying
1
Put food and ingredients into the inner pot.
2
Follow step 6 in “Preparations before cooking”.
3
Put the plug in the power socket (fig. 9).
4
Press the menu button (
МЕНЮ
) once or repeatedly until the
cooking function you need is selected (fig. 10).
»
To set a different cooking time, refer to chapter “Adjusting the
cooking time and temperature”.
5
Press the start button (
СТАРТ/ВЫКЛ
) to start cooking (fig. 11).
6
When the cooking is finished, you will hear 4 beeps. The
multicooker will be in keep-warm mode automatically.
»
The keep-warm indicator lights up (fig. 12).
Note
•
Do not close the top lid when cooking in the fry mode.
Boiling/steaming
1
Pour some water into the inner pot.
2
To boil food, put the food into the inner pot.
3
To steam food, put the steam tray into the inner pot.
4
Put the food to be steamed on a plate first or directly in the
steam tray.
5
Follow steps 6 and 7 in “Preparations before cooking”.
6
Press the menu button (
МЕНЮ
) once or repeatedly until the
cooking function you need is selected (fig. 10).
»
To set a different cooking time, refer to chapter “Adjusting the
cooking time and temperature”.
7
Press the start button (
СТАРТ/ВЫКЛ
) to start cooking (fig. 11).
8
When the cooking is finished, you will hear 4 beeps. The
multicooker will be in keep-warm mode automatically.
»
The keep-warm indicator lights up (fig. 12).
Note
•
The quantity of water needed depends on the amount of food in the
steam tray. Do not immerse the steam tray in water.
•
After cooking, use a kitchen glove or a cloth, as the plate and steam tray
will be very hot.
Roasting
1
Put food and ingredients into the inner pot.
2
Follow step 6 in “Preparations before cooking”.
3
Put the plug in the power socket (fig. 9).
4
Press the menu button (
МЕНЮ
) once or repeatedly until the
cooking function you need is selected (fig. 10).
»
To set a different cooking time or temperature, refer to
chapter “Adjusting the cooking time and temperature”.
5
Press the start button (
СТАРТ/ВЫКЛ
) to start cooking (fig.11).
6
There are 2 stages of roasting. When the first stage (about 35
minutes) is over, you will hear 5 beeps as a reminder to turn the
food.
7
Press the menu button (
МЕНЮ
) to start the second stage. If it
beeps for 5 minutes without operation, the multicooker will enter
into keep warm mode until end of the cooking time.
8
When the cooking is finished, you will hear 4 beeps. The
multicooker will be in keep-warm mode automatically.
»
The keep-warm indicator lights up (fig. 12).
Manual
You may use the manual mode to cook food with more control over
the cooking time and temperature.
1
Put food and ingredients into the inner pot.
2
Press the menu button (
МЕНЮ
) once or repeatedly until the
cooking function you need is selected (fig. 10).
»
To set a different cooking time or temperature, refer to
chapter “Adjusting the cooking time and temperature”.
3
Press the start button (
СТАРТ/ВЫКЛ
) to start cooking (fig. 11).
4
When the cooking is finished, you will hear 4 beeps. The
multicooker will be in keep-warm mode automatically.
»
The keep-warm indicator lights up (fig. 12).
Note
•
If you cook food at a temperature below 70°C, turn off the keep-warm
mode before start cooking.
•
If you cook food at a temperature above 130°C, the top lid must be
opened during cooking.
Keep-warm mode
The multicooker provides you with easy control over the keep-warm
mode.
•
After you have selected the cooking function using the menu
button (
МЕНЮ
), if you press the start button (
СТАРТ/ВЫКЛ
)
directly, the keep-warm indicator will light up. After the cooking is
finished, the multicooker will switch to keep-warm mode directly.
•
After you have selected the cooking function using the
menu button (
МЕНЮ
), if you press the keep-warm button
(
ПОДОГРЕВ
) first, and then the start button (
СТАРТ/ВЫКЛ
),
the keep-warm indicator will be off. After the cooking is finished,
the multicooker will be in standby mode.
Note
•
In standby mode, you can press the keep-warm button (
ПОДОГРЕВ
) to
enter keep-warm mode.
•
In keep-warm mode, you can press the keep-warm button (
ПОДОГРЕВ
)
to enter standby mode.
Adjusting the cooking time and temperature
You can adjust the cooking time for all functions except rice, roast,
and plov; you can also adjust the cooking temperature for bake and
manual. Refer to chapter “Functions overview” table for the time and
temperature regulation of each function.
1
Select the cooking function you need, and the default cooking
time will display on the screen.
2
To set a different cooking time, press the cooking time button
(
ВРЕМЯ ПРИГОТОВЛЕНИЯ
) (fig. 15), and the default cooking
time starts flashing on the display.
3
Press the increase (
+
) or the decrease (
-
) button to set the hour
unit (fig. 16).
4
After the hour unit is set, wait for a few seconds before the
hour unit is confirmed, and the minute unit starts flashing on the
display.
5
Press the increase (
+
) or the decrease (
-
) button to set the
minute unit (fig. 17).
6
For bake and manual, to set a different cooking temperature,
press the temperature button (
ТЕMП.
) (fig. 18), and the default
temperature starts flashing on the display.
7
Press the increase (
+
) or the decrease (
-
) button to set the
desired cooking temperature (fig. 19).
8
Press the start button (
СТАРТ/ВЫКЛ
) to confirm the cooking
time or temperature and start cooking (fig. 11).
Preset time for delayed cooking
You can preset the delayed cooking time for all cooking functions
except reheat, bake, egg/pasta and fry.
1
Select the cooking function you need.
2
Press the preset time button (
ОТСРОЧКА
), and the default
preset time starts flashing on the display (fig. 20).
3
Preset the increase button (
+
) and the decrease button (
-
) to set
the desired preset time (fig. 21).
4
Press the start button (
СТАРТ/ВЫКЛ
) to confirm the preset
timer (fig. 11).
5
The cooking will be finished when the preset time has elapsed.
6
The multicooker will be in keep-warm or standby modes
depending on the function you select.
Note
•
The preset button is not responsive in standby mode.
Setting up child lock
To protect your child from using the multicooker, you may set up the
child lock function.
•
Press and hold the preset button (
ОТСРОЧКА
) for 3 seconds
to enter the child lock mode (fig. 22).
»
The child lock icon lights up on the display.
•
To unlock, press and hold the preset button (
ОТСРОЧКА
) for 3
seconds again (fig. 23).
»
The child lock lights off.
5
Cleaning and Maintenance
Note
•
Unplug the multicooker before starting to clean it.
•
Wait until the multicooker has cooled down sufficiently before cleaning it.
Interior
Inside of the top lid and the main body:
•
Wipe with wrung out and damp cloth.
•
Make sure to remove all the food residues stuck to the
multicooker.
Heating element:
•
Wipe with wrung out and damp cloth.
•
Remove food residues with wrung out and damp cloth.
Exterior
Surface of the top lid and outside of the main body:
•
Wipe with a cloth damped with soap water.
•
Only use soft and dry cloth to wipe the control panel.
•
Make sure to remove all the food residues around the
control panel.
Accessories
Inner pot, steam rack, and detachable steam vent cap:
•
Soak in hot water and clean with sponge.
6 Environment
Do not throw away the appliance with normal household
waste at the end of its life, but hand it in at an official
collection point for recycling. By doing this, you can help to
preserve the environment.
7
Guarantee and service
If you need service or information, or if you have a problem, visit the
Philips website at www.philips.com or contact the Philips Customer
Care Center in your country. You can find its phone number in the
worldwide guarantee leaflet. If there is no Customer Care Center in
your country, go to your local Philips dealer.
8 Specifications
Model Number
HD3197
Rated power output
860W
Rated capacity
5.0L
9 Troubleshooting
If you encounter problems when using this multicooker, check the
following points before requesting service. If you cannot solve the
problem, contact the Philips Consumer Care Center in your country.
Problem
Solution
The light on the
button does not
go on.
There is a connection problem. Check if the
power cord is connected to the multicooker
properly and if the plug is inserted firmly into
the power outlet.
The light is defective. Take the appliance
to your Philips dealer or a service center
authorized by Philips.
The display does
not function.
The multicooker is not connected to the
power supply. If there is no power supply, the
power failure backup function does not work
and the display does not function.
The battery for the display runs out of power.
Take the appliance to your Philips dealer or a
service center authorized by Philips to have
the battery replaced.
The rice is not
cooked.
There is not enough water. Add water
according to the scale on the inside of the
inner pot.
You did not press the start button
(
СТАРТ / ВЫКЛ
).
Make sure that there is no foreign residue on
the heating element and the outside of the
inner pot before switching the multicooker on.
The heating element is damaged, or the inner
pot is deformed. Take the multicooker to your
Philips dealer or a service center authorized
by Philips.
The rice is too
dry and not well
cooked.
Add more water to the rice, and cook for a
bit longer.
The multicooker
does not switch
to the keep-warm
mode automatically.
You might have pressed the keep-warm
button (
ПОДОГРЕВ
) before pressing the
start button (
СТАРТ/ВЫКЛ
). In this case the
multicooker will be in standby mode after the
cooking is finished.
The temperature control is defective. Take the
appliance to your Philips dealer or a service
center authorized by Philips.
The rice is
scorched.
You have not rinse the rice properly. Rinse the
rice until the water runs clear.
Water spills out of
the multicooker
during cooking.
Make sure that you add water to the level
indicated on the scale inside the inner pot
that corresponds to the number of cups of
rice used.
I cannot get to the
desired cooking
function.
Press the menu button (
МЕНЮ
) repeatedly
to select the desired function as shown by the
indicator.
Rice smells bad
after cooking
Clean the inner pot with some washing
detergent and warm water.
After cooking, make sure the steam vent cap,
inner lid and inner pot is cleaned thoroughly.
Error message
(E1, E2, E3, or E4)
appears on the
display.
There has been a power failure during cooking.
Take the appliance to your Philips dealer or a
service center authorized by Philips.
Қазақша
1
Көп функциялы тағам
пісіргішіңіз
Сатып алғаныңыз құтты болсын және Philips компаниясына қош
келдіңіз!
Philips ұсынатын қолдауды толық пайдалану үшін, өнімді www.
philips.com/welcome торабында тіркеңіз.
2
Қорап ішіндегі заттар (1-сурет).
Көп функциялы тағам
пісіргіштің негізгі бөлігі
Өлшеуіш шыны аяқ
Тоқ сымы
Бу сөресі
Пайдаланушы нұсқаулығы
Рецепттер
Қауіпсіздік жапсырмасы
Кепілдік картасы
3
Шолу (2- -сурет)
a
Жоғарғы қақпақ
g
Қуат розеткасы
b
Ішкі ыдысы
h
Тағам пісіргіштің тұтқасы
c
Қақпақты шешу түймесі
i
Су деңгейінің көрсеткіштері
d
Басқару панелі
j
Алынатын бу шығатын
тесікше қақпағы
e
Қыздыру элементі
k
Мөрлейтін сақина
f
Негізгі тұлғасы
Басқару элементтеріне шолу (3-сурет )
l
Жылы сақтау түймесі
q
Азайту түймесі
m
Пісіру уақыты түймесі
r
Температура түймесі
n
Меню түймесі
s
Көбейту түймесі
o
А л д ы н а л а о р н а т у /
балалардан қорғау құлпы
түймесі
t
Бастау/бас тарту түймесі
p
Дисплей экраны
Функцияларға шолу
Функциялар
Әдепкі
пісіру
уақыты
Пісіру
уақытын
реттеу
ауқымы
Алдын
ала
орнату
уақыты
Әдепкі пісіру
температурасы
Күріш/жарма
(рис/крупы)
30-40
мин.
/
1-24 сағ.
130-140
°C
Ботқа
(каша)
10 мин.
5 мин. - 2
сағ.
1-24 сағ.
90-100°C
Палау
(плов)
40 мин.
/
1-24 сағ.
130-140
°C
Сорпа
(суп)
1 сағ.
20 мин.-4
сағ.
1-24 сағ.
90-100°C
Йогурт/айран
(йогурт/
кефир)
8 сағ.
6-12 сағ. 1-24 сағ.
40±3°C
Жұмыртқа/
макарон
(яйца/паста )
4 мин
1-15 мин.
/
100
°C
Омлет
10 мин. 5-20 мин.
/
120
°C
Сусындар
(напитки)
10 мин. 5-40 мин. 1-24 сағ.
100°C
Пицца
(пиццa)
35 мин.
10-60
мин.
/
130
°C
Дірілдек
(холодец)
6 сағ.
4-10 сағ. 1-24 сағ.
90-100°C
Пісіру
(печь)
45 мин.
20 мин. -
2 сағ.
/
130°C
Жылыту
(разогреть)
25 мин. 5-60 мин.
/
85°C
Бұқтыру/
көкөніс
тағамы
(тушить/рагу)
1 сағ.
20 мин. -
10 сағ.
1-24 сағ.
90°C
Қуыру
(жарить)
15 мин
5-60 мин.
/
145-160°C
Қайнату/булау
(варить/на
пару)
20 мин.
5 мин. - 2
сағ.
1-24 сағ.
100°C
Жай пісіру
(томить)
5 сағ.
1-15 сағ. 1-24 сағ.
80°C
Қ ы з д ы р ы п
пісіру
(Запекать)
1 сағ.
/
/
130
°C
Қолмен
(мультиовар)
2 сағ.
5 мин. -
10 сағ.
1-24 сағ.
100
°C
Есте сақтаңыз
•
Пісіру және қолмен орындау функциялары үшін пісіру температурасын
реттеуге болады. Пісіру үшін 40°C - 160°C арасындағы температура
қолжетімді; қолмен орындау функциясы үшін 30°C - 160°C арасындағы
температура қолжетімді.
•
Пісіру басталғаннан кейін, ағымдағы пісіру процесін тоқтату үшін
Бастау/бас тарту түймесін (
СТАРТ/ВЫКЛ
) басуыңызға болады, сонда
көп функциялы тағам пісіргіш күту режиміне өтеді.
4
Көп функциялы тағам пісіргішті
пайдалану
Алғашқы рет қолданар алдында
1
Ішкі ыдыстан барлық қосалқы құралдарды алыңыз, одан кейін
ішкі ыдыстың орам материалын алыңыз.
2
Көп функциялы тағам пісіргішті бірінші рет пайдаланбастан
бұрын оның бөліктерін мұқият тазалаңыз («Тазалау және
техникалық қызмет көрсету» тарауын қараңыз).
Есте сақтаңыз
•
Көп функциялы тағам пісіргішті пайдаланбастан бұрын барлық
бөліктерінің толық кепкенін тексеріңіз.
Күріш/жарма пісіру
1
Күрішті/жарманы өлшегіш шыныаяқпен өлшеңіз
(4- -сур.).
2
Күрішті/жарманы мұқият жуыңыз.
3
Алдын ала жуылған күрішті/жарманы ішкі ыдысқа салыңыз.
4
Суды ішкі ыдыстың ішіндегі шкалада көрсетілген деңгейге
дейін құйыңыз және күріштің/жарманың бетін тегістеңіз.
5
Қақпақты ашу үшін қақпақты босату түймесін басыңыз (
5-сурет).
6
Ішкі ыдыстың сыртын кептіріп сүртіңіз (6- сурет), содан кейін
ішкі ыдысты көп функциялы тағам пісіргішке салыңыз (7-сурет
).
Есте сақтаңыз
•
Ішкі ыдыстың қыздыру элементіне дұрыс тиіп тұрғанын тексеріңіз.
•
Күріш/жарма мен су пропорциясы туралы мәліметтерді рецептіден
қараңыз.
•
Ішкі ыдыстың ішінде белгіленген деңгей тек көрсеткіш болып
табылады. Күріштің әртүрлі түрлері үшін су деңгейін өз қалауыңызға
қарай әрқашан реттеуіңізге болады.
•
Ішкі ыдыстың сырты таза және құрғақ екенін және ысыту элементінде
немесе магниттік қосқышта бөтен қалдықтың жоқ екенін тексеріңіз.
7
Көп функциялы тағам пісіргіштің қақпағын жауып
(8- сурет), ашаны қуат розеткасына қосыңыз (9-сурет).
8
Қажет пісіру функциясы таңдалғанша мәзір түймесін (МЕНЮ)
бір рет немесе қайта-қайта басыңыз (10- сурет).
9
Бастау түймесін (СТАРТ/ВЫКЛ) пісіруді бастау үшін басыңыз
(11- сурет).
10
Пісіру аяқталғанда 4 сигнал естисіз. Көп функциялы тағам
пісіргіш жылы сақтау режиміне автоматты түрде өтеді.
»
Жылы сақтау көрсеткіші жанады (12- сурет).
Есте сақтаңыз
•
Тұратын аймағыңызда кернеу тұрақты болмаса, көп функциялы тағам
пісіргіш тасуы мүмкін.
•
Пісіру аяқталғаннан кейін күрішті/жарманы араластырыңыз және
жұмсақ болуы үшін артық ылғалды кетіру үшін оны бірден қопсытыңыз.
•
Пісіру жағдайларына байланысты күріштің/жарманың төменгі бөлігі
аздап қоңырлануы мүмкін.
Ботқа пісіру
1
Тамақты және ботқа ингредиенттерін ішкі ыдысқа салыңыз.
Есте сақтаңыз
•
Ішкі ыдыста көрсетілген ең жоғарғы су деңгейінен асырмаңыз, себебі
бұл көп функциялы тағам пісіргіштің тасуына себеп болуы мүмкін.
2
«Пісіруден бұрынғы сақтық шаралары» бөліміндегі 6 және
7-қадамдарды орындаңыз.
3
Қажет пісіру функциясы таңдалғанша мәзір түймесін (
МЕНЮ
)
бір рет немесе қайта-қайта басыңыз (10- сурет).
»
Басқа пісіру уақытын орнату үшін «Пісіру уақыты мен
температурасын реттеу» тарауын қараңыз.
4
Бастау түймесін (
СТАРТ/ВЫКЛ
) пісіруді бастау үшін басыңыз
(11-сурет).
5
Пісіру аяқталғанда 4 сигнал естисіз. Көп функциялы тағам
пісіргіш жылы сақтау режиміне автоматты түрде өтеді.
»
Жылы сақтау көрсеткіші жанады (12-сурет).
Палау пісіру
1
Тамақты және ингредиенттерді ішкі ыдысқа салыңыз.
2
«Пісіруден бұрынғы сақтық шаралары» бөліміндегі 6 және
7-қадамдарды орындаңыз.
3
Қажет пісіру функциясы таңдалғанша мәзір түймесін (
МЕНЮ
)
бір рет немесе қайта-қайта басыңыз (10- сурет).
4
Бастау түймесін (
СТАРТ/ВЫКЛ
) пісіруді бастау үшін басыңыз
(11-сурет).
5
Пісіру аяқталғанда 4 сигнал естисіз. Көп функциялы тағам
пісіргіш жылы сақтау режиміне автоматты түрде өтеді.
»
Жылы сақтау көрсеткіші жанады (12-сурет).
Сорпа/сусындар/дірілдек пісіру және жай
пісіру
1
Ингредиенттер мен суды ішкі ыдысқа құйыңыз.
Есте сақтаңыз
•
Ішкі ыдыста көрсетілген ең жоғарғы су деңгейінен асырмаңыз, себебі
бұл көп функциялы тағам пісіргіштің тасуына себеп болуы мүмкін.
2
«Пісіруден бұрынғы сақтық шаралары» бөліміндегі 6 және
7-қадамдарды орындаңыз.
3
Қажет пісіру функциясы таңдалғанша мәзір түймесін (
МЕНЮ
)
бір рет немесе қайта-қайта басыңыз (10- сурет).
»
Басқа пісіру уақытын орнату үшін «Пісіру уақыты мен
температурасын реттеу» тарауын қараңыз.
4
Бастау түймесін (
СТАРТ/ВЫКЛ
) пісіруді бастау үшін басыңыз
(11-сурет).
5
Пісіру аяқталғанда 4 сигнал естисіз. Көп функциялы тағам
пісіргіш жылы сақтау режиміне автоматты түрде өтеді.
»
Жылы сақтау көрсеткіші жанады (12-сурет).
Йогурт жасау
1
Йогурттың ингредиенттерін жақсылап шайқаңыз және оларды
шыны контейнерге құйыңыз (13-сурет).
2
Шыны контейнерді ішкі ыдысқа салыңыз (14-сурет).
Контейнердің нығыздалғанын тексеріңіз.
3
Ішкі ыдысқа біраз су құйыңыз. Контейнердің жартысы суға
батып тұрғанын тексеріңіз.
4
«Пісіруден бұрынғы сақтық шаралары» бөліміндегі 6 және
7-қадамдарды орындаңыз.
5
Қажет пісіру функциясы таңдалғанша мәзір түймесін (
МЕНЮ
)
бір рет немесе қайта-қайта басыңыз (10- сурет).
»
Басқа пісіру уақытын орнату үшін «Пісіру уақыты мен
температурасын реттеу» тарауын қараңыз.
6
Бастау түймесін (
СТАРТ/ВЫКЛ
) пісіруді бастау үшін басыңыз
(11-сурет).
7
Пісіру аяқталғанда 4 сигнал естисіз. Көп функциялы тағам
пісіргіш күту режиміне автоматты түрде өтеді.
Жұмыртқа/макарон пісіру
1
Ішкі ыдысқа біраз су құйыңыз.
Есте сақтаңыз
•
Ішкі ыдыста көрсетілген ең жоғарғы су деңгейінен асырмаңыз, себебі
бұл көп функциялы тағам пісіргіштің тасуына себеп болуы мүмкін.
2
«Пісіруден бұрынғы сақтық шаралары» бөліміндегі 6 және
7-қадамдарды орындаңыз.
3
Қажет пісіру функциясы таңдалғанша мәзір түймесін (
МЕНЮ
)
бір рет немесе қайта-қайта басыңыз (10- сурет).
»
Басқа пісіру уақытын орнату үшін «Пісіру уақыты мен
температурасын реттеу» тарауын қараңыз.
4
Бастау түймесін (
СТАРТ/ВЫКЛ
) пісіруді бастау үшін басыңыз
(11-сурет).
5
Су қайнағанда, көп функциялы тағам пісіргіш сигнал шығарады.
6
Ішкі ыдысқа жұмыртқа/макарон салыңыз.
Есте сақтаңыз
•
Макарон пісіру кезінде ішкі ыдысқа макарон салынғаннан кейін
қақпақты ашық ұстаңыз. Бір-біріне жабыспауы үшін макаронды үздіксіз
араластырып отырыңыз.
7
Пісіру аяқталғанда 2 сигнал естисіз. Көп функциялы тағам
пісіргіш күту режиміне автоматты түрде өтеді.
Омлет пісіру
1
Омлет ингредиенттерін ішкі ыдысқа салыңыз.
2
«Пісіруден бұрынғы сақтық шаралары» бөліміндегі 6 және
7-қадамдарды орындаңыз.
3
Қажет пісіру функциясы таңдалғанша мәзір түймесін (
МЕНЮ
)
бір рет немесе қайта-қайта басыңыз (10- сурет).
»
Басқа пісіру уақытын орнату үшін «Пісіру уақыты мен
температурасын реттеу» тарауын қараңыз.
4
Бастау түймесін (
СТАРТ/ВЫКЛ
) пісіруді бастау үшін басыңыз
(11-сурет).
5
Пісіру аяқталғанда 4 сигнал естисіз. Көп функциялы тағам
пісіргіш жылы сақтау режиміне автоматты түрде өтеді.
»
Жылы сақтау көрсеткіші жанады. (12-сурет)
Пицца пісіру
1
Пицца ингредиенттерін ішкі ыдысқа салыңыз.
2
«Пісіруден бұрынғы сақтық шаралары» бөліміндегі 6 және
7-қадамдарды орындаңыз.
3
Қажет пісіру функциясы таңдалғанша мәзір түймесін (
МЕНЮ
)
бір рет немесе қайта-қайта басыңыз (10- сурет).
»
Басқа пісіру уақытын орнату үшін «Пісіру уақыты мен
температурасын реттеу» тарауын қараңыз.
4
Бастау түймесін (
СТАРТ/ВЫКЛ
) пісіруді бастау үшін басыңыз
(11-сурет).
5
Пісіру аяқталғанда 4 сигнал естисіз. Көп функциялы тағам
пісіргіш жылы сақтау режиміне автоматты түрде өтеді.
»
Жылы сақтау көрсеткіші жанады (12-сурет)
Есте сақтаңыз
•
Қатырылған пиццаны пісірсеңіз, пісіру уақытын қалау бойынша реттей
аласыз. Пісіру уақыты артқанда, пицца қоңырлау болады.
Пісіру
1
Тағам мен ингредиенттерді пісіру үшін ішкі ыдысқа салыңыз.
2
«Пісіруден бұрынғы сақтық шаралары» бөліміндегі 6-қадамды
орындаңыз.
3
Ашаны қуат розеткасына қосыңыз (9-сурет).
Есте сақтаңыз
•
Торт пісірген кезде, пісіру кезінде қақпақты жауып қойыңыз. Тортты
130°C-та және 45 минут пісіру әдетте жақсы пісіру нәтижесін береді.
•
Басқа тамақты пісіріп жатсаңыз, температураны 130°C-тан жоғары
етіп орнатқанда пісіру кезінде қақпақты ашық ұстаңыз.
4
Қажет пісіру функциясы таңдалғанша мәзір түймесін (
МЕНЮ
)
бір рет немесе қайта-қайта басыңыз (10- сурет).
»
Басқа пісіру уақытын немесе температурасын орнату үшін
«Пісіру уақыты мен температурасын реттеу» тарауын
қараңыз.
5
Бастау түймесін (
СТАРТ/ВЫКЛ
) пісіруді бастау үшін басыңыз
(11- сурет).
6
Пісіру аяқталғанда 4 сигнал естисіз. Көп функциялы тағам
пісіргіш жылы сақтау режиміне автоматты түрде өтеді.
»
Жылы сақтау көрсеткіші жанады. (12- сурет)
Есте сақтаңыз
•
Пісіруден кейін көп функциялы тағам пісіргіштен ішкі ыдысты алғанда,
ас үй қолғабын немесе майлығын пайдаланыңыз, себебі ішкі ыдыс өте
ыстық болады.
Қайта қыздыру
1
Суыған тағамды қопсытып, оны ішкі ыдысқа тегістеп жайыңыз.
2
Қатты құрғақ болмауы үшін тағамға біраз су құйыңыз. Судың
мөлшері тағамның көлеміне байланысты болады.
3
«Пісіруден бұрынғы сақтық шаралары» бөліміндегі 6 және
7-қадамдарды орындаңыз.
4
Қажет пісіру функциясы таңдалғанша мәзір түймесін (
МЕНЮ
)
бір рет немесе қайта-қайта басыңыз (10- сурет).
»
Басқа пісіру уақытын орнату үшін «Пісіру уақыты мен
температурасын реттеу» тарауын қараңыз.
5
Бастау түймесін (
СТАРТ/ВЫКЛ
) пісіруді бастау үшін басыңыз
(11- сурет).
6
Пісіру аяқталғанда 4 сигнал естисіз. Көп функциялы тағам
пісіргіш жылы сақтау режиміне автоматты түрде өтеді.
»
Жылы сақтау көрсеткіші жанады (12- сурет).
Бұқтыру/көкөніс тағамын пісіру
1
Тағам мен ингредиенттерді ішкі ыдысқа салыңыз.
2
«Пісіруден бұрынғы сақтық шаралары» бөліміндегі 6 және
7-қадамдарды орындаңыз.
3
Қажет пісіру функциясы таңдалғанша мәзір түймесін (
МЕНЮ
)
бір рет немесе қайта-қайта басыңыз. (10- сурет)
»
Басқа пісіру уақытын орнату үшін «Пісіру уақыты мен
температурасын реттеу» тарауын қараңыз.
4
Бастау түймесін (
СТАРТ/ВЫКЛ
) пісіруді бастау үшін басыңыз
(11- сурет).
5
Пісіру аяқталғанда 4 сигнал естисіз. Көп функциялы тағам
пісіргіш жылы сақтау режиміне автоматты түрде өтеді.
»
Жылы сақтау көрсеткіші жанады (12- сурет).
Қуыру
1
Тағам мен ингредиенттерді ішкі ыдысқа салыңыз.
2
«Пісіруден бұрынғы сақтық шаралары» бөліміндегі 6-қадамды
орындаңыз.
3
Ашаны қуат розеткасына қосыңыз (9-сурет).
4
Қажет пісіру функциясы таңдалғанша мәзір түймесін (
МЕНЮ
)
бір рет немесе қайта-қайта басыңыз (10- сурет).
»
Басқа пісіру уақытын орнату үшін «Пісіру уақыты мен
температурасын реттеу» тарауын қараңыз.
5
Бастау түймесін (
СТАРТ/ВЫКЛ
) пісіруді бастау үшін басыңыз
(11- сурет).
6
Пісіру аяқталғанда 4 сигнал естисіз. Көп функциялы тағам
пісіргіш жылы сақтау режиміне автоматты түрде өтеді.
»
Жылы сақтау көрсеткіші жанады (12- сурет).
1
22
23
o
l
m
n
c
b
a
e
d
j
k
i
h
g
f
s
t
r
q
p
http://www.philips.com/welcome
User manual
http://www.philips.com/welcome
Recipe
http://www.philips.com/welcome
Safety leaflet
http://www.philips.com/welcome
Warranty
3S
3S
Есте сақтаңыз
•
Қуыру режимінде пісіру кезінде үстіңгі қақпақты жаппаңыз.
Қайнату/булау
1
Ішкі ыдысқа біраз су құйыңыз.
2
Тамақты қайнату үшін ішкі ыдысқа салыңыз.
3
Тамақты булау үшін бу науасын ішкі ыдысқа салыңыз.
4
Алдымен бумен пісірілетін тамақты тәрелкеге немесе бу
науасына салыңыз.
5
«Пісіруден бұрынғы сақтық шаралары» бөліміндегі 6 және
7-қадамдарды орындаңыз.
6
Қажет пісіру функциясы таңдалғанша мәзір түймесін (
МЕНЮ
)
бір рет немесе қайта-қайта басыңыз (10- сурет).
»
Басқа пісіру уақытын орнату үшін «Пісіру уақыты мен
температурасын реттеу» тарауын қараңыз.
7
Бастау түймесін (
СТАРТ/ВЫКЛ
) пісіруді бастау үшін басыңыз
(11- сурет).
8
Пісіру аяқталғанда 4 сигнал естисіз. Көп функциялы тағам
пісіргіш жылы сақтау режиміне автоматты түрде өтеді.
»
Жылы сақтау көрсеткіші жанады (12- сурет).
Есте сақтаңыз
•
Қажет су мөлшері бу науасындағы тамақ көлеміне байланысты болады.
Бу науасын суға батырмаңыз.
•
Пісіруден кейін ас үй қолғабын немесе майлығын пайдаланыңыз, себебі
тәрелке мен бу науасы өте ыстық болады.
Қыздырып пісіру
1
Тағам мен ингредиенттерді ішкі ыдысқа салыңыз.
2
«Пісіруден бұрынғы сақтық шаралары» бөліміндегі 6-қадамды
орындаңыз.
3
Ашаны қуат розеткасына қосыңыз (9-сурет).
4
Қажет пісіру функциясы таңдалғанша мәзір түймесін (
МЕНЮ
)
бір рет немесе қайта-қайта басыңыз (10- сурет).
»
Басқа пісіру уақытын немесе температурасын орнату үшін
«Пісіру уақыты мен температурасын реттеу» тарауын
қараңыз.
5
Бастау түймесін (
СТАРТ/ВЫКЛ
) пісіруді бастау үшін басыңыз
(11-сурет).
6
Қыздырып пісірудің 2 кезеңі бар. Бірінші кезең (шамамен
35 минут) біткенде сіз тамақты аудару еске салғышы болып
табылатын 5 сигнал естисіз.
7
Екінші кезеңді бастау үшін мәзір түймесін (
МЕНЮ
) басыңыз.
Егер ол әрекетсіз 5 минут бойы сигнал шығарса, көп
функциялы тағам пісіргіш пісіру уақытының соңына дейін жылы
сақтау режиміне өтеді.
8
Пісіру аяқталғанда 4 сигнал естисіз. Көп функциялы тағам
пісіргіш жылы сақтау режиміне автоматты түрде өтеді.
»
Жылы сақтау көрсеткіші жанады (12- сурет).
Қолмен
Пісіру уақыты мен температурасын көбірек бақылап тағам пісіру
үшін қолмен орындау режимін пайдалана аласыз.
1
Тағам мен ингредиенттерді ішкі ыдысқа салыңыз.
2
Қажет пісіру функциясы таңдалғанша мәзір түймесін (
МЕНЮ
)
бір рет немесе қайта-қайта басыңыз (10- сурет).
»
Басқа пісіру уақытын немесе температурасын орнату үшін
«Пісіру уақыты мен температурасын реттеу» тарауын
қараңыз.
3
Бастау түймесін (
СТАРТ/ВЫКЛ
) пісіруді бастау үшін басыңыз
(11- сурет).
4
Пісіру аяқталғанда 4 сигнал естисіз. Көп функциялы тағам
пісіргіш жылы сақтау режиміне автоматты түрде өтеді.
»
Жылы сақтау көрсеткіші жанады (12- сурет).
Есте сақтаңыз
•
Тағамды 70°C-тан төмен температурада пісірсеңіз, пісіруді
бастамастан бұрын жылы сақтау режимін өшіріңіз.
•
Тамақты 130°C-тан жоғары температурада пісірсеңіз, пісіру кезінде
жоғарғы қақпақты ашу керек.
Жылы сақтау режимі
Көп функциялы тағам пісіргіш жылы сақтау режимін оңай
басқаруға мүмкіндік береді.
•
Мәзір түймесін (
МЕНЮ
) пайдаланып пісіру функциясын
таңдағаннан кейін бастау түймесін (
СТАРТ/ВЫКЛ
) тікелей
бассаңыз, жылы сақтау көрсеткіші жанады. Пісіру уақыты
аяқталғаннан кейін, көп функциялы тағам пісіргіш жылы сақтау
режиміне тікелей ауысады.
•
Мәзір түймесін (
МЕНЮ
) пайдаланып пісіру функциясын
таңдағаннан кейін, бірінші жылы сақтау түймесін
(
ПОДОГРЕВ
), одан кейін бастау түймесін (
СТАРТ/ВЫКЛ
)
бассаңыз, жылы сақтау көрсеткіші өшеді. Пісіру уақыты
аяқталғаннан кейін, көп функциялы тағам пісіргіш күту
режимінде болады.
Есте сақтаңыз
•
Күту режимінде жылы сақтау режиміне өту үшін жылы сақтау түймесін
(
ПОДОГРЕВ
) басуыңызға болады.
•
Жылы сақтау режимінде күту режиміне өту үшін жылы сақтау
түймесін (
ПОДОГРЕВ
) басуыңызға болады.
Пісіру уақыты мен температурасын реттеу
Күріш, қуыру және палаудан басқа барлық функциялар үшін пісіру
уақытын реттеуге болады; сондай-ақ, пісіру және қол режимі
үшін пісіру температурасын реттеуге болады. Әрбір функцияның
уақыты мен температурасын реттеуге арналған «Функцияларға
шолу» кестесін қараңыз.
1
Қажет пісіру функциясын таңдаңыз, сонда экранда әдепкі
пісіру уақыты көрсетіледі.
2
Басқа пісіру уақытын орнату үшін пісіру уақыты түймесін
(
ВРЕМЯ ПРИГОТОВЛЕНИЯ
) басыңыз (15- сурет), сонда
дисплейде әдепкі пісіру уақыты жыпылықтай бастайды.
3
Сағат бірлігін орнату үшін көбейту (
+
) немесе азайту (
-
)
түймесін басыңыз (16- сурет)
4
Сағат бірлігі орнатылғаннан кейін, сағат бірлігі расталғанша
бірнеше секунд күтіңіз, сонда дисплейде минут бірлігі
жыпылықтай бастайды.
5
Сағат бірлігін орнату үшін көбейту (
+
) немесе азайту (
-
)
түймесін басыңыз (17- сурет).
6
Пісіру және қол режимі үшін басқа пісіру температурасын
орнату үшін температура түймесін (
ТЕMП.
) түймесін
(18- сурет) басыңыз, сонда дисплейде әдепкі температура
жыпылықтай бастайды.
7
Қажетті пісіру температурасын орнату үшін көбейту (
+
)
немесе азайту (
-
) түймесін басыңыз (19- сурет).
8
Пісіру уақытын немесе температурасын растау және пісіруді
бастау үшін бастау түймесін (
СТАРТ/ВЫКЛ
) басыңыз (11-
сурет).
Кідіртілген пісіру үшін уақытты алдын ала
орнату
Кідіртілген пісіру уақытын қыздыру, пісіру, жұмыртқа/макарон
және қуырудан басқа барлық функциялар үшін алдын ала орнатуға
болады.
1
Қажет пісіру функциясын таңдаңыз.
2
Уақытты алдын ала орнату түймесін (
ОТСРОЧКА
) басыңыз,
сонда дисплейде әдепкі алдын ала орнатылған уақыт
жыпылықтай бастайды (20- сурет).
3
Қажетті алдын ала орнатылған уақытты орнату үшін көбейту
түймесін (
+
) және азайту түймесін (
-
) алдын ала орнатыңыз
(21- сурет).
4
Алдын ала орнатылған таймерді растау үшін бастау түймесін
(
СТАРТ/ВЫКЛ
) басыңыз (11- сурет).
5
Алдын ала орнатылған уақыт өткен кезде, пісіру аяқталады.
6
Сіз таңдаған функцияға байланысты көп функциялы тағам
пісіргіш жылы сақтау немесе күту режимінде болады.
Есте сақтаңыз
•
Алдын ала орнату түймесі күту режимінде жұмыс істемейді.
Балалардан қорғау құлпын орнату
Баланы көп функциялы тағам пісіргішті пайдаланудан қорғау үшін
балалардан қорғау құлпы функциясын орнатуыңызға болады.
•
Балалардан қорғау құлпы режиміне өту үшін алдын ала орнату
түймесін (
ОТСРОЧКА
) 3 секунд бойы басып тұрыңыз (22-
сурет).
»
Дисплейде балалардан қорғау құлпының белгішесі жанады.
•
Құлыпты ашу үшін алдын ала орнату түймесін (
ОТСРОЧКА
) 3
секунд бойы қайтадан басып тұрыңыз (23- сурет).
»
Балалардан қорғау құлпының шамдары өшеді.
5
Тазалау және техникалық
қызмет көрсету
Есте сақтаңыз
•
Көп функциялы тағам пісіргішті тазалар алдында оны тоқтан
ажыратыңыз.
•
Тазаламастан бұрын көп функциялы тағам пісіргіштің жеткілікті түрде
салқындауын күтіңіз.
Іші
Үстіңгі қақпақтың және негізгі корпустың іші:
•
Сығылған, ылғалды шүберекпен сүртіңіз.
•
Көп функциялы тағам пісіргішке жабысқан барлық тағам
қалдықтарын міндетті түрде кетіріңіз.
Қыздыру элементі:
•
Сығылған, ылғалды шүберекпен сүртіңіз.
•
Тағам қалдықтарын сығылған және дымқыл шүберекпен
алыңыз.
EN
User manual
KK
Қолданушының нұсқасы
RU
Руководство пользователя
UK
Посібник користувача