Страница 3 из 47 Contents Contents ................................................ 1 Installing a System SmartCard or System Box ......................................... 35 Introduction .......................................... 2 Diagnosing Basic Problems ............... 37 Kensington Security Slot
Страница 4 из 47 Introduction Congratulations on your purchase and welcome to Philips! This manual contains information about how to install and operate your TV. If you still have problems after reading this manual, call your Local Philips Customer or Service Centre. The telephone numbers and addresses are given in
Страница 5 из 47 Safety 1. Two people are required to lift and carry a TV that weighs more than 25 kilograms. Improper handling of the TV can cause serious injury. 2. If you place the TV set on a solid surface, ensure the surface is level and that it can withstand the weight of the TV. 3. Mounting the TV on the
Страница 6 из 47 Troubleshooting If you are experiencing problems, check this list of symptoms and suggested steps to take before requesting service. You may be able to solve the problem yourself. Note: Please be familiar with the commercial features as described in the TV installation. The effects of several of
Страница 7 из 47 Troubleshooting Symptoms Power Possible Solutions TV cannot be • If you are using the POWER button of the remote control to switched on switch on the TV, note that button is only use to set the TV to stand-by mode. Use the Digit 0-9 or CH + / – buttons to switch on TV. • Check if YES is selected in
Страница 8 из 47 Getting started Mounting the TV on a wall How to switch your TV on This TV is compatible with the VESA wall mounting standard. Please contact your local electronics retailer for a VESA compliant bracket to wall mount this TV. To switch the TV on, press the POWER key on the side controls. A green
Страница 9 из 47 Overview of TV Connectors and Controls 9 DATA 1 DATA 2 4 8 VGA In 3 15 PROGRAM 10 2 1 EXT 4 EXT 3 11 12 13 Warning Do not connect any telephone cables or equipment to Data 1 (RJ12) & Data 2 (RJ45) connectors. 1. . POWER To switch off the TV. 2. - PROGRAM + To switch on TV and also to select the
Страница 10 из 47 Remote Controls The following remote controls are applicable to Philips Professional and Business Solutions TV products. These can be used for setup and configuration purposes. RC2573 is an optional remote control for Institutional TV / Professional and Business Solutions features and SmartCard
Страница 11 из 47 Guest Remote Control Keys 1. Alarm On To activate the alarm function. Applicable to models with the clock display. 1 2 3 4 5 6 7 8 9 2. Alarm Off To deactivate the alarm function. Applicable to models with the clock display. 3. Smart Sound To select the predefined sound settings. 4. Sleep To
Страница 12 из 47 Guest Remote Control Keys 10 11 12 13 14 15 16 17 10. Power To set the TV to stand-by mode. 11. PAY TV / INFO / RADIO To access the first available Pay TV, Info or Radio channel. The + and – buttons allow you to access the next and previous programme. 12. Smart Picture To select predefined picture
Страница 13 из 47 Overview of TV Setup Main Menu / Sub-Menus SETUP LANGUAGE COMMUNICATION COMMUNICATION STORE DCM TYPE NO. OF PROGRAMS TV PAY TV INFO RADIO STORE PROGRAM INSTALL PROGRAM NO. INPUT SYSTEM FREQUENCY LABEL STORE FINE TUNE MUTE TELETEXT LANGUAGE PROTECTION ENGLISH, FRANCAIS, DEUTSCH, ITALIANO SP - SPI,
Страница 14 из 47 Overview of TV Setup Main Menu / Sub-Menus SETUP CONFIGURATION SWITCH ON / OSD PICTURE / SOUND SECURITY CONTROL VIDEO ADJUSTMENT FEATURES > > > > > > * CLOCK SETUP DISPLAY STANDBY DISPLAY ON TIME SETTING TELETEXT TIME DOWNLOAD DOWNLOAD PROGRAM TIME OFFSET BUZZER VOLUME > > > > > > > * CLOCK SETUP
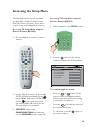
Страница 15 из 47 Accessing the Setup Menu The following remote control commands are applicable to Philips Professional and Business Solutions products. These can be used for setup and configuration purposes. Accessing TV Setup Menu using the Remote Control (RC2573) 1. Slide the button to the SETUP location.
Страница 16 из 47 Installation A. Selecting the language COMMUNICATION COMMUNICATION STORE ENABLE CARD SLOT DCM TYPE You can select ENGLISH, FRANCAIS, DEUTSCH or ITALIANO as your preferred language. • OFF > YES GENERIC In the SETUP menu, press the > button repeatedly to select your preferred language. SETUP LANGUAGE
Страница 17 из 47 Installation Note: The total number of programmes you can define for TV, PAYTV, INFO and RADIO is 125. For example, if you define 50 programmes for TV, 30 for PAYTV and 20 for INFO, the number of programmes available for RADIO is 25. The total number of programmes allowed is 125. C. Defining the
Страница 18 из 47 Installation 2. Selecting an input source PROGRAM INSTALL PROGRAM NO. INPUT SYSTEM FREQUENCY LABEL STORE FINE TUNE MUTE TELETEXT LANGUAGE PROTECTION TV 1 TUNER WEST EU 559.2500 > ( )> > 0 NONE WEST EU NO • Press the < or > button to select the item you want to configure. • Press the < or > button
Страница 19 из 47 Installation 3. Selecting the TV system Note: You can only select SYSTEM if TUNER is selected in the INPUT source. • Press the > button to select SYSTEM and press the > button repeatedly to select the desired system (WEST EU, UK, EAST EU or FRANCE). PROGRAM INSTALL PROGRAM NO. INPUT SYSTEM
Страница 20 из 47 Installation • Press the > button to move to the next character slot and continue to select the next character with the < or > button (maximum of 8 characters). • Press the mode. button to exit label • Press the > button to select STORE. • Press the > button to store name. The name will appear on
Страница 21 из 47 Installation • Press the > button to select YES. PROGRAM INSTALL PROGRAM NO. INPUT SYSTEM FREQUENCY LABEL STORE FINE TUNE MUTE TELETEXT LANGUAGE PROTECTION TV 1 TUNER WEST EU 559.2500 > (SPORTS )> > 2 NONE WEST EU NO PROGRAM INSTALL PROGRAM NO. INPUT SYSTEM FREQUENCY LABEL STORE FINE TUNE MUTE
Страница 22 из 47 Installation * VIDEO ADJUSTMENT feature is only available when the input source selected is EXT4 CVI, VGA, HDMI 1 or HDMI 2. • Press the > button to enter SWITCH ON / OSD menu. SWITCH ON / OSD WELCOME MESSAGE SWITCH ON PROGRAM SWITCH ON VOLUME SWITCH ON PIC FMT POWER ON VOLUME INDICATOR PROGRAM
Страница 23 из 47 Installation If LAST STATUS option is selected, the last power status will be activated when TV is switched on. If ON option is selected, the TV will always switch on when the mains cord is inserted in the mains socket and turn on. The POWER buttons on the Guest Remote Control and the TV will be
Страница 24 из 47 Installation The SECURITY feature allows you to select and configure the settings and options for : The SECURITY feature offers you two security modes: STANDARD and HIGH. – – – – • Press the < or > button to select STANDARD or HIGH. SECURITY KEYBOARD LOCK REMOTE CONTROL LOCK VIDEO OUT MUTE If
Страница 25 из 47 Installation • Press the > button to select YES to lock the TV keyboard buttons except for the POWER button. The VIDEO OUT MUTE feature allows you to mute the Video from the TV to any external devices. • Select ALL to lock all the TV keyboard buttons including the POWER button. • Press the > button
Страница 26 из 47 Installation CONFIGURATION SWITCH ON / OSD PICTURE / SOUND SECURITY CONTROL VIDEO ADJUSTMENT FEATURES > > > > > > Note : If a remote or keyboard command is received before the ESP time period expires, the Timer will reset and begin counting down again. • Press the < or > button to select a
Страница 27 из 47 Installation The STEP TUNING feature allows tuning to be performed for each digit entry if YES is selected. • Press the > button to select STEP TUNING. CONTROL ESP AUDIO / VIDEO MUTE STEP TUNING DIGIT TIMEOUT AUTO SCART ALWAYS RGB MIN VOLUME MAX VOLUME 2 YES YES 3.0 NO NO 0 99 CONTROL ESP AUDIO /
Страница 28 из 47 Installation If ALL is selected, the TV will then react to both AV1 and AV2. If POWER SCART is selected, the TV when in stand-by mode will automatically switch on when a scart signal is detected. Likewise, when a scart signal is not detected, the TV will go to stand-by automatically. CONTROL ESP
Страница 29 из 47 Installation • If COMMUNICATION is not SP-SPI or SP-I2C, select AUTO to allow RGB insertion in AV1 (EXT1) and not other sources. The MIN and MAX VOLUME options allow you to specify the limit setting for Minimum and Maximum Volume. • Press the > button repeatedly to select MIN VOLUME or MAX VOLUME.
Страница 30 из 47 Installation Note: HORIZONTAL and VERTICAL options are only available when the input sources selected are HDMI 1 or HDMI 2. • Press the < or > button to select HORIZONTAL or VERTICAL. VIDEO ADJUSTMENT HORIZONTAL VERTICAL PHASE CLOCK AUTO ADJUST RESET < < < < > > > > > > VIDEO ADJUSTMENT HORIZONTAL
Страница 31 из 47 Installation The RESET option allows you to return to the factory settings (default settings). Note: RESET is only available when the input sources selected are VGA, EXT4 CVI and CARD EXT4. CONFIGURATION SWITCH ON / OSD PICTURE / SOUND SECURITY CONTROL VIDEO ADJUSTMENT FEATURES > > > > > > • Press
Страница 32 из 47 Installation FEATURES SMART POWER SMART SOUND KEY DEFAULT HDMI 1 AUDIO DEFAULT HDMI 2 AUDIO LOW POWER STANDBY FEATURES LOW SMART SOUND EXT3 AUDIO HDMI NO The SMART SOUND KEY option allows you to select between AUDIO SELECT or SMART SOUND. • Press the > button to select SMART SOUND KEY. FEATURES
Страница 33 из 47 Installation The LOW POWER STANDBY option allows you to save electricity when TV is in stand-by mode. • Press the > button repeatedly until LOW POWER STANDBY is highlighted. FEATURES SMART POWER SMART SOUND KEY DEFAULT HDMI 1 AUDIO DEFAULT HDMI 2 AUDIO LOW POWER STANDBY LOW SMART SOUND EXT3 AUDIO
Страница 34 из 47 Installation • Press the < or > button to set the brightness level (1 - 5 and OFF). • CLOCK SETUP DISPLAY STANDBY DISPLAY ON TIME SETTING TELETEXT TIME DOWNLOAD DOWNLOAD PROGRAM TIME OFFSET BUZZER VOLUME CLOCK SETUP 3 > > > > > > 2. Setting the brightness level of the clock when the TV is switched
Страница 35 из 47 Installation 5. Retrieving the correct time from Teletext of the selected channel • You can select a channel which has teletext transmission from which the correct time from the teletext is retrieved. • Press the < or > button to select TIME OFFSET. CLOCK SETUP DISPLAY STANDBY DISPLAY ON TIME
Страница 36 из 47 Cloning the TV and the SmartLoader configuration Cloning the TV configuration to the SmartLoader Cloning the SmartLoader configuration to the TV • • Slide button on the left of the SmartLoader up to the position. Aim SmartLoader at green LED of the TV (5 to 15 cm away). Slide button on the left of
Страница 37 из 47 Installing a System SmartCard or System Box NOTE: Before installing a System SmartCard or System Box, ensure the TV is switched off. Sample of System Box 1. Inserting the System SmartCard or System Box • • Insert the SmartCard into the SmartCard slot on the rear of the TV (available for certain
Страница 38 из 47 Installing a System SmartCard or System Box 3. Enabling the Card Slot FEATURES For the System SmartCard or System Box to function, the Card Slot must be enabled. • SMART POWER SMART SOUND KEY DEFAULT HDMI 1 AUDIO DEFAULT HDMI 2 AUDIO LOW POWER STANDBY Press the > button to select ENABLE CARD SLOT.
Страница 39 из 47 Diagnosing Basic Problems 1. TV does not seem to communicate with the external interactive terminal. – COMMUNICATION COMMUNICATION STORE ENABLE CARD SLOT DCM TYPE Check the Communication Source • Press the RECALL button on the remote (in Setup position). Item 08 of the menu should read
Страница 40 из 47 Diagnosing Basic Problems – Check whether the Card Slot is enabled • If the TV still does not communicate with the System SmartCard, in the COMMUNICATION menu, press the > button repeatedly until ENABLE CARD SLOT is highlighted. COMMUNICATION COMMUNICATION STORE ENABLE CARD SLOT DCM TYPE OFF > YES
Страница 41 из 47 Appendix A – Multi Remote Controls Support Programming the Multi Remote Controls function Multi RC function supports up to four TV sets operating in one room without any interference from each other remote controls. Each Guest Remote Control must be programmed individually to one of the four colour
Страница 42 из 47 Appendix B – Resolutions Table Refer to the HDMI INPUT table if you use the HDMI connector to plug in a PC (PC Format) or a Video Input (Video Format), for example, a HDMI DVD player. HDMI INPUT Mode PC Format Video Format Signal Format 640 x 480 60 Hz, 72 Hz, 75 Hz, 85 Hz 800 x 600 60 Hz, 72 Hz,
Страница 43 из 47 Environmental Information Recycling The packaging of this product is intended to be recycled. Contact your local authorities for information about how to recycle the packaging. Note: Specifications and information are subject to change without notice. For further assistance, call the customer
Страница 44 из 47 Information for Users in the UK (Not applicable outside UK) Important Positioning the TV For the best results, choose a position where light does not fall directly on the screen, and at some distance away from radiators or other sources of heat. Leave a space of at least 5 cm all around the TV for