English
1 Important
Read these instructions for use carefully before using the appliance and save them for future
reference.
Danger
•
Do not immerse the motor unit in water nor rinse
it under the tap.
•
Do not connect the appliance to a timer switch.
Warning
•
Always switch off the appliance and disconnect
from the supply if it is left unattended and before
assembling, disassembling, cleaning, changing
accessories or approaching parts that move in use.
•
Before you connect the appliance to the power,
make sure that the voltage indicated on the bottom
of the appliance corresponds to the local power
voltage.
•
If the power cord, the plug, or other parts are
damaged, do not use the appliance.
•
If the supply cord is damaged, it must be replaced
by the manufacturer, its service agent or similarly
qualified persons in order to avoid a hazard.
•
Appliance can be used by persons with reduced
physical, sensory or mental capabilities or lack of
experience and knowledge if they have been given
supervision or instruction concerning use of the
appliance in a safe way and if they understand the
hazards involved.
•
Be very careful when you handle the cutter,
especially when you remove it from the worm shaft
and during cleaning. The cutting edges are very
sharp!
•
Do not use your fingers or an object (e.g. a spatula)
to push ingredients into the hopper while the
appliance is running. Only the pushers are to be
used for this purpose.
•
Do not insert your fingers in the metal drum while
the appliance is running.
•
Make sure you fully assemble and lock the hopper
before putting in the worm shaft, blade and screen
into the hopper.
•
This appliance shall not be used by children. Keep
the appliance and its cord out of reach of children.
•
Children shall not play with the appliance.
•
Do not use the appliance if the rotating sieve or the
protecting cover is damaged or has visible cracks.
Caution
•
The appliance is intended for household use only.
•
Before you connect the appliance to the mains,
make sure that the appliance is assembled correctly.
•
Never use any accessories or parts from other
manufacturers or that Philips does not specifically
recommend. If you use such accessories or parts,
your guarantee becomes invalid.
•
Always switch the appliance off by pressing the O/I
button.
•
Do not let the appliance run unattended.
•
Do not exceed the maximum operating time of
5 minutes at all applications.
•
Let the appliance cool down to room temperature
before next operation.
•
In order to avoid a hazard due to inadvertent
resetting of the thermal cut-out, this appliance
must not be supplied through an external switching
device, such as a timer, or connected to a circuit that
is regularly switched on and off by the utility.
•
Noise level: Lc = 87 dB [A]
Safety system
This appliance is equipped with overheat protection. If the appliance overheats, it switches
off automatically. Unplug the appliance and let it cool down until room temperature. Then,
put the mains plug back into the power outlet and switch on the appliance again. Please
contact your Philips dealer or an authorized Philips service center if the overheat protection
is activated too often.
The appliance is also equipped with mechanical protection. To protect the motor, the plastic
gear has been designed to break if bones or utensils are fed into the appliance. When this
happens, simply remove the gear and exchange it.
Electromagnetic fields (EMF)
This Philips appliance complies with all standards regarding electromagnetic fields (EMF). If
handled properly and according to the instructions in this user manual, the appliance is safe
to use based on scientific evidence available today.
Recycling
Your product is designed and manufactured with high quality materials and
components, which can be recycled and reused.
When you see the crossed-out wheel bin symbol attached to a product, it means the
product is covered by the European Directive 2002/96/EC:
Never dispose of your product with other household waste. Please inform yourself
about the local rules on the separate collection of electrical and electronic products.
The correct disposal of your old product helps prevent potentially negative
consequences on the environment and human health.
2 Introduction
Congratulations on your purchase and welcome to Philips! To fully benefit from the support
that Philips offers, register your product at www.philips.com.
With this product, you can
•
mince meat
•
make sausages (HR2709/HR2712/HR2713 only)
•
make kebbe (HR2713 only)
•
cut vegetables and grate cheese (HR2711/HR2713 only)
•
juice soft fruits (HR2712 only)
Tip
•
For more recipes, go to www.kitchen.philips.com.
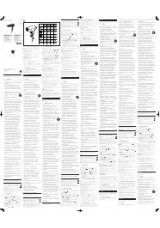
3 What’s in the box (Fig. 1)
a
Hopper release button
• Press and hold it when you remove
the hopper.
k
Sausage separator (HR2709/
HR2712/HR2713 only)
b
Motor unit
l
Kebbe maker (HR2713 only)
•
A
: Kebbe separator
•
B
: Kebbe shaper
c
/
• Switch off or on the appliance.
m
Pusher for the plastic hopper
(HR2711/HR2713 only)
d
Handle
n
Plastic hopper (HR2711/HR2713
only)
e
Metal hopper
o
Metal drums (HR2711/HR2713
only)
•
A
: Coarse grater drum
•
B
: Fine grater drum (HR2713
only)
•
C
: Slicer drum
f
Worm shaft
p
Pusher for the metal hopper
g
Cutter/Knife
q
Feeding tray
h
Grinding discs
•
A
: Coarse grinding disc (diameter of
8 mm)
•
B
: Fine grinding disc (diameter of
5 mm)
r
Innovative cleaning tool
i
Screw ring
Soft fruit juicer (HR2712 only)
s
Juicing nozzle
t
Juicing body
u
Sieve
v
Shaft
w
Seal ring
x
Soft fruit juicer hopper
y
Pusher for soft fruit juicer
j
Sausage horns (HR2709/HR2712/HR2713
only)
•
A
: Large sausage horn (diameter of
22 mm)
•
B
: Small sausage horn (diameter of
12 mm)
4 Before first use
Before you use the appliance and accessories for the first time, thoroughly clean the parts
that come into contact with food. (See “Cleaning” in Fig. 5 and Fig. 6).
5 Mince meat
Before you start, make sure you assemble according to Fig. 2-1.
Mince meat (Fig. 3-1)
Note
• Never grind bones, nuts, or other hard items.
•
Never use frozen meat! Before you grind the meat, defrost it first.
• Do not overload the appliance by pushing too much meat into the hopper.
• You can select the appropriate grinding disk for the preferred granularity of minced meat. You
can also grind more than once for finer texture.
Tip
• Remove bones, gristle, and sinews out of the meat as much as possible.
•
Before your make sausages, mince the meat first. (refer to "Make sausages")
• If the hopper is stuck, switch off the appliance and disassemble the hopper from the motor
unit. Then remove the stuck stuff from the hopper.
6 Make sausages (HR2709/HR2712/HR2713
only)
Before you start, make sure you assemble according to Fig.2-2.
Make sausages (Fig. 3-2)
Note
•
Make sure that the projections on the hopper align with the notches of the motor.
• Do not block the air outlet grooves of the sausage horn.
• Do not make the sausages too thick in case the sausage skin is overstretched.
• Keep the sausage skin wet to prevent it from sticking on the sausage horn.
Recipe
Sausages
Ingredients:
•
4,500 g ground pork
•
5 Tbsp. of salt
•
1 Tbsp. of ground white pepper
•
2 Tbsp. of rubbed sage
•
1 tsp. of ginger
•
1 Tbsp. of nutmeg
•
1 Tbsp. of thyme
•
470 ml ice water
•
1 Tbsp. of ground hot red pepper
Directions:
1
Mince the meat with the coarse grinding disc.
2
Thoroughly mix the minced meat and other ingredients.
3
Follow the instructions above to make your own sausages.
7 Make kebbe (HR2713 only)
Before you start, make sure you assemble according to Fig. 2-3.
Make kebbe (Fig. 3-3)
Recipe
Kebbe
Yield:
5-8 servings
Ingredients:
•
Outer casing
•
500 g lamb or fat-free mutton, cut into strips
•
500 g bulgur wheat, washed and drained
•
1 small onion
•
Filling
•
400 g lamb, cut into strips
•
15 ml oil
•
2 medium onions, finely chopped
•
5-10 ml ground allspice
•
15 ml plain flour
• salt and pepper
Directions:
•
Outer casing
1)
Mince the meat, wheat, and onion together with the fine grinding disc.
2)
Thoroughly mix the minced ingredients, and then mince the mixture twice again.
3)
Use the kebbe maker to shape the mixture into kebbe casing.
•
Filling
1)
Mince the meat with the fine grinding disc.
2)
Fry the onion chops until they turn golden brown.
3)
Add the minced meat and other ingredients in, and then cook for 1-2 minutes.
4)
Drain off excessive fat and cool the filling down.
•
Cooking
1)
Push some filling into the outer casing, and then pinch both ends to seal it.
2)
Heat the oil for deep frying (190°C).
3)
Deep fry the kebbe for 3-4 minutes, or until it turns golden brown.
8 Cut vegetables (HR2711/HR2713 only)
Before you start, make sure you assemble according to Fig. 2-4.
Cut vegetables (Fig. 2-4)
Fig. 4 indicates the foods that each drum is applicable to and the cutting shapes.
Note
• Only use the plastic hopper in combination with the metal drums and the pusher for plastic
hopper.
Tip
• You can also grate cheese.
Register your product and get support at
HR2709
HR2710
HR2712
HR2713
www.philips.com/welcome
Specifications are subject to change without notice
© 2015 Koninklijke Philips N.V.
All rights reserved.
EN
User manual
KK
Қолданушының нұсқасы
RU
Руководство пользователя
UK
Посібник користувача
4240 002 01651
2
2-1
2-2
1
b
a
c
2-3
2-4
e
p
q
f
g
i
k
l
B
A
n
m
o
A
B
C
r
A
B
h
4
v
w
u
t
s
x
y
2-5
3-1
3-2
3-3
3-4
3-5
3
6
j
A
B
5
d
HR2713
HR2709/HR2712
HR2713
HR2711/HR2713
HR2711/HR2713
HR2712
9 Soft fruit juicer (HR2712 only)
You can use the soft fruits juicer to juice soft fruits such as tomatoes, oranges and grapes.
You are not recommended to juice hard fruits such as apples and pears.
Before you start, make sure you assemble according to Fig. 2-5.
Juice soft fruits (Fig. 3-5)
Caution
•
Be careful when you handle or clean the sieve. The cutting edges are very sharp.
•
Users should be aware that the maximum recommended running time is up to 2 minutes.
•
Never insert your hand or another object (e.g. a fork, knife, spoon or spatula) into the feeding tube.
Only use the pusher supplied for the soft fruit juicer.
•
Wait until the screw in the masticating tube has stopped rotating before you take off the tool from
the main unit.
Note
•
Always check the screw before use. Do not use the juicer if you notice any damage like
cracks, grazes or a loose grating disc.
• Before processing ingredients, remove all seeds and pips from plums, apricots, peaches and
cherries, remove all tough skins from pineapples, melons etc.
Tip
•
You can get a lot more juice if you run the pulp through a few times.
10 Cleaning and maintenance (Fig. 5 and Fig. 6)
•
Before you remove accessories or clean the motor unit, switch off and unplug the
appliance.
•
Do not immerse the motor unit in water nor rinse it under the tap.
•
Do not clean the metal parts in a dishwasher.
•
Clean the main unit with a moist cloth.
•
Pass pieces of bread through the hopper to remove any meat left.
•
Wash removable parts with a soft brush in soapy water, rinse them with clear water,
and then dry them with soft cloth or tissues immediately.
•
Lightly brush the metal parts with fat or oil to prevent rusting.
Note
•
Use the innovative cleaning tool to remove the remains stuck in the grinding discs. rinse them with
clear water, and then dry them with soft cloth or tissues immediately.
Қазақша
1 Маңызды ақпарат
Құрылғыны қолданар алдында, осы нұсқауды ықыласпен оқып шығыңыз, әрі болашақта
қолдану үшін сақтап қойыңыз.
Қауіпті
•
Мотор бөлігін суға салуға немесе оны ағын су
астында шаюға болмайды.
•
Құралды таймерге қоспаңыз.
Ескерту
•
Қараусыз қалдырсаңыз және жинамастан,
бөлшектеместен, тазаламастан, қосалқы
құралдарды алмастырмастан немесе қолданғанда
қозғалып тұратын бөліктерді ұстамастан бұрын
құрылғыны өшіріп, қуат көзінен ажыратыңыз.
•
Құралды розеткаға жалғамас бұрын, құралдың
астында көрсетілген кернеудің жергілікті
розетканың кернеуіне сәйкес келетінін тексеріңіз.
•
Қуат сымы, штепсель немесе басқа бөлшектер
зақымданған болса, құралды қолданбаңыз.
•
Қуат сымы зақымдалған болса, қауіптің алдын алу
үшін, оны өндіруші, оның қызмет агенті немесе
сол сияқты кәсіби мамандар алмастыруы тиіс.
•
Құрылғыны қауіпсіз пайдалану жөніндегі
нұсқаулар беріліп, басқа біреу қадағалаған және
құралды пайдалануға қатысты қауіп-қатерлер
түсіндірілген жағдайда, осы құрылғыны физикалық,
сезу немесе ойлау қабілеті шектеулі, білімі мен
тәжірибесі аз адамдар пайдалана алады.
•
Турағышты, әсіресе оны шиыршық өзектен
шешкенде және тазалау кезінде, абайлап ұстаңыз.
Шеттері өте өткір!
•
Құрал қосылып тұрғанда, түтікке азықтарды
саусақпен немесе басқа затпен (мысалы, күрекше)
тықпаңыз. Бұл үшін тығындағышты ғана пайдалану
керек.
•
Құрал қосылып тұрғанда, темір барабанға
саусақтарыңызды салмаңыз.
•
Шиыршық өзек, жүз бен экранды түтікке салар
алдында түтікті міндетті түрде толық құрастырып,
бекітіп алыңыз.
•
Бұл құрылғыны балалардың пайдалануына
болмайды. Құралды және оның сымын
балалардың қолдары жетпейтін жерде сақтаңыз.
•
Балалар құралмен ойнамауы керек.
•
Айналмалы елек немесе қорғаныш қақпағы
бүлінсе немесе көрінетін жарық болса, құрылғыны
пайдалануға болмайды.
Абайлаңыз
•
Құрал тек үй ішінде қолдануға арналған.
•
Розеткаға қоспас бұрын, құралдың дұрыс
құрастырылғанын тексеріңіз.
•
Басқа өндірушілер шығарған немесе Philips
компаниясы нақты ұсынбаған қосалқы құралдар
мен бөлшектерді пайдаланушы болмаңыз.
Ондай қосалқы құралдар мен бөлшектерді
пайдалансаңыз, құралдың кепілдігі өз күшін
жояды.
•
Әрқашан құралды қосу/өшіру түймесін басу
арқылы өшіріңіз.
•
Құралды қадағалаусыз істеп тұрған күйде
қалдыруға болмайды.
•
Кез келген қолданыста 5 минуттан артық
істетпеңіз.
•
Келесі жұмыстың алдында құрылғыны бөлме
температурасына дейін суытып алыңыз.
•
Жылуды қосу/өшіру түймесін байқаусызда
бастапқы қалпына келтіру нәтижесінде орын
алатын қауіпті жағдайды болдырмау үшін, бұл
құралға таймер сияқты сырттай қосылатын құрал
жалғанбауы керек және оны өшіріліп-қосылатын
электр желісіне жалғамаған жөн.
•
Шу деңгейі: Lc = 87 дБ [A]
Қауіпсіздік жүйесі
Бұл құралдың шамадан тыс қызудан қорғауы бар. Қатты қызып кетсе, құрал автоматты
түрде өшеді. Құралды розеткадан ажыратып, бөлме температурасына дейін
салқындатып алыңыз. Содан кейін, қуат сымын қайтадан розеткаға жалғап, құралды
қайта қосыңыз. Шамадан тыс қызудан қорғау тым жиі қосылатын болса, Philips дилеріне
немесе уәкілетті Philips қызмет көрсету орталығына хабарласыңыз.
Құралда механикалық қорғау да бар. Моторды қорғау үшін арнайы пластикалық тетік
жасалған, ол құралға сүйектер немесе асүйлік құралдар салынғанда сынады. Бұндай
жағдай орын алғанда, тетікті шешіп, ауыстырыңыз.
Электромагниттік өрістер (ЭМӨ)
Бұл Philips Avent құралы электромагниттік өрістерге (ЭМӨ) қатысты барлық
стандарттарға сәйкес келеді. Нұсқаулықта көрсетілгендей және ұқыпты қолданылған
жағдайда, құралды пайдалану қазіргі ғылыми дәлелдер негізінде қауіпсіз болып табылады.
Өңдеу
Өнім қайта өңдеуге және қайта пайдалануға болатын жоғары сапалы
материалдардан және бөлшектерден жасалған.
Өнімде үсті сызылған дөңгелекті қоқыс жәшігінің белгісі болса, өнім Еуропалық
2002/96/EC директивасына кіретінін білдіреді.
Ешқашан өніміңізді басқа тұрмыстық қалдықтармен бірге тастамаңыз. Электр
және электрондық өнімдерді бөлек жинау туралы жергілікті ережелермен
танысыңыз. Ескі өнімді қоқысқа дұрыс тастау қоршаған ортаға және адам
денсаулығына ықтималды кері әсерін тигізудің алдын алады.
2 Кіріспе
Осы затты сатып алуыңызбен құттықтаймыз және Philips компаниясына қош келдіңіз!
Philips ұсынатын қолдауды толық пайдалану үшін, өнімді www.philips.com торабында
тіркеңіз.
Осы өніммен мына әрекеттерді орындауға болады:
•
ет тарту;
•
шұжықтарды әзірлеу (тек HR2709/HR2712/HR2713)
•
кеббе әзірлеу (тек HR2713)
•
көкөністерді кесу мен ірімшікті үгу (тек HR2711/HR2713)
•
жұмсақ жемістер шырынын сығу (тек HR2712)
Кеңес
•
Көбірек рецептілерді алу үшін, www.kitchen.philips.com торабына өтіңіз.
3 Қорап ішіндегі заттар (1-сурет)
a
Тығындағышты босату түймесі
• Түтікті шешкенде басып тұрыңыз.
k
Шұжықты бөлгіш (тек HR2709/
HR2712/HR2713)
b
Мотор бөлігі
l
Кеббе әзірлегіш (тек HR2713)
•
A
: Кеббе бөлгіш
•
B
: Кеббе пішін беру құралы
c
/
• Құралды өшіреді немесе қосады.
m
Пластик түтікке арналған
тығыздағыш (тек HR2711/
HR2713)
d
Тұтқа
n
Пластик түтік (тек HR2711/
HR2713)
e
Темір түтік
o
Темір барабандар (тек HR2711/
HR2713)
•
A
: Ірі үккіштен өткізу
барабаны
•
B
: Ұсақ үккіштен өткізу
барабаны (тек HR2713)
•
C
: Тілімдегіш барабан
f
Бұрамдықты білік
g
Темір түтіктің тығыздағышы
g
Турағыш/Пышақ
q
Беруші науа
h
Ұсақтау дискілері
•
A
: Ірі ұсақтау дискісі (диаметрі: 8
мм)
•
B
: Майда ұсақтау дискісі (диаметрі:
5 мм)
r
Инновациялық тазарту құралы
i
Бұранда сақинасы
Жұмсақ жеміс шырын сыққышы (тек
HR2712)
s
Шырын сыққыш саптамасы
t
Шырын сыққыш корпусы
u
Елеуіш
v
Білік
w
Тығыздаушы сақина
x
Жұмсақ жеміс шырын
сыққышының түтігі
y
Жұмсақ жеміс шырын
сыққышына арналған тығыздағыш
j
Шұжық саптамалары (тек HR2709/
HR2712/HR2713)
•
A
: Үлкен шұжық саптамасы
(диаметрі: 22 мм)
•
B
: Кіші шұжық саптамасы (диаметрі:
12 мм)
4 Бірінші рет қолданар алдында
Құралды және қосалқы құралдарды бірінші рет пайдалану алдында тамаққа тиген
бөліктерді
мұқият тазалаңыз. («Тазалау» бөлімін қараңыз. 5-сурет және ).
5 Етті тарту
Бастамастан бұрын, келесі суретке сай жинағаныңызды тексеріңіз: 2-1.
Етті тарту (9-1 3-1)
Есте сақтаңыз
•
Сүйектерді, жаңғақтарды немесе басқа қатты заттарды ұсақтаушы болмаңыз.
•
Мұздатылған етті ешқашан қолданбаңыз! Тартпас бұрын, еттің мұзын ерітіп алыңыз.
•
Түтікке тым көп ет тығындап құралды шамадан тыс жүктемеңіз.
•
Туралған еттің керекті түйіршік ірілігі үшін тиісті ұсақтау дискісін таңдауға болады.
Сондай-ақ, ұсағырақ қылу үшін бірнеше рет турауға да болады.
Кеңес
•
Еттен сүйектерді, шеміршектерді және сіңірлерді мүмкіндігінше алып тастаңыз.
•
Шұжық жасамас бұрын, етті тартып алыңыз. («Шұжық жасау» бөлімін қараңыз)
•
Егер түтік тұрып қалса, құралды өшіріңіз және түтікті мотор бөлігінен ажыратыңыз.
Сосын тұрып қалған затты түтіктен алып тастаңыз.
6 Шұжықтарды әзірлеу (тек HR2709/
HR2712/HR2713)
Бастамастан бұрын, келесі 2-2 суретіне сай жинағаныңызды тексеріңіз.
Сосискалар әзірлеу (9-2 3-2)
Есте сақтаңыз
•
Түтіктегі шығыңқы жерлер мотордың ойықтарына тураланғанын тексеріңіз.
•
Шұжық саптамасындағы ауа шығаратын саңылауларды жаппаңыз.
•
Шұжық қабығы қатты созылған жағдайда, шұжықтарды тым қалың жасамаңыз.
•
Шұжық саптамасына жабыспауы үшін, шұжық қабығын сулап тұрыңыз.
Рецепттер
Шұжықтар
Қосылатын заттар:
•
4500 г ұсақтап туралған шошқаның еті
•
5 ас қасық тұз
•
1 ас қасық ақ бұрыш
•
2 ас қасық үгілген сәлбен
•
1 кіші қасық жанжабіл
•
1 ас қасық жұпар жүзім дәні
•
1 ас қасық жебіршөп
•
470 мл мұздай су
•
1 ас қасық үгітілген ащы қызыл бұрыш
Нұсқаулар:
1
Етті ірі ұсақтау дискімен тартыңыз.
2
Тартылған етті және басқа азықтарды мұқият араластырыңыз.
3
Шұжықтарды өзіңіз жасау үшін жоғарыдағы нұсқауларды орындаңыз.
7 Кеббе әзірлеу (тек HR2742)
Бастамастан бұрын, келесі суретке сай жинағаныңызды тексеріңіз: 2-3.
Кеббе әзірлеу (9-3 3-3)
Рецепттер
Кеббе
Көлемі:
5-8 кісілік
Қосылатын заттар:
•
Сырты
•
500 г тілімдеп туралған бағлан еті немесе майсыз қой еті
•
500 г жуылған және кептірілген булгур бидайы
•
1 кіші өлшемді пияз
•
Салма
•
400 г тілімдеп туралған бағлан еті
•
15 мл сұйық май
•
2 орта өлшемді пияз, майдалап туралған
•
5-10 мл ұнтақталған қалампыр бұрышы
•
15 мл қоспасыз ұн
•
Тұз және бұрыш
Нұсқаулар:
•
Сырты
1)
Етті, бидайды және пиязды майда ұсақтау дискімен тартыңыз.
2)
Тартылған азықты мұқият араластырыңыз, содан кейін қоспаны тағы екі рет
тартыңыз.
3)
Кеббе жасау құралымен қоспаға кеббе пішінін беріңіз.
•
Салма
1)
Етті майда ұсақтау дискімен тартыңыз.
2)
Пияз бөліктерін қызарғанша қуырыңыз.