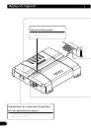
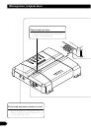
Страница 1 из 86 ESPAÑOL AMPLIFICATEUR DE PUISSANCE PONTABLE A DEUX VOIES ENGLISH BRIDGEABLE TWO-CHANNEL POWER AMPLIFIER DEUTSCH FRANÇAIS GM-5300T NEDERLANDS Mode d’emploi ITALIANO Owner’s Manual êìëëäàâ
Страница 2 из 86 Contents Before Using This Product ...................... 1 Visit our website ................................................ 1 In case of trouble .............................................. 2 CAUTION ........................................................ 2 CAUTION
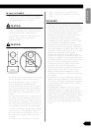
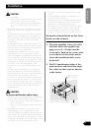
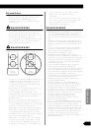
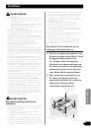
Страница 3 из 86 When the unit does not operate properly, contact your dealer or the nearest authorized PIONEER Service Station. Never replace the fuse with one of greater value or rating than the original fuse. Use of an improper fuse could result in overheating and smoke and could cause damage to the product and
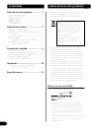
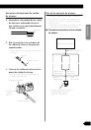
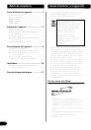
Страница 4 из 86 Setting the Unit Power Indicator The power indicator lights when the power is switched on. Bass Boost Level Control Switch You can select a bass boost level from 0 dB, 6 dB and 12 dB. 3
Страница 5 из 86 ENGLISH Gain Control ESPAÑOL If the sound level is too low, even when the volume of the car stereo used along with this power amplifier is turned up, turn gain control on the front of the power amplifier clockwise. If the sound distorts when the volume is turned up, turn the gain control
Страница 6 из 86 Connecting the Unit CAUTION • Disconnect the negative (–) terminal of the battery to avoid the risk of short-circuit and damage to the unit. • Secure the wiring with cable clamps or adhesive tape. To protect the wiring, wrap adhesive tape around it where they lie against metal parts. • Do not route
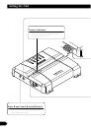
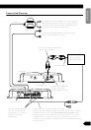
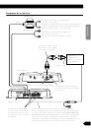
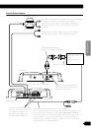
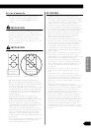
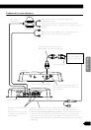
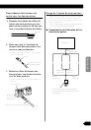
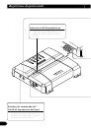
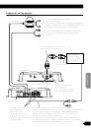
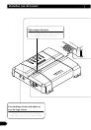
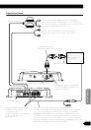
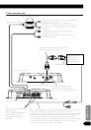
Страница 7 из 86 ENGLISH Connection Diagram Fuse (30 A) ESPAÑOL Special red battery wire [RD-223] (sold separately) After making all other connections at the amplifier, connect the battery wire terminal of the amplifier to the positive (+) terminal of the battery. Grommet Fuse (30 A) Ground wire (black) [RD-223]
Страница 8 из 86 Connecting the Unit Connecting the Power Terminal • Always use the special red battery and ground wire [RD-223], which is sold separately. Connect the battery wire directly to the car battery positive terminal (+) and the ground wire to the car body. 4. Connect the wires to the terminal. • Fix the
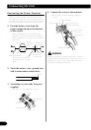
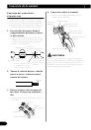
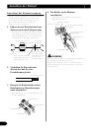
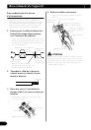
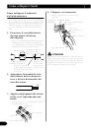
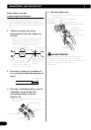
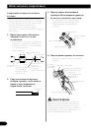
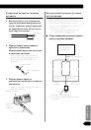
Страница 9 из 86 Twist Using the Speaker Input Connect the car stereo speaker output wires to the amplifier using the supplied speaker input connector. • Do not connect both the RCA input and the speaker input at the same time. ESPAÑOL 1. Expose the end of the speaker wires using nippers or a cutter by about 10 mm
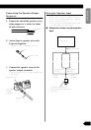
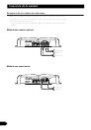
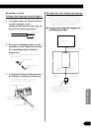
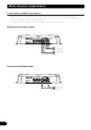
Страница 10 из 86 Connecting the Unit Connecting the Speaker Wires The speaker output mode can be two-channel (stereo) or one-channel (mono). Connect the speaker leads to suit the mode according to the figures shown below. • Do not connect both the RCA input and the speaker input at the same time. Two-channel mode
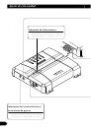
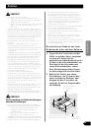
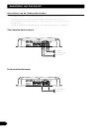
Страница 11 из 86 Installation • • • • become hot to the touch and minor burns could result. Do not install the amplifier on unstable places such as the spare tire board. The best location for installation differs with the car model and installation location. Secure the amplifier at a sufficiently rigid location.
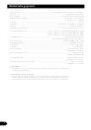
Страница 12 из 86 Specifications Power source ........................................................................................................ 14.4 V DC (10.8 V to 15.1 V allowable) Grounding system
Страница 13 из 86 ENGLISH ESPAÑOL DEUTSCH FRANÇAIS ITALIANO NEDERLANDS êìëëäàâ 12
Страница 14 из 86 Contenido Antes de usar este producto .................... 1 Visite nuestro sitio Web .................................... 1 En caso de desperfectos .................................... 2 PRECAUCION ................................................ 2 PRECAUCION
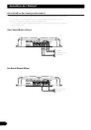
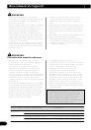
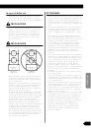
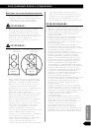
Страница 15 из 86 Si esta unidad no funciona correctamente, póngase en contacto con su distribuidor o con el Centro de Servicio PIONEER autorizado más cercano. PRECAUCION Diagrama B - Incorrecto Altavoz + de 8Ω Altavoz + de 4Ω Altavoz + de 8Ω Altavoz + de 4Ω L+ R- L+ RAmplificador Pioneer Modo de conexión en puente
Страница 16 из 86 Ajuste de esta unidad Indicador de alimentación El indicador de alimentación se ilumina cuando la unidad se encuentra activada. Interruptor del control del nivel de refuerzo de graves Se puede seleccionar un nivel de refuerzo de graves de 0 dB, 6 dB y 12 dB. 3
Страница 17 из 86 ENGLISH Control de ganancia ESPAÑOL Si el nivel del sonido está muy bajo, aún cuando se aumenta el volumen del equipo estéreo para automóvil usado con este amplificador de potencia, gire a la derecha el control de ganancia en la parte delantera del amplificador de potencia. Si hay distorsión del
Страница 18 из 86 Conexión de la unidad PRECAUCION • Quite el terminal negativo (–) de la batería para evitar riesgo de cortocircuitos y daño a la unidad. • Asegure el alambrado con abrazaderas de cable o cinta adhesiva. Para proteger el alambrado, envuelva cinta adhesiva alrededor de ellos en donde contacta con
Страница 19 из 86 ENGLISH Diagrama de conexión Fusible (30 A) Ojal ESPAÑOL Fusible (30 A) Cable de batería rojo especial [RD-223] (en venta por separado) Después de realizar todas las conexiones al amplificador, conecte el terminal del conductor de batería del amplificador al terminal positivo (+) de la batería.
Страница 20 из 86 Conexión de la unidad 4. Conecte los cables al terminal. Conexión del terminal de alimentación • Fijar los cables firmemente utilizando los tornillos para terminales. • Siempre utilice el cable de batería rojo especial y el cable de tierra [RD-223], vendidos separadamente. Conecte el cable de
Страница 21 из 86 Tuérzala Uso de la entrada de altavoz Conecte los hilos de la salida de altavoz del estéreo de automóvil al amplificador usando el conector de entrada de altavoz suministrado. • No poder conectar tanto la entrada de RCA y la entrada de altavoz al mismo tiempo. ESPAÑOL 1. Desnude la extremidad de
Страница 22 из 86 Conexión de la unidad Conexión de los cables de altavoces El modo de salida de altavoces puede ser en dos canales (estéreo) o uno canal (mono). Conecte los cables de altavoz para ajustarse al modo según los diagramas mostrados abajo. • No poder conectar tanto la entrada de RCA y la entrada de
Страница 23 из 86 Instalación • • Ejemplo de instalación en la alfombra del piso o en el chasis 1. Ubique el amplificador en la posición en donde va a ser instalado. Inserte los tornillos autoterrajantes suministrados (4 × 18 mm) en los orificios de los tornillos. Presione los tornillos con un destornillador de modo
Страница 24 из 86 Especificaciones Alimentación ...................................................................................................... 14,4 V CC (10,8 V a 15,1 V permisible) Sistema de puesta a tierra
Страница 25 из 86 ENGLISH ESPAÑOL DEUTSCH FRANÇAIS ITALIANO NEDERLANDS êìëëäàâ 12
Страница 26 из 86 Inhaltsverzeichnis Vor Gebrauch dieses Produkts ................ 1 Unsere Website ................................................ 1 Im Störungsfall .................................................. 2 VORSICHT ...................................................... 2 VORSICHT
Страница 27 из 86 Bei Betriebsstörungen den Händler oder eine PIONEER-Kundendienststelle kon-sultieren. VORSICHT Diagramm B - Falsch 8-Ω+ Laut- sprecher 4-Ω+ Laut- sprecher 8-Ω+ Laut- sprecher 4-Ω+ Laut- sprecher L+ R- L+ R- Pioneer Verstäker Pioneer Verstäker 4-Ω-Überbrückungsmodus 2-Ω-Überbrückungsmodus ITALIANO
Страница 28 из 86 Einstellen dieses Geräts Stromanzeige Die Stromanzeige leuchtet auf, wenn die Stromversorgung eingeschaltet wird. Bassverstärkungs-Pegelregelschalter Als Bassverstärkungspegel können Sie entweder 0 dB, 6 dB oder 12 dB wählen. 3
Страница 29 из 86 ENGLISH Verstärkungsregelung ESPAÑOL Wenn die Lautstärke zu schwach ist, selbst wenn der Lautstärkeregler der zusammen mit diesem Leistungsver-stärker verwendeten Auto-Stereo-Anlage aufgedreht wird, drehen Sie den Verstärkungsregler an der Frontseite des Leistungsverstärkers im Uhrzeigersinn. Falls
Страница 30 из 86 Anschluss der Einheit VORSICHT • Trennen Sie das Batterieanschlusskabel vom negativen (–) Batteriepol, um Kurzschlüsse und Schäden am Gerät zu vermeiden. • Befestigen Sie die Kabel mit Kabelklemmen oder Klebeband. Kabel, die Kontakt mit Metallteilen haben, sollten an den betreffenden Stellen mit
Страница 31 из 86 ENGLISH Anschlussschema Sicherung (30 A) Tülle ESPAÑOL Sicherung (30 A) Spezielles rotes Batteriekabel [RD-223] (separat erhältlich) Nachdem alle anderen Anschlüsse am Verstärker ausgeführt worden sind, das Batterie-Kabelklemme des Verstärkers mit der positiven (+) Klemme der Batterie verbinde.
Страница 32 из 86 Anschluss der Einheit Anschluss der Stromversorgung • Nur das getrennt erhältliche rote Spezial-Batterieund Massekabel [RD-223] verwenden. Das Batteriekabel direkt an den Pluspol (+) der Wagenbatterie und das Massekabel an Karosseriemasse anschließen. 4. Die Drähte an die Klemme anschließen. •
Страница 33 из 86 Zusammendrehen Benutzung des LautsprecherEingangs Den Eingangsdraht des Autostereolautsprechers mit dem gelieferten Verbinder an den Verstärker anschließen. ESPAÑOL 1. Die Enden der Lautsprecherkabel um ca. 10 mm mit einer Kneifzange oder einem Schneider abisolieren und die Kabelenden
Страница 34 из 86 Anschluss der Einheit Anschließen der Lautsprecherkabel Die Lautsprecherausgang-Betriebsart kann Zwei-Kanal (Stereo) oder EinKanal (Mono) sein. Schließen Sie die Lautsprecherkabel an, um der Tonart anzupassen, gemäß folgenden Bildern. • So darf man das RCA-Input und das Input vom Lautsprecher nicht
Страница 35 из 86 Einbau • • • • Ein elektrischer Schlag könnte die Folge sein. Berührung mit Flüssigkeiten kann auch zu einer Beschädigung von Verstärker und Lautsprechern, sowie zu Rauchbildung und Überhitzung führen. Außerdem können Oberflächen von Verstärker und jeglicher angebrachter Lautsprecher heiß werden,
Страница 36 из 86 Technische Daten Stromversorgung ............................................................................ 14,4 V Gleichspannung (Toleranz 10,8 V bis 15,1 V) Erdungssystem
Страница 37 из 86 ENGLISH ESPAÑOL DEUTSCH FRANÇAIS ITALIANO NEDERLANDS êìëëäàâ 12
Страница 38 из 86 Table des matières Avant d’utiliser cet appareil .................... 1 Visitez notre site Web ...................................... 1 En cas d’anomalie ............................................ 2 PRÉCAUTION .................................................. 2 PRÉCAUTION
Страница 39 из 86 ATTENTION En cas d’anomalie de fonctionnement, veuillez consulter le distributeur ou le centre d’entretien PIONEER le plus proche. Diagramme B - Incorrect Enceinte + de 8Ω Enceinte + de 4Ω Enceinte + de 8Ω Enceinte + de 4Ω R- L+ R- Amplificateur Pioneer Branchement en pont de 4 Ω Branchement en
Страница 40 из 86 Réglage de l’appareil Témoin d’alimentation Ce témoin s’éclaire lorsque l’amplificateur est sous tension. Commutateur de commande d’amplitude de l’accentuation des graves Vous pouvez choisir un niveau d’accentuation de 0 dB, 6 dB ou 12 dB. 3
Страница 41 из 86 ENGLISH Commande du gain ESPAÑOL Si le niveau d’écoute est faible même lorsque la commande de l’autoradio est sur la position correspondant au maximum, tournez la commande de gain, placée le devant de l’amplificateur, dans le sens des aiguilles d’une montre. Inversement, si vous constatez de la
Страница 42 из 86 Raccordement de l’appareil PRÉCAUTION • Pour éviter tout risque de court-circuit ou d’endommager cet appareil, débranchez le câble relié à la borne négative (–) de la batterie, au niveau de cette borne. • Fixez les câbles au moyen de colliers ou du ruban adhésif. Lorsque l’isolant du câble peut
Страница 43 из 86 ENGLISH Schéma de raccordement Fusible (30 A) ESPAÑOL Câble rouge de liaison à la batterie [RD-223] (vendu séparément) Après avoir effectué tous les autres raccordements de l’amplificateur, reliez ce câble à la borne positive (+) de la batterie. Passe-câble caoutchouté Fusible (30 A) Câble de masse
Страница 44 из 86 Raccordement de l’appareil 4. Reliez les câbles aux bornes. Raccordement de la borne d’alimentation • Utilisez le faisceau de câbles de liaison à la batterie (un câble rouge et un câble de masse) qui est vendu séparément [RD-223]. Reliez le câble rouge à la borne positive (+) de la batterie et le
Страница 45 из 86 Torsadez Usage de l’entrée de haut-parleur Sélection du joint d’entrée du haut-parleur fourni avec la voiture, dont la connection de sortie pour le haut-parleur à stéréo sera liée à l’amplifier. • Ne connecteur pas l’entrée de haut-parleur et l’entrée de RCA en même temps. ESPAÑOL 1. Dénudez
Страница 46 из 86 Raccordement de l’appareil Connexion des câbles des haut-parleurs Le mode de sortie des haut-parleurs peut être à deux voies (stéréo) ou à une voie (mono). Connecter les fils du haut-parleur pour se conformer au mode suivant les figures cidessous. • Ne connecteur pas l’entrée de haut-parleur et
Страница 47 из 86 Installation • • • • De plus, le contact avec un liquide pourrait endommager l’amplificateur et les enceintes, produire de la fumée ou surchauffer l’appareil. Enfin, la surface de l’amplificateur et des enceintes connectées peut devenir chaude au toucher et entraîner de légères brûlures.
Страница 48 из 86 Caractéristiques techniques Alimentation .............................................................................................................. 14,4 V CC (10,8 V à 15,1 V permis) Mise à la masse
Страница 49 из 86 ENGLISH ESPAÑOL DEUTSCH FRANÇAIS ITALIANO NEDERLANDS êìëëäàâ 12
Страница 50 из 86 Indice Prima di usare questo prodotto .............. 1 Visita il nostro sito Web .................................... 1 In caso di difficotà.............................................. 2 PRECAUZIONE ................................................ 2 PRECAUZIONE
Страница 51 из 86 ATTENZIONE Se l’apparecchio non funziona correttamente, rivolgersi al rivenditore o ad un Centro Assistenza Autorizzato PIONEER. PRECAUZIONE Diagramma A - Appropriato Diagramma B - Non appropriato Altoparlante + da 4 Ω Altoparlante + da 8 Ω Altoparlante + da 4 Ω R- L+ R- Amplificatore Pioner
Страница 52 из 86 Regolazione di questa unità Indicatore dell’alimentazione L’indicatore dell’alimentazione viene illuminato quando si attiva l’alimentazione. Selettore di commando del livello di espansione dei bassi Per mezzo di questo comando si può selezionare tra 0 dB, 6 dB e 12 dB il livello di espansione dei
Страница 53 из 86 ENGLISH Comando del guadagno ESPAÑOL Se il livello sonoro continua a rimanere troppo basso, anche alzando il volume dello stereo utilizzato in concomitanza con questo amplificatore di potenza, ruotare in senso orario il comando del guadagno ubicato sulla parte anteriore dell’amplificatore. Se
Страница 54 из 86 Come collegare l’unità PRECAUZIONE • Togliere il contatto negativo (–) dalla batteria per evitare ogni rischio di cortocircuito e danni all’unità. • Fissare il cablaggio con dei fermi per cavi oppure nastro adesivo. Per proteggere il cablaggio, avvolgere il nastro adesivo intorno al cablaggio dove
Страница 55 из 86 Fusibile (30 A) Occhiello Cavo di massa (nero) [RD-223] (venduto separatamente) Collegare alla parte metallica della carrozzeria oppure dello chassis. DEUTSCH Cavo di connessione con spine tipo RCA (venduto separatamente). FRANÇAIS Impianto stereo della macchina con prese a spilli di uscita RCA
Страница 56 из 86 Come collegare l’unità Come collegare il terminale dell’alimentazione • Usare sempre lo speciale cavo rosso per batteria e il cavo di messa a terra [RD-223], venduti a parte. Collegare il cavo per la batteria direttamente al terminale positivo (+) della batteria dell’auto, ed il cavo per la messa a
Страница 57 из 86 Torcere L’uso di ingresso dell’altoparlante Usare il connettore per ingresso altoparlante fornito insieme con la macchina, collegare I fili per ingresso stereo altoparlante all’amplificatore. • Non connettere insieme l’ingresso RCA e l’ingresso altoparlante nello stesso istante. ESPAÑOL 1.
Страница 58 из 86 Come collegare l’unità Collegamento dei cavi d’altoparlanti Il modo di uscita altoparlante può essere a due canali (stereo) e a una canale (mono). Colleja i fili dell’alpoparlanpe in giuspo modo secondo le norme di sicurezza sotto le riportate. • Non connettere insieme l’ingresso RCA e l’ingresso
Страница 59 из 86 Installazione • • • • superficie dell’amplificatore o quella degli altoparlanti ad esso collegati potrebbe inoltre divenire molto calda e, al contatto, procurare piccole scottature. Non installare l’amplificatore in luoghi instabili come il pannello della ruota di scorta. Verificare che nulla si
Страница 60 из 86 Caratteristiche Alimentazione ............................................................................................... 14,4 V C.C. (10,8 V a 15,1 V permissìbili) Collegamento a terra
Страница 61 из 86 ENGLISH ESPAÑOL DEUTSCH FRANÇAIS ITALIANO NEDERLANDS êìëëäàâ 12
Страница 62 из 86 Inhoudsopgave Alvorens gebruik ........................................ 1 Bezoek onze website ........................................ 1 Bij problemen .................................................... 2 WAARSCHUWING ........................................ 2 WAARSCHUWING
Страница 63 из 86 Neem contact op met uw dealer of het dichtstbijzijnde PIONEER servicecentrum, wanneer de eenheid niet juist functioneert. WAARSCHUWING WAARSCHUWING Diagram B - Incorrect 8Ω + Luid- spreker 4Ω + Luid- spreker 8Ω + Luid- spreker 4Ω + Luid- spreker R- L+ R- Pioneer versterker 4 Ω brugschakeling 2 Ω
Страница 64 из 86 Instellen van dit toestel Spanningsindicator De spanningsindicator licht op wanneer de spanning wordt ingeschakeld. Versterkingsniveauschakelaar van de lage tonen U kunt de lage tonen extra versterken (Bass Boost) met 0 dB, 6 dB of 12 dB. 3
Страница 65 из 86 ENGLISH Versterkingsregelaar ESPAÑOL Draai de versterkingsregelaar op het voorpaneel van de eindversterker naar rechts indien de weergave te zacht klinkt, zelf wanneer het volume is verhoogd met de auto-stereo die u met deze eindversterker gebruikt. Draai de versterkingsregelaar naar links indien
Страница 66 из 86 Aansluiten van het toestel WAARSCHUWING • Voorkom kortsluiting en beschadiging van de eenheid en ontkoppel de nagatieve (–) accupool van het voertuig. • Zet de bedrading met kabelklemmen of isoleerof plakband vast. Bescherm de bedrading door de gedeelten in de buurt van metalen delen met
Страница 67 из 86 ENGLISH Aansluitschema Zekering (30 A) ESPAÑOL Speciaal rood accusnoer [RD-223] (los verkrijgbaar) Sluit, nadat alle andere aansluitingen op de versterker zijn gemaakt, het accusnoer-aansluitpunt van de versterker aan op het positieve aansluitpunt (+) van de accu. Doorvoerbuisje Zekering (30 A)
Страница 68 из 86 Aansluiten van het toestel 4. Sluit de draden aan. Aansluiten van het spanningsaansluitpunt • Gebruik altijd het los verkrijgbare, speciale rode accu- en aardedraad [RD-223]. Verbind het accudraad direct met de positieve pool (+) van de autoaccu en het aardedraad met het chassis van de auto. • Zet
Страница 69 из 86 Het gebruik van luidsprekeringang Verbinden de autostereo luidspreker uitgaan met de versterker door Gebruiken de geleverent spreker ingaan verbinding. • Maak niet tegelijk met de RCA ingang en de luidsprekeringang een verbinding. 7 In geval van Luidsprekeringangs de verbinding gebruiken ESPAÑOL 1.
Страница 70 из 86 Aansluiten van het toestel Aansluiten van de luidsprekerdraden De uitgangsfunctie voor de luidspreker kan voor twee kanalen (stereo) of een kanaal (mono) worden ingesteld. Sluit de luidsprekersnoercn aan overeenkomstig de gewenste functie zoals aangegeven in de onderstaande afbeeldingen. • Maak
Страница 71 из 86 Installatie • • • • luidsprekers kunnen ook beschadigd raken, rook produceren en oververhit raken door contact met vloeistoffen. Daarbij kan het oppervlak van de versterker en het oppervlak van aangesloten luidsprekers heet worden, hetgeen kan leiden tot lichte brandwonden. Installeer de versterker
Страница 72 из 86 Technische gegevens Spanningsbron .................................................................................. 14,4 V gelijkstroom (10,8 V t/m 15,1 V toelaatbaar) Aarding
Страница 73 из 86 ENGLISH ESPAÑOL DEUTSCH FRANÇAIS ITALIANO NEDERLANDS êìëëäàâ 12