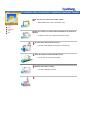
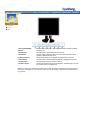
Страница 2 из 55 Main Page On-Screen Display Safety Instructions Troubleshooting Notational Check List Power Q&A Installation Self-Test Feature Check Cleaning Other Introduction Specifications Unpacking General Specifications Front PowerSaver Rear Preset Display Modes Setup Information Connecting Your Monitor
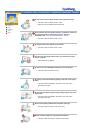
Страница 3 из 55 Notational Power Installation Clean Other Failure to follow directions noted by this symbol could result in bodily harm or damage to equipment. Prohibited Important to read and understand at all times Do not disassemble Disconnect the plug from the outlet Do not touch Grounding to prevent an
Страница 4 из 55 When not used for extended periods of time, set your PC to DPMS. If using a screen saver, set it to the active screen mode. z Notational Power If the size of your monitor is small, or if the same image is present for long periods of time, you may see afterimages due to damage to the flourescent
Страница 5 из 55 Do not cover the vents on the monitor cabinet. z Bad ventilation may cause a breakdown or fire. Notational Power Installation Clean Other Put your monitor in a location with low humidity and a minimum of dust. z An electric shock or fire could result inside the monitor. Do not drop the monitor when
Страница 6 из 55 When cleaning the monitor case or the surface of the TFT-LCD, wipe with a slightly moistened, soft fabric. Notational Power Installation Do not spray detergent directly on the monitor. Clean Other Use the recommended detergent with a smooth cloth. If the connector between the plug and the pin is
Страница 7 из 55 Do not remove cover(or back). No user serviceable parts inside. z z Notational This may cause an electric shock or a fire. Refer servicing to qualified service personnel. Power Installation Clean Other If your monitor does not operate normally - in particular, if there are any unusual sounds or
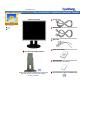
Страница 8 из 55 SyncMaster 181T Monitor and Stand Power Cord Unparking Front Rear Signal Cable DVI Cable Quick Setup Guide Pivot Stand and S/W CD(Option) Warranty Card (Not available in all locations) Please make sure the following items are included with your monitor. If any items are missing, contact your
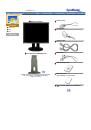
Страница 9 из 55 SyncMaster 191T Monitor and Stand Power Cord Unparking DC-Adapter Front Rear Signal Cable Pivot Stand and S/W CD(Option) DVI Cable Quick Setup Guide Please make sure the following items are included with your monitor. If any items are missing, contact your dealer. Warranty Card (Not available in
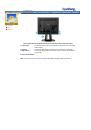
Страница 10 из 55 Unparking Front Rear 1.Analog(A)/Digital(B) indicator 2. Auto button 3. Exit button 4,5. Adjust buttons 6. Menu button 7. Power button 8. Power indicator When push the 'Exit' button, then Selects the Video signal(A or B)while the OSD is off. Use this button to auto adjustment direct access. Use
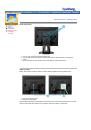
Страница 11 из 55 SyncMaster 181T Unparking Front Rear (The configuration at the back of the monitor may vary from product to product.) 1. Power port 2. DVI Port 3. Signal Port Connect the power cord for your monitor to the power port on the back of the monitor. Connect the DVI Cable to the DVI Port on the back of
Страница 12 из 55 SyncMaster 191T Unparking Front Rear (The configuration at the back of the monitor may vary from product to product.) 1. Power port 2. DVI Port 3. Signal Port Connect the DC Adapter for your monitor to the power port on the back of the monitor. Connect the DVI Cable to the DVI Port on the back of
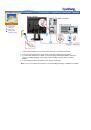
Страница 13 из 55 SyncMaster 181T Connecting Your Monitor Installing the Monitor Driver Installing VESA compliant mounting 1. Connect the power cord for your monitor to the power port on the back of the monitor. Plug the power cord for the monitor into a nearby outlet. 2. Connect the signal cable to the 15-pin,
Страница 14 из 55 SyncMaster 191T Connecting Your Monitor Installing the Monitor Driver Installing VESA compliant mounting 1. Connect the DC Adapter for your monitor to the power port on the back of the monitor. 2. Connect the signal cable to the 15-pin, D-sub connector on the back of your monitor. 3. If you are
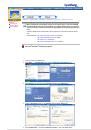
Страница 15 из 55 Connecting Your Monitor When prompted by the operating system for the monitor driver, insert the CD-ROM included with this monitor. Driver installation is slightly different from one operating system to another. Follow the directions as appropriate for the operating system you have. Installing the
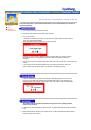
Страница 16 из 55 Windows XP/2000 1. Insert CD into the CD-ROM driver. 2. Click "Windows XP/2000 Driver". 3. Choose your monitor model in the model list, then click the "OK" button. 4. Click the "Install" button in the "Warning" window. 5. If you can see following "Message" window, then click the "Continue Anyway"
Страница 17 из 55 Windows XP | Windows 2000 | Windows Me | Windows 98 | Windows 95 | Windows NT | Linux Connecting Your Monitor Installing the Monitor Driver When prompted by the operating system for the monitor driver, insert the CD-ROM included with this monitor. Driver installation is slightly different from one
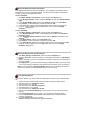
Страница 18 из 55 6. Select "Don't search ,I will.." then click "Next" and then click "Have disk". 7. Click the "Browse" button then choose A:(D:\Driver) and choose your monitor model in the model list and click the "Next" button. 8. If you can see following "Message" window, then click the "Continue Anyway" button.
Страница 19 из 55 10. Monitor driver installation is completed. Microsoft® Windows® 2000 Operating System When you can see "Digital Signature Not Found" on your monitor, follow these steps. 1. Choose "OK" button on the "Insert disk" window. 2. Click the "Browse" button on the "File Needed" window. 3. Choose
Страница 20 из 55 Microsoft® Windows® 95 Operating System First determine the Windows 95 version installed on your computer by right-clicking the My Computer icon on PC and selecting Properties. The version number is listed under System. Perform the steps for the appropriate version. Version 4.00.950A 1. Click
Страница 21 из 55 Removing the base | Attaching a base Connecting Your Monitor Installing the Monitor Driver Removing the base Installing VESA compliant mounting 1. Turn off your monitor and unplug its power cord. 2. Lay the LCD monitor face-down on a flat surface with a cushion beneath it to protect the screen. 3.
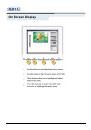
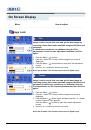
Страница 23 из 55 On Screen Display Menu How to adjust Brightness Adjust the Brightness. 1 2 3 Push the Menu ( ) button. Push the Menu ( ) button to open the Brightness adjustment screen. Use the + button to increase the brightness or - button to decrease the brightness. Contrast Adjust the Contrast. 1 2 3 4 Push
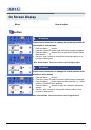
Страница 24 из 55 On Screen Display Menu How to adjust Image Lock Fine Image Lock is used to fine tune and get the best image by removing noises that creates unstable images with jitters and shimmers. If satisfactory results are not obtained using the Fine adjustment, use the Coarse adjustment and then use Fine
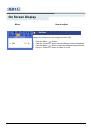
Страница 25 из 55 On Screen Display Menu How to adjust Position H-Position Follow these instructions to change the horizontal position of the monitor's entire display. 1 2 3 4 Push the Menu ( ) button. Push the - button or + button until the Position screen is displayed. Push the Menu ( ) button twice to open the
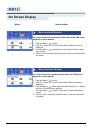
Страница 26 из 55 On Screen Display Menu How to adjust Reset Geometry Reset Geometry parameters are replaced with the factory default values. 1 2 3 4 Push the Menu ( ) button. Push the - button or + button until the Reset screen is displayed. Push the Menu ( ) button twice to open the Geometry Reset adjustment
Страница 27 из 55 On Screen Display Menu How to adjust Color Temperature Color Temperature Color temperature is a measure of the "warmth"of the image colors. 1 2 3 4 Push the Menu ( ) button. Push the - button or + button until the Color Temperature screen is displayed. Push the Menu ( ) button to open the Color
Страница 28 из 55 On Screen Display Menu How to adjust Image Size If your computer or video board supplies a signal rate and addressability lower than 1280 x 1024, this LCD Monitor provides a scaling processor that can expand the addressability up to 1280 x 1024. 1 2 3 4 Push the Menu ( ) button. Push the - button
Страница 29 из 55 On Screen Display Menu How to adjust Halftone Change the opaqueness of the background of the OSD. 1 2 3 4 Push the Menu ( ) button. Push the - button or + button until the Halftone screen is displayed. Push the Menu ( ) button to open the Halftone selection screen. Use the - button or + button to
Страница 30 из 55 On Screen Display Menu How to adjust Menu Position(H-Position) You can change the horizontal position where the OSD menu appears on your monitor. 1 2 3 4 Push the Menu ( ) button. Push the - button or + button until the Menu Position screen is displayed. Push the Menu ( ) button twice to open the
Страница 31 из 55 On Screen Display Menu How to adjust Menu Display Time The menu will automatically turn off if no adjustments are made for a certain time period. You can set the amount of time the menu will wait before it turns off. 1 2 3 4 Push the Menu ( ) button. Push the - button or + button until the Menu
Страница 32 из 55 On Screen Display Menu How to adjust Auto Adjustment Auto adjustment allows the monitor to self-adjust to the incoming video signal. The values of fine, coarse and position are adjusted automatically. 1 Push the Auto button. Note:To make the automatic adjustment function sharper, execute the 'AUTO'
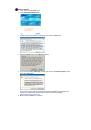
Страница 33 из 55 Before calling for service, check the information in this section to see if you can remedy any problems yourself. If you do need assistance, please call the phone number on the warranty card, the phone number on the Information section or contact your dealer. Check List Q&A Self-Test Feature Check
Страница 34 из 55 strange after running a program or due to a crash between applications? The screen suddenly has become unbalanced. Has the video card been set properly? Set the video card by referring to the video card manual. Have you changed the video card or the driver? Adjust screen image position and size
Страница 35 из 55 Question How can I change the frequency? Check List Q&A Answer Frequency can be changed by reconfiguring the video card. Note that video card support can vary, depending on the version of the driver used. (Refer to the computer or the video card manual for details.) Self-Test Feature Check How can
Страница 36 из 55 Self-Test Feature Check Check List | Warning Messages | Environment | Useful Tips Your monitor provides a self test feature that allows you to check whether your monitor is functioning properly. Q&A Self-Test Feature Check 1. Turn off both your computer and the monitor. 2. Unplug the video cable
Страница 37 из 55 z z A monitor recreates visual signals received from the PC. Therefore, if there is trouble with the PC or the video card, this can cause the monitor to become blank, have poor coloring, noise, Video mode not supported, etc. In this case, first check the source of the problem, and then contact a
Страница 38 из 55 SyncMaster 181T General Model Name General PowerSaver Preset Timing Modes SyncMaster 181T LCD Panel Size 18.1 inch diagonal Display area 359.04 (H) x 287.232 (V) Pixel Pitch 0.2805 (H) x 0.2805 (V) Type a-si TFT active matrix Viewing Angle 80/80/80/80(L/R/T/B),Typical Synchronization Horizontal 30
Страница 39 из 55 SyncMaster 191T General Model Name SyncMaster 191T LCD Panel Size 19.0 inch diagonal General Display area 376.32 (H) x 301.056 (V) PowerSaver Preset Timing Modes Pixel Pitch 0.298 (H) x 0.294 (V) Type a-si TFT active matrix Viewing Angle 85/85/85/85(L/R/T/B) Synchronization Horizontal 30 ~ 81 kHz
Страница 40 из 55 SyncMaster 181T General PowerSaver Preset Timing Modes This monitor has a built-in power management system called PowerSaver. This system saves energy by switching your monitor into a low-power mode when it has not been used for a certain amount of time. The monitor automatically returns to normal
Страница 41 из 55 SyncMaster 191T General PowerSaver Preset Timing Modes This monitor has a built-in power management system called PowerSaver. This system saves energy by switching your monitor into a low-power mode when it has not been used for a certain amount of time. The monitor automatically returns to normal
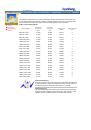
Страница 42 из 55 SyncMaster 181T If the signal transferred from the computer is the same as the following Preset Timing Modes, the screen will be adjusted automatically. However, if the signal differs, the screen may go blank while the power LED is on. Refer to the video card manual and adjust the screen as
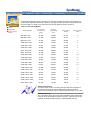
Страница 43 из 55 SyncMaster 191T If the signal transferred from the computer is the same as the following Preset Timing Modes, the screen will be adjusted automatically. However, if the signal differs, the screen may go blank while the power LED is on. Refer to the video card manual and adjust the screen as
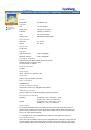
Страница 44 из 55 Service Terms Regulatory Natural Color For Better Display Authority U.S.A. : samsung Computer Products Customer Service 400 Valley Road, Suite 201, Mt. Arlington, NJ 07856 Tel. : (973)601-6000, 1-800-samsung (1-800-726-7864) Fax. : (973)601-6001 http://samsungmonitor.com/ BRAZIL : samsung
Страница 45 из 55 Service Terms Regulatory Natural Color For Better Display Authority UKRAINE : (user manual) samsung ELECTRONICS REPRESENTATIVE OFFICE IN UKRAINE 4 Glybochitska str. HUNGARY : Kiev, Ukraine samsung Electronics Magyar Rt Tel. 8-044-4906878 1039, Budapest, Lehel u. 15-17. Fax 8-044-4906887 Tel: 36 1
Страница 46 из 55 Dot Pitch Service The image on a monitor is composed of red, green and blue dots. The closer the dots, the higher the resolution. The distance between two dots of the same color is called the 'Dot Pitch'. Unit: mm Terms Vertical Frequency Regulatory The screen must be redrawn several times per
Страница 47 из 55 Service FCC Information | IC Compliance Notice | MPR II Compliance European Notice (Europe only) | PCT Notice | TCO'95-Ecological requirements for personal computers (TCO applied model only) TCO'99-Ecological requirements for personal computers (TCO applied model only) Medical Requirement Terms
Страница 48 из 55 MPR II Compliance Service Terms Regulatory This monitor complies with SWEDAC(MPR II) recommendations for reduced electric and magnetic fields. European Notice (Europe only) Natural Color For Better Display Authority Products with the CE Marking comply with both the EMC Directive (89/336/EEC),
Страница 49 из 55 The requirements cover a wide range of issues: environment, ergonomics, usability, emission of electrical and magnetic fields, energy consumption and electrical and fire safety. Service Terms Regulatory The environmental demands concern among other things restrictions on the presence and use of
Страница 50 из 55 Service Terms Regulatory Natural Color For Better Display Authority Congratulations! You have just purchased a TCO'99 approved and labelled product! Your choice has provided you with a product developed for professional use. Your purchase has also contributed to reducing the burden on the
Страница 51 из 55 Service Terms Regulatory Natural Color For Better Display Authority Mercury is sometimes found in batteries, relays and switches. It damages the nervous system and is toxic in high doses. The relevant TCO'99 requirement states that batteries may not contain any mercury. It also demands that mercury
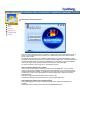
Страница 52 из 55 Natural Color Software Program Service Terms Regulatory Natural Color For Better Display Authority One of the recent problems in using a computer is that the color of the images printed out by a printer or other images scanned by a scanner or a digital camera are not the same as those shown on the
Страница 53 из 55 For Better Display Service Terms 1. Adjust computer resolution and screen injection rate (refresh rate) in control panel of computer as described below to enjoy the best quality of picture. You can have an uneven quality of picture in the screen if the best quality of picture is not provided in