Страница 3 из 58 Content EN CAREFULLY READ THIS USER’S MANUAL BEFORE PUTTING THE TELEVISION INTO OPERATION. KEEP IT FOR FUTURE USE. RECORD THE MODEL NUMBER AND THE SERIAL NUMBER OF THE TELEVISION. SEE THE LABEL ON THE REAR COVER AND PROVIDE THIS INFORMATION TO YOUR VENDOR IN THE EVENT THAT YOU REQUIRE REPAIRS.
Страница 4 из 58 EN Important safety instructions 1. Important safety instructions If you want to use this product correctly, carefully read this user’s manual and store it for future reference. If you give (sell) the appliance to somebody, please also include all the documentation together with this appliance,
Страница 5 из 58 Important safety instructions EN Installation, operation – – – – – – – – – – – – Install the appliance according to the instructions in the user’s manual. Leave free space on all sides of the appliance necessary for proper air circulation. This removes the heat created during operation. Covering
Страница 6 из 58 EN Important safety instructions – Before turning on the appliance, check that the electrical connection is performed properly and in accordance with the instructions of the manufacturer. Before connecting or changing the connection, turn off the appliance and disconnect it from the mains. Remember
Страница 7 из 58 Important safety instructions EN Note: Only connect the appliance to a properly grounded socket with a protective grounding pin. Note: If you will be installing the appliance on a wall or to the ceiling, follow the manufacturer’s instruction found in the user’s manual of the particular appliance.
Страница 8 из 58 EN Important safety instructions Remote control and batteries – – – – – – Do not expose the remote control or the batteries to direct sunlight or sources of heat, such as heaters, heat exchangers, stoves or other appliances (including amplifiers) that produce heat. Do not use or leave the appliance
Страница 9 из 58 Important safety instructions EN DVD player This device is equipped with a built-in DVD player. For safety reasons, as a rule, the disc drive is located on the side of the device, thus preventing exposure to laser radiation. Under no circumstances should you in any way attempt to modify or change
Страница 10 из 58 EN Important safety instructions Cleaning discs – Fingerprints and dust affect the quality of the image while playing the recording from the disc. Prior to use, wipe the disc from the centre outwards using a clean lint-free cloth. – Do not use any solvents such as thinners, benzol (benzene),
Страница 11 из 58 Important safety instructions EN Region code This player is intended for playing DVD video designated by the code for region 2 or ALL (discs designated in this way can be played by all DVD players). You can find the region code of the disc on its label, the region code of the player is located on
Страница 12 из 58 EN Important safety instructions Notes on the USB connector: – USB memory devices must be inserted into the appliance directly. To prevent data transmission failure or its interference, do not use USB extension cables. Electrostatic discharges may cause the appliance to malfunction. In such an
Страница 13 из 58 Stand assembly EN 2. Stand assembly Before attaching/detaching the stand, ensure the television is switched off and unplugged from the power outlet. Before performing work spread cushioning (e.g. soft blanket) over the base area to lay the LED TV on this will prevent it from being damaged. Make
Страница 14 из 58 EN Device description 3. Device description 3.1. Control panel button function The buttons on the lower-right panel control your TV´s basic features, including the on-screen menu. To use the more advanced features, you should use the remote control. Note: Pictures are only for illustration. 1. 2.
Страница 15 из 58 Device description EN 3.2. T V terminal connections 1. 2. 3. 4. 5. 6. 7. 8. 9. 10. 11. CI+: Cl input YPbPr AV input USB input slot HDMI input COAXIAL output RF antenna jack PC AUDIO input SCART input VGA Headphone socket EN 13 2016 06/2016
Страница 16 из 58 EN Remote control 4. Remote control 1. 2. 3. 4. 5. 6. 7. 8. 9. 10. 11. 12. 13. 14. 15. 16. POWER: Turns the LCD TV on and into standby mode. AUDIO I/II: Switch the audio channel of multimedia playing. MUTE: Mutes and restores your LCD TV sound. 0-9: Pressing a number selects a channel. SLEEP: Set
Страница 17 из 58 Remote control EN 17. GUIDE: Displays the Program Guide on the screen in DTV mode. Press again to turn GUIDE off. : Freeze a multi-page changing on Teletext mode. 18. DTV/RADIO: In DTV mode, press DTV/RADIO button to enter DTV or RADIO mode. 19. PVRLIST: In DTV mode, displays the executed PVR LIST
Страница 18 из 58 EN First time setup 5. First time setup Press INPUT button to display the input source list. Press / or OK button to select the desired input source. Press OK button to enter the input source. Press EXIT button to quit. Connect an RF cable from the Tv’s input called “RF-In” and to your TV
Страница 19 из 58 First time setup EN 5.4. Auto Tuning Select among Analogue (ATV) or digital (DVT) or leave both sources ATV+DTV. ATV tuning will start first. If you want to skip ATV tuning, press MENU button and left arrow button. Then DTV tuning will start. To skip DTV tuning, press MENU button and left arrow
Страница 20 из 58 EN First time setup Note: If an automatic tuning do not find any receivable channel (e.g. inconvenient antenna) or you have paused it manually, you can still tune channels manually, one by one, as it is described down in the manual. To do so, you will need some technical data about channel you wish
Страница 21 из 58 Menu EN 6. Menu 6.1. Channel menu Press MENU button to display the main menu. Press / button to select CHANNEL in the main menu. 1. 2. 3. Press / button to select the option that you want to adjust in the CHANNEL menu. Press Enter button to adjust. After finishing your adjustment, Press
Страница 22 из 58 EN Menu 6.1.2. ATV manual tuning Current CH Set the channel number. Color System Select the color system (available systems: AUTO, PAL, SECAM). Sound System Select the sound system. Fine-Tune Adjust the frequency of the channel finely. Search Start searching channel. 20 EN 2016 06/2016
Страница 23 из 58 Menu EN 6.1.3. DTV manual tuning Press / button to select DTV Manual Tuning, then press Enter button to enter sub-menu. Press / button to select channel, then press Enter button to search program. 6.1.4. Program Edit Press / button to select Pro g ram Edit, then press Enter button to
Страница 24 из 58 EN Menu 6.1.5. Schedule list You can program certain events fixed in time in digital broadcasting. Such planned (programmed) events are saved in the List. Press / button to select Schedule List, then press Enter button to enter sub-menu. It is available in source. Press the YELLOW button to
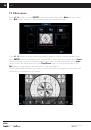
Страница 25 из 58 Menu EN 6.1.6. Signal information Press / button to select Signal Information, press the Enter button to see the detail information about the signal. Only available when there is signal in DTV. Use programs/channels with the highest values of both variables, max. is 100 for a satisfactory
Страница 26 из 58 EN Menu 6.2.1. Picture mode Press / button to select Picture Mode, then press OK button to enter sub-menu. You can change the value of contrast, brightness, color, sharpness and tint when the picture is in Personal mode. Tip: You can press PMODE button to change the Picture Mode directly.
Страница 27 из 58 Menu EN Increase the blue tone for the white. Increase the sex-linked colors for the white. Increase the red color for the white. Cold Normal Warm 6.2.3. Noise Reduction To filter out and reduces the image noise and improve picture quality. Press / button to select Noise Reduction, then press OK
Страница 28 из 58 EN Menu 6.3. Sound menu Press MENU button to display the main menu. Press / button to select SOUND in the main menu. 1. 2. 3. Press / button to select the option that you want to adjust in the SOUND menu. Press Enter button to adjust. After finishing your adjustment, Press Enter button to
Страница 29 из 58 Menu EN Tip: You can press SMODE button on the remote control to change the Sound Mode directly. Standard Music Movie Sports Personal Produces a balanced sound in all environments. Preserves the original sound. Good for musical programs. Enhances treble and bass for a rich sound experience.
Страница 30 из 58 EN Menu 6.4. Time menu Press MENU button to display the main menu. Press / button to select TIME in the main menu. 1. 2. 3. Press / button to select the option that you want to adjust in the TIME menu. Press Enter button to adjust. After finishing your adjustment, Press Enter button to save
Страница 31 из 58 Menu EN 6.4.2. Sleep timer Press / button to select Sleep Timer, then press Enter button to enter sub-menu. Press / button to select. (Available options are:Off,10min,20min,30min,60min, 90min,120min,180min,240min). 6.4.3. Auto standby Press / button to select Auto Standby, then press
Страница 32 из 58 EN Menu 6.4.4. OSD timer Press / button to select OSD Timer, then press Enter button to enter sub-menu. Press / button to select how long the setting will be displayed before automatic shut off. 6.5. Lock menu Press MENU button to display the main menu. Press / button to select LOCK in
Страница 33 из 58 Menu EN 6.5.1. Lock system Press / button to select Lock System, then press Enter button to make the following 3 options valid. 6.5.2. Set password Press / button to select Set Password, then press Enter button to enter sub-menu to set new password. EN 31 2016 06/2016
Страница 34 из 58 EN Menu 6.5.3. Channel lock Press / button to select Channel Lock, then press Enter button to enter sub-menu to select. Press Green button to lock or unlock the channel. 6.5.4. Parental Guidance Press / button to select Parental Guidance, then press Enter button to enter submenu to select
Страница 35 из 58 Menu EN 6.5.5. Key lock Press / button to select Key Lock, then press / button to select Off or On. When Key Lock’s statue is on, you can’t use the Key panel button. 6.6. Hotel mode Hotel mode serves to limit the TV functions for easier usage in place where for example maximum volume or
Страница 36 из 58 EN Menu 6.6.4. Max volume Press / button to select Max Volume, then press / button to adjust. 6.6.5. Clear lock Press / button to select Clear Lock, then press Enter button to clear the setting you have done before. 6.7. Setup menu Press MENU button to display the main menu. Press /
Страница 37 из 58 Menu EN 6.7.2. TT language Press / button to select TT Language, then press Enter button to enter sub-menu. Press / / / button to select TT language. 6.7.3. Audio Languages Press / button to select Audio Languages, then press Enter button to enter submenu. It serves to automatically
Страница 38 из 58 EN Menu 6.7.4. Subtitle Language Press / button to select Subtitle Language, then press Enter button to enter submenu. It serves to automatically select a certain language if this is available. You can select 2 languages – first and second. If the desired language is not available, the system
Страница 39 из 58 Menu EN WARNING Formatting will delete all data on the memory stick! Note: Firstly try each USB device for speed and record reliability. In case of unsatisfactory result, change it to other one, particularly faster. USB device speed is a key parameter of a reliable record and time shift. 6.7.7.
Страница 40 из 58 EN Menu 6.7.11. Software Update (USB) Press / button to select Software Update (USB), plug your USB device in the USB slot, then press Enter button to update the right software. WARNING Run the software update only if you have an original software to the correct model from the manufacturer
Страница 41 из 58 Menu EN Auto Standby Press / button to turn the Auto Standby on or off. Device List Press Enter button to open the main menu of device. 6.8. Screen menu (only PC mode) Press MENU button to display the main menu. Press / button to select SCREEN in the main menu. 1. 2. 3. Press / button
Страница 42 из 58 EN Menu 6.8.3. V-Offset Adjust the vertical position of the picture. Press / button to select V-Offset, then press Enter button to enter sub-menu 6.8.4. Size Adjust the display size. Press / button to select Size, then press Enter button to enter sub-menu. 6.8.5. Phase Adjust the horizontal
Страница 43 из 58 USB EN 7. USB Note: Before operating Media menu, plug in USB device,then press INPUT button to set the Input Source to Media . TV will recognise majority of USB devices and it will shortly show the menu for playback. If there is no action, menu disappears and the previous mode will be on. Press /
Страница 44 из 58 EN USB 7.1. Photo menu Press / button to select PHOTO in the main menu, then press Enter button to enter. Press Exit button to return to the previous menu and exit menu to quit. Press / button to select the file you want to watch in the file selecting menu, then press ENTER button to display
Страница 45 из 58 USB EN 7.2. Music menu Press / button to select MUSIC in the main menu, then press Enter button to enter. Press Exit button to return to the previous menu and exit menu to quit. Press / button to select drive disk you want to watch, then press Enter button to enter. Press down arrow to hide
Страница 46 из 58 EN USB 7.3. Movie menu Press / button to select MOVIE in the main menu, then press Enter button to enter. Press Exit button to return to the previous menu and exit menu to quit. Press / button to select drive disk you want to watch, then press Enter button to enter. Press media button to
Страница 47 из 58 USB EN 7.4. Text menu Press / button to select TEXT in the main menu, then press Enter button to enter. Press Exit button to return to the previous menu and exit menu to quit Press / button to select drive disk you want to watch, then press Enter button to enter. Press / button to
Страница 48 из 58 EN DVD player 8. DVD player Supported DVD formats CD Digital Audio 12 cm / Dolby Digital AC-3 CD-R/CD-RW/CD+RW HDCD VCD/SVCD DVD / DVD-R / DVD-RW / DWD+R / DWD+RW JPEG / AVI / MP4 / DAT MPEG 1 / MPEG 2 DivX 3.11 / 4.x / 5.x / Ultra XvID 46 EN 2016 06/2016
Страница 49 из 58 Trouble shooting guide EN 9. Trouble shooting guide WARNING Under no circumstances should you try to repair the device yourself, the device does not contain any parts that a user could repair himself. Always take the device to the authorised service centre in case of repair, adjustment or any other
Страница 50 из 58 EN Trouble shooting guide Symptoms No response to remote control Possible solutions Batteries of remote control may have exhausted, if necessary, change the batteries. Clean the remote control lens. The distance between LED TV and remote control should be within 8m, within recommended operating
Страница 51 из 58 Trouble shooting guide Symptoms Picture is distorted, macroblock, small block, dots, pixelization, etc. Noise from speakers TV turns off automatically TV turns on automatically. Picture is not shown in full screen. EN Possible solutions Compression of video contents may cause distortion especially
Страница 52 из 58 EN Technical specifications 10. Technical specifications Model Panel size Consumption Standby power consumption Nominal voltage Remote control VESA wall mount Dimensions with stand (W × H × D) Dimensions w/o stand (W × H × D) Weight Connections RF IN AV in SCART Component YPbPr VGA (D-Sub 15 pin)
Страница 53 из 58 Technical specifications Stereo sound Sound output PVR recording to USB Pitch correction Progressive Scan Timeshift function Electronic Programme Guide EPG Teletext Teletext pages Comb filter OSD menu Zoom Noise reduction Timer off /on/sleep Subtitles Audio language Channel list Favourites list
Страница 54 из 58 EN Technical specifications Information sheet Importer: FAST ČR, a.s., Černokostelecká 1621, 251 01 Říčany Brand Model Energy efficiency class Screen diagonal in cm/inches [cm/"] Electric energy consumption when on [W] Annual electric energy consumption* [kWh] Electric energy consumption in standby
Страница 55 из 58 EN INSTRUCTIONS AND INFORMATION REGARDING THE DISPOSAL OF USED PACKAGING MATERIALS Dispose of packaging material at a public waste disposal site. DISPOSAL OF USED ELECTRICAL AND ELECTRONIC APPLIANCES The meaning of the symbol on the product, its accessory or packaging indicates that this product
Страница 56 из 58 EN EN Warranty conditions Warranty card is not a part of the device packaging. This product is warranted for the period of 24 months from the date of purchase to the end-user. Warranty is limited to the following conditions. Warranty is referred only to the customer goods using for common domestic