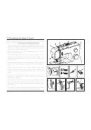
Страница 2 из 71 IMPORTANT SAFETY INSTRUCTIONS When using an electrical appliance, basic safety should always be followed, including the following: Read all instructions before using this sewing machine. DANGER - To reduce the risk of electric shock: 1. An appliance should never be left unattended when plugged in.
Страница 3 из 71 Congratulations As the owner of a new Singer sewing machine, you are about to begin an exciting adventure in creativity. From the moment you first use your machine, you will know you are sewing on one of the easiest to use sewing machines ever made. May we recommend that, before you start to use
Страница 4 из 71 List of Contents Machine Basics Principle Parts of the Machine..............................................................................................................................................2/3 Connecting Machine to Power Source
Страница 5 из 71 Principal Parts of the Machine 1. Thread tension dial 2. Thread take-up lever 3. Reverse sewing lever 8 1 4. Thread cutter 9 5. Presser foot 2 6. Needle plate cover 7. Removable extension table/ accessory storage 3 8. Bobbin stopper 10 4 11 9. Stitch width dial 10. Stitch length dial 5 6 11.
Страница 6 из 71 Principal Parts of the Machine 14. Horizontal spool pin 15. Bobbin winding spindle 16. Hole for auxiliary spool pin 20 17. Handwheel 21 18. Power and light switch 14 19. Main plug socket 15 20. Bobbin thread guide 16 21. Upper thread guide 22. Face plate 17 23. Handle 22 23 24 24. Presser foot
Страница 7 из 71 Connecting Machine to Power Source Connect the machine to a power source as illustrated. (1) This appliance is equipped with a polarized plug which must be used with the appropriate polarized outlet. (2) Attention: Unplug power cord when machine is not in use. A Foot control The foot control pedal
Страница 8 из 71 Two Step Presser Foot Lifter When sewing several layers or thick fabrics, the presser foot can be raised to a higher position for easy positioning of the work. (A) A 5
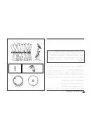
Страница 9 из 71 Accessories 1 Standard accessories Standard accessories (1) a. All purpose foot b. Zipper foot c. Buttonhole foot d. Button sewing foot e. Seam ripper/ brush f. Edge/ quilting guide g. Pack of needles h. Spool holders i. Bobbin (3x) j. L-screwdriver k. Darning plate l. Auxiliary Spool Pin m. Spool
Страница 10 из 71 Winding the Bobbin - Place thread and corresponding spool holder on to spool pin. (1/2) - Snap thread into thread guide. (3) - Wind thread clockwise around bobbin winder tension discs. (4) - Thread bobbin as illustrated and place on spindle. (5) - Push bobbin spindle to right. (6) - Hold thread
Страница 11 из 71 Inserting the Bobbin When inserting or removing the bobbin, the needle must be fully raised. 1. Insert the bobbin in the bobbin case with the thread running counterclockwise direction (arrow). 2. Pull the thread through the slit (A). 3. Draw the thread clockwise until it slips into the notch (B).
Страница 12 из 71 Threading the Upper Thread This is a simple operation but it is important to carry out correctly as by not doing so several sewing problems could result. - Start by raising the needle to its highest point (1), and continue turning the handwheel counterclockwise until the needle just slightly begins
Страница 13 из 71 Automatic Needle Threader - Raise the needle to its highest position. - Press lever (A) down as far as it will go. - The threader automatically swings to the threading position (B). - Pass thread around thread guide (C). A - Pass the thread in front of the needle around the hook (D) from bottom to
Страница 14 из 71 Raising the Bobbin Thread Hold the upper thread with the left hand. Turn the handwheel (1) towards you (counterclockwise) lowering, then raising needle. Note: If it is difficult to raise the bobbin thread, check to make sure the thread is not trapped by the hinged cover or the Removable Extension
Страница 15 из 71 Thread Tension Upper thread tension Basic thread tension setting: "4". (1) To increase the tension, turn the dial to the next number up. To reduce the tension, turn the dial to the next number down. A. Normal thread tension for straight stitch sewing. B. Thread tension too loose for straight stitch
Страница 16 из 71 How to Choose Your Pattern The diagram on this page display the stitch patterns available on the machine. a b c Stitches in the top of the diagram are indicated on the Pattern Selector Dial in gray. To select the patterns indicated with the gray color, turn the Pattern Selector Dial. (d) Use the
Страница 17 из 71 Stitch Width Dial & Stitch Length Dial Function of stitch width dial The maximum zigzag stitch width for zigzag stitching is 6mm; however, the width can be reduced on any patterns. The width increases as you move zigzag dial from "0" - "6". (1) The Stitch Width Dial is also the control for the
Страница 18 из 71 Sewing Straight Stitch To begin sewing, set the machine for straight stitch. (1) Place the fabric under the presser foot with the fabric edge lined up with the desired seam guide line on the needle plate. (2) Lower the presser foot lifter, and then step on the foot controller to start sewing. (3) 1
Страница 19 из 71 Reverse Sewing To secure the beginning and the end of a seam, press down the reverse sewing lever (A). Sew a few reverse stitches. Release the lever and the machine will sew forward again. (1) A Removing the Work Turn the handwheel toward you (counterclockwise) to bring the thread take up lever to
Страница 20 из 71 Choosing Stretch Stitch Patterns The Stretch Stitch Patterns are indicated with a blue color on the Pattern Selector Dial. To select these stitches, turn the Pattern Selector Dial to the desired pattern. Then, turn the Stitch Length Dial to the indicator marked "S1". Though there are several
Страница 21 из 71 Blind Hem For hems on curtains, trousers, skirts, etc. Blind hem for stretch fabrics. Blind hem for firm fabrics. Set the Stitch Length Dial with the range shown on the diagram at the right. Blind hems, however, are normally sewn with a longer stitch length setting. Set the Stitch Width Dial at a
Страница 22 из 71 Sew 1-step Buttonholes Buttonhole sewing is a simple process that provides reliable results. However, it is strongly suggested to always make a practice buttonhole on a sample of your fabric and stabilizer. Making a Buttonhole 1. Using tailor's chalk, mark the position of the buttonhole on the
Страница 23 из 71 Sewing on Buttons Install the darning plate. (1) Change the all purpose foot to the button sewing foot. (2) Set the stitch length to "0". Place the button and fabric under the Button Sewing foot, as illustrated in (3). Set the machine for zig-zag stitch, then set the width to number "3" - "6". Turn
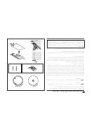
Страница 24 из 71 Gathering * The gathering foot is an optional accessory not included with your machine. (1) - Remove the presser foot shank. (2) - Attach the gathering foot. - Sew a single row or multiple rows of straight stitches. - If more gathering is required, loosen the upper thread tension to below 2 so that
Страница 25 из 71 Free Motion Darning, Stippling * The darning/ embroidery foot is an optional accessory not included with your machine. (1) Darning: Install the darning plate. (2) Remove the presser foot shank. (3) Attach the darning/ embroidery foot to the presser foot bar. The lever (a) should be behind the
Страница 26 из 71 The Even Feed Foot Accessory (Optional) Always try to sew first without the Even Feed Foot accessory which should be used only when necessary. Attaching head (e) It is easier to guide the fabric and you have a better view of the seam when using the standard, regular foot on your machine. Your
Страница 27 из 71 Side Cutter (Optional) Lift the presser foot lifter (a) to raise the presser foot bar. (1) Remove the presser foot. (See page 26) b Attach the Side Cutter to the machine as follows (2): - Insert the arm (b) to the needle clamp (c). - Lower the presser foot lifter while making sure the pin (d) of
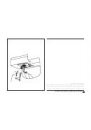
Страница 28 из 71 Installing the Removable Extension Table Hold the removable extension table horizontally, and push it in the direction of the arrow. (1) To remove the extension table, pull it toward the left. 1 The inside of the removable extension table can be utilized as an accessory box. To open, flip cover
Страница 29 из 71 Attaching the Presser Foot Shank Raise the presser foot bar (a) with the presser foot lifter. Attach the presser foot shank (b) as illustrated. (1) a a Attaching the presser foot Lower the presser foot shank (b) using the presser foot lifter, until the cut-out (c) is directly above the pin (d). (2)
Страница 31 из 71 Darning Plate For certain types of work, (e.g. darning or free-hand embroidery), the darning plate must be used. Install the darning plate as illustrated. For normal sewing, remove the darning plate. For free-motion sewing it is recommended to use a darning/embroidery foot, available as an optional
Страница 32 из 71 Inserting & Changing Needles Change the needle regularly, especially if it is showing signs of wear and causing problems. For best sewing results ® always use SINGER Brand Needles. D A Insert the needle as illustrated as follows: A. Loosen the needle clamp screw and tighten again after inserting
Страница 33 из 71 Changing the Bulb Disconnect the machine from the power supply by removing the plug from the main socket! Replace bulb with same type rated 10 watts (110-120V area) or 15 watts (220-240V area). - Loosen screw (A) as illustrated. (1) Remove the face plate (B). Unscrew the bulb and install a new one
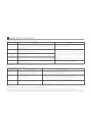
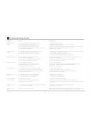
Страница 34 из 71 Troubleshooting Guide Problem Cause Correction Upper thread breaks 1. The machine is not threaded correctly. 2. The thread tension is too tight. 3. The thread is too thick for the needle. 4. The needle is not inserted correctly. 5. The thread is wound around the spool holder pin. 6. The needle is
Страница 35 из 71 Please note that on disposal, this product must be safely recycled in accordance with relevant National legislation relating to electrical/electronic products. If in doubt please contact your retailer for guidance.