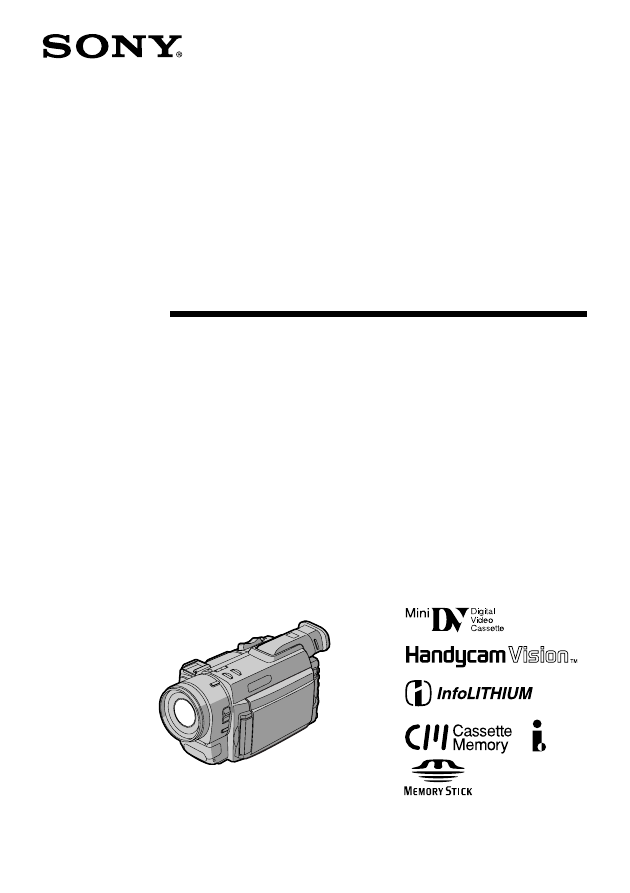
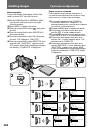
Инструкция для SONY DCR-TRV890E

(скачивание инструкции бесплатно)
Формат файла: PDF
Доступность: Бесплатно как и все руководства на сайте. Без регистрации и SMS.
Дополнительно: Чтение инструкции онлайн
background image

3-864-632-34 (2)

Digital Video
Camera Recorder

Operating Instructions

Before operating the unit, please read this manual thoroughly,
and retain it for future reference.

Инструкция по эксплуатации

Перед эксплуатацией аппарата внимательно прочтите,
пожалуйста, данное руководство и сохраняйте его для
дальнейших справок.

©1998 by Sony Corporation

DCR-TRV890E/TRV900E

DCR-TRV900E

1
2
3
4
5
6
7
8
9
10
11
12
13
14
15
16
17
18
19
20
21
22
23
24
25
26
27
28
29
30
31
32
33
34
35
36
37
38
39
40
41
42
43
44
45
46
47
48
49
50
51
52
53
54
55
56
57
58
59
60
61
62
63
64
65
66
67
68
69
70
71
72
73
74
75
76
77
78
79
80
81
82
83
84
85
86
87
88
89
90
91
92
93
94
95
96
97
98
99
100
101
102
103
104
105
106
107
108
109
110
111
112
113
114
115
116
117
118
119
120
121
122
123
124
125
126
127
128
129
130
131
132
133
134
135
136
137
138
139
140
141
142
143
144
145
146
147
148
149
150
151
152
153
154
155
156
157
158
159
160
161
162
163
164
165
166
167
168
169
170
171
172
173
174
175
176
177
178
179
180
181
182
183
184
185
186
187
188
189
190
191
192
193
194
195
196
197
198
199
200
Оглавление инструкции
  • Страница 1 из 201
    3-864-632-34 (2) Digital Video Camera Recorder Operating Instructions Before operating the unit, please read this manual thoroughly, and retain it for future reference. Инструкция по эксплуатации Перед эксплуатацией аппарата внимательно прочтите, пожалуйста, данное руководство и сохраняйте его для
  • Страница 2 из 201
    English Русский Welcome! Добро пожаловать! Congratulations on your purchase of this Sony Handycam Vision camcorder. With your Handycam Vision you can capture life’s precious moments with superior picture and sound quality. Your Handycam Vision is loaded with advanced features, but at the same time
  • Страница 3 из 201
    English Table of contents Replacing recording on a tape – insert editing (DCR-TRV900E only) .......................................... 112 Audio dubbing ......................................................... 114 Getting started Memory card slot operations Installing and charging the battery pack
  • Страница 4 из 201
    Русский Оглавление Перед началом эксплуатации Использование данного руководства ................ 5 Проверка прилагаемых принадлежностей ....... 7 Подготовка к эксплуатации Уcтaнoвка и зарядка батарейного блока .......... 8 Вставка кассеты ................................................ 13 Основные
  • Страница 5 из 201
    Before you begin Перед началом эксплуатации Using this manual Использование данного руководства Model number Типы различий Line The POWER recording switch position during playback DCR-TRV900E r VTR DCR-TRV890E — PLAYER Note on Cassette Memory This camcorder is based on the DV format. You can only
  • Страница 6 из 201
    Using this manual Precaution on copyright Television programmes, films, video tapes, and other materials may be copyrighted. Unauthorized recording of such materials may be contrary to the provision of the copyright laws. Precautions on camcorder care • The LCD screen and/or the colour viewfinder
  • Страница 7 из 201
    Checking supplied accessories Check that the following accessories are supplied with your camcorder. Проверка прилагаемых принадлежностей Проверьте, что следующие принадлежности прилагаются к Вашей видеокамере. 1 2 3 5 4 7 8 6 9 !º 1 Wireless Remote Commander (1) (p. 190) RMT-811: DCR-TRV900E
  • Страница 8 из 201
    Getting started Подготовка к эксплуатации Installing and charging the battery pack Уcтaнoвка и зарядка батарейного блока Before using your camcorder, you first need to install and charge the battery pack. To charge the battery pack, use the supplied AC power adaptor. This comcorder operates only
  • Страница 9 из 201
    Installing and charging the battery pack Установка и зарядка батарейного блока Charging the battery pack Зарядка батарейного блока Заряжайте батарейный блок на плоской поверхности, неподверженной вибрации. Батарейный блок слегка заряжен на заводе. (1) Откройте крышку гнезда DC IN и подсоедините
  • Страница 10 из 201
    Installing and charging the battery pack Notes • “– – – min” appears on the display window until the camcorder calculates remaining battery time. • Remaining battery time indication on the display window roughly indicates the recording time with the viewfinder. Use it as a guide. It may differ from
  • Страница 11 из 201
    Installing and charging the battery pack Установка и зарядка батарейного блока При использовании ЖКД While using with LCD Continuous recording time ** Typical recording time *** Playing time with LCD Батарейный Время Время блок непрерывной типичной записи** записи*** Время воспроизведения на ЖКД
  • Страница 12 из 201
    Installing and charging the battery pack Установка и зарядка батарейного блока To remove the battery pack Для снятия батарейного блока Lift up the viewfinder. While pressing BATT RELEASE, slide the battery pack in the direction of the arrow. Поднимите видоискатель вверх. Нажимая BATT RELEASE,
  • Страница 13 из 201
    Inserting a cassette Вставка кассеты Вы можете использовать только кассету mini *. DV, co знaкoм Убедитесь, что источник питания установлен. (1) Нажимая маленькую синюю кнопку на выключателе EJECT, сдвиньте его в направлении стрелки. Кассетный отсек открывается автоматически. (2) Вставьте кассету в
  • Страница 14 из 201
    Основные операции Basic operations Camera recording Make sure that the power source is installed and a cassette is inserted and that the START/STOP MODE selector inside the LCD panel is set to . Before you record one-time events, you had better make a trial recording to make sure that the camcorder
  • Страница 15 из 201
    Запись с помощью видеокамеры Camera recording Для временной остановки записи [a] Press START/STOP. The “STBY” indicator appears on the LCD screen or in the viewfinder (Standby mode). Нажмите START/STOP. Индикатор “STBY” появляется на экране ЖКД или в видоискателе (режим готовности). To finish
  • Страница 16 из 201
    Запись с помощью видеокамеры Camera recording Note on the lock knob When you set the lock knob to the left position, the POWER switch will not be set to MEMORY accidentally. Примечание к фиксирующей ручке Когда Вы установите фиксирующую ручку в левое положение, выключатль POWER не сможет случайно
  • Страница 17 из 201
    Запись с помощью видеокамеры Camera recording Примечание к индикаци оставшейся ленты Индикация может отображаться неточно в зависимости от ленты. Хотя индикация не отображается в момент включения записи, она появится через несколько секунд. Note on remaining tape indicator The indicator may not be
  • Страница 18 из 201
    Запись с помощью видеокамеры Camera recording Zooming speed (Variable speed zooming) Скорость наезда видеокамеры (наезд с различной скоростью) Press the power zoom lever a little for a relatively slow zoom; press it still more for a high-speed zoom. Нажмите переключатель приводного трансфокатора
  • Страница 19 из 201
    Camera recording Запись с помощью видеокамеры Selecting the start/stop mode Выбор режима запуска/остановки 1 2 Basic operations / Основные операции Ваша видеокамера имеет два режима, кроме нормального режима запуска/остановки. Эти режимы позволяют Вам снять серию коротких кадров, создавая в
  • Страница 20 из 201
    Camera recording Notes on 5SEC recording • If you have turned off the indicators on the LCD screen, the dots do not appear. • When selecting “ ANTI GROUND SHOOTING” or “5SEC,” the fader function does not work. • When selecting “5SEC,” the time code is not displayed. Shooting with the LCD screen You
  • Страница 21 из 201
    Camera recording [a] Letting the subject monitor the shot You can turn the LCD panel over so that it faces the other way and you can let the subject monitor the shot while shooting with the viewfinder. Turn the LCD panel up vertically. When you turn the LCD panel 180 degrees, the indicator appears
  • Страница 22 из 201
    Camera recording 22 Запись с помощью видеокамеры To cancel mirror mode Turn the LCD panel down toward the camcorder body. Для отмены зеркального режима Поверните панель ЖКД вниз в направлении корпуса видеокамеры. Notes on mirror mode •When you turn the LCD panel about 135 degrees to 180 degrees,
  • Страница 23 из 201
    Camera recording Запись с помощью видеокамеры Self-timer recording Запись по таймеру самозапуска Вы можете выполнить запись с помощью таймера самозапуска. Этот режим будет очень полезным, если Вы хотите записать самого себя. (1) Нажмите (таймер самозапуска) для отображения индикатора (таймера
  • Страница 24 из 201
    Hints for better shooting Советы для лучшей съемки For hand-held shots, you will get better results by holding the camcorder according to the following suggestions: • Hold the camcorder firmly and secure it with the grip strap so that you can easily manipulate the controls with your thumb. [a] Для
  • Страница 25 из 201
    Hints for better shooting Cautions on the LCD panel and on the viewfinder •Do not pick up the camcorder by the viewfinder or the LCD panel. [d] •Do not place the camcorder so as to point the viewfinder or the LCD panel toward the sun. The inside of the viewfinder or the LCD panel may be damaged. Be
  • Страница 26 из 201
    Checking the recorded picture Проверка записанного изображения Using the EDITSEARCH, you can review the last recorded scene or check the recorded picture on the LCD screen or in the viewfinder. (1)While pressing the small green button on the POWER switch, set it to CAMERA. (2)Press the – Œ side of
  • Страница 27 из 201
    Воспроизведение ленты Playing back a tape Вы можете просматривать изображение на экране ЖКД или в видоискателе. (1) Вставьте записанную ленту окошком, обращенным наружу. (2) Нажимая OPEN, откройте панель ЖКД. (3) Нажимая маленькую зеленую кнопку на выключателе POWER, установите его в положение VTR
  • Страница 28 из 201
    Playing back a tape Воспроизведение ленты To display the LCD screen/viewfinder screen indicators Press DISPLAY. To erase the indicators, press again. Для отображения экранных индикаторов на экане ЖКД/в видоискателе Нажмите DISPLAY. Для стирания индикаторов нажмите еще раз. Notes on screen
  • Страница 29 из 201
    Playing back a tape To locate a scene (picture search) Keep pressing 0 or ) during playback. To resume normal playback, release the button. To monitor the high-speed picture while advancing the tape or rewinding (skip scan) Воспроизведение ленты Для обнаружения эпизода (поиск изображения) Держите
  • Страница 30 из 201
    Playing back a tape Notes on playback •The sound is muted in the various playback modes. •During playback other than normal playback, the previous recording may appear in mosaic image. This is not malfunction. •When playback pause mode lasts for 5 minutes, the camcorder automatically enters stop
  • Страница 31 из 201
    Searching for the end of the picture You can go to the end of the recorded portion after you record and play back the tape. The tape starts rewinding or fast-forwarding and the last about 5 seconds of the recorded portion plays back. Then the tape stops at the end of the recorded picture (End
  • Страница 32 из 201
    Advanced operations Using alternative power sources You can choose any of the following power sources for your camcorder: battery pack, mains, and 12/24 V car battery. Choose the appropriate power source depending on where you want to use your camcorder. Place Power Accessory to be used source
  • Страница 33 из 201
    Using alternative power sources Использование альтернативных источников питания 2, 3 1 PRECAUTION The set is not disconnected from the AC power source (mains) as long as it is connected to the mains lead, even if the set itself has been turned off. Note Keep the AC power adaptor away from the
  • Страница 34 из 201
    Изменение установок режимов Changing the mode settings You can change some of the mode settings programmed at the factory to further enjoy the features and functions of the camcorder. Just turn the control dial to select the menu items displayed on the LCD screen. You can make selections in the
  • Страница 35 из 201
    Changing the mode settings Notes on changing the mode settings •Menu items differ depending on the setting of the POWER switch to VTR (DCR-TRV900E)/ PLAYER (DCR-TRV890E), CAMERA or MEMORY. •While recording in mirror mode, you cannot operate the menu system. Selecting the mode setting of each item
  • Страница 36 из 201
    Changing the mode settings STEADYSHOT <ON/OFF> •Normally select ON. •Select OFF when you do not have to worry about camera-shake. STEADYSHOT <ON/OFF> • Обычно выбирайте ON. • Выбрирайте OFF, когда Вы не беспокоетесь о дрожании камеры. AE SHIFT Adjust the setting level of AE (Automatic Exposure).
  • Страница 37 из 201
    Changing the mode settings AUDIO MIX* Select this item to adjust the balance between the stereo 1 and stereo 2 by turning the control dial. NTSC PB <ON PAL TV/NTSC 4.43> •Normally select ON PAL TV. •Select NTSC 4.43 when playing back a tape recorded in the NTSC colour system. When you play back on
  • Страница 38 из 201
    Changing the mode settings Items for the MEMORY SET menu CONTINUOUS <OFF/ON/MULTI SCRN> •Select OFF not to record continuously. •Select ON to record 2 to 4 pictures continuously. •Select MULTI SCRN to record nine pictures continuously. QUALITY <STANDARD/FINE/SUPER FINE> •Select STANDARD to record
  • Страница 39 из 201
    Changing the mode settings Items for the CM SET menu CM SEARCH <ON/OFF> •Select ON to search using cassette memory. •Select OFF to search without using cassette memory. TITLEERASE Erase the title you have superimposed. TAPE TITLE Select this item to label the cassette tape. ERASE ALL Select this
  • Страница 40 из 201
    Changing the mode settings ÒREMAIN <AUTO/ON> • Select AUTO to display the remaining time of the tape in the following cases: – With the power on or a tape inside, for eight seconds after the remaining time of the tape becomes certain. – For eight seconds after the · or DISPLAY button is pressed. –
  • Страница 41 из 201
    Changing the mode settings Items for the OTHERS menu WORLD TIME Select this item to set the clock by a time difference. See page 156 for details. BEEP <MELODY/NORMAL/OFF> •Normally select MELODY so that a melody sounds when you start/stop recording, etc. •Select NORMAL so that beeps sound when you
  • Страница 42 из 201
    Changing the mode settings DISPLAY <LCD or V-OUT/LCD > • Normally select LCD. • Select V-OUT/LCD to display indicators both on the LCD screen and TV screen. REC LAMP <ON/OFF> • Normally select ON. • Select OFF when you do not want the camera recording lamp on the front of the unit to light up.
  • Страница 43 из 201
    Photo recording VTR POWER 1 Вы можете записывать неподвижное изображение, как фотографию приблизительно в течение семи секунд. Этот режим является очень полезным, когда Вы хотите наслаждаться изображением похожим на фотографию, или когда Вы делаете распечатку изображений, используя видеопринтер (не
  • Страница 44 из 201
    Photo recording When shooting in the dark Install the HVL-FDH2 video flash light (not supplied) to the accessory shoe. If the exposure is in manual exposure mode, set it to automatic exposure mode. When appears next to the “CAPTURE” indicator on the LCD screen or in the viewfinder, the video flash
  • Страница 45 из 201
    Photo recording Запись фотографий Printing the still picture Распечатка неподвижного изображения You can print a still picture by using the video printer (not supplied). Connect the video printer using the S video connecting cable (not supplied). Refer to the operating instruction of the video
  • Страница 46 из 201
    Shooting with all the pixels – PROG. SCAN Съемка со всеми элементами изображения – PROG. SCAN When modifying the digital images on your personal computer, set PROG. SCAN to ON before shooting. You can record the images on a mini DV tape frame by frame with higher resolution. Since the image taken
  • Страница 47 из 201
    Съемка со всеми элементами изображения – PROG. SCAN Note on the progressive mode The normal TV broadcast divides the screen into two finer fields and displays them in turns every 1/50 of a second. Thus, the actual image displayed in an instant covers only half of the apparent image area. Displaying
  • Страница 48 из 201
    Using the FADER function You can fade in or out to give your recording a professional appearance. When fading in, the picture gradually fades in while the sound increases. When fading out, the picture gradually fades out while the sound decreases. FADER [a] STBY Использование функции FADER Вы
  • Страница 49 из 201
    Using the FADER function You cannot use the fader function in the following situations – The START/STOP MODE selector is set to ANTI GROUND SHOOTING or 5SEC. – The camcorder is in the photo recording. – A title is displayed on the LCD screen or in the viewfinder. If the title is not necessary,
  • Страница 50 из 201
    Shooting with backlighting When you shoot a subject with the light source behind the subject or a subject with a light background, use the BACK LIGHT function. Press BACK LIGHT. The c indicator appears on the LCD screen or in the viewfinder. Съемка с задней подсветкой Когда Вы снимаете объект с
  • Страница 51 из 201
    Using the wide mode function You can record a 16:9 wide picture to watch on the 16:9 wide-screen TV (16:9WIDE). The picture with black bands at the top and the bottom on the LCD screen or in the viewfinder [a] is normal. The picture on a normal TV [b] is horizontally compressed. You can watch the
  • Страница 52 из 201
    Using the wide mode function To cancel wide mode Select OFF in step 5, then press the control dial. To watch the tape recorded in wide mode To watch the tape recorded in 16:9WIDE mode, set it to full mode. For details, refer to the operating instruction of your TV. Note that the picture recorded in
  • Страница 53 из 201
    Enjoying picture effect Наслаждение эффектами изображений Selecting picture effect Выбор эффекта изображения You can make pictures like those of television with the Picture Effect function. [a] [b] Вы можете сделать изображения похожим на те, что передают по телевидению с помощью функции эффектов
  • Страница 54 из 201
    Enjoying picture effect Using picture effect function (1) While in Standby mode, press PICTURE EFFECT. (2) Turn the control dial to select the desired picture effect mode. Наслаждение эффектами изображений Использование функции эффектов изображения (1) В режиме готовности нажмите PICTURE EFFECT.
  • Страница 55 из 201
    Recording with various effects – digital effect With the following functions of Digital Effect, you can add various visual effects to the picture. The sound is recorded normally. STILL You can record a still picture to be superimposed on a moving picture. LUMI. You can replace a brighter portion of
  • Страница 56 из 201
    Recording with various effects – digital effect (1) While in Standby mode or Recording mode, press DIGITAL EFFECT. The digital effect indicator flashes. (2) Turn the control dial to select the desired digital effect mode. (3) Press the control dial. The digital effect indicator lights up and the
  • Страница 57 из 201
    Recording with various effects – digital effect To cancel digital effects Press DIGITAL EFFECT so that the indicator disappears. Notes on the OLD MOVIE mode You cannot use the following functions in the OLD MOVIE mode. – Functions using the PROGRAM AE button – 16:9WIDE mode – Functions using the
  • Страница 58 из 201
    Shooting with manual adjustment Съемка с ручной регулировкой Under normal conditions, this unit automatically makes various adjustments as it shoots. However, you can adjust manually the following functions to your preference. Functions you can adjust by setting the AUTO LOCK selector to the centre
  • Страница 59 из 201
    Shooting with manual adjustment Съемка с ручной регулировкой Adjusting exposure Регулировка экспозиции Adjust the exposure manually under the following cases. [a] [b] •Bright subject and dark background •To record the darkness faithfully (1)Set AUTO LOCK selector to the centre (auto lock release)
  • Страница 60 из 201
    Shooting with manual adjustment Съемка с ручной регулировкой Adjusting the shutter speed Регулировка скорости затвора (1)Set AUTO LOCK selector to the centre (auto lock release) position while the camcorder is in Standby mode. (2)Press SHUTTER SPEED. The shutter speed indicator appears on the LCD
  • Страница 61 из 201
    Shooting with manual adjustment Съемка с ручной регулировкой Adjusting the white balance Регулировка баланса белого 1 Регулировка баланса белого делает так, что белые объекты выглядят белыми и позволяет получить запись с более естественным цветовым балансом при съемке видеокамерой. Обычно баланс
  • Страница 62 из 201
    Shooting with manual adjustment Съемка с ручной регулировкой Display Shooting conditions Дисплей ∑ •Adjusting the white balance according to the light source. This operation is not available during recording. Follow the steps described below to adjust the settings again. ∑ w (Outdoor) •Recording a
  • Страница 63 из 201
    Shooting with manual adjustment Notes on the ∑ indicator on the screen •The state of the indicator shows as follows: Slow flashing: white balance is not adjusted. Fast flashing: white balance is being adjusted. Lights up: white balance has been adjusted. •When the ∑ indicator remains flashing even
  • Страница 64 из 201
    Shooting with manual adjustment Съемка с ручной регулировкой Adjusting recording level Регулировка уровня записи You can adjust the recording sound level. Use headphones to monitor the sound when you adjust. (1) Set the POWER switch to CAMERA. (2) Press MENU to display the menu. (3) Turn the
  • Страница 65 из 201
    Shooting with manual adjustment Съемка с ручной регулировкой To adjust the microphone level automatically Для регулировки уровня микрофона автоматически Select AUTO in step 5, then press the control dial. Выберите AUTO в пункте 5, а затем нажмите регулировочный диск. Notes on the adjustment •The
  • Страница 66 из 201
    Shooting with manual adjustment Съемка с ручной регулировкой Shooting with the zebra pattern Съемка с зебротаблицей You can set the camcorder to display a zebra pattern (diagonal stripes) in the portion of the picture on the LCD screen or in the viewfinder with a subject whose brightness exceeds a
  • Страница 67 из 201
    Shooting with manual adjustment Съемка с ручной регулировкой To erase the zebra pattern Для стирания зебротаблицы Select OFF in step 5, then press the control dial. Выберите OFF в пункте 5, а затем нажмите регулировочный диск. Notes on shooting with the zebra pattern • A zebra pattern appears at
  • Страница 68 из 201
    Shooting with manual adjustment Съемка с ручной регулировкой To activate the Steady Shot function again Для активизации функции устойчивой съемки снова Select ON in step 5, then press the control dial. Выберите ON в пункте 5, а затем нажмите регулировочный диск. Notes on the Steady Shot function •
  • Страница 69 из 201
    Shooting with manual adjustment Съемка с ручной регулировкой To deactivate AE shift Для отключения смещения АЕ Set the bar indicator at the centre in step 5, then press the control dial. Установите индикатор на центр в пункте 5, а затем нажмите регулировочный диск. When you adjust AE shift The –4
  • Страница 70 из 201
    Shooting with manual adjustment Съемка с ручной регулировкой To deactivate gain shift Для отключения смещения усиления Select 0dB in step 5, then press the control dial. Выберите 0dB в пункте 5 , а затем нажмите регулировочный диск. What is gain shift When shooting in bright conditions, the gain
  • Страница 71 из 201
    Using the PROGRAM AE function You can select from five PROGRAM AE (Auto Exposure) modes to suit your shooting situation, referring to the following. Использование функции PROGRAM AE Вы можете выбрать один из пяти режимов PROGRAM AE (автоматической экспозиции), который подходит для съемки в Вашей
  • Страница 72 из 201
    Using the PROGRAM AE function Использование функции PROGRAM AE Using the PROGRAM AE function Использование функции PROGRAM AE (1)Set AUTO LOCK selector to the centre (auto lock release) position while the camcorder is in Standby or Recording mode. (2) Press PROGRAM AE. (3) Turn the control dial so
  • Страница 73 из 201
    Using the PROGRAM AE function Использование функции PROGRAM AE To return to automatic adjustment mode Для возврата к режиму автоматической регулировки Set AUTO LOCK selector to AUTO LOCK or press PROGRAM AE so that the indicator disappears. Установите селектор AUTO LOCK в положение AUTO LOCK или
  • Страница 74 из 201
    Focusing manually Ручная фокусировка When to use manual focus Когда использовать ручную фокусировку In the following cases you should obtain better results by adjusting the focus manually. [a] [b] • Insufficient light [a] • Subjects with little contrast — walls, sky, etc. [b] • Too much brightness
  • Страница 75 из 201
    Focusing manually Ручная фокусировка Adjusting focus manually Регулировка фокусировки вручную When focusing manually, first focus in telephoto before recording, and then reset the shot length. (1) Slide FOCUS down to MANUAL. The f indicator appears on the LCD screen or in the viewfinder. (2) Turn
  • Страница 76 из 201
    Interval recording You can make a time-lapse recording by setting the camcorder to automatically record and standby sequentially. You can achieve an excellent recording for flowering, emergence, etc., with this function. (1) Set the POWER switch to CAMERA. (2) Press MENU to display the menu. , then
  • Страница 77 из 201
    Запись с интервалами Interval recording VTR POWER VTR 9 POWER 1 I NTERVA L OFF OFF MENU MEMORY CAMERA MEMORY CAMERA 2,8 6 3,4 CAMERA S E T [ M E N U ] D: E ZN OD O M 1 6 : 9W I DE S T E ADY SHOT AE SH I F T GA I N SH I F T F RAME REC I NT . REC OF F RE TURN CAMERA S E T D Z OOM 1 6 : 9W I DE S T E
  • Страница 78 из 201
    Interval recording 78 Запись с интервалами During the interval recording mode The INTERVAL indicator appears. В режиме записи с интервалами Появляется индикатор INTERVAL. Notes on interval recording • You cannot do interval recording with photo recording. • You cannot perform interval recording in
  • Страница 79 из 201
    Cut recording Запись с прерыванием Используя функции записи с прерыванием, Вы можете выполнять запись с мультипликационным эффектом остановки движения. Для создания этого эффекта перемещайте объект понемногу и выполняйте запись с прерыванием. Рекомендуется использовать треногу и управлять
  • Страница 80 из 201
    Cut recording To cancel the cut recording Для отмены записи с прерыванием • Set FRAME REC to OFF in the menu system. • Set the POWER switch to OFF, VTR, or MEMORY. •Установите команду FRAME REC в положение OFF в системе меню. •Установите переключатель POWER в положение OFF, VTR или MEMORY. Notes on
  • Страница 81 из 201
    Наложение титра Superimposing a title Если Вы используете ленту кассеты с памятью, Вы можете выполнять наложение титров во время записи или после выполнения записи. Когда Вы воспроизводите ленту, титр отображается в течение пяти секунд от точки его наложения. Вы можете выбирать из восьми
  • Страница 82 из 201
    Superimposing a title To superimpose the title from beginning After step 7, press START/STOP to start recording. To superimpose the title while you are recording After pressing START/STOP to start recording, start from step 1. In this case, beep or melody is not heard. To use the custom title When
  • Страница 83 из 201
    Superimposing a title Наложение титра Erasing a title Стирание титра 1,6 MENU (1) Нажмите MENU для отображения меню. (2) Поверните регулировочный диск для выбора , а затем нажмите диск. (3) Поверните регулировочный диск для выбора TITLEERASE, а затем нажмите диск. (4) Поверните регулировочный диск
  • Страница 84 из 201
    Making a custom title Создание собственного титра If you use a tape with cassette memory, you can make up to two titles and store them in the camcorder. We recommend you to set the POWER switch to VTR (DCR-TRV900E) or PLAYER (DCR-TRV890E) or eject the cassette before you begin. Your title can have
  • Страница 85 из 201
    Making a custom title To edit a title you have stored In step 3, select CUSTOM1 or CUSTOM2, depending on which title you want to edit, then change the title. To erase a character In step 4, turn the control dial to select [ M ] then press the dial. The last character is erased. Repeat this step
  • Страница 86 из 201
    Labelling a cassette If you use a tape with cassette memory, you can label a cassette. The label can consist of up to 10 characters and is stored in cassette memory. When you insert the labeled cassette and turn the power on, the label is displayed on the LCD screen, in the viewfinder, or on the TV
  • Страница 87 из 201
    Labelling a cassette Обозначение кассеты To erase a character Для стирания знака In step 6 turn the control dial to select [ M ], then press the dial. The last character is erased. В пункте 6 поверните регулировочный диск для выбора [ M ], а затем нажмите. Последний знак будет стерт. To change the
  • Страница 88 из 201
    Watching on a TV screen Просмотр на экране телевизора Connect the camcorder to your TV or VCR to watch the playback picture on the TV screen. When monitoring the playback picture by connecting the camcorder to your TV, we recommend you to use mains for the power source. Connecting directly to a TV
  • Страница 89 из 201
    Watching on a TV screen If your VCR or TV is a monaural type Connect only the white plug for audio on both the camcorder and the VCR or the TV. If you connect the white plug, the sound is L (left) signal. If you connect the red plug, the sound is R (right) signal. When you adjust the TV screen Set
  • Страница 90 из 201
    Watching on a TV screen To cancel the LASER LINK function Press LASER LINK. Для отмены функции LASER LINK Нажмите LASER LINK. Notes on LASER LINK • When LASER LINK is activated (the LASER LINK button is lit), the camcorder consumes power. Press and turn off the LASER LINK button when it is not
  • Страница 91 из 201
    Viewing the picture with the picture effect You can play back recorded images with the picture effect. The available picture effects are NEG. ART, SEPIA, B&W and SOLARIZE. During playback, press PICTURE EFFECT. See page 53 for details on the picture effect. Просмотр изображения с эффектами
  • Страница 92 из 201
    Viewing the picture with the digital effect You can play back the recorded images with the digital effect. The available digital effects are STILL, FLASH, LUMI. and TRAIL. (1) During playback, press DIGITAL EFFECT. (2) Turn the control dial to select the desired digital effect mode. (3) Press the
  • Страница 93 из 201
    Searching the boundaries of recorded tape with date – date search You can search for the boundaries of recorded tape with date – Date Search function. To search the beginning of the specific date and play back from the point, there are two ways: •Using cassette memory, you can select the date
  • Страница 94 из 201
    Searching the boundaries of recorded tape with date – date search Поиск границ на записанной ленте с помощью даты – поиск даты (1) Set the POWER switch to VTR (DCRTRV900E) or PLAYER (DCR-TRV890E). (2) Press MENU to display the menu. (3) Turn the control dial to select CM SEARCH in , then press the
  • Страница 95 из 201
    Searching the boundaries of recorded tape with date – date search Поиск границ на записанной ленте с помощью даты – поиск даты Для остановки поиска Нажмите p. Notes •The interval of the boundaries between the dates needs to be more than two minutes. The camcorder may not search if the beginning of
  • Страница 96 из 201
    Searching the boundaries of recorded tape with date – date search Поиск границ на записанной ленте с помощью даты – поиск даты (1) Set the POWER switch to VTR (DCRTRV900E) or PLAYER (DCR-TRV890E). (2) Press MENU to display the menu. (3) Turn the control dial to select CM SEARCH in , then press the
  • Страница 97 из 201
    Searching the boundaries of recorded tape with title – title search You can search for the boundaries of recorded tape with title – Title Search function. If you use a tape with cassette memory, you can select the title displayed on the LCD screen. You can only operate with the Remote Commander.
  • Страница 98 из 201
    Searching the boundaries of recorded tape with title – title search Поиск границ на записанной ленте с помощью титра – поиск титра (1) Set the POWER switch to VTR (DCRTRV900E) or PLAYER (DCR-TRV890E). (2) Press MENU to display the menu. (3) Turn the control dial to select CM SEARCH in , then press
  • Страница 99 из 201
    Searching for a photo – photo search/photo scan You can search for the recorded still picture – Photo Search function. There are two modes in Photo Search: •Using cassette memory, you can select the recorded date which is displayed on the LCD screen. •Without using cassette memory. Вы можете
  • Страница 100 из 201
    Searching for a photo – photo search/photo scan Searching for a photo by using cassette memory – photo search You can use this function only when playing back a tape with cassette memory (p. 150). (1) Set the POWER switch to VTR (DCRTRV900E) or PLAYER (DCR-TRV890E). (2) Press MENU to display the
  • Страница 101 из 201
    Searching for a photo – photo search/photo scan Поиск фотографий – фотопоиск/ фотосканирование Searching for a photo without using cassette memory – photo search Поиск фотографий без использования памяти кассеты фотопоиск VTR 1 PHOTO S E ARCH OFF SEARCH MODE POWER 5 Если Вы используете ленту
  • Страница 102 из 201
    Searching for a photo – photo search/photo scan Scanning photo – photo scan You can use this function whether the tape has cassette memory or not. (1) Set the POWER switch to VTR (DCRTRV900E) or PLAYER (DCR-TRV890E). (2) Press SEARCH MODE on the Remote Commander repeatedly until the photo scan
  • Страница 103 из 201
    Returning to a preregistered position 1 0 : 05 : 23 0 : 00 : 00 Используя пульт дистанционного управления Вы можете легко вернуться к желаемой точке ленты после воспроизведения. (1) Во время воспроизведения нажмите ZERO SET MEMORY в месте, которое Вы хотите потом обнаружить. Счетчик будет
  • Страница 104 из 201
    Displaying recording data – data code function Отображение данных записи – Функция кода данных You can display recording data (date/time or various settings when recorded) on the LCD screen or in the viewfinder during playback (Data Code). The Data Code is also displayed on the TV. Вы можете
  • Страница 105 из 201
    Editing onto another tape Монтаж на другую ленту You can create your own video programme by editing with any other DV, mini DV, h 8 mm, H Hi8, j VHS, k S-VHS,  VHSC, K S-VHSC or l Betamax VCR that has audio/video inputs. You can edit with little deterioration of picture and sound quality when
  • Страница 106 из 201
    Editing onto another tape Notes on editing when using the A/V connecting cable •Press DATA CODE, SEARCH MODE on the Remote Commander, or DISPLAY to turn off the display indicators. Otherwise, the indicators will be recorded on the tape. •If your TV or VCR is a monaural type, connect the yellow plug
  • Страница 107 из 201
    Editing onto another tape To perform a more precise editing Use DV synchro-editing function. (see page 108) Starting editing (1) Insert a blank tape (or a tape you want to record over) into the VCR, and insert your recorded tape into the camcorder. (2) Play back the recorded tape on the camcorder
  • Страница 108 из 201
    Editing partially on a mini DV tape – DV synchro-editing Частичный монтаж на ленту mini DV – синхронный цифровой видеомонтаж By simply selecting the scenes to edit, you can duplicate the desired portion on a tape, using other equipment connected with an i.LINK cable (DV connecting cable). The
  • Страница 109 из 201
    Editing partially on a mini DV tape – DV synchro-editing PLAY 1 FF 2 VTR REW POWER 7,9 Частичный монтаж на ленту mini DV – синхронный цифровой видеомонтаж OFF REC 4 5,6 8,10 OTHERS BEEP C O MM A N D E R D I SPLAY DV ED I T I NG OTHERS BEEP C O MM A N D E R D I SPLAY DV ED I T I NG RE ADY RE TURN [
  • Страница 110 из 201
    Запись с КВМ или телевизора (только DCR-TRV900E) Recording from a VCR or TV (DCRTRV900E only) Вы можете записать ленту с другого КВМ или телевизионную программу с телевизора, который имеет выходы аудио/видео. Подсоедините видеокамеру к КВМ или телевизору. Если Вы подсоедините видеокамеру прямо к
  • Страница 111 из 201
    Запись с КВМ или телевизора (только DCR-TRV900E) If your TV or VCR is a monaural type, connect the yellow plug of the A/V connecting cable for video to the TV or VCR. Connect only the white or red plug for audio to the TV or VCR. If you connect the white plug, the sound is L (left) signal. If you
  • Страница 112 из 201
    Replacing recording on a tape – insert editing (DCR-TRV900E only) Замещение записи на ленте – монтаж в режиме вставки (только DCR-TRV900E) You can insert a new scene from a VCR onto your originally recorded tape by specifying starting and ending points. After inserting, the previous picture and
  • Страница 113 из 201
    Replacing recording on a tape – insert editing (DCRTRV900E only) Замещение записи на ленте – монтаж в режиме вставки (только DCR-TRV900E) To change the end point Для изменения конечной точки Press ZERO SET MEMORY on the Remote Commander so that the ZERO SET MEMORY indicator disappears and begin
  • Страница 114 из 201
    Audio dubbing You can record an audio sound to add to the original sound on a tape by connecting audio equipment or a microphone. If you connect the audio equipment, you can add sound to your recorded tape by specifying starting and ending points. The original sound will not be erased. You can only
  • Страница 115 из 201
    Наложение звукового сопровождения Audio dubbing Dubbing with the AUDIO/VIDEO jack (DCR-TRV900E only) Перезапись с использованием гнезда AUDIO/VIDEO (только DCR-TRV900E) Audio equipment/ Аудиоаппаратура AUDIO L AUDIO/ VIDEO A/V connecting cable/Соединительный кабель аудио/видео Ç : Signal
  • Страница 116 из 201
    Audio dubbing Наложение звукового сопровождения Adding an audio sound on a recorded tape Наложение звукового сопровождения на записанную ленту (1) Insert your recorded tape into the camcorder. (2) Set the POWER switch to VTR. (3) On the camcorder, locate the point where the recording should begin
  • Страница 117 из 201
    Audio dubbing If you make all the connections The audio input to be recorded will take precedence over others in the following order. •MIC (PLUG IN POWER) jack •Intelligent accessory shoe •AUDIO/VIDEO jack * •Built-in microphone * DCR-TRV900E only If you disconnect or connect a cable to the
  • Страница 118 из 201
    Memory card slot operations Using the memory card slot–introduction This camcorder is equipped with a memory card slot that conforms to ATA specification of PC Card standard. You can record still images to floppy disks using the supplied floppy disk adapter, Memory Sticks (not supplied) or PC cards
  • Страница 119 из 201
    Using the memory card slot – introduction The types of PC cards you can use Use TYPE II PC cards that conform to ATA specification of PC card standard. Format the PC card with this camcorder before use. Once you format the PC card, you can store data of up to 64 MB in it. Notes on the supplied
  • Страница 120 из 201
    Using the memory card slot – introduction Be sure to place the adapter on a stable surface Placing the floppy disk adapter on an unstable or slanting surface or holding the adapter by hand during operation may result not only in malfunction of the unit but also in injury. Do not shake or jar the
  • Страница 121 из 201
    Using the memory card slot – introduction Использование гнезда для платы расширения памяти – введение About the power source Относительно источника питания When you use the memory card slot, getting the power from a mains is recommended, using the AC power adaptor. Когда Вы используете гнездо для
  • Страница 122 из 201
    Using the memory card slot – introduction Connecting the floppy disk adapter or PC card With the upper side of the connector facing the LCD panel, insert the connector until it clicks. Access lamp/ Лампочка доступа Использование гнезда для платы расширения памяти – введение Подсоединение адаптера
  • Страница 123 из 201
    Using the memory card slot – introduction Использование гнезда для платы расширения памяти – введение Inserting a floppy disk Вставка флоппи-диска Вставляйте флоппи-диск до тех пор, пока он не защелкнется. Перед вставкой проверьте, что лепесток предохранения записи установлен в позволяющее запись
  • Страница 124 из 201
    Использование гнезда для платы расширения памяти – введение Using the memory card slot – introduction Note Unless you press any memory operating buttons after inserting another foppy disk, the indicator may not disappear from the screen. Selecting image quality mode You can select one of three
  • Страница 125 из 201
    Using the memory card slot – introduction Использование гнезда для платы расширения памяти – введение Setting image quality Установка качества изображения Setting Meaning Установка SUPER FINE (SFN) This is the highest image quality in this camcorder. The number of still images you can record is
  • Страница 126 из 201
    Using the memory card slot – introduction Formatting (initializing) a PC card or a floppy disk (1) When you format a floppy disk, insert a disk into the floppy disk adapter. When you format a PC card, insert the card into the memory card slot. (2) Set the POWER switch to MEMORY. Make sure that the
  • Страница 127 из 201
    Using the memory card slot – introduction Использование гнезда для платы расширения памяти – введение VTR 2 POWER 2 OFF MEMORY CAMERA 3 1 MENU M E MO R Y S E T CON T I NUOUS QUA L I T Y PROT EC T S L I D E S H OW DE L ETE A L L F ORMA T [ MENU ] : END 5 6 7 M E MO R Y S E T C O N T I N U O US O F F
  • Страница 128 из 201
    Recording an image from a mini DV tape as a still image This camcorder can read moving picture data recorded on a mini DV tape and record it as a still image on a floppy disk or a PC card. The unit can also take in moving picture data through the input connector and record it as a still image on a
  • Страница 129 из 201
    Recording an image from a mini DV tape as a still image When the access lamp is flashing Never shake or strike the unit. As well do not turn the power off , eject a PC card/floppy disk adapter or remove the battery pack. Otherwise, the image data breakdown may occur. If “MEMORY FULL” appears on the
  • Страница 130 из 201
    Recording an image from a mini DV tape as a still image When recording the image through the AUDIO/VIDEO jack You can record only from a PAL system-based TV when you use this function. Запись изображения с ленты mini DV в качестве неподвижного изображения При записи изображения через гнездо
  • Страница 131 из 201
    Copying still images from a mini DV tape – photo save Копирование неподвижных изображений с ленты mini DV – сохранение фотографий Используя функцию поиска, Вы можете автоматически получать неподвижные изображения с лент mini DV и последовательно записывать их на флоппидиск или плату персонального
  • Страница 132 из 201
    Copying still images from a mini DV tape – photo save Копирование неподвижных изображений с ленты mini DV – сохранение фотографий To cancel copying Для отмены копирования Press MENU to stop copying. Нажмите MENU для остановки копирования. When the memory of the floppy disk or PC card is full Когда
  • Страница 133 из 201
    Recording still images on PC cards (not supplied) – memory photo recording Запись неподвижных изображений на платы персонального компьютера (не прилагаются) – запись фотографий в память You can record still images with all the pixels (progressive) on an optional PC card. Вы можете записывать
  • Страница 134 из 201
    Recording still images on PC cards (not supplied) – memory photo recording When you are recording a still image You can neither turn off the power nor press PHOTO. When you press the PHOTO button on the Remote Commander The camcorder immediately records the image that is on the screen when you
  • Страница 135 из 201
    Запись неподвижных изображений на платы персонального компьютера (не прилагаются) – запись фотографий в память (1) Set the POWER switch to MEMORY. Make sure that the lock knob is set to the right (unlock) position. (2) Press MENU to display the menu. (3) Turn the control dial to select , then press
  • Страница 136 из 201
    Recording still images on PC cards (not supplied) – memory photo recording Запись неподвижных изображений на платы персонального компьютера (не прилагаются) – запись фотографий в память Settings of continuous shooting Установки непрерывной съемки Setting Meaning (indicator on the screen) Установка
  • Страница 137 из 201
    Viewing a still picture – memory photo playback You can play back still images recorded on a floppy disk or PC card. You can also play back 6 images at a time by selecting the index screen. Before operation Connect the floppy disk adapter (with a disk inside) or insert a PC card into the unit. Вы
  • Страница 138 из 201
    Просмотр неподвижного изображения – воспроизведение фотографий из памяти Viewing a still picture – memory photo playback To play back recorded images on a TV screen • Connect this camcorder to the TV with the supplied A/V connecting cable before the operation. You cannot play back images using the
  • Страница 139 из 201
    Просмотр неподвижного изображения – воспроизведение фотографий из памяти Viewing a still picture – memory photo playback 1 2 3 4 5 6 ” mark/” Метка MVC 0 0 0 0 6 To return to the normal playback screen (single screen) Press MEMORY +/– to move the ” mark to the image you want to display on full
  • Страница 140 из 201
    Viewing a still picture – memory photo playback Viewing the recorded images using a personal computer The image data recorded with this camcorder is compressed in the JPEG format. If your personal computer has an application software that allows you to see JPEG images, you can see images recorded
  • Страница 141 из 201
    Preventing accidental erasure – PROTECT Предотвращение случайного стирания – PROTECT To prevent accidental erasure of important images, you can protect selected images. Для предотвращения случайного стирания важных изображений Вы можете защитить выбранные изображения. Before operation Connect the
  • Страница 142 из 201
    Preventing accidental erasure – PROTECT Предотвращение случайного стирания – PROTECT To cancel protection of the image Для отмены защиты изображения Select OFF in step 5, then press the control dial. Выберите OFF в пункте 5, а затем нажмите регулировочный диск. Note Formatting erases all
  • Страница 143 из 201
    Удаление изображений Deleting images Удаление выбранного изображения Deleting selected image Before operation Connect the floppy disk adapter (with a disk inside) or insert a PC card into the unit. (1) Display the image you want to erase. (2) Press MEMORY DELETE. “DELETE?” appears on the LCD
  • Страница 144 из 201
    Удаление изображений Deleting images Before operation Connect the floppy disk adapter (with a disk inside) or insert a PC card into the unit. Перед началом операции Подсоедините адаптер флоппи-диска (с установленным диском) или вставьте плату персонального компьютера в аппарат. (1) Set the POWER
  • Страница 145 из 201
    Deleting images Удаление изображений To cancel deleting all the images on the disk Для отмены удаления всех изображений на диске Select RETURN in step 4, then press the control dial. Выберите RETURN в пункте 4, а затем нажмите регулировочный диск. While “DELETING” appears Do not turn the POWER
  • Страница 146 из 201
    Copying the image recorded with the memory card slot to mini DV tapes (DCR-TRV900E only) Копирование изображения, записанного с использованием гнезда для платы расширения памяти, на ленты mini DV (только DCR-TRV900E) You can copy still images or titles recorded with the memory card slot and record
  • Страница 147 из 201
    Copying the image recorded with the memory card slot to mini DV tapes (DCR-TRV900E only) To stop copying in the middle Press π. During copying You cannot operate the following buttons : MEMORY PLAY, MEMORY INDEX, MEMORY DELETE, MEMORY +, or MEMORY –. Note on the index screen You cannot record the
  • Страница 148 из 201
    Playing back images in a continuous loop – SLIDE SHOW Воспроизведение изображений в непрерывном замкнутом цикле – SLIDE SHOW You can automatically play back images in sequence. This function is useful especially when checking the recorded images or during a presentation. Вы можете автоматически
  • Страница 149 из 201
    Playing back images in a continuous loop – SLIDE SHOW Воспроизведение изображений в непрерывном замкнутом цикле – SLIDE SHOW To cancel the slide show Для отмены показа слайдов Press MENU to stop the slide show. Нажмите MENU для отмены показа слайдов. To pause during a slide show Для паузы во время
  • Страница 150 из 201
    Additional information Usable cassettes and playback modes Используемые кассеты и режимы воспроизведения Selecting cassette types Выбор типов кассет You can use the mini DV cassette only. You cannot use any other DV, h 8 mm, H Hi8, j VHS, k S-VHS,  VHSC, K SVHSCor l Betamax cassette. We recommend
  • Страница 151 из 201
    Usable cassettes and playback modes Используемые кассеты и режимы воспроизведения When you play back Во время воспроизведения Copyright signal Сигнал авторского права When playing back Using any other video camera recorder, you cannot record on a tape that has recorded a copyright control signals
  • Страница 152 из 201
    Usable cassettes and playback modes Используемые кассеты и режимы воспроизведения Notes on the mini DV cassette Примечания к кассете mini DV To prevent accidental erasure Slide out the protect tab on the cassette so that the red portion is visible. [a] When affixing a label on the mini DV cassette
  • Страница 153 из 201
    Charging the vanadiumlithium battery in the camcorder Resetting the date and time The date and time are set at the factory. Set the time according to the local time in your country. If you do not use the camcorder for about a year, the date and time settings may be released (bars may appear)
  • Страница 154 из 201
    Resetting the date and time Установка даты и времени (1) Set the POWER switch to CAMERA. (2) Press MENU to display the menu. (3) Turn the control dial to select , then press the dial. (4) Turn the control dial to select CLOCK SET, then press the dial. (5) Turn the control dial to adjust the year,
  • Страница 155 из 201
    Resetting the date and time To correct the date and time setting Repeat steps 2 to 5. Установка даты и времени Для корректировки установки даты и времени Повторите пункты с 2 по 5. If you do not set the date and time “--.--.--” is recorded on the tape and “80.1.1” on the PC card or floppy disk. The
  • Страница 156 из 201
    Simple setting of clock by time difference Простая установка часов с помощью разницы во времени You can easily set the clock for a local time by a time difference in the menu system. You can also reset the clock simply by setting the time difference to zero. (1)While the camcorder is in Standby
  • Страница 157 из 201
    Tips for using the battery pack This section shows you how you can get the most out of your battery pack. Советы по использованию батарейного блока Данный раздел показывает, как Вы можете получить наибольшую отдачу от Вашего батарейного блока. Preparing the battery pack Always carry additional
  • Страница 158 из 201
    Tips for using the battery pack Советы по использованию батарейного блока When to replace the battery pack Когда заменять батарейный блок While you are using your camcorder, the remaining battery indicator on the LCD screen or in the viewfinder decreases gradually as battery power is used up. The
  • Страница 159 из 201
    Tips for using the battery pack Советы по использованию батарейного блока Уход за батарейным блоком •Remove the battery pack from the camcorder after using it, and keep it in a cool place. When the battery pack is installed to the camcorder, a small amount of current flows to the camcorder even if
  • Страница 160 из 201
    Tips for using the battery pack Советы по использованию батарейного блока How the battery consumption is displayed Как отображается расход заряда батарейного блока The power consumption of the camcorder changes depending on its use, such as whether the LCD panel is used or not, how the autofocusing
  • Страница 161 из 201
    Tips for using the battery pack Why the remaining battery indication does not match the continuous recording time in the operating instruction 1) Full charge: Charging for about 1 hour after the charge lamp of the AC power adaptor goes off. 2) Normal charge: Charging just until the charge lamp of
  • Страница 162 из 201
    Tips for using the battery pack Советы по использованию батарейного блока Notes on the terminals Примечания к контактам If the terminals (metal parts on the back) are not clean, the battery charge duration will be shortened When the terminals are not clean or when the battery pack has not been used
  • Страница 163 из 201
    Maintenance information and precautions Moisture condensation If the camcorder is brought directly from a cold place to a warm place, moisture may condense inside the camcorder, on the surface of the tape, on the lens, on the head, or on the floppy disk. In this condition, the tape may stick to the
  • Страница 164 из 201
    Maintenance information and precautions Информация по уходу за аппаратом и предосторожности Video head cleaning Очистка видеоголовок To ensure normal recording and clear pictures, clean the video heads. The video heads may be dirty when: • mosaic-pattern noise appears on the playback picture •
  • Страница 165 из 201
    Maintenance information and precautions Информация по уходу за аппаратом и предосторожности Precautions Предосторожности Эксплуатация видеокамеры •Operate the camcorder on 7.2 V (battery pack) or 8.4 V (AC power adaptor). •Should any solid object or liquid get inside the casing, unplug the
  • Страница 166 из 201
    Maintenance information and precautions Информация по уходу за аппаратом и предосторожности AC power adaptor Сетевой адаптер переменного тока Charging • Use only an “InfoLITHIUM” type battery pack. • Place the battery pack on a flat surface without vibration during charging. • The battery pack will
  • Страница 167 из 201
    Maintenance information and precautions Информация по уходу за аппаратом и предосторожности Примечания к сухим батарейкам To avoid possible damage from battery leakage or corrosion, observe the following. •Be sure to insert the batteries in the correct direction. •Dry batteries are not
  • Страница 168 из 201
    Using your camcorder abroad Each country or area has its own electric and TV colour systems. Before using your camcorder abroad, check the following points. Power sources You can use your camcorder in any country or area with the supplied AC power adaptor within 100 V to 240 V AC, 50/60 Hz.
  • Страница 169 из 201
    English Trouble check If you run into any problem using the camcorder, use the following table to troubleshoot the problem. Should the difficulty persist, disconnect the power source and contact your Sony dealer or local authorized Sony service facility. Camcorder Power Symptom Cause and/or
  • Страница 170 из 201
    Trouble check Operation Symptom Cause and/or corrective actions The end search function does not work correctly. • The tape has a blank portion in the middle. The tape does not move when a tape transport button is pressed. • The POWER switch is not set to VTR (DCR-TRV900E) or PLAYER (DCR-TRV890E).
  • Страница 171 из 201
    Trouble check Operation Symptom Cause and/or corrective actions • The tape has no cassette memory. m Use a tape with cassette memory. (p. 97) • CM SEARCH is set to OFF in the menu system. m Set it to ON. (p. 98) • There is no title in the tape. m Superimpose the titles. (p. 81) indicator does not
  • Страница 172 из 201
    Trouble check Picture Symptom Cause and/or corrective actions The picture seems to be in flash motion. • PROG. SCAN is set to ON in the menu system, or the POWER switch is set to MEMORY. This is caused by progressive scanning (display with all the pixels) and is not a malfunction. rrrrr is
  • Страница 173 из 201
    Trouble check Others Symptom Cause and/or corrective actions • Disconnect the mais lead of the AC power adaptor or remove the battery, then reconnect it in about 1 minute. Turn the power on. If the functions still do not work, open the LCD panel and press the RESET button beside the speaker using a
  • Страница 174 из 201
    English Self-diagnosis function The camcorder has a self-diagnosis display. This function displays the camcorder’s condition with five digits (a combination of a letter and figures) on the LCD screen or in the viewfinder. If this occurs, check the following code chart. The five-digit display
  • Страница 175 из 201
    Русский Проверка неисправностей Если у Вас возникла какая-либо проблема при использовании видеокамеры, воспользуйтесь следующей таблицей для отыскания и устранения проблемы. Если трудности все еще остаются, то отсоедините источник питания и обратитесь к Вашему дилеру Sony или на местное
  • Страница 176 из 201
    Проверка неисправностей Работа Признак Причина и/или действия по исправлению Функция поиска конца не работает правильно. • В середине ленты имеется незаписанный участок. Лента не перемещается при нажатии кнопки перемещения ленты. • Выключатель POWER не установлен в положение VTR (DCR-TRV900E) или
  • Страница 177 из 201
    Проверка неисправностей Работа Признак Причина и/или действия по исправлению Функция поиска титра не работает. • Кассета ленты не имеет памяти. m Используйте ленту с памятью кассеты. (стр. 97) • Функция CM SEARCH установлена на OFF в системе меню. m Установите ее на ON. (стр. 98) • На ленте нет
  • Страница 178 из 201
    Проверка неисправностей Изображение Признак Причина и/или действия по исправлению Изображение выглядит как при периодическом движении. • Функция PROG. SCAN установлена ON в системе меню, или выключатель POWER установлен в положение MEMORY. Это вызвано прогрессивным сканированием (отображение со
  • Страница 179 из 201
    Проверка неисправностей Прочее Признак Причина и/или действия по исправлению • Отсоедините сетевой провод сетевого адаптера переменного тока или снимите батарейный блок, а затем подключите его снова приблизительно через 1 минуту. Включите питание. Если функции все еще не работают, откройте панель
  • Страница 180 из 201
    Русский Функция самодиагностики Видеокамера имеет дисплей самодиагностики. Данная функция отображает состояние видеокамеры с помощью пяти знаков (комбинация буквы и цифр) на экране ЖКД или в видоискателе. Если это случится, проверьте следующую кодовую таблицу. Пятизначный дисплей информирует Вас о
  • Страница 181 из 201
    English Specifications Video camera recorder System LCD screen Picture 3.5 inches measured diagonally 72.4 x 50.4 mm (2 7/8 x 2 in.) On-screen display TN LCD/TFT active matrix method Total dot number 184,580 (839 x 220) Input and output connectors (Input connectors are supplied with LASER LINK
  • Страница 182 из 201
    Русский Технические характеристики Видеокамера Система Система видеозаписи Две вращающиеся головки, система наклонной механической развертки Система аудиозаписи Вращающиеся головки, система РСМ Квантование: 12 битов (сдвиг по частоте 32 кГц, стереозвучание 1, стереозвучание 2), 16 битов (сдвиг по
  • Страница 183 из 201
    Identifying the parts Опознавание частей 1 2 3 4 8 9 !º 6 7 1 EDITSEARCH buttons (p. 26) 1 Кнопки EDITSEARCH (стр. 26) 2 BACK LIGHT button (p. 50) 2 Кнопка BACK LIGHT (стр. 50) 3 FADER button (p. 48) 3 Кнопка FADER (стр. 48) 4 ND FILTER button (p. 65) 4 Кнопка ND FILTER (стр. 65) 5 AUTO LOCK
  • Страница 184 из 201
    Identifying the parts Опознавание частей @º @¡ @™ !§ !¶ @£ @¢ @∞ !• !ª !§ Tape transport buttons (p. 27) π STOP (stop) 0 REW (rewind) · PLAY (playback) ) FF (fast-forward) P PAUSE (pause) r REC (record) (DCR-TRV900E only) !§ Кнопки перемещения ленты (стр. 27) π STOP (остановка) 0 REW (ускоренная
  • Страница 185 из 201
    Identifying the parts Опознавание частей @§ #™ #£ @¶ @ª #º #¡ @§ LCD Screen (p. 20) @§ Экран ЖКД (стр. 20) @¶ LCD BRIGHT buttons (p. 20, 27) @¶ Кнопки LCD BRIGHT (стр. 20, 27) @• VOLUME buttons (p. 27) @• Кнопки VOLUME (стр. 27) @ª RESET button (p. 173) @ª Кнопка RESET (стр. 173) #º DATA CODE
  • Страница 186 из 201
    Опознавание частей Identifying the parts #¶ MEMORY PLAY INDEX DELETE PICTURE EFFECT DIGITAL EFFECT TITLE #• MENU $¡ $™ $£ $¢ #ª $º $∞ #¶ MEMORY INDEX button (p. 138) #¶ Копка MEMORY INDEX (стр. 138) #• MEMORY PLAY button (p. 137) #• Кнопка MEMORY PLAY (стр. 137) #ª PICTURE EFFECT button (p. 54) #ª
  • Страница 187 из 201
    Identifying the parts Опознавание частей $ª %º $§ %¡ $¶ %™ $• %£ %¢ $§ Лампочка доступа (стр. 122) $¶ DC IN jack (p. 9) $¶ Гнездо DC IN (стр. 9) $• Hooks for shoulder strap (p. 192) $• Ушки для плечевого ремня (стр. 192) $ª Intelligent accessory shoe $ª Башмак для установки вспомогательного
  • Страница 188 из 201
    Identifying the parts Опознавание частей ^º ^¡ ^™ %∞ %§ %¶ %• %ª %∞ LANC l control jack l stands for Local Application Control Bus System. The l control jack is used for controlling the tape transport of video equipment and peripherals connected to it. This jack has the same function as the jack
  • Страница 189 из 201
    Identifying the parts Опознавание частей Floppy disk adapter Адаптер флоппи-диска 2 3 4 1 1 Соединитель гнезда для платы расширения памяти (стр. 122) 2 Floppy disk eject button (p. 123) 3 Floppy disk slot (p. 123) 2 Кнопка выталкивания флоппи-диска (стр. 123) 4 Access lamp (p. 122) 3 Гнездо флоппи
  • Страница 190 из 201
    Identifying the parts Опознавание частей Remote Commander Пульт дистанционного управления The buttons that have the same name on the Remote Commander as on the camcorder function identically. Кнопки пульта дистанционного упрвления, которые имеют одинаковые наименования с кнопками на видеокамере,
  • Страница 191 из 201
    Identifying the Parts Опознавание частей To prepare the Remote Commander To use the Remote Commander, you must insert two R6 (size AA) batteries. Use the supplied R6 (size AA) batteries. (1) Remove the battery cover from the Remote Commander. (2) Insert both of the R6 (size AA) batteries with
  • Страница 192 из 201
    Identifying the parts Опознавание частей Notes on the Remote Commander •Keep the remote sensor away from strong light sources such as direct sunlight or illumination. Otherwise, the remote control may not be effective. •Be sure that there is no obstacle between the remote sensor on the camcorder
  • Страница 193 из 201
    Identifying the parts Опознавание частей Operation indicators Рабочие индикаторы 1 2 0 min – + ST I LL P ROG . S C A N NEG . ART . –3 10000 F1 . 6 AE A 1 2 dB STBY 0:1 2:3 4 1 2 min Z ERO S E T M E MO R Y END SEARCH 16B I T !§ !¶ !• !ª @º @¡ @™ @£ @¢ @∞ @§ @¶ @• @ª 1 Cassette memory indicator (p.
  • Страница 194 из 201
    Identifying the parts !¢ Steady shot OFF indicator (p. 67) Опознавание частей !¢ Индикатор отключения устойчивой съемки (стр. 67) !∞ Manual focus/Infinity indicator (p. 74) !§ Recording mode indicator (p. 39) !¶ Standby/Recording indicator (p. 14) /Tape transport mode indicator (p. 27) /Image
  • Страница 195 из 201
    Identifying the parts Опознавание частей Display window Окошко дисплея 2 1 3 1 Индикатор оставшегося времени в минутах (стр. 9)/счетчик ленты (стр. 103)/ счетчик памяти (стр. 138)/индикатор временного кода (стр. 14) 2 FULL charge indicator (p. 9) 2 Индкатор зарядки FULL (стр. 9) 3 Remaining battery
  • Страница 196 из 201
    Warning indicators If indicators flash on the LCD screen or in the viewfinder or warning messages appear on the screen, check the following: : You can hear the beep sound when BEEP is set to MELODY or NORMAL in the menu system. Предупреждающие индикаторы Если индикаторы мигают на экране ЖКД или в
  • Страница 197 из 201
    Warning indicators 1 The battery is weak or dead. Slow flashing: The battery is weak. Fast flashing: The battery is dead. Depending on conditions, the i indicator may flash, even if there are 5 to 10 minutes remaining. 2 The tape is near the end. The flashing is slow. 3 The tape has run out. The
  • Страница 198 из 201
    Index A, B, C Audio mode ................................ 39 AUTO SHTR ............................... 35 Battery release ............................ 12 BEEP ............................................ 41 Car battery .................................. 33 Cassette memory .........................
  • Страница 199 из 201
  • Страница 200 из 201
    Sony Corporation Printed in Japan
  • Страница 201 из 201