Доступность: Бесплатно как и все руководства на сайте. Без регистрации и SMS.
Дополнительно: Чтение инструкции онлайн
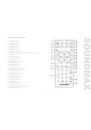
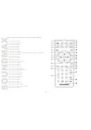
SM-CMD3008
MULTIMEDIA DVD/CD/MP3 RECEIVER with built-in 3” TFT display Instruction manual
DVD/CD/MP3-
3” TFT-
Страница: (1 из 64)
навигация
1
2
3
4
5
6
7
8
9
10
11
12
13
14
15
16
17
18
19
20
21
22
23
24
25
26
27
28
29
30
31
32
33
34
35
36
37
38
39
40
41
42
43
44
45
46
47
48
49
50
51
52
53
54
55
56
57
58
59
60
61
62
63
64
Оглавление инструкции
Страница 1 из 65 SM-CMD3008 MULTIMEDIA DVD/CD/MP3 RECEIVER with built-in 3” TFT display Instruction manual DVD/CD/MP33” TFT-
Страница 2 из 65 Dear customer! Thank you for purchasing our product. For safety, it is strongly recommended to read this manual carefully before connecting, operating and/or adjusting the product and keep the manual for reference in the future. Table of contents Table of contents
Страница 3 из 65 Important safeguards Read carefully through the manual to familiarize yourselves with this unit. Keep this manual handy as a reference for operating procedures and precautions. Do not allow persons who have not read through this manual to use this unit. “CLASS 1 LASER PRODUCT”. This product
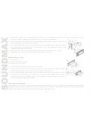
Страница 4 из 65 Accessories Receiver Front panel Remote controller Front panel protective case ISO cable Installation parts: Release keys Screw 5 Screw 25 Flat washer Spring washer Metal strap Nut Consumer information Warranty card Instruction manual 1 1 1 1 1 pc pc pc pc pc 2 1 1 2 2 1 1 1 1 1 pcs pc pc pcs pcs
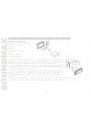
Страница 5 из 65 Installation/connection Choose the mounting location where the unit will not interfere with the normal driving function of the driver. Before finally installing the unit, connect the wiring and make sure that the unit works properly. Consult with your nearest dealer if installation requires the
Страница 6 из 65 1. Install the sleeve into the dashboard; ensure it is installed with the correct side and there are no obstacles (wires, dashboard elements, etc) for the unit installation. 2. After installing the sleeve into the dashboard, bend tabs fitting to the size of the dashboard to fix the sleeve in place.
Страница 7 из 65 2. DIN REAR-MOUNT (Method B) For this method, use the screw holes in the lateral sides of the unit. Fix the unit with the help of the factory radio mounting brackets. 1. Select a position in which the screw holes of the brackets (3) are aligned with the screw holes in the unit body, and screw in
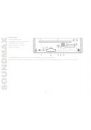
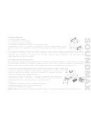
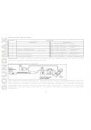
Страница 8 из 65 Electrical Connection Connector A 1. 2. 3. 4. Memory +12V 5. Auto antenna output 6. 7. +12 V (to ignition key) 8. Ground Connector B 1. Rear right speaker (+) 2. Rear right speaker (-) 3. Front right speaker (+) 4. Front right speaker (-) 5. Front left speaker (+) 6. Front left speaker (-) 7. Rear
Страница 9 из 65 ISO Connection table Location Function Connector A 1 2 3 4 5 6 7 8 Connector B Rear right (+) - Blue Rear right (-) - Blue/White Front right (+) - Grey Front right (-) - Grey/White Front left (+) - Green Front left (-) - Green/White Rear left (+) - Brown Rear left (-) - Brown/White Battery
Страница 10 из 65 Reverse driving cable connection If the rear view video camera is connected, the unit automatically switches to camera picture during reverse driving. The unit returns to the original work mode after the reverse driving is done. 10
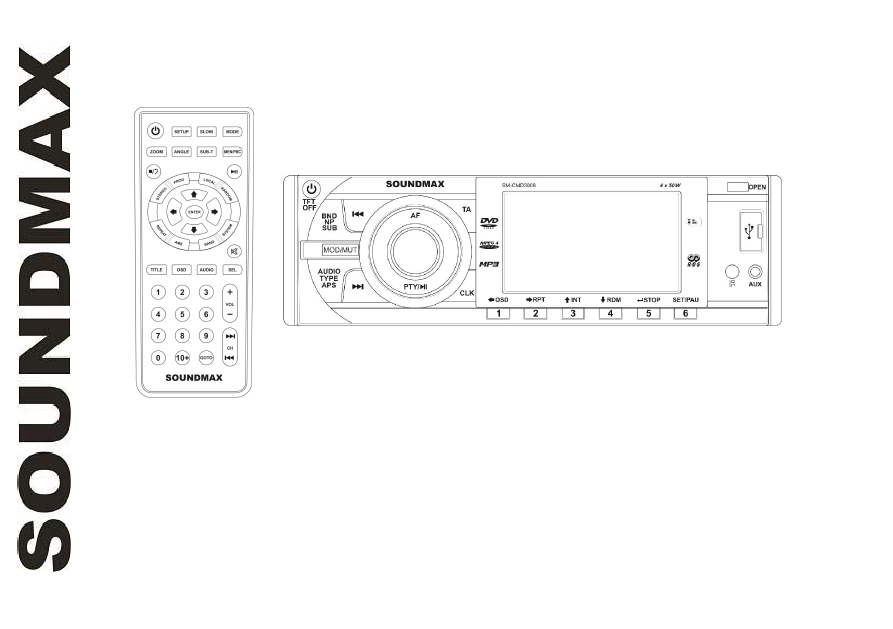
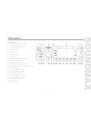
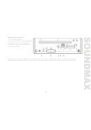
Страница 11 из 65 Unit controls Front panel 1. POWER/TFT OFF button 2. BND/NP/SUB button 3. PREVIOUS button 4. AF button 5. TA button 6. Display 7. OPEN button 8. USB port 9. AUDIO/TYPE/APS button 10. MOD/MUT button 11. NEXT button 12. PTY/PLAY/PAUSE button 13. VOLUME regulator/SELECT button 14. CLK button 15.
Страница 12 из 65 Inner panel 1. Disc loading slot 2. SD/MMC memory card slot 3. RESET button (hole) 4. Panel status indicator 5. EJECT button Pressing RESET hole will erase the clock setting and stored stations. Panel status indicator lights up when you flip down the panel and flashes when you remove the panel. 12
Страница 14 из 65 Changing the battery 1. Press the catch and at the same time pull out the battery tray (pic. 1). 2. Insert the 1 lithium battery, type CR2025 (3V) battery with the stamped (+) mark facing upward. Insert the battery tray into the remote controller (pic.2). Pic. 1 Pic. 2 Warning: Store the battery
Страница 15 из 65 General operations Reset the unit Operating the unit for the first time or after replacing the car battery, you must reset the unit. Press RESET button (hole) with a pointed object, such as a ballpoint pen, to set the unit to initial state. Note: When some errors occur, you can also press RESET
Страница 16 из 65 between the left and right speakers. Fader is to adjust the balance between the rear and front speakers. After you have reached your desired effect, leave the unit idle in order for the new setting to take effect. Note: If the equalizer is set on, bass and treble are not adjustable. EQ modes Press
Страница 17 из 65 COLOR1 (green button backlight) and COLOR2 (red button backlight). After you have reached your desired effect, leave the unit idle in order for the new setting to take effect. TFT on/off Press POWER/TFT OFF button on the panel to switch the TFT display off. Press the button again to switch the
Страница 18 из 65 Radio operations Band select Press repeatedly BND/NP/SUB button on the panel or BAND button on the RC to select your desired radio band in Radio mode: FM1, FM2, FM3, AM1 (MW1), AM2 (MW2). In each set of the bands you can store up to 6 preset stations, making total 30 preset memory stations.
Страница 19 из 65 STEREO button on the RC to switch stereo reception on/off. Improvement of reception of distant stations can be done by selecting mono mode, which may cut down some reception noise. Local radio station search Press repeatedly SELECT button on the panel or SEL button on the RC until the display shows
Страница 20 из 65 PTY (Program Type) This radio will allow you to select the type of program required, and will search for a station broadcasting that type of program. Press PTY/PLAY/PAUSE button to show the music type. Then press 1 - 6 number buttons to choose different music programs available. Press
Страница 21 из 65 RETUNE S/L: RETUNE refers to the time period the unit allows for radio scan when reception is interrupted. SHORT represents a time period of 30 seconds and LONG represents a time period of 90 seconds. MASK DPI/ALL: During MASK DPI mode, the unit will mask only the AF which has different PI, this is
Страница 22 из 65 Disc operations Insert/Eject disc Open the front panel and insert a disc into the disc slot with label side up. The disc will be automatically loaded into the unit. The first file in the root folder will be played. Close the front panel. Open the front panel and press EJECT button to eject the disc
Страница 23 из 65 Play/Pause/Stop During playback press PLAY/PAUSE button on the RC or press and hold 6/SET/PAU button on the panel to pause playback. Do this operation again to resume playback. To stop playback, press STOP button on the RC or press and hold 5/STOP/ENTER button on the panel. Selecting
Страница 24 из 65 input needed settings. Press ENTER button on the RC or 5/STOP/ENTER button on the panel to start playback from the set number or time. Programming the playback Press PROG button on the RC to open program menu. Use cursor buttons to select the program position and use number buttons to input the
Страница 25 из 65 Changing angle (for DVD only) Press ANGLE button on the RC to playback images at different camera angles. If a disc doesn’t support multi-angle playback, this function will not work. Selecting audio language (for DVD only) During DVD disc playback, press AUDIO button on the RC repeatedly to select
Страница 26 из 65 USB/SD/MMC operation USB/SD/MMC notes USB format supports 2.0. Capacity: up to 32 Gb. For correct and satisfactory operation, licensed SD/MMC memory cards of famous brands should be used with this unit. Avoid using memory cards of unknown brands. Capacity: up to 32 Gb. Inserting SD/MMC card/USB
Страница 27 из 65 Setup menu Press SETUP button on the RC or 6/SET/PAU button on the panel to display setup screen, use UP/DOWN cursor buttons to select the desired setup page: System, Disc. Press RIGHT cursor button to go to the selected page item list. In the selected page select an item using UP/DOWN cursor
Страница 28 из 65 Password Change the password. The initial factory password is 0000. You can set your own password. If you forget your own password, you can use 0000 as general password. Rating The control level is for parental to control playing content and protect your children from violence and erotic. The disc,
Страница 29 из 65 Handling and cleaning discs Dirty, scratched or warped discs may cause skip ping or noise. Handle the disc only by the edges. To keep clean do not touch its surface. Discs should be stored in their cases after use to avoid scratches. Do not expose discs to direct sunlight, high humidity, high
Страница 30 из 65 Troubleshooting guide Below is a table describing simple measures that can help you eliminate most problems likely to emerge when this unit is in use. If below measures do not help, turn to a service center or to the nearest dealer. Symptom Cause Solution No power The car ignition is not on. If the
Страница 31 из 65 Specification General Power supply: Maximum power output: Storage support: Compatible formats: Unit dimensions/Net weight: Gift box dimensions/Gross weight: ESP function: Temperature range: TFT display Screen size: Resolution: Aspect ratio: Contrast ratio: Brightness: View angle: FM Radio Frequency
Страница 50 из 65 ON (ST OFF). ( FM SELECT ) SEL VOLUME (ST ON) (ST OFF). STEREO , . ON (LOC OFF). OFF ( RDS SELECT ). . SEL VOLUME LOC ON ( VOL+/VOL, VOL+/VOL- ; LOCAL ST , ) , LOC , DLOC LOC/DX. RDS RDS ( , ) AF ( . , . ) , AF, AF RDS TA ( . AF. . . , . ) TA. , . 50 TA. , AF.
Страница 51 из 65 , TA; FM- , PTY ( , ) Pop, Rock 2 Easy, Light 3 Classics 4 Jazz, Country 5 Nation, Oldies 6 Folk . , News, Affairs, Info Sport, Educate, Drama Culture, Science, Varied , Weather, Finance, Children Social, Religion, Phone IN Travel, Leisure, Document 51 . . . . . - TA. . , , , , RDS, PTY/PLAY/PAUSE,
Страница 52 из 65 , PTY , ; . , . . SELECT , VOLUME VOL+/VOL. TA SEEK/TA ALARM: PI SOUND/MUTE: PI sound: TA; , DPI , . , . , ; «L» . TA , MASK ALL RDS. 52 , PI, . PI mute: . . , TA SEEK TA ALARM: . . RETUNE L/RETUNE S: «RETUNE» . «S» : Retune MASK DPI/MASK ALL: ), , MASK , . PI SEL . TA SEEK. AF ( , MASK DPI. ,