Страница 3 из 54 ITALIANO Manuale di Istruzione SLEDGE by Studiologic® 3 I
Страница 4 из 54 Informazioni di sicurezza Importanti informazioni di sicurezza Leggi attentamente il manuale. Esso contiene tutte le informazioni di cui hai bisogno per utilizzare questo strumento. Segui le istruzioni nel manuale. La garanzia verrà annullata qualora venissero effettuati interventi non autorizzati
Страница 5 из 54 Indice Informazioni di sicurezza 4 Il tuo nuovo SLEDGE Pannello di controllo/ Vista posteriore 6 Prima di utilizzare SLEDGE 7 7 Collegamenti 8 Selezione suoni / Variations 10 10 10 10 11 11 11 11 Ruote Master Volume Mode Trigger Mode Mono Selezione suono 10‘HOLD Store Exit Funzioni 12 13 14 15 16
Страница 6 из 54 Il tuo nuovo SLEDGE La ringraziamo molto per aver scelto lo Sledge, uno strumento “State-of-the-Art” progettato dalla Studiologic in collaborazione con la rinomata ditta Waldorf. Lo Sledge è facile da usare, grazie al pannello di controllo completo con comandi ad accesso diretto, e offre un
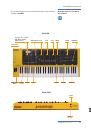
Страница 7 из 54 Pannello di controllo / Connessioni Tutti i pulsanti operativi sono indicati in grassetto corsivo (es. On/Off). Indicazione delle funzioni nel manuale VISTA DALL‘ALTO Slezione suoni- STORE ARP - MIDI - GLOBAL funzione PANEL MODULATION OSC1 OSC2 OSC3 MIXER FILTER AMPLIFIER Connessioni Pitch & Mod
Страница 8 из 54 Before using the SLEDGE Power connection Usate il cavo di alimentazione in dotazione per collegare lo Sledge alla rete elettrica. Accendete lo strumento mediante l‘apposito pulsante posto sul retro dello stumento. Sustain / Expression pedal Collegate i pedali (opzionali) PS-100 o VFP 1 alla presa
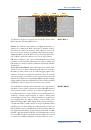
Страница 9 из 54 Connections MIDI / USB • MIDI In, MIDI Out • USB Pedali • Expression, Hold Output / Headphones • Left, Right Inserire un cavo jack in uscita Right / Mono (se si decide di avere un output di miscelazione Mono) o 2 cavi separati in entrambe le prese jack di uscita dedicati, se è possibile utilizzare
Страница 10 из 54 Ruote / Master Volume / Mode RUOTE • Modulation • Pitch 10 Master Volume MODE • Trigger • Mono Ruote di espressione Le 2 ruote sul lato sinistro degli strumenti sono i più popolari controlli in tempo reale; il Pitch Bend (a sinistra) permette di controllare in modo continuo l’intonazione
Страница 11 из 54 Selezione dei suoni Value 10‘HOLD Tatsi Navigazione Frecce Su/Giù STORE Tastierino Numerico EXIT Tutti i suoni dello Sledge possono essere selezionati in 3 modi: • Ruotando la manopola Value • Agendo sui due tasti di navigazione sotto il display • Selezionando il relativo numero (program change)
Страница 12 из 54 Ricerca categorie Value Categoria Suono Suono • Numero Suno / Nome Suono Filtro Categorie Ricerca per categorie Lo Sledge offre una funzione speciale per abilitare ricerche semplici, suddividendo i suoni in categorie simili. Se siete alla ricerca di suoni Pad (ad esempio), verranno visualizzati
Страница 13 из 54 Arpeggiatore Arpeggiatore Questa funzione è generatore automatico di arpeggio, sotto il controllo di poche, chiare e semplici pagine di menu programmabili dell‘utente, che si possono scorrere con i tasti dedicati sotto il display, mentre il controllo desiderato e / o il parametro viene selezionato
Страница 14 из 54 MIDI / Salvataggio dei Suoni MIDI MIDI I controlli Midi sono legati a tutte le funzioni di interfaccia MIDI dello strumento, che permette di controllare unità esterne e/o di essere controllati da unità esterne. Le pagine correlate (selezionabili mediante i tastini sotto il display) sono: Channel:
Страница 15 из 54 Parametri Globali Global La funzione GLOBAL riassume tutti i controlli generali degli strumenti, non correlati ad un suono specifico o un programma. L‘elenco dei controlli ed il loro significato è come segue: Global Master Tune: permette di accordare lo strumento in un range compreso tra 430 e 450
Страница 16 из 54 Funzione Panel Panel Panel Questo controllo permette di leggere contemporaneamente tutti i potenziometri nella loro posizione fisica e generare tutti i relativi controlli su vari parametri, per allineare istantaneamente tutto il pannello alla generazione del suono. Si tratta di una caratteristica
Страница 17 из 54 Modulation / Glide MODULATION GLIDE LFO1, LFO2, WHEEL ON/OFF, RATE Shape: l‘utente può selezionare la forma d’onda modulante, dal dente di sega (sawtooth) al generatore casuale (random). Un‘onda sinusoidale o un triangolo sono generalmente utilizzati per ottenere effetti simmetrici (come Vibrato o
Страница 18 из 54 Oscillatore 1 OSC1 OCTAVE, SEMITONE, WAVETABLE, PULSE WITH, WAVEFORM Octave: il range va da 64 a 1‘ (7 ottave), si noti che l’altezza standard di un pianoforte è riferita a 8‘ e questo significa che, impostando il controllo relativo alla posizione centrale, un tasto qualsiasi della tastiera suona
Страница 19 из 54 Osc 2 / Osc3 / Mixer / Noise OSC2 OSC3 MIXER Queste 2 sezioni sono sostanzialmente identiche all’OSC 1 con le seguenti differenze: NOISE OSC2 / OSC 3 Detune: il relativo controllo permette di “stonare” un po ‚gli oscillatori, rispetto a OSC 1 (che non ha alcun controllo detune). Questo permette di
Страница 20 из 54 Filtro FILTER FILTRO 20 FILTER ENVELOPE Type: quando un tipo Low-Pass viene selezionato, tutte le frequenze al di sopra della frequenza di taglio vengono smorzate/filtrate. Quando un tipo passa alto è selezionata, tutte le frequenze al di sotto della frequenza di taglio vengono filtrate. Quando un
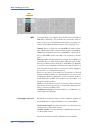
Страница 21 из 54 Inviluppo del filtro CUTOFF SUS FREQ ATTACK KEY ON DECAY RELEASE SUSTAIN TIME KEY OFF Attack: determina il tempo che impiega il filtro per raggiungere la massima frequenza di taglio, che è determinata anche da altri parametri (rif: cutoff, tracking, amount ecc). INVILUPPO Decay: controlla il tempo
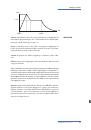
Страница 22 из 54 Inviluppo dell‘amplificatore AMPLIFIER ENVELOPE AMPLITUDE SUS LEVEL ATTACK DECAY KEY ON Inviluppo RELEASE SUSTAIN TIME KEY OFF Questa sezione ha una funzione simile alla sezione precedente (Filter), ha effetto sul volume del suono e non ha alcun effetto frequenza del filtro. In generale, il filtro
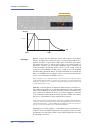
Страница 23 из 54 Effetto 1/Effetto 2 EFFECT 1 EFFECT 2 Chorus: questo effetto caldo e ricco viene generato utilizzando algoritmi che creano copie del segnale di ingresso, mescolandole al segnale di uscita. Il risultato è come un insieme di più suoni simultanei, come un coro di voci unisone, da cui il nome di
Страница 25 из 54 Dichiarazioni Tuti i prodotti Studiologic sono costruiti attentamente, calibrati, testati, e sono soggetti a garanzia. Registra il tuo strumento per avere pieno supporto. Danni causati da trasporto non conforme, montaggio o errata manutenzione, non sono coperti da questa garanzia. Per eventuali
Страница 27 из 54 ENGLISH Operation Manual SLEDGE by Studiologic® 27 E
Страница 28 из 54 Safety Instructions Important Safety Instructions Please read the entire manual. It contains all the information you need to use this unit. Please follow the instructions in the manual. The warranty will be void if unauthorized work is carried out on the instrument. Only accessories that are
Страница 29 из 54 Index Safety Instructions 28 Your new SLEDGE How functions are shown in this manual Control panel / Back View 30 31 31 Before using the SLEDGE 32 Connections 33 Sound Select / Variations 34 34 34 34 35 35 35 35 36 Wheels Master Volume Mode Trigger Mode Mono Sound Selection 10‘HOLD Store Exit
Страница 30 из 54 Your new SLEDGE Thank you very much for choosing the SLEDGE. You have obtained a state-of-the-art keyboard made by the renowned manufacturer Studiologic in cooperation with Waldorf. The SLEDGE is easy to operate, thanks to the real-time complete control panel, and offers a perfect keyboard touch.
Страница 31 из 54 Control Panel / Connections All operation buttons are marked in bold italic in this manual (example: On/Off). How functions are shown in this manual TOP VIEW Sound selection - STORE ARP - MIDI - GLOBAL PANEL Function MODULATION OSC1 OSC2 OSC3 MIXER FILTER AMPLIFIER Connections Pitch & Mod Wheels
Страница 32 из 54 Before using the SLEDGE Power connection Use the power chord to connect the instrument to the power socket. Switch the unit on by using the power switch near to the power plug on the back of the instrument. Sustain / Expression pedal Connect the (optional) sustain pedal PS-100 or VFP 1 at the
Страница 33 из 54 Connections MIDI / USB • MIDI In, MIDI Out • USB Pedals • Expression, Hold Output / Headphones • Left, Right You can either connect a good headphones set to the dedicated output and insert one jack cable in the Output Right/Mono (if you decide to have a Mono output mixing) or 2 separate jack cables
Страница 34 из 54 Wheels / Master Volume / Mode WHEELS • Modulation • Pitch 34 Master Volume MODE • Trigger • Mono Wheels The 2 wheels on the left side of the instruments are the most popular real-time controls, used since the early Analogue Synthesizer time; they allow to control both the Pitch Bending of the sound
Страница 35 из 54 Sound Selection Value 10‘HOLD Navigation tabs Up/Down arrows STORE Key Pad EXIT All sounds / programs can be selected in 3 ways: • By rotating the Value dial; • Using the 2 Navigation tabs under the display; • Selecting the related program change on the numerical key pad; please note that 3 numbers
Страница 36 из 54 Category Search Sound • Sound Number / Sound Name Value Sound Category Category Filter Category Search The Sledge offers a special function to enable easy searches for sounds of same categories. If you’re searching for pad sounds, only these sounds will be displayed as you scan the storage banks
Страница 37 из 54 Arpeggiator Arpeggiator This function is a real-time automatic arpeggio generator, under control of few, clear and simple user’s programmable menu pages, that can be scrolled by the dedicated buttons under the display while the desired control and/or parameter is selected by rotating the Value
Страница 38 из 54 MIDI / Sound Backup MIDI MIDI The Midi controls are related to all Midi Interface functions of the Sledge, allowing it to control external units and/or to be controlled by external units. The related pages (scrolled by the navigation tabs under the display) are: Channel: from 1 to 16 (the Sledge
Страница 39 из 54 Global Parameters Global The Global function summarizes all general controls of the instruments, not related to a specific sound or program. The list of controls and their meaning is as it follows: Global Master tune: it allows to tune the instrument in a range between 430 and 450 Hertz, related to
Страница 40 из 54 Panel Function Panel Panel This control allows to read at once all potentiometers physical position and generate all related controls on the various parameters, to instantly align the sound generation to the control panel. It is a very useful feature when the user is looking for a new sound and he
Страница 41 из 54 Modulation / Glide MODULATION GLIDE LFO1, LFO2, WHEEL ON/OFF, RATE Shape: by using the Shape button, the user can select the related shape of the Modulating waveform, from the Sawtooth to the Random generator; please note the a sine wave or a triangle is generally used for obtaining symmetrical
Страница 42 из 54 Oscillator 1 OSC1 OCTAVE, SEMITONE, WAVETABLE, PULSE WITH, WAVEFORM Octave: the range is from 64’ to 1’ (7 octaves); please note that the standard range for a piano is 8’ and this means that, by setting the related control to the middle position, any key played on the keyboard will play with the
Страница 43 из 54 Osc 2 / Osc3 / Mixer / Noise OSC2 OSC3 MIXER The function of these 2 sections are mostly the same of the OSC 1 with the following differences: NOISE OSC2 / OSC 3 Detune: the related control allows to slightly detune the oscillators, as compared to OSC 1 (that has no detune control). This allows to
Страница 44 из 54 Filter FILTER FILTER 44 FILTER ENVELOPE Type: when a low pass type is selected via the Type parameter, all frequencies above the cutoff frequency are damped. When a high pass type is selected, all frequencies below the cutoff frequency are damped. When a band pass type is selected, only frequencies
Страница 45 из 54 Filter envelope CUTOFF SUS FREQ ATTACK KEY ON DECAY RELEASE SUSTAIN TIME KEY OFF Attack: determines the time to reach the maximum filter cut off frequency, that is also determined by other parameters (ref: amount). FILTER ENVELOPE Decay: controls the time to reach the Sustain level (frequency of
Страница 46 из 54 Amplifier envelope AMPLIFIER ENVELOPE AMPLITUDE SUS LEVEL ATTACK DECAY KEY ON AMPLIFIER ENVELOPE RELEASE SUSTAIN TIME KEY OFF This section has no effect on the frequency of the filter, while it controls the amplitude (volume) of the sound. In general, the filter may control large part of the timbre
Страница 47 из 54 Effect 1/Effect 2 EFFECT 1 EFFECT 2 Chorus: this warm and rich effect is generated by using Comb filters that creates slightly detuned copies of the input signal and mix it into the output signal. The result sounds like an ensemble of several simultaneous sounds, like a choir as opposed to a single
Страница 49 из 54 Declarations Every product from Studiologic by Fatar has been carefully manufactured, calibrated and tested, and carries a two year warranty. Please register your product to get full support. Damage caused by incorrect transport, mounting or handling is not covered by this warranty. For any further