ЦЕНТЪР ЗА ПОДДЪРЖАНЕ НА ЛИЦЕТО И НОКТИТЕ
Прочетете Инструкцията преди използване на комплекта
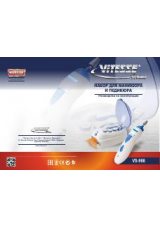
ОПИСАНИЕ
1.
Корпус на основното устройство
2.
Прозрачен капак
3.
Гнездо за включване на адаптера за мрежата
4.
Прекъсвач за сушене/масаж "OFF/F/M+F"
5.
Адаптер за мрежата
6.
Бутон за отваряне на капака
7.
Капак на сушенето на нокти
8.
Огледало
9.
Вентилатор за изсушаване на нокти
10. Масажна възглавница
11. Диск за придаване на форма на ноктите
12. Цилиндрична наставка
13. Филцов диск за шлифоване и полиране
14. Наставки:гребени за вежди (A, B, C).
15. Наставка с остър връх
16. Ролков масажор
17. Козметична четчица
18. Лопатка за автоматично повдигане на кожички
19. Голяма конусовидна наставка
20. Гъба от дунапрен
21. Четчица
22. Наставка за подвиване на мигли
23. Пръчица за повдигане на кожичките
24. Преходник за установяване на въртящите се наставки
25. Прекъсвач за захранването "0/I"
26. Устройство за маникюр/педикюр
27. Индикатор за зареждане
28. Козметична самобръсначка
29. Диск с дребни нарязвания за обработване на ноктите
МЕРКИ ЗА БЕЗОПАСНОСТ
Комплектът е предназначен само за домашно използване.
За осигуряване на правилното функциониране на
устройството се препоръчва то да бъде изключвано за 15
минути след всеки 20 минути непрекъснато използване.
Внимание! Спазвайте следните правила, за да
избегнете риск от изгаряния, токов удар, пожар и
опасност за здравето на човека:
1.
Убедете се, че работното напрежение на адаптера за
мрежата съответства на напрежението на мрежата.
2.
Съхранявайте комплекта извън достъпа на деца.
Необходимо
е
да
бъдете
внимателни,
ако
устройството се използва в близост до деца от хора с
ограничени възможности.
3.
Използвайте устройството само по предназначение и
за
цели,
описани
в
даденото
ръководство,
използвайте само наставките, които влизат в
комплекта на доставката.
4.
Не използвайте устройството по време на вземане на
душ или вана. Не слагайте и не съхранявайте уреда на
места, откъдето той може да падне във ваната или
мивката, напълнена с вода.
5.
Не потапяйте устройството и адаптера за мрежата във
вода или друга течност.
6.
Ако устройството или адаптера за мрежата не работи
правилно, не го използвайте, обърнете се в
упълномощения сервизен център за ремонт.
7.
Не пренасяйте устройството, като вземате кабела на
адаптера за мрежата.
8.
Никога не използвайте устройството в състояние на
сънливост или умора.
9.
Не използвайте устройството на открито и на места,
където се използва аерозолна пулверизация.
10. Не използвайте устройството, ако имате отворени
рани или одрасквания на пръстите или стъпалата на
краката.
11. Консултирайте се с лекар преди използване на
устройството, при наличие на диабет или при
заболявания на съдовете.
ЗАРЕЖДАНЕ НА АКУМУЛАТОРНИТЕ БАТЕРИИ
: Преди използване на устройството проверете, дали
акумулаторните батерии.са напълно заредени.
: Убедете се, че работното напрежение на адаптера за
мрежата съответства на напрежението на мрежата.
: Времето за зареждане трябва да бъде не по:малко от
12 часа.
: Времето за повторно зареждане е не по:малко от 6
часа.
•
Убедете се, че уредът е изключен, прекъсвачът на
захранването (25) е в положение "0".
•
Поставете устройството (26) на подставката (1).
•
Включете щепсела на адаптера за мрежата (5) в
гнездото (3).
•
Вкарайте адаптера за мрежата в контакта, при това на
устройството индикаторът за зареждане (27) ще
светне.
•
За
продължаване
на
срока
на
работа
на
акумулаторните батерии се препоръчва веднъж на три
месеца напълно да ги разредите, като оставите
прибора включен до спиране на двигателя, след това
осъществете пълно зареждане.
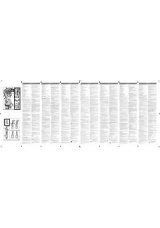
УСТАНОВЯВАНЕ НА НАСТАВКИТЕ
: За установяване на въртящите се наставки се използва
преходникът (24).
: Съвместете маркировката на корпуса на преходника
(24) с маркировката на корпуса на устройството (26) и
завъртете преходника по посока на часовниковата
стрелка до ограничителя, за снемане на преходника го
завъртете против часовниковата стрелка и махнете от
устройството.
: Изберете необходимата наставка и я установете на
оста на преходника (24), за махане на наставките
изключете устройството с прекъсвача (25), изтеглете
наставката нагоре и я махнете.
: Наставките (22 и 28) се установяват на корпуса на
устройството без преходника (24).
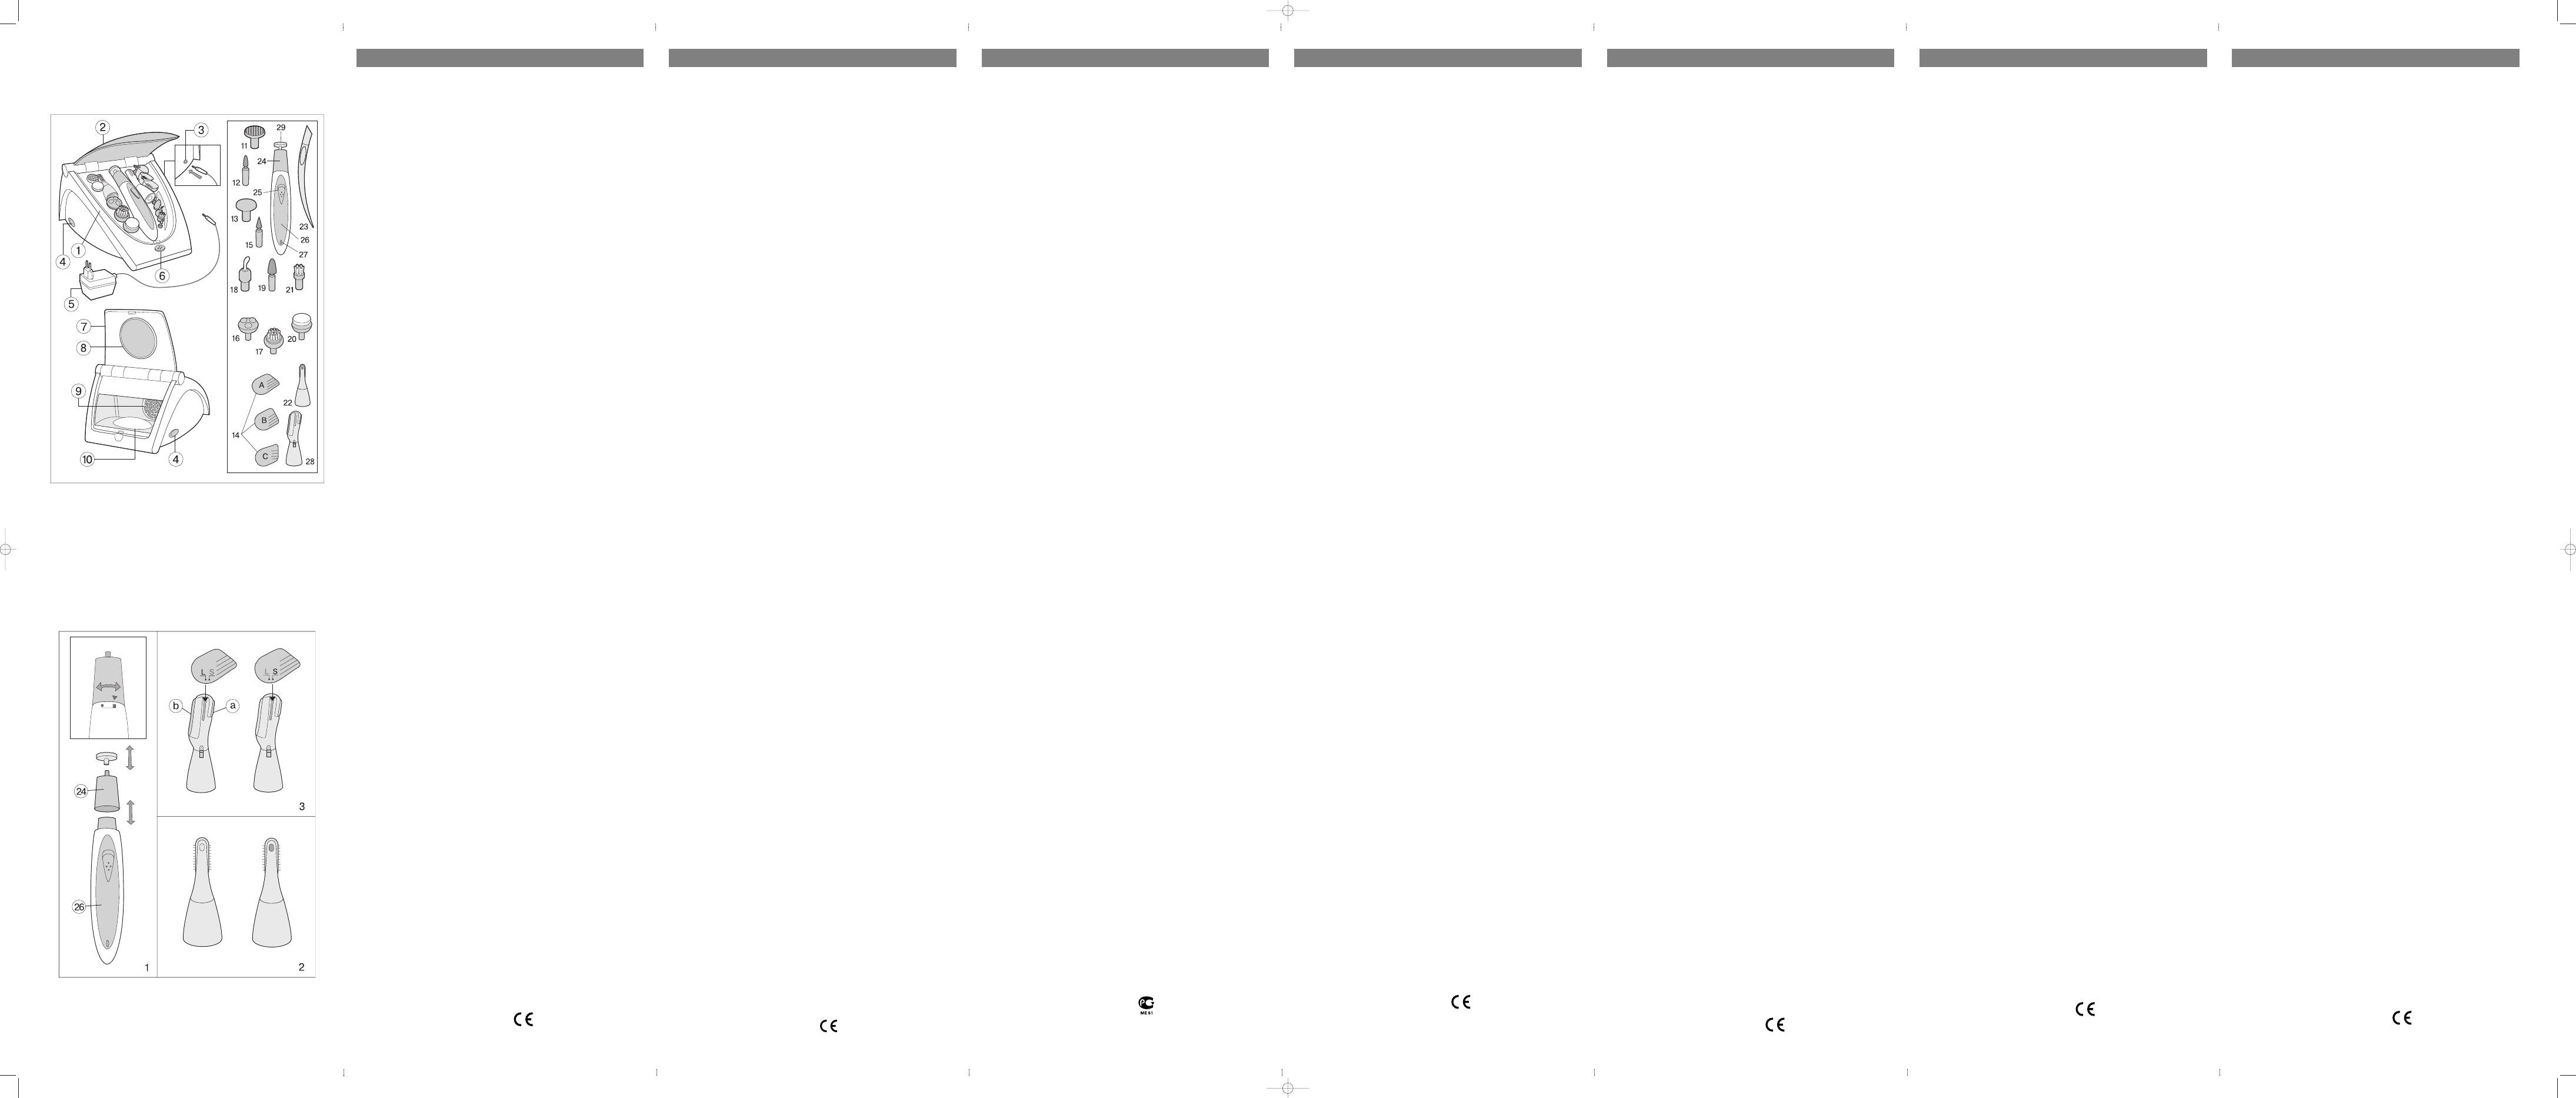
НАСТАВКА ЗА ПОДВИВАНЕ НА МИГЛИ
Използвайте подвиването на мигли след снемането на
грима, но до налагането на каквато и да е маска.
•
Установете наставката за подвиване на мигли (22) на
устройството (26), съвместете маркировките на
наставката и устройството и завъртете наставката (22)
по посока на часовниковата стрелка.
•
Включете устройството с прекъсвача (25).
•
Изчакайте около една минута, докато "индикаторът за
нагряване" не смени своя цвят (Рис.2).
•
Не приближавайте наставката прекалено близо до
очите!
•
Премествайте наставката по посока от корените на
миглите навън, повторете няколко пъти, докато миглата
не се подвие, тъй както вие го искате. Начинът за
използване е еднакъв както за горните, така и за
долните мигли.
•
След подвиването на мигли изключете захранването на
устройството с прекъсвача (25).
•
Изчакайте от 3 до 5 минути за изстиване на наставката
за подвиване на мигли преди да я махнете от
устройството.
Внимание: Наставката за подвиване на мигли не бива да
се пирближава близо до очите, за да избегнете
получаването на изгаряния.
КОЗМЕТИЧНА БРЪСНАЧКА (Рис. 3)
Козметичната бръсначка може да бъде използвана за
отстраняване на нежелателни косми на лицето на страната
(а) и в областта на бикини : страната (b).
•
Установете наставката козметична бръсначка (28) на
устройството (26), съвместете маркировките на
наставките и устройството и завъртете наставката (28)
по посока на часовниковата стрелка.
•
Включете устройството с прекъсвача (25).
За придаване на форма на веждите:
:
С помощта на молив за вежди нарисувайте
необходимия контур на веждата.
:
Отстранете космите зад нарисувания от вас контур с
козметичната бръсначка (28), със страната (а).
Използване на наставките / гребени за вежди
Наставките : гребени за вежди (14) позволяват да се
изрежат космите до установената дължина и под
установения ъгъл.
:
Изберете желаемата наставка (14) и я приложете към
веждата за избор на съответствието на необходимата
дължина на косата и техният ъгъл.
:
Всяка наставка (14) е снабдена с по два чифта
направляващи, в зависимост от необходимата дължина
на косата на веждите: А : 2/4 мм, В : 6/8 мм, С : 10/12
мм.
:
Срешете и изправете косата на веждите с гребена.
:
Установете избраната наставка (14) върху козметичната
бръсначка, като използвате едната страна на
бръсначката за отстраняване на тънки косми (а).
Бавно премествайте наставката:гребен от края на веждата
към началото на растежа на косата, повторете
процедурата 3, 4 пъти, докато не бъде достигната
необходимата дължина на косата на веждата.
Внимание: Наставката гребен трябва да се притиска към
веждата при преместването и.
Областта бикини
Използвайте наставката на козметичната бръсначка (28)
страната (b) за отстраняване на нежелателни косми в
областта бикини.
: Не използвайте наставката (28) върху чувствителни
участъци на кожата.
Внимание! За да избегнете повреждането на кожата, не
използвайте наставката (28) с повредени остриета.
ИЗПОЛЗВАНЕ НА ЛИЦЕВАТА КОЗМЕТИЧНА ЧЕТЧИЦА
Козметичната четчица се използва за интензивно и меко
почистване на кожата на лицето.
: Установете преходника (24) върху устройството (26),
както е описано по:горе.
: Установете козметичната четчица (17) на оста на
преходника (24).
: Отстранете излишната козметика.
: Нанесете сапун, почистващ крем или гел на четчицата.
: Включете устройството с прекъсвача (25).
: С кръгообразни движения обработете кожата на
лицето, избягвайки чувствителните участъци на кожата
около очите.
: След приключване на процедурата отстранете
остатъците на почистващия крем или гела и изтрийте
кожата на лицето с тонизиращ лосион.
РОЛКОВ МАСАЖОР
Ролковият масажор може да се използва за ефективно
нанасяне на кожата на лицето на овлажняващ крем или гел.
: Установете ролковия масажор (16) на оста на
преходника (24)
: Нанесете на кожата на лицето овлажняващия крем.
: Включете устройството с прекъсвача (25) и с меки
кръгообразни движения масажирайте кожата на
лицето. Не осъществявайте процедурата на масажа
повече от две минути и избягвайте чувствителните
участъци на кожата около очите.
: След
приключване
на
процедурата
остранете
остатъците от крема от кожата на лицето с помощта на
хартиена салфетка.
ГЪБА ОТ ДУНАПРЕН
С помощта на гъбата от дунапрен може да бъде
осъществено равномерно нанасяне на лицето на основата
за грима.
: Установете наставката (20) на оста на преходника (24).
: Нанесете на кожата на лицето основата за грима.
: Включете устройството с прекъсвача (25) и с меки
кръгообразни движения равномерно разпределяйте
основата за грима по кожата на лицето. Не
осъществявайте процедурата повече от две минути и
не допускайте чувствителните участъци на кожата
около очите.
КОМПЛЕКТ ЗА МАНИКЮР/ПЕДИКЮР
Предлагаме ви варианти за използване на наставките за
маникюр/педикюр.
Дискове за придаване на форма на ноктите (11, 29).
За меки и тънки нокти използвайте диска с дребна
насечка. За по:дебели нокти отначало използвайте диска
с брусова насечка, и завършете обработването с диска с
дребна насечка. Можете да използвате тези дискове на
участъци с груба кожа, като пети или за отстраняване на
мазоли на ръцете, внимателно премествайте диска за
постепенно снемане на пласта от омъртвяла кожа.
Цилиндрична наставка (12)
се използва за обработване
на повърхността на дебелите нокти на пръстите на ръцете
и краката.
Филцов диск за шлифоване и полиране (13).
Използва
се за полиране на повърхността на ноктите след
маникюра/педикюра и им придава допълнителен блясък.
Наставката с остър връх (15)
се използва за
отстраняване на отмрялата кожа и почистване на врастнал
нокът.
Лопатка за автоматично повдигане на кожичките (18).
Бъдете внимателни при използване на дадената наставка,
не допускайте дълбоко приникване на лопатката под
кожата. Започнете обработването от едната страна на
нокътя и постепенно премествайте наставката.
Голямата конусовидна наставка (19)
се използва за
шлифоване на груба кожа, мазоли или за шлифоване на
повърхността на ноктите. Внимателно придвижвайте тази
наставка по обоработваната кожа или нокътя.
Четчица (21)
служи за предварително или окончателно
почистване на повърхностите на ноктите.
Пръчица за повдигане на кожичките (23).
Използва се
за ръчно повдагане на кожичките.
Полезни съвети
За поддържане на ноктите в добро състояние и постигане
на добри резултати при използване на комплекта за
маникюр/педикюр използвайте следните препоръки:
• Избягвйте попадане на ноктите на разяждащи
химически вещества.
• Не подлагайте ръцете на силно охлаждане. Когато
времето е студено, винаги си слагайте ръкавици.
• Не използвйте алкален сапун и прекалено голямо
количество вода при миене на ръце.
• Доброто навлажняване на ноктите : това е начин
ноктите да бъдат силни, здрави, устойчиви към
разделяне на слоеве и нечупливи. След процедурата на
обработването на ноктите нанесете върху тях
овлажняващ крем или лосион.
• За да предотвратите разделяне на ноктите на слоеве,
използвайте само висококачествен лак за нокти. Преди
използване на каквото и да е средство за овлажняване
шлифовайте ноктите.
• Преди остраняване на кожичките първоначално ги
навлажнете, а след това внимателно повдигайте с
наставката или пръчицата.
• За безопасно използване и отстраняване на кожичките
използвайте маникюрни щипци вместо ножици.
• За да предотвратите намаляването на дебелината на
ноктите, шлифовайте и полирайте ноктите с интервали
от седем до десет дни.
ВКЛЮЧВАНЕ НА СУШЕНЕТО НА НОКТИ И МАСАЖОРА
ЗА ПРЪСТИТЕ НА РЪЦЕТЕ
•
Включете щепсела на адаптера за мрежата (5) в
гнездото (3).
•
Отворете сушенето за нокти, като установите капака (7)
във вертикално положение.
•
Включете сушенето, като установите превключвателя
(4) в положение "F".
•
За включване на функцията за масаж и сушене,
установете превключващият бутон (4) в положение
"M+F".
•
След
приключване
на
процедурата
изключете
сушенето, като установите превключвателя (4) в
положение "OFF".
•
Отделението за сушене може да се използва за
съхраняване на лака за нокти, и т. н.
ПОДДЪРЖАНЕ И ОБСЛУЖВАНЕ
•
Избърсвайте корпуса на устройството с мека влажна
кърпа. Не използвайте абразивни средства за
почистване и разтворители за почистване на корпуса
на устройството.
•
Никога не потапяйте устройството в каквато и да е
течност.
•
Периодично изтривайте наставките с медицински
спирт за дезинфекция.
•
Не се опитвайте самостоятелно да ремонтирате
даденото устройство. При повреда на устройството
или адаптера за мрежата се обърнете за ремонт в
упълномощения сервизен център.
•
Съхранявайте комплекта за маникюр и педикюр в
безопасно, сухо място.
ОПАЗВАНЕ НА ОКОЛНАТА СРЕДА
•
Вградените
акумулаторни
батерии
съдържат
компоненти, които замърсяват околната среда.
•
Преди
оползотворяване
на
прибора
извадете
акумулаторни батерии.
•
Не изхвърляйте акумулаторни батерии заедно с
обикновените битови отпадъци, а ги занасяйте в
специален приемателен пункт.
Технически характеристики
Адаптер за мрежата:
Напрежение на захранването
220:230В 50 Хц
Изходно напрежение
2,8 В 550 мА
Производителят си запазва правото да изменя
характеристиките на приборите без предварително
уведомяване.
Срок на използване над 3 години
Гаранция
Подробни условия на гаранцията могат да бъдат получени
от дилера, който е продал тази апаратура. При всяка
рекламация по време на срока на действие на тази
гаранция е необходимо да се представи чека или
квитанцията за купуване.
Това изделие съответства на
изискванията за електромагнитна
съвместимост на директива
89/336/ЕЕС на Съвета на Европа и на
нареждането 73/23 ЕЕС за апаратурата
с низко напрежение.
БЪЛГАРСКИ
8
KIT DE CUIDADO FACIAL Y DE UÑAS
Antes de usar el kit lea estas instrucciones
DESCRIPCION
1. Cuerpo del dispositivo principal
2. Tapa transparente
3. Entrada para el adaptador
4. Interruptor del secador/masaje “OFF/F/M+F”
5. Adaptador
6. Botón para abrir la tapa
7. Tapa del secador de uñas
8. Espejo
9. Ventilador para secar las uñas
10. Almohadilla de masaje
11. Disco para dar forma a las uñas
12. Cilindro
13. Disco de fieltro para pulir
14. Peines para pestañas (A, B, C).
15. Accesorio puntiagudo
16. Masajeador con bolillas
17. Pincel de limpieza
18. Palillo levantacutículas automático
19. Cono grande
20. Esponja de goma espuma
21. Cepillo
22. Accesorio para ondulación de pestañas
23. Palillo levantacutículas
24. Adaptador para accesorios giratorios
25. Interruptor de alimentación “0/I”
26. Aparato para manicura/pedicura
27. Indicador del nivel de carga
28. Depiladora
29. Disco de grano fino para el tratamiento de las uñas
MEDIDAS DE SEGURIDAD
Este kit está destinado sólo para uso doméstico.
Para que este aparato funcione bien le recomendamos
apagar por 15 minutos después de cada 20 minutos de
uso continuo.
¡Atención! Para evitar quemaduras, una descarga
eléctrica, incendio o daños físicos tenga las sigu
ientes precauciones:
1. Cerciórese que la tensión del adaptador coincida con
la de su red eléctrica.
2. Conserve el aparato fuera del alcance de los niños.
Preste especial atención si el aparato es usado cerca
de los niños o minusválidos.
3. Use el aparato sólo para los fines descriptos en estas
instrucciones. Use sólo accesorios que forman parte
de este kit.
4. No use el aparato durante baños de inmersión o cuan>
do se ducha. No coloque ni guarde el aparato en
lugares, de donde pueda caerse a la bañera o fre>
gadero con agua.
5. No sumerja el aparato y el adaptador en agua u otro
líquido.
6. Si el aparato o el adaptador no funcionan como corre>
sponde, no los use, recurra a un centro de servicio
técnico autorizado para que los reparen.
7. No use el cable del adaptador para transportar el
aparato.
8. Nunca use el aparato si tiene sueño o está cansada.
9. No use el aparato a la intemperie y en lugares donde
usan spray.
10. No use el aparato si tiene lastimaduras o rasguños
recientes en los dedos o las plantas de los pies.
11. Si tiene diabetes o problemas con los vasos sanguí>
neos, antes de usar el aparato, consúltese al médico.
CARGA DE PILAS
>
Antes de usar el aparato efectúe una carga completa
de las pilas.
>
Cerciórese que la tensión del adaptador coincida con la
de su red eléctrica.
> El tiempo de la primera carga no debe ser inferior a 12
horas.
> El tiempo de recarga no debe ser inferior a 6 horas.
• Cerciórese que el aparato esté apagado y el interruptor
de alimentación (25) se encuentre en “0”.
• Coloque el aparato (26) en el cuerpo (1).
• Conecte la clavija del adaptador (5) a la entrada (3).
• Enchufe el adaptador al tomacorriente, y al mismo
tiempo se encenderá el indicador del nivel de carga
(27).
• Para aumentar la vida útil de las pilas recomendamos
una vez en tres meses descargarlas por completo,
dejando el aparato encendido hasta que se detenga el
motor. Luego recomendamos efectuar la carga com>
pleta de las pilas.
COLOCACION DE ACCESORIOS
> Para colocar los accesorios giratorios se usa el adapta>
dor (24).
> Haga coincidir la marca, situada en el cuerpo del adap>
tador (24) con la del cuerpo del aparato (26), luego gire
el adaptador en sentido de las agujas del reloj hasta el
tope. Para extraer el adaptador, gírelo en sentido con>
trario a las agujas del reloj, y quítelo del aparato.
> Seleccione el accesorio deseado e insértelo en el eje
del adaptador (24). Para quitar el accesorio, apague el
aparato con el interruptor (25), tire del accesorio hacia
arriba y quítelo.
> Los accesorios (22 y 28) se colocan en el cuerpo del
aparato sin el adaptador (24).
ACCESORIO PARA ONDULACIÓN DE PESTAÑAS
Ondule las pestañas después de quitar el maquillaje, y
antes de aplicar cualquier tipo de máscara.
• Inserte el accesorio para ondular pestañas (22) en el
aparato (26), haciendo coincidir las marcas situadas en
el accesorio y del aparato, y luego gire el accesorio
(22) en sentido de las agujas del reloj.
• Encienda el aparato con el interruptor (25).
• Espere aproximadamente un minuto hasta que “el indi>
cador del nivel de calentamiento” cambie de color
(Dib.2).
• ¡No acerque demasiado el accesorio a los ojos!
• Traslade el accesorio desde las raíces de las pestañas
hacia las puntas, repita este procedimiento varias
veces hasta que las pestañas se ondulen como usted
desea. El método de aplicación es igual tanto para las
pestañas superiores como para las inferiores.
• Después de ondular las pestañas apague el aparato
con el interruptor (25).
• Antes de quitar del aparato el accesorio para ondular
pestañas, aguarde unos 3> 5 minutos a que éste se
enfríe.
Atención: Para evitar quemaduras no acerque el accesorio
para ondular las pestañas a los ojos.
DEPILADORA (Dib. 3)
Esta depiladora se puede usar para quitar el vello del ros>
tro, lado (a) y de la ingle, lado (b).
• Inserte la depiladora (28) en el aparato (26), haciendo
coincidir las marcas de la depiladora y el aparato, y gire
la depiladora (28) en sentido de las agujas del reloj.
• Encienda el aparato con el interruptor (25).
Para dar forma a las cejas:
> Con el delineador de ojos dibuje el contorno deseado
de las cejas.
> Quite el vello que se encuentra fuera del contorno dibu>
jado, con la parte (a) de la depiladora (28).
Uso de peines para cejas
Estos accesorios (14) permiten cortar el largo y ángulo
establecidos del vello.
> Seleccione el accesorio deseado (14) y acérquelo a la
ceja para seleccionar el largo y el ángulo de corte
deseados.
> Cada accesorio (14) cuenta con dos pares de guías, de
acuerdo al largo deseado del vello de las cejas: A – 2/4
mm, B – 6/8 mm, C – 10/12 mm.
> Peine y enderece el vello de las cejas con el peine.
> Inserte el accesorio seleccionado (14) en la depiladora,
utilizando el lado (a) para quitar el vello fino.
Traslade lentamente el peine desde el extremo de las cejas
hacia las raíces, repitiendo dicho movimiento 3, 4 veces,
hasta que logre el largo deseado del vello de las cejas.
Atención: Al pasar el peine, éste debe adherirse a la ceja.
Ingle
Use el lado (b) de la depiladora para quitar el vello en la
ingle.
> No use el accesorio (28) en las partes sensibles de la
piel.
¡Atención! Para evitar lastimaduras, no use el accesorio
(28) si tiene las cuchillas estropeadas.
USO DEL PINCEL DE LIMPIEZA FACIAL
Se usa para la limpieza intensiva o suave del rostro.
> Coloque el adaptador (24) en el aparato (26), como se
describe más arriba.
> Inserte el pincel de limpieza facial (17) en el eje del
adaptador (24).
> Quite los restos de maquillaje.
> Agregue jabón, crema de limpieza o gel en el pincel.
> Encienda el aparato con el interruptor (25).
> Con movimientos circulares limpie el rostro, evitando el
contacto con las partes sensibles de la piel situada
alrededor de los ojos.
> Al finalizar la limpieza quite los restos de crema de
limpieza o gel y frote el rostro con una loción tonifi>
cante.
MASAJEADOR CON BOLILLAS
Este accesorio se puede usar para una efectiva aplicación
en el rostro de la crema humectante o gel.
> Inserte el masajeador (16) en el eje del adaptador (24).
> Aplique una crema humectante sobre el rostro.
> Encienda el aparato con el interruptor (25) y con
movimientos circulares efectúe suaves masajes en el
rostro. Pero no haga masajes por más de dos minutos,
evite el contacto con las partes sensibles de la piel situ>
ada alrededor de los ojos.
> Después de finalizar el masaje quite los restos de
crema del rostro con una servilleta de papel.
ESPONJA DE GOMA ESPUMA
Con la ayuda de esta esponja se puede aplicar una base
uniforme de maquillaje.
> Inserte el accesorio (20) en el eje del adaptador (24).
> Aplique sobre el rostro la base para maquillaje.
> Encienda el aparato con el interruptor (25) y con
movimientos circulares suaves distribuya en el rostro
en forma uniforme la base para maquillaje. Pero no
haga masajes por más de dos minutos, evite el contac>
to con las partes sensibles de la piel situada alrededor
de los ojos.
KIT PARA MANICURA/PEDICURA
Le proponemos opciones de uso de accesorios para man>
icura/pedicura.
Discos para dar forma a las uñas (11, 29).
Para las uñas
blandas y finas use el disco de grano fino. Para uñas más
gruesas use primero el disco de grano grueso y finalice
con el disco de grano fino. Se puede usar estos discos en
tales lugares que tengan piel endurecida, como talones o
para quitar callos en las manos. Traslade con cuidado el
disco para quitar paulatinamente la piel muerta.
Cilindro (12),
se usa para tratar la superficie de las uñas
gruesas de las manos o pies.
Disco de fieltro para pulir (13).
Se usa para pulir la
superficie de las uñas después de manicura/pedicura, le
da un brillo adicional.
Accesorio puntiagudo (15),
se usa para quitar la piel
muerta y las uñas encarnadas.
Palillo levantacutículas automático (18).
Tenga cuida>
do cuando usa este accesorio, trate de no penetrarlo
mucho debajo de la piel. Comience por un lado de la uña y
traslade paulatinamente el accesorio hacia el otro lado.
Cono grande (19),
se usa para pulir la piel endurecida,
callos o pulir la superficie de las uñas. Traslade con cuida>
do este accesorio por la piel o uña tratada.
Cepillo (21),
Sirve para la limpieza preliminar o final de la
superficie de las uñas.
Palillo levantacutículas (23).
Se usa para levantar
cutículas en forma manual.
Consejos útiles
Para mantener las uñas sanas y alcanzar buenos resulta>
dos durante el uso de este kit para manicura/pedicura siga
las siguientes recomendaciones:
• Evite que las uñas entre en contacto con substancias
químicas irritantes.
• No exponga las manos a mucho frío. Siempre cuando
hace frío use los guantes.
• No use jabón alcalino y demasiada agua cuando lava
las manos.
• Una buena humectación de las uñas es la clave para
tener uñas sanas y fuertes, que no se exfolien ni se
rompan. Después de finalizar el tratamiento de las uñas
aplique sobre ellas la crema o loción humectante.
• Para evitar la exfoliación de las uñas use sólo esmaltes
para uñas de alta calidad. Antes de usar algún produc>
to humectante pula las uñas.
• Antes de quitar las cutículas, primero humedézcalas,
luego levántelas con el accesorio o palillo.
• Para quitar las cutículas de una manera segura en lugar
de tijeras use las pinzas de manicura.
• Para evitar que las uñas reduzcan su grosor deberá
pulirlas una vez cada siete>diez días.
ENCENDIDO DEL SECADOR DE UÑAS Y MASAJE
PARA LOS DEDOS DE LAS MANOS
• Conecte la clavija del adaptador (5) a la entrada (3).
• Abra el secador de uñas, posicionando la tapa (7) ver>
ticalmente.
• Encienda el secador, posicionando el interruptor (4) en
“F”.
• Para activar la función de masaje o secado, posicione el
interruptor (4) en “M+F”.
• Al finalizar la sesión, apague el secador, posicionando
el selector (4) en ”OFF”.
• El compartimiento para el secado se puede usar para
guardar el esmalte para uñas, etc.
MANTENIMIENTO
• Limpie el cuerpo del aparato con un paño suave húme>
do. No use productos de limpieza abrasivos o disol>
ventes para su limpieza.
• Nunca sumerja el aparato en líquido alguno.
• Periódicamente limpie los accesorios con alcohol
medicinal para desinfectarlos.
• No intente a reparar este aparato Usted mismo. Si des>
cubre algunas fallas en el aparato o adaptador recurra
a un centro de servicio técnico autorizado para que los
reparen.
• Conserve este kit para manicura y pedicura en un lugar
seco y seguro.
PROTECCION DEL MEDIO AMBIENTE
• Las pilas recargables incorporadas contienen compo>
nentes que contaminan el medio ambiente.
• Antes de desechar el aparato quite las pilas recar>
gables.
• No arroje las pilas junto con la basura común,
entréguelas en el punto de recepción especial.
Ficha técnica
Adaptador
Voltaje y frecuencia:
220>230 V ~ 50 Hz
Tensión de salida:
2,8 V, 550 mA
El fabricante se reserva el derecho de modificar las carac%
terísticas de la plancha sin previo aviso.
La vida útil del aparato es no menor de 3 años.
Garantía
La garantía detallada es entregada por el vendedor de este
aparato. Para efectuar cualquier reclamo, dentro del
plazo de vigencia de la presente garantía, se debe pre>
sentar el ticket o factura de compra de este aparato.
Este producto cumple con las normas de
compatibilidad electromagnética, de la
directiva 89/336/EEC del Consejo de las
Comunidades Europeas, y las reglamenta%
ciones 73/23 CEE, para los aparatos de
bajo voltaje.
ESPAÑOL
7
CENTRO PER LA CURA DEL VISO E DELLE UNGHIE
Leggete le presenti istruzioni prima dell’uso dell’apparec>
chio
DESCRIZIONE
1. Corpo del dispositivo principale
2. Coperchio trasparente
3. Presa per inserimento dell’ adattatore di rete
4. Interrutore dell’asciugatura/del massaggio
«OFF/F/M+F»
5. Adattatore di rete
6. Pulsante dell’apertura del coperchio
7. Coperchio dell’asciugatura delle unghie
8. Specchio
9. Ventilatore dell’asciugatura delle unghie
10. Cuscino di massaggio
11. Disco per l’aggiustamento delle unghie
12. Bocchetta cilindrica
13. Disco di feltro per la rettifica e la lucidatura delle unghie
14. Bocchette>pettini per le sopracciglia (A, B, C).
15. Bocchetta appuntita
16. Dispositivo a sfera per il massaggio
17. Pennello cosmetico
18. Paletta automatica per il sollevamento della cuticola
19. Bocchetta grande a cono
20. Spugna di plastico espanso
21. Spazzolino
22. Bocchetta per l’arricciamento delle ciglia
23. Bastoncino per il sollevamento della cuticola
24. Raccordo per il collegamento delle bocchette girevoli
25. Interrutore dell’alimentazione «0/I»
26. Dispositivo per il manicure/il pedicure
27. Indicatore del caricamento
28. Rasoio cosmetico
29. Disco con i tagli piccoli per la lavorazione delle unghie
NORME DI SICUREZZA
Il completo e’ adatto solo per l’uso domestico.
Per garantire il buon stato del funzionamento del dispositivo
si raccomanda di spegnerlo per 15 minuti dopo ogni 20
minuti del funzionamento costante.
Attenzione! Rispettate le regole seguenti per evitare il
rischio delle ustioni, della scossa elettrica, dell’incen
dio, delle lesioni:
1. Prima dell’accensione dell’apparecchio assicuratevi
che la tensione della rete corrisponde alla tensione del>
l’adattatore.
2. Tenete l’apparecchio nei posti non accessibili dai bam>
bini. Siete particolarmente attenti se l’apparecchio
viene usato dai bambini o dalle persone handicappate.
3. Usate l’apparecchio solo in modo appropriato per gli
scopi secondo le presenti istruzioni. Usate solo le boc>
chette che fanno parte del completo della fornitura.
4. Non usate l’apparecchio nella doccia e durante il
bagno. Non lasciate e non tenete l’apparecchio nei
posti, in cui esso puo’ cadere nella vasca o nel lavandi>
no.
5. Non mettete mai l’apparecchio e l’adattatore nell’ac>
qua o negli altri liquidi.
6. Non usate l’apparecchio o l’adattatore danneggiato.
Rivolgetevi al centro riparazioni autorizzato per la sua
riparazione.
7. Non usate il cavo di rete in qualita’ della manopola per
il trasporto del dispositivo.
8. Non usate mai il dispositivo se siete stanchi o avete la
sonnolenza.
9. Non usate l’apparecchio nell’aria aperta e nei posti
della polverizzazione degli spray.
10. Non usate l’apparecchio se avete le ferite aperte o le
graffiature sulle dita o sui piedi.
11. Consultatevi il Vostro medico prima di usare il dispositi>
vo se avete il diabete o la malattia dei vasi.
Caricamento delle batterie di accumulatori
> Prima dell’uso del dispositivo, fate il caricamento com>
pleto delle batterie di accumulatori.
> Assicuratevi che la tensione della rete corrisponde alla
tensione dell’adattatore.
> Il periodo del caricamento dev’essere almeno 12 ore.
> Il periodo del caricamento ripetuto dev’essere almeno 6
ore.
• Assicuratevi che il dispositivo e’ spento, l’interrutore del>
l’alimentazione (25) si trova in posizione “0”.
• Mettete il dispositivo (26) sul supporto (1).
• Attaccate la spina dell’adattatore (5) alla presa (3).
• Inserite l’adattatore di rete nella presa elettrica, si
accende l’indicatore del caricamento (27).
• Per prolungare la durata delle batterie di accumulatori si
raccomanda di scaricarle completamente una volta ogni
tre mesi, lasciando l’apparecchio acceso fino all’arresto
del motore, dopo di che effettuare il caricamento com>
pleto.
INSTALLAZIONE DELLE BOCCHETTE
> Per installare le bocchette girevole si usa il raccordo
(24).
> Fate collimare la scritta sul corpo del raccordo (24) con
la scritta sul corpo del dispositivo (26) e girate il raccor>
do in senso orario, per togliere il raccordo, giratelo in
senso antiorario e staccatelo dal dispositivo.
> Scegliete la bocchetta desiderata e mettetela sull’albero
del raccordo (24), per togliere la bocchetta spegnete il
dispositivo mediante l’interrutore (25), prendete la boc>
chetta, tiratela in direzione verso l’alto e toglietela.
> Le bocchette (22 e 28) vengono installate sul corpo del
dispositivo senza il raccordo (24).
BOCCHETTA PER L’ARRICCIAMENTO DELLE CIGLIA
Usate la bocchetta per l’arricciamento delle ciglia dopo
aver tolto il trucco ma prima di usare qualsiasi maschera.
• Installate la bocchetta per l’arricciamento delle ciglia
(22) sul dispositivo (26), fate collimare le scritte sulla
bocchetta e sul dispositivo, girate la bocchetta (22) in
senso orario.
• Accendete il dispositivo mediante l’interrutore (25).
• Aspettate circa un minuto finche “l’indicatore del riscal>
damento” non cambia il colore (Disegno 2).
• Non accostate la bocchetta vicino agli occhi!
• Spostate la bocchetta in direzione dalle radici delle ciglia
fuori, ripetete per qualche volta finche non ottenete l’ar>
ricciamento desiderato delle ciglia. Il modo dell’uso e’
uguale sia per le ciglia superiori che per le ciglia inferiori.
• Dopo l’arricciamento delle ciglia spegnete il dispositivo
mediante l’interrutore (25).
• Aspettate da tre a cinque minuti per il raffreddamento
della bocchetta per l’arricciamento delle ciglia prima di
toglierla dal dispositivo.
Attenzione: E’ vietato accostate la bocchetta vicino agli
occhi per evitare le ustioni.
RASOIO COSMETICO (Disegno 3)
Si puo’ usare il rasoio cosmetico per l’eliminazione dei peli
indesiderati sul viso, lato (a) e nella zona di bikini, lato (b).
• Installate il rasoio cosmetico (28) sul dispositivo (26),
fate collimare le scritte sulla bocchetta e sul dispositivo,
girate la bocchetta (28) in senso orario.
• Accendete il dispositivo mediante l’interrutore (25).
Per dare la forma alle sopracciglia:
> Disegnate il contorno delle sopracciglia con la matita per
le sopracciglia.
> Eliminate i peli attorno al contorno disegnato con il
rasoio cosmetico (28), lato (a).
Uso delle bocchetteApettini per le sopracciglia
Le bocchette>pettini per le sopracciglia (14) permettono di
tagliare i peli secondo la lunghezza impostata e secondo
l’angolo impostato.
> Scegliete la bocchetta desiderata (14) e accostatela al
sopracciglio per effettuare la scelta della lunghezza
desiderata e dell’angolo.
> Ogni bocchetta (14) ha due coppie delle guide secondo
la lunghezza desiderata delle sopracciglia: A – 2/4 mm,
B – 6/8 mm, C – 10/12 mm.
> Pettinate e raddrizzate i peli delle sopracciglia con un
pettine.
> Installate la bocchetta (14) sul rasoio cosmetico usando
il lato del rasoio adatto all’eliminazione dei peli sottili (a).
Spostate lentamente la bocchetta>pettine dal margine del
sopracciglio all’inizio della crescita dei peli, rupetete questa
procedura per 3>4 volte finche’ non ottenete la lunghezza
desiderata delle sopracciglia.
Attenzione: la bocchetta%pettine dev’essere accostata al
sopracciglio durante lo spostamento:
Zona di bikini
Usate il rasoio cosmetico (28) lato (b) per l’eliminazione dei
peli indesiderati nella zona di bikini.
> Non usate la bocchetta (28) sulle zone sensibili della
pelle.
Attenzione! Per evitare le lesioni della pelle, non usate la
bocchetta (28) con le lame danneggiate.
USO DELLO PENNELLO COSMETICO
Il pennello cosmetico viene usato per la pulizia intensa e
dolce della pelle del viso.
> Installate il raccordo (24) sul dispositivo (26), come e’
indicato sopra.
> Installate il pennello cosmetico (17) sull’albero del rac>
cordo (24).
> Eliminate gli eccessi dei cosmetici.
> Mettete il sapone, la crema per la pulizia o il gel.
> Accendete il dispositivo mediante l’interrutore (25).
> Con i movimenti circolari lavorate la pelle del viso, evitate
i posti sensibili attorno agli occhi.
> Al termine della procedura eliminate i residui della crema
per la pulizia o del gel, strofinate la pelle con la lozione
ricostituente.
DISPOSITIVO A SFERA PER MASSAGGIO
Il dispositivo a sfera per il massaggio si puo’ usare per l’ap>
plicazione sulla pelle del viso della crema umidificante o del
gel.
> Installate il dispositivo a sfera per il massaggio (16) sul>
l’albero del raccordo (24)
> Mettete sul viso la crema umidificante.
> Accendete il dispositivo mediante l’interrutore (25), con
i movimenti dolci circolari effettuate il massaggio della
pelle del viso. Non effettuate questa procedura per piu’
di due minuti, evitate i posti sensibili attorno agli occhi.
> Al termine della procedura eliminate i residui della crema
con un fazzoletto di carta.
SPUGNA DI PLASTICO ESPANSO
Mediante la spugna di plastico espanso si puo’ ottenere
l’applicazione uniforme della base per il trucco.
> Installate la bocchetta (20) sull’albero del raccordo (24).
> Mettete sul viso la base per il trucco.
> Accendete il dispositivo mediante l’interrutore (25), con
i movimenti dolci circolari distribuite la base per il trucco
in modo uniforme sul viso. Non effettuate questa proce>
dura per piu’ di due minuti, evitate i posti sensibili attorno
agli occhi.
DISPOSITIVO PER IL MANICURE/IL PEDICURE
Vi proponiamo le varianti dell’uso delle bocchette per il
manicure/il pedicure.
Dischi per l’aggiustamento delle unghie (11, 29).
Per le
unghie deboli e sottili usate il disco con i tagli piccoli. Per le
unghie piu’ spesse, usate prima il disco con i tagli grandi,
finite la lavorazione con il disco con i tagli piccoli. Si puo’
usare questi dischi sulla pelle dura, per esempio, sulle
calcagna, per l’eliminazione dei calli sulle mani, spostate il
disco con cautela per togliere in modo graduale lo strato
della pelle vecchia.
Bocchetta cilindrica (12).
Viene usata per la lavorazione
della superficie delle unghie grosse delle dita delle mani e
dei piedi.
Disco di feltro per la lucidatura delle unghie (13).
Viene
usato per la lucidatura della superficie delle unghie dopo il
manicure/il pedicure, le rende piu’ brillanti.
Bocchetta appuntita (15).
Viene usata per l’eliminazione
della pelle vecchia e per la pulizia dell’unghia incarnita.
Paletta automatica per il sollevamento della cuticola
(18).
Siete attenti durante l’uso di questa bocchetta, non
lasciate la paletta penetrare profondamente sotto la pelle.
Iniziate le lavorazione da un lato dell’unghia e spostate
lentamente la bocchetta.
Bocchetta grande a cono (19).
Viene usata per la rettifi>
ca della pelle dura, dei calli o per la rettifica della superficie
delle unghie. Spostate la bocchetta con cautela lungo la
pelle o l’unghia.
Spazzolino (21).
Serve per la pulizia preliminare o finale
della superficie delle unghie.
Bastoncino per il sollevamento della cuticola (23).
Viene usato per il sollevamento manuale della cuticola.
Consigli utili
Per mantenere le unghie sane e ottenere il buon risultato
durante l’uso del completo per il manicure/il pedicure
seguite le raccomandazioni seguenti:
• Evitate la penetrazione sulle unghie delle sostanze
chimiche irritanti.
• Non sottoponete le mani all’azione eccessiva del freddo.
Quando fa freddo, mettete sempre i guanti sulle mani.
• Non lavate le mani con il sapone di sodio troppo spesso,
non usate la quantita’ eccessiva dell’acqua.
• L’umidificazione corretta e’ la chiave per le unghie forti e
sane. Dopo la lavorazione delle unghie mettete le mani
nella vaschetta a bolle per l’umidificazione delle mani e
delle unghie, poi mettete la crema umidificante o la
lozione.
• Usate gli smalti dell’alta qualita per avere le unghie che
non si stratificano. Prima di usare qualche mezzo per l’u>
midificazione, lucidate le unghie.
• Prima dell’eliminazione della cuticola, umidificatela e
sollevatela con cautela con la bocchetta o il bastoncino.
• Per effettuare l’eliminazione sicura della cuticola usate
le pinzette da manicure, non usate le forbici.
• Per non assottigliare le unghie, fra un processo della ret>
tifica e della lucidatura delle unghie e un’altro devono
passare almeno sette > dieci giorni.
ACCENSIONE DELL’ASCIUGATURA PER LE UNGHIE E
DEL DISPOSITIVO PER MASSAGGIO DELLE DITA
DELLE MANI
> Attaccate la spina dell’adattatore di rete (5) alla presa
(3).
> Aprite l’asciugatura per le unghie, mettendo il coperchio
(7) in posizione orizzontale.
> Accendete l’asciugatura mettendo il selettore (4) in
posizione «F».
> Per l’accensione della funzione del massaggio e della
asciugatura, mettete il selettore (4) in posizione «M+F».
> Al termine della procedura spegnete l’asciugatura met>
tendo il selettore (4) in posizione «OFF».
> Lo scompartimento dell’asciugatura si puo’ usare per
conservarci lo smalto per le unghie ecc.
Cura del dispositivo e la manutenzione
• Strofinate il corpo del dispositivo con il tessuto umido
soffice. Non usate i detergenti abrasivi o i solventi per la
pulizia del corpo del dispositivo.
• Non immergete mai il dispositivo in qualsiasi liquido.
• Strofinate ogni tanto le bocchette con lo spirito medico
per la disinfezione.
• E’ vietato riparare il dispositivo da se’. Nel caso del guas>
to dell’apparecchio o dell’adattatore di rete, rivolgetevi
al centro riparazioni autorizzato.
• Tenete il dispositivo per il manicured il pedicure nel
posto asciutto e sicuro.
Difesa dell’ambiente circostante
• Le batterie di accumulatori contengono i componenti
che possono inquinare l’ambiente.
• Prima del ricupero della macchinetta, bisogna tirare
fuori la batteria di accumulatori.
• Non buttate via le batterie di accumulatori insieme ai
soliti rifiuti, portatele al punto ricevente speciale.
Caratteristiche tecniche:
Adattatore di rete:
Tensione dell’alimentazione:
220>230 V 50 Hz
Tensione dell’uscita:
2,8 V, 550 mA
La casa produttrice si riserva il diritto di cambiare le carat%
terictiche tecniche dell’apparecchio senza alcun preavviso.
La durata dell’apparecchio non e’ meno di 3 anni.
Garanzia
Le condizioni dettagliate della garanzia si possono
richiedere al rivenditore dell’apparecchio. Qualsiasi
reclamo deve essere richiesto prima della scadenza della
garanzia e deve essere accompagnato dallo scontrino fis>
cale oppure da un altro documento che attesti l’acquisto.
Questo prodotto corrisponde ai requisiti di
compatibilità elettromagnetica stabiliti
dalla direttiva 89/336/EEC del Consiglio
Europeo e dalla Direttiva 73/23 CEE sugli
apparecchi di bassa tensione.
ITALIANO
6
ENSEMBLE POUR LES SOINS DU VISAGE ET DES
ONGLES
Veuillez SVP lire la notice d’exploitation avant de commencer
l’utilisation de l’appareil
DESCRIPTION
1.
Corps de l’appareil principal
2.
Couvercle transparent
3.
Douille de connexion de l’adaptateur secteur
4.
Interrupteur du séchoir/du massage «OFF/F/M+F»
5.
Adaptateur secteur
6.
Bouton d’ouverture du couvercle
7.
Couvercle du séchoir des ongles
8.
Miroir
9.
Ventilateur du séchoir des ongles
10. Coussin de massage
11. Disque de la mise en forme des ongles
12. Embout cylindrique
13. Disque en feutre pour polissage et repolissage
14. Embouts>peignes pour les sourcils (A, B, C).
15. Embout pointu
16. Masseur à billes
17. Pinceau cosmétique
18. Palette pour le soulèvement automatique de la cuticule
19. Grand embout conique
20. Eponge en mousse de polyester
21. Brossette
22. Embout à friser les cils
23. Baguette à soulever les cuticules
24. Adaptateur pour l’installation des embouts rotatifs
25. Interrupteur d’alimentation «0/I»
26. Dispositif pour manucure/pédicure
27. Témoin lumineux de chargement
28. Rasoir cosmétique
29. Disque à faible denture pour le traitement des ongles
CONSIGNES DE SECURITE
L’ensemble est réservé à l’utilisation domestique.
Pour que l’appareil fonctionne comme il faut, il est conseillé
de le débrancher pour 15 minutes après toutes les 20 minutes
de fonctionnement continu.
Attention! Veuillez respecter les suivantes consignes au
risque de brûlure, électrocution, incendie ou autres
traumas:
1.
Avant de brancher l’appareil assurez>vous que la tension
de l’adaptateur secteur correspond à la tension de votre
installation.
2.
Rangez l’appareil hors d’atteinte des enfants. Soyez par>
ticulièrement attentif si l’appareil est utilisé par des
enfants ou des personnes handicapées.
3.
N’utilisez l’appareil qu’à sa destination directe aux fins
spécifiés dans la notice d’exploitation. Utilisez unique>
ment les accessoires fournis.
4.
N’utilisez pas l’appareil en prenant une douche ou un
bain. Ne placez pas et ne rangez pas l’appareil dans l’en>
droit d’où il peut tomber dans le lavabo ou la baignoire
remplie d’eau.
5.
N’immergez pas l’appareil dans l’eau ou tout autre liq>
uide.
6.
Si vous avez remarqué des défaillances de l’appareil ou
de l’adaptateur secteur, n’utilisez pas l’appareil
adressez>vous au centre de service agréé pour la répara>
tion.
7.
Ne portez pas l’appareil en le tenant par le cordon de
l’adaptateur secteur.
8.
N’utiliser jamais l’appareil si vous somnolez ou si vous
êtes très fatigué.
9.
N’utilisez pas l’appareil en plein air ni aux endroits d’utili>
sation des aérosols.
10. N’utilisez pas l’appareil si vous avez des plaies ouvertes
ou des égratignures sur les doigts ou les pieds.
11. Si vous avez le diabète ou si vous avez des problèmes
avec les vaisseaux consultez votre médecin avant d’u>
tiliser l’appareil.
CHARGEMENT DES PILES RECHARGEABLES
> Avant d’utiliser l’appareil chargez complètement les piles
rechargeables.
> Assurez>vous que la tension de fonctionnement de l’adap>
tateur secteur correspond à la tension de votre installa>
tion.
> Le premier chargement doit durer au moins 12 heures.
> Le temps des chargements ordinaires – au moins 6
heures.
• Assurez>vous que l’appareil est débranché, c à d l’inter>
rupteur (25) est à la position «0».
• Installez l’appareil (26) sur le socle (1).
• Connectez la fiche de l’adaptateur secteur (5) à la douille
(3).
• Insérez l’adaptateur secteur dans la prise de courant, le
témoin lumineux de chargement s’allume (27).
• Pour prolonger la durée de service des piles recharge>
ables il est conseiller de les décharger complètement une
fois tous les trois mois (pour cela laissez l’appareil branché
jusqu’à ce que le moteur s’arrête) et de les charger com>
plètement.
INSTALLATION DES EMBOUTS
> Pour monter les embouts rotatifs il faut utiliser l’adaptateur
(24).
> Faites coïncider la marque sur le corps de l’adaptateur
(24) avec la marque au corps de l’appareil (26) et tournez
l’adaptateur à fond dans le sens d’une aiguille d’une mon>
tre, pour enlever l’adaptateur tournez>le dans le sens con>
traire d’une aiguille d’une montre et retirez l’adaptateur.
> Choisissez un embout et montez>le à la tige de l’adapta>
teur (24), pour enlever l’embout débranchez l’appareil par
l’interrupteur (25), tirez l’embout en haut en enlevez>le.
> Embouts (22 et 28) sont à monter sur le corps de l’appareil
sans adaptateur (24).
EMBOUT A FRISER LES CILS
Utilisez l’appareil à friser les cils après avoir enlevé le maquil>
lage mais avant d’appliquer un masque.
• Montez l’embout à friser les cils (22) à l’appareil (26),
faites coïncider les marques de l’embout avec les mar>
ques portées sur l’appareil et tournez l’embout (22) dans
le sens d’une aiguille d’une montre.
• Branchez l’appareil au moyen de l’interrupteur (25).
• Patientez une minute pour que «l’indicateur de chauffage»
change de couleur (fig.2).
• N’approchez pas l’embout trop près aux yeux!
• Passez l’embout des racines des cils vers l’extrémité,
refaites l’opération plusieurs fois, jusqu’à ce que le cil soit
frisé comme vous le voulez. Le mode d’emploi de l’ap>
pareil est le même pour les cils intérieurs comme
supérieurs.
• Après le frisage des cils coupez l’alimentation de l’appareil
au moyen de l’interrupteur (25).
• Patientez de 3 à 5 minutes pour que l’embout à friser
refroidisse avant de le ranger.
Attention: Il est interdit d’approcher l’embout à friser les cils
trop près des yeux au risque de brûlure.
RASOIR COSMETIQUE (Fig. 3)
Vous pouvez utiliser le rasoir cosmétique pour enlever des
poils gênants sur le visage (côté (a) et dans la zone de bikini
(côté (b).
• Montez l’embout – rasoir cosmétique (28) sur l’appareil
(26), faites coïncider les marques de l’embout avec les
marques portées sur l’appareil et tournez l’embout (28)
dans le sens d’une aiguille d’une montre.
• Branchez l’appareil par l’interrupteur (25).
Pour donner la forme aux sourcils:
> Avec un crayon à sourcils dessinez le contour désiré.
> Avec le côté (a) du rasoir cosmétique enlevez les poils sor>
tant du contour dessiné.
Utilisation des embouts – peignes pour les sourcils
Les embouts>peignes des sourcils (14) vous permettront de
couper les poils des sourcils à la longueur désirée à l’angle
voulu.
> Choisissez l’une des embouts (14) et serrez>le contre le
sourcil pour choisir la longueur des poils et de l’angle de
la coupe.
> Chaque embout (14) a deux paires de guides, selon la
longueur nécessaire des poils des sourcils: A – 2/4 mm, B
– 6/8 mm, C – 10/12 mm.
> Démêlez et lissez les poils des sourcils avec un peigne.
> Montez l’embout choisi (14) sur le rasoir cosmétique en
utilisant le côté du rasoir destiné à enlever les poils fins (a).
Passez lentement l’embout > peigne de l’extrémité du sourcil
vers leur implantation, refaites la procédure 3 ou 4 fois,
jusqu’à atteindre la longueur désirée.
Attention: L’embout – peigne doit être serré contre le sourcil
en maniant l’appareil.
Zone de bikini
Utilisez l’embout – rasoir cosmétique (28) côté (b) pour
enlever les poils gênants dans la zone de bikini.
> N’utilisez l’embout (28) aux secteurs sensibles de la peau.
Attention! Au risque de léser la peau n’utilisez pas l’embout
(28) si les lames sont endommagées.
UTILISATION DU PINCEAU COSMETIQUE POUR LE VISA
AGE
Le pinceau est destiner au nettoyage intense et doux de la
peau du visage.
> Montez l’adaptateur (24) sur l’appareil (26) comme décrit
ci>dessus.
> Montez le pinceau cosmétique (17) sur la tige de l’adapta>
teur (24).
> Enlevez les superflus des cosmétiques.
> Appliquez du savon, de la crème ou du gel purifiant sur le
pinceau.
> Branchez l’appareil par l’interrupteur (25).
> Par des mouvements circulaires travaillez la peau du vis>
age en évitant des secteurs sensibles autour des yeux.
> A l’issue de la procédure enlevez les restes de la crème
purifiante ou du gel et essuyez la peau du visage avec une
lotion à l’effet tonique.
MASSEUR A BILLES
Le masseur à billes peut être utilisé pour appliquer de la
meilleure manière une crème ou gel hydratant.
> Montez le masseur à billes (16) sur la tige de l’adaptateur
(24)
> Appliquez de la crème hydratante sur la peau du visage.
> Branchez l’appareil par l’interrupteur (25) et par des mou>
vements circulaires massez la peau du visage. Le mas>
sage ne doit pas durer plus de deux minutes. Evitez les
secteurs sensibles de la peau autour des yeux.
> Apres la procédure enlevez les restes de la crème avec
une serviette en papier.
EPONGE EN MOUSSE DE POLYESTER
L’éponge fournie vous aidera à appliquer régulièrement la
base pour le maquillage.
> Montez l’embout (20) sur la tige de l’adaptateur (24).
> Appliquez la base pour le maquillage sur votre visage.
> Branchez l’appareil par l’interrupteur (25) et repartissez la
base de maquillage sur le visage en maniant l’embout par
des mouvements circulaires. La procédure ne doit pas
durer plus de deux minutes et évitez des secteurs sensi>
bles autour des yeux.
ENSEMBLE POUR MANUCURE/PEDICURE
Nous vous proposons des options d’utilisation des embouts
de manucure/pédicure.
Disques pour la mise en forme des ongles (11, 29).
Pour
les ongles mous et fins utilisez le disque avec faible denture.
Pour le traitement des ongles épais et durs utilisez le disque
avec la denture rude en terminant le traitement par le disque
avec faible denture. Vous pouvez utiliser les disques pour
enlever la peau meurtrie des talons, les durillons des mains
etc.
Embout cylindrique (12).
Cet embout sert à traiter la sur>
face des ongles épais des doigts ou des orteils.
Disque en feutre pour le polissage (13).
Cet embout sert à
polir la surface des ongles après le manucure/pédicure pour
les rendre plus brillants.
Embout pointu (15).
Cet embout sert à enlever la peau
meurtrie et à libérer l’ongle incarné.
Palette pour soulever la cuticule (18).
Soyez prudent en
utilisant cet embout, évitez la pénétration trop profonde de la
pellette sous la peau. Commencez le traitement à l’un côté de
l’ongle et passez lentement à l’autre.
Grand embout conique (19).
Cet embout sert à polir et à
repolir la peau meurtrie, des durillons ou à repolir la surface
des ongles. Maniez lentement l’embout sur la peau ou l’ongle
travaillé.
Brossette (21).
Sert pour le nettoyage préliminaire ou de
finition de la surface des ongles.
Baguette pour soulever la cuticule (23).
Cet accessoire
est utilisé pour soulever la cuticule manuellement.
Pour maintenir les ongles en bon état et pour avoir de bons
résultats en utilisant l’ensemble pour manucure/ pédicure
suivez les suivants conseils:
• Evitez le contact des ongles avec des matières chimiques.
• N’exposez pas les mains au froid fort. En temps froid
portez toujours des gants.
• N’utilisez pas le savon en alcalin et ne lavez pas les mains
pendant trop de temps.
• Une bonne hydratation c’est la clé à la santé des ongles.
Après a procédure de traitement des ongles utilisez la
cuve à bulles pour restaurer l’hydratation des ongles et de
la peau des mains, ensuite enduisez>les d’une crème
hydratante ou d’une lotion.
• Pour prévenir le fendillement des ongles utilisez unique>
ment le vernis de haute qualité. Avant d’appliquer des
compositions hydratantes polissez les ongles.
• Avant d’enlever les cuticules hydratez>les d’abord et
soulevez avec précautions par la palette ou la baguette.
• Pour que l’enlèvement des cuticules soit bien sécurisé
utilisez les pinces de manucure au lieu des ciseaux.
• Pour éviter la diminution de l’épaisseur des ongles il faut
les laisser reposer pendant 7 ou 10 jours entre les séances
de polissage et de repolissage.
BRANCHEMENT DU SECHOIR DES ONGLES ET DU
MASSEUR DES DOIGTS
• Connectez la fiche de l’adaptateur secteur (5) à la douille
(3).
• Ouvrez le séchoir des ongles, en mettant le couvercle (7) à
la position verticale.
• Branchez le séchoir en mettant l’interrupteur (4) à la posi>
tion «F».
• Pour brancher l’option du massage et de séchage, mettez
l’interrupteur (4) à la position «M+F».
• A l’issue de la procédure débranchez l’appareil en mettant
l’interrupteur (4) à la position «OFF».
• Vous pouvez ranger le vernis à ongles ou autre chose dans
le compartiment du séchoir.
NETTOYAGE ET ENTRETIEN
• Essuyez le corps de l’appareil avec un chiffon doux légère>
ment mouillé. N’utilisez pas pour le nettoyage de l’appareil
des agents abrasifs ni des dissolvants.
• N’immergez jamais l’appareil dans l’eau ou tout autre liq>
uide.
• Régulièrement nettoyez les embouts avec l’alcool médical
pour les désinfecter.
• N’essayez pas de réparer l’appareil vous>même. En cas
de découvertes des défaillances de l’appareil adressez>
vous au centre de service agréé.
• Rangez l’appareil pour manucure et pédicure dans un
endroit sec et sur.
Protection de l’environnement
• Les piles rechargeables intégrées contiennent des com>
posants polluant l’environnement.
• Avant de jeter l’appareil enlevez les piles.
• Ne jetez pas les piles ensemble avec les déchets domes>
tiques, amenez>les dans un poste spécialisé de recyclage.
Caractéristiques techniques
Adaptateur secteur:
Tension d’alimentation
220>230V 50 Hz
Tension de sortie
2,8 V 550 mA
Le producteur se réserve le droit de changer les caractéris%
tiques des appareils sans préavis.
Le délai de service de l’appareil est pas moins de 3 ans.
Garantie
Pour des conditions de garantie plus détaillées adressez>vous
au distributeur qui vous a vendu l’appareil. En cas de toute
sorte de prétention pendant la période de la présente garantie
il faudra présenter le ticket quittance de l’achat.
Le présent appareil satisfait aux exigences
de compatibilité électromagnétique en vertu
de la directive 89/336/EEC du conseil de
l’Europe et la préscription 73/23 EEC pour
l’appareillage de bas voltage.
FRANÇAIS
5
ЦЕНТР ПО УХОДУ ЗА ЛИЦОМ И НОГТЯМИ
Внимательно прочитайте инструкцию перед
использованием набора
ОПИСАНИЕ
1.
Корпус основного устройства
2.
Прозрачная крышка
3.
Гнездо подключения сетевого адаптера
4.
Выключатель сушки/массажа (OFF/F/M+F)
5.
Сетевой адаптер
6.
Кнопка открытия крышки
7.
Крышка сушки для ногтей
8.
Зеркало
9.
Вентилятор сушки для ногтей
10. Подушечка для ногтей
11. Диск для грубой полировки
12. Цилиндрическая насадка
13. Фетровый диск для шлифовки и полировки
14. Насадки:расчески для бровей (A, B, C)
15. Остроконечная насадка
16. Шариковый массажер
17. Косметическая кисточка
18. Лопатка для автоматического поднятия кутикулы
19. Большая конусная насадка
20. Поролоновая губка
21. Щеточка для ногтей
22. Насадка для завивки ресниц
23. Палочка для поднятия кутикул
24. Переходник для установки вращающихся насадок
25. Выключатель питания "0/I"
26. Устройство для маникюра/педикюра
27. Индикатор зарядки
28. Косметическая бритва
29. Диск для тонкой полировки
МЕРЫ БЕЗОПАСНОСТИ
Набор предназначен только для домашнего
использования.
Для обеспечения исправного состояния устройства
рекомендуется отключать его на 15 минут после каждых 20
минут непрерывной работы.
Внимание! Соблюдайте следующие правила во
избежание риска ожога, удара током и пожара:
1.
Убедитесь, что рабочее напряжение сетевого
адаптера соответствует напряжению сети.
2.
Храните набор в недоступном для детей месте. Будьте
предельно
внимательны,
если
устройство
используется рядом с детьми или людьми с
ограниченными возможностями.
3.
Используйте устройство только по назначению и для
целей, описанных в данном руководстве, используйте
только те насадки, которые входят в комплект
поставки.
4.
Не используйте устройство во время принятия душа
или ванны. Не кладите и не храните устройство в
местах, где оно может упасть в ванну или раковину,
наполненную водой.
5.
Не погружайте устройство и сетевой адаптер в воду
или любую другую жидкость.
6.
Если устройство или сетевой адаптер не работает
должным образом, не используйте его, обратитесь в
авторизованный сервисный центр для ремонта.
7.
Не переносите устройство, взявшись за шнур сетевого
адаптера.
8.
Никогда не используйте устройство в состоянии
сонливости или усталости.
9.
Не используйте устройство на открытом воздухе и в
местах, где применяются аэрозольные распылители.
10. Не используйте устройство, если есть открытые раны
или царапины на пальцах или ступнях ног.
11. Проконсультируйтесь с врачом перед
использованием устройства, если вы больны
диабетом или имеете заболевание сосудов.
ЗАРЯДКА АККУМУЛЯТОНЫХ БАТАРЕЙ
: Перед использованием устройства проведите полную
зарядку аккумуляторных батарей.
: Убедитесь, что рабочее напряжение сетевого адаптера
соответствует напряжению сети.
: Время зарядки должно составлять не менее 12 часов.
: Время повторной зарядки не менее 6 часов.
•
Убедитесь, что устройство выключено: выключатель
питания (25) находится в положении "0".
•
Поместите устройство (26) на подставку (1).
•
Подключите штекер сетевого адаптера (5) к гнезду (3).
•
Вставьте сетевой адаптер в розетку, при этом на
устройстве загорится индикатор зарядки (27).
•
Для продления срока службы аккумуляторных батарей
рекомендуется раз в три месяца полностью их
разрядить, оставив прибор включенным до остановки
двигателя; только после этого можно провести полную
зарядку.
УСТАНОВКА НАСАДОК
: Для установки вращающихся насадок используется
переходник (24).
: Совместите метку на корпусе переходника (24) с
меткой на корпусе устройства (26) и поверните
переходник по часовой стрелке до упора; для снятия
переходника поверните его против часовой стрелки и
снимите с устройства
: Выберите необходимую насадку и установите ее на ось
переходника (24); для снятия насадки выключите
устройство выключателем (25), потяните за насадку по
направлению вверх и снимите ее.
: Насадки (22 и 28) устанавливаются на корпус
устройства без переходника (24).
НАСАДКА ДЛЯ ЗАВИВКИ РЕСНИЦ
Используйте завивку для ресниц после снятия макияжа, но
до наложения любой маски.
•
Установите насадку для завивки ресниц (22) на
устройство (26), совместите метки на насадке и
устройстве и поверните насадку (22) по часовой
стрелке.
•
Включите устройство выключателем (25).
•
Подождите примерно минуту, пока “индикатор нагрева”
не изменит свой цвет (Рис.2).
•
Перемещайте насадку по направлению от корней
ресниц наружу, повторите несколько раз, пока ресницы
не завьются так, как вы того желаете. Способ
применения одинаков как для верхних, так и для нижних
ресниц.
•
После завивки ресниц отключите питание устройства
выключателем (25).
•
Прежде чем снять насадку с устройства, подождите от 3
до 5 минут, чтобы насадка для завивки ресниц остыла.
Внимание! Не приближайте насадку для завивки ресниц
близко к глазам, чтобы избежать получения ожога.
КОСМЕТИЧЕСКАЯ БРИТВА (Рис. 3)
Косметическую бритву можно использовать для удаления
нежелательных волосков на лице (сторона “а”) и в области
бикини (сторона “b”).
•
Установите косметическую бритву (28) на устройство
(26), совместите метки на насадке и устройстве и
поверните насадку (28) по часовой стрелке.
•
Включите устройство выключателем (25).
Для придания формы бровям:
:
Карандашом для бровей нарисуйте нужный контур
брови.
:
Удалите волосы за нарисованным вами контуром
косметической бритвой (28) стороной “а”.
Использование насадок/расчесок для бровей
Насадки:расчески для бровей (14) позволяют срезать
волосы на установленную длину и под заданным углом.
:
Выберите желаемую насадку (14) и приложите ее к
брови для выбора соответствия необходимой длины
волос и их угла.
:
Каждая насадка (14) имеет по две пары направляющих,
в зависимости от необходимой длины волос бровей: А :
2/4 мм, В : 6/8 мм, С : 10/12 мм.
:
Расчешите и распрямите волосы бровей расческой.
:
Установите выбранную насадку (14) на косметическую
бритву, используя сторону бритвы для удаления тонких
волосков “а”.
Медленно перемещайте насадку:расческу от края брови к
началу роста волос, повторите процедуру 3:4 раза, пока не
будет достигнута необходимая длина волос брови.
Внимание! Обязательно прижимайте насадку:расческу к
брови при ее перемещении.
Область бикини
Применяйте косметическую бритву (28) (сторона “b”) для
удаления нежелательных волосков в области бикини.
: Не используйте насадку (28) на чувствительных
участках кожи.
Внимание! Чтобы не травмировать кожу, не используйте
насадку (28) с поврежденными лезвиями.
ИСПОЛЬЗОВАНИЕ ЛИЦЕВОЙ КОСМЕТИЧЕСКОЙ
КИСТОЧКИ
Косметическая кисточка используется для интенсивной и
мягкой очистки кожи лица.
: Установите переходник (24) на устройство (26), как
описано выше.
: Установите косметическую кисточку (17) на ось
переходника (24).
: Удалите излишки косметики.
: Нанесите мыло, очищающий крем или гель на кисть.
: Включите устройство выключателем (25).
: Круговыми движениями обработайте кожу лица,
избегая чувствительных участков кожи около глаз.
: По окончании процедуры удалите остатки очищающего
крема или геля и протрите кожу лица тонизирующим
лосьоном.
ШАРИКОВЫЙ МАССАЖЕР
Шариковый
массажер
может
использоваться
для
эффективного нанесения на кожу лица увлажняющего
крема или геля.
: Установите
шариковый
массажер
(16)
на
ось
переходника (24).
: Нанесите на кожу лица увлажняющий крем.
: Включите устройство выключателем (25) и мягкими
круговыми движениями массируйте кожу лица. Не
проводите процедуру массажа более двух минут и
избегайте чувствительных участков кожи вокруг глаз.
: После завершения процедуры осторожно удалите
остатки крема с кожи лица бумажной салфеткой.
ПОРОЛОНОВАЯ ГУБКА
С
помощью
поролоновой
губки
можно
достичь
равномерного нанесения на лицо основы для макияжа.
: Установите насадку (20) на ось переходника (24).
: Нанесите на кожу лица основу для макияжа.
: Включите устройство выключателем (25) и мягкими
круговыми движениями равномерно распределите
основу для макияжа по коже лица. Не проводите
процедуру
более
двух
минут
и
избегайте
чувствительных участков кожи вокруг глаз.
НАБОР ДЛЯ МАНИКЮРА/ПЕДИКЮРА
Предлагаем вам варианты использования насадок для
маникюра/педикюра.
Диски для полировки (11, 29).
Не рекомендуется
использовать эти диски для мягких и тонких ногтей. Можно
использовать эти диски на таких участках с грубой кожей,
как пятки, или для удаления мозолей на руках : аккуратно
перемещайте диск для постепенного снятия слоя
омертвевшей кожи.
Цилиндрическая насадка (12).
Используется для
обработки поверхности толстых ногтей на пальцах рук или
ног.
Фетровый диск для шлифовки и полировки (13).
Используется для полировки поверхности ногтей после
маникюра/педикюра и придает им дополнительный блеск.
Остроконечная насадка (15).
Используется для
удаления омертвевшей кожи и очистки вросшего ногтя.
Лопатка для автоматического поднятия кутикулы (18).
Будьте очень осторожны, когда используете данную
насадку; не допускайте глубокого проникновения лопатки
под кожу. Начните обработку с одной стороны ногтя и
постепенно перемещайте насадку.
Большая конусная насадка (19).
Используется для
шлифовки грубой кожи, мозолей или для шлифовки
поверхности ногтей. Аккуратно перемещайте эту насадку
по обрабатываемой коже или ногтю.
Щеточка (21).
Служит для предварительной или
окончательной очистки поверхности ногтей.
Палочка для поднятия кутикул (23).
Используется для
поднятия кутикулы вручную.
Полезные советы
Для поддержания ногтей в здоровом состоянии и
достижения хороших результатов при использовании
маникюрного/педикюрного набора следуйте следующим
рекомендациям:
• Избегайте
попадания
на
ногти
раздражающих
химических веществ.
• Не подвергайте руки сильному охлаждению. В
холодную погоду всегда носите перчатки.
• Не пользуйтесь щелочным мылом и чрезмерным
количеством воды при мытье рук.
• Хорошее увлажнение ногтей : это ключ к здоровым и
крепким ногтям, стойким к расслаиванию и ломкости.
После процедуры обработки ногтей нанесите на них
увлажняющий крем или лосьон.
• Для
предотвращения
расслаивания
ногтей
используйте только высококачественный лак для
ногтей. Перед использованием какого:либо средства
для увлажнения отполируйте ногти.
• Перед удалением кутикул сначала увлажните их, а
затем аккуратно поднимайте насадкой или палочкой.
• Для безопасного и удаления кутикул используйте
вместо ножниц маникюрные щипцы.
• Для предотвращения уменьшения толщины ногтей
производите шлифовку и полировку ногтей с
интервалами от семи до десяти дней.
ВКЛЮЧЕНИЕ СУШКИ ДЛЯ НОГТЕЙ И МАССАЖЕРА ДЛЯ
ПАЛЬЦЕВ РУК
•
Подключите штекер сетевого адаптера (5) к гнезду (3).
•
Откройте сушку для ногтей, установив крышку (7) в
вертикальное положение.
•
Включите сушку, установив переключатель (4) в
положение F.
•
Для включения функции массажа и сушки установите
переключатель (4) в положение M+F.
•
По окончании процедуры выключите сушку, установив
переключатель (4) в положение OFF.
•
Отделение сушки можно использовать для хранения
лака для ногтей и пр.
УХОД И ОБСЛУЖИВАНИЕ
•
Протирайте корпус устройства мягкой влажной тканью.
Не используйте абразивные чистящие средства и
растворители для чистки корпуса устройства.
•
Никогда не погружайте устройство в какую:либо
жидкость.
•
Периодически протирайте насадки медицинским
спиртом для дезинфекции.
•
Запрещается самостоятельно ремонтировать данное
устройство.
При
обнаружении
неисправности
устройства или сетевого адаптера обратитесь для
ремонта в авторизованный сервисный центр.
•
Храните набор для маникюра и педикюра в безопасном,
сухом месте.
ЗАЩИТА ОКРУЖАЮЩЕЙ СРЕДЫ
•
Встроенные
аккумуляторные
батареи
содержат
компоненты, которые загрязняют окружающую среду.
•
Перед утилизацией прибора удалите аккумуляторные
батареи.
•
Не выбрасывайте аккумуляторные батареи вместе с
обычными бытовыми отходами, а сдавайте их в
специальный приемный пункт.
Технические характеристики
Сетевой адаптер
Напряжение питания:
220:230 В ~ 50 Гц
Выходное напряжение:
2,8 В, 550 мА
Производитель оставляет за собой право изменять
характеристики приборов без предварительного
уведомления.
Срок службы прибора не менее 3х лет
Данное изделие соответствует всем
требуемым европейским и российским
стандартам безопасности и гигиены.
Производитель: АН:ДЕР ПРОДАКТС ГмбХ, Австрия
Йеневайнгассе, 10/10, 1210, Вена, Австрия
РУССКИЙ
4
GESICHTSA UND HANDPFLEGECENTER
Lesen Sie die Gebrauchsanweisung vor der Anwendung des
Gerätes aufmerksam durch
BESCHREIBUNG
1.
Gehäuse des Hauptgerätes
2.
Durchsichtiger Deckel
3.
Büchse für Netzadapteranschluss
4.
Schalter für den Nagellacktrockner /Massage
«OFF/F/M+F»
5.
Netzadapter
6.
Taste zum Deckelöffnen
7.
Deckel des Nagellacktrockners
8.
Spiegel
9.
Nagellacktrocknerlüfter
10. Massagekissen
11. Scheibe zum Nagelformen
12. Zylindrischer Aufsatz
13. Filzscheibe zum Schleifen uns Polieren der Nägel
14. Kammaufsätze für die Augenbrauen (A, B, C).
15. Spitzer Aufsatz
16. Kugelmassage
17. Make>up>Pinsel
18. Automatischer Spatel zum Anheben der Kutikula
19. Großer kegelförmiger Aufsatz
20. Schwamm
21. Bürstchen
22. Wimpernzangenaufsatz
23. Stäbchen zum Anheben der Kutikula
24. Übergangsstück für die drehbaren Aufsätze
25. Speiseschalter «0/I»
26. Vorrichtung für Maniküre/Pediküre
27. Ladeindikator
28. Damenrasierer
29. Scheibe mit kleinen Kerben zum Nagelbearbeiten
VORSICHTSMASSNAHMEN.
Das Gerät ist ausschließlich für den Privatgebrauch bestimmt.
Um den Betriebszustand des Gerätes zu erhalten, wird es emp>
fohlen es für 15 Minuten nach je 20 Minuten Betrieb
abzustellen.
Achtung! Halten Sie die folgenden Vorschriften ein, um
das Risiko von Verbrennungen, Stromschlag und
Feuerentfachung zu vermeiden:
1.
Überzeugen Sie sich vor dem Anschließen davon, dass die
Betriebsspannung des Netzadapters der Netzspannung
entspricht.
2.
Bewahren Sie das Gerät an einem kindersicheren Ort auf.
Besondere Vorsicht ist geboten, wenn das Gerät in der
Nähe von Kindern oder von behinderten Personen benutzt
wird.
3.
Benutzen Sie das Gerät nur seiner Bestimmung nach, wie
es in der vorliegenden Anleitung angeführt ist. Verwenden
Sie nur die Aufsätze, die im Lieferumfang enthalten sind.
4.
Benutzen Sie das Gerät nicht in der Dusche oder in der
Badewanne. Legen Sie das Gerät nicht an Stellen hin, von
denen es in ein Waschbecken oder eine Badewanne fallen
könnte, die mit Wasser gefüllt sind. Bewahren Sie es auch
nicht an solchen Orten auf.
5.
Tauchen Sie das Gerät oder den Netzadapter nicht in
Wasser oder in andere Flüssigkeiten.
6.
Wenn das Gerät oder der Netzadapter nicht korrekt funk>
tioniert, sollten Sie die Benutzung einstellen und sich an
ein autorisiertes Service>Center wenden.
7.
Halten Sie das Gerät beim Transport nicht an der
Netzadapterschnur fest.
8.
Benutzen Sie das Gerät niemals, wenn Sie müde oder
schläfrig sind.
9.
Benutzen Sie das Gerät nicht im Freien oder an Orten, wo
Sprays angewendet werden.
10. Benutzen Sie das Gerät nicht, wenn Sie offene Wunden
oder Kratzer auf den Fingern oder auf den Fußsohlen
haben sollten.
11. Lassen Sie sich vor der Anwendung des Gerätes von
einem Arzt beraten, wenn Sie an Diabetes oder an einer
Gefäßerkrankung leiden.
Aufladen der Akkubatterien
>
Führen Sie vor der Anwendung des Gerätes eine
Vollaufladung der Akkubatterien durch.
> Überzeugen Sie sich davon, dass die Betriebsspannung
des Netzadapters der Netzspannung entspricht.
> Die erste Ladezeit muss mindestens 12 Stunden betragen.
> Die Dauer der nachfolgenden Ladevorgänge – mindestens
6 Stunden.
• Überzeugen Sie sich davon, dass das Gerät ausgeschaltet
ist und der Speiseschalter (25) in der Position «0» steht.
• Stellen Sie das Gerät (26) auf das Untergestell (1).
• Schließen Sie den Stecker des Netzadapters (5) an die
Büchse (3) an.
• Schließen Sie den Netzadapter an eine Steckdose an,
dabei leuchtet auf dem Gerät der Ladeindikator (27) auf.
• Um die Lebensdauer der Akkubatterien zu verlängern wird
es empfohlen sie einmal in drei Monaten vollständig zu
entleeren, indem Sie das Gerät bis zum Motorstillstand
eingeschaltet lassen, und erst danach die Vollaufladung
durchführen.
AUFSTECKEN DER AUFSÄTZE
> Zum Aufsetzen der drehbaren Aufsätze wird die Über>
gangsvorrichtung (24) verwendet.
> Vereinigen Sie die Markierung auf dem Gehäuse der Über>
gangsvorrichtung (24) mit der Markierung auf dem
Gehäuse des Gerätes (26) und drehen Sie die Über>
gangsvorrichtung im Uhrzeigersinn bis zum Anschlag, zum
Abnehmen der Übergangsvorrichtung drehen Sie sie gegen
den Uhrzeigersinn und nehmen Sie sie vom Gerät ab
> Wählen Sie den gewünschten Aufsatz und setzen Sie ihn auf
die Achse der Übergangsvorrichtung (24) auf, zum
Abnehmen des Aufsatzes schalten Sie das Gerät mit dem
Schalter (25) aus und ziehen Sie den Aufsatz nach oben ab.
> Die Aufsätze (22 und 28) werden auf das Gehäuse des
Gerätes ohne Übergangsvorrichtung (24) aufgesetzt.
WIMPERNZANGENAUFSATZ
Benutzen Sie den Wimpernzangenaufsatz nach dem
Abwaschen des Make>ups, jedoch vor der Anwendung einer
beliebigen Maske.
• Setzen Sie den Wimpernzangenaufsatz (22) auf das Gerät
(26) auf, vereinigen Sie die Markierungen auf dem Aufsatz
und auf dem Gerät und drehen Sie den Aufsatz (22) im
Uhrzeigersinn.
• Schalten Sie das Gerät mit dem Speiseschalter (25) an.
• Warten Sie etwa eine Minute, bis der «Wärmeindikator»
seine Farbe wechselt (Abb.2).
• Führen Sie den Aufsatz nicht zu nahe an die Augen!
• Bewegen Sie den Aufsatz von den Wimpernwurzeln nach
außen, wiederholen Sie das mehrmals, bis die Wimpern die
gewünschte Form erreichen. Das Anwendungsverfahren
für die oberen und unteren Wimpern ist identisch.
• Nach der Bearbeitung der Wimpern schalten Sie das Gerät
mit dem Speiseschalter (25) aus.
• Warten Sie von 3 bis 5 Minuten ab, bis sich der
Wimpernzangenaufsatz abgekühlt hat, bevor Sie ihn vom
Gerät abnehmen.
Achtung: Der Wimpernzangenaufsatz darf nicht zu nahe an die
Augen gehalten werden, um Verbrennungen zu vermeiden.
DAMENRASIERER (Abb. 3)
Der Damenrasierer kann zum Entfernen von unerwünschten
Härchen im Gesicht Seite (a) und in der Bikini>Zone Seite (b)
verwendet werden.
• Setzen Sie den Damenrasiereraufsatz (28) auf das Gerät
(26) auf, vereinigen Sie die Markierungen auf dem Aufsatz
und auf dem gerät und drehen Sie den Aufsatz (28) im
Uhrzeigersinn.
• Schalten Sie das Gerät mit dem Speiseschalter (25) ein.
Zum Formen der Augenbrauen:
> Malen Sie mit einem Augenbrauenstift die gewünschte
Augenbrauenlinie.
> Entfernen Sie die Haare hinter der von ihnen gezeichneten
Linie mit dem Damenrasierer (28), Seite (a).
Anwendung der Augenbrauenkammaufsätze
Die Augenbrauenbürstenaufsätze (14) erlauben es die Haare
auf die voreingestellte Länge und im eingestellten Winkel zu
schneiden.
> Wählen Sie den gewünschten Aufsatz (14) und halten Sie
ihn an die Braue, um die entsprechende Haarlänge und den
Winkel einzustellen.
> Jeder Aufsatz (14) besitzt zwei Führungsbahnenpaare, in
Abhängigkeit
von
der
gewünschten
Länge
der
Augenbrauenhaare: A – 2/4 mm, B – 6/8 mm, C – 10/12
mm.
> Bürsten und glätten Sie die Brauenhaare mit dem Kamm.
> Setzen Sie den gewählten Aufsatz (14) auf den
Damenrasierer auf, benutzen Sie eine Seite des Rasierers
zum Entfernen von feinen Härchen (a).
Bewegen Sie den Kammaufsatz langsam vom
Augenbrauenrand hin zum Haarwuchsbeginn, wiederholen
Sie diese Prozedur 3, 4 Mal, bis die gewünschte
Augenbrauenlänge erreicht wird.
Achtung: Der Kammaufsatz muss bei der Bewegung an die
Augenbraue gepresst werden.
BikiniAZone
Verwenden Sie den Damenrasiereraufsatz (28) Seite (b) zum
Entfernen von unerwünschten Härchen in der Bikini>Zone.
> Benutzen Sie den Aufsatz (28) nicht auf empfindlichen
Hautpartien.
Achtung! Um Hautverletzungen zu vermeiden, sollten Sie den
Aufsatz (28) nicht mit beschädigten Klingen benutzen.
ANWENDUNG DES MAKEAUPAGESICHTSPINSELS
Der Make>up>Pinsel wird für die intensive und sanfte Reinigung
der Gesichtshaut verwendet.
> Setzen Sie die Übergangsvorrichtung (24) auf das Gerät
(26) auf, wie es oben beschrieben wird.
> Setzen Sie den Make>up>Pinsel (17) auf die Achse der
Übergangsvorrichtung (24) auf.
> Entfernen Sie überschüssiges Make>up.
> Tragen Sie Seife, eine Reinigungscreme oder ein
Reinigungsgel auf den Pinsel auf.
> Schalten Sie das Gerät mit dem Speiseschalter (25) ein.
> Bearbeiten Sie mit Kreisbewegungen die Gesichtshaut,
vermeiden Sie dabei die empfindlichen Hautpartien um die
Augen.
> Nach dem Beenden dieser Prozedur entfernen Sie die
Creme> oder Gelreste und wischen Sie die Gesichtshaut mit
einem Tonikum ab.
KUGELMASSAGEGERÄT
Das Kugelmassagegerät kann zum effizienten Auftragen von
Feuchtigkeitscremes und Gels auf die Gesichtshaut verwendet
werden.
> Setzen Sie den Kugelmassageaufsatz (16) auf die Achse
der Übergangsvorrichtung (24) auf
> Tragen Sie auf die Gesichtshaut eine Feuchtigkeitscreme
auf.
> Schalten Sie das Gerät mit dem Speiseschalter (25) ein und
massieren
Sie
die
Gesichtshaut
in
sanften
Kreisbewegungen. Führen Sie die Massageprozedur nicht
länger als zwei Minuten durch und vermeiden Sie dabei die
empfindlichen Hautpartien um die Augen.
> Nach dem Beenden der Prozedur entfernen Sie die
Cremereste mit einem Papiertuch von der Haut.
SCHWÄMMCHEN
Mit dem Schwämmchen kann den Make>up>Fonds gleich>
mäßig aufgetragen werden.
> Setzen Sie den Aufsatz (20) auf die Achse der Über>
gangsvorrichtung (24) auf.
> Tragen Sie den Make>up>Fonds auf das Gesicht auf.
> Schalten Sie das Gerät mit dem Speiseschalter (25) ein und
verteilen Sie mit sanften Kreisbewegungen den Make>up>
Fonds auf der Gesichtshaut. Führen Sie die Prozedur nicht
länger als zwei Minuten durch und vermeiden Sie dabei die
empfindlichen Hautpartien um die Augen.
MANIKÜRE/PEDIKÜREASET
Wir schlagen Ihnen folgende Varianten für die Anwendung der
Maniküre /Pediküre>Aufsätze vor.
Scheiben zum Nagelformen (11, 29).
Für weiche und dünne
Fingernägel benutzen Sie die Scheibe mit der feinen Kerbung.
Für festere Nägel benutzen Sie zuerst die Scheibe mit der
groben Kerbung, und beenden Sie die Arbeit mit der Scheibe
mit der feinen Kerbung. Benutzen Sie diese Scheiben auf
solchen Flächen mit grober Haut, wie etwa die Fersen, oder
zum Entfernen von Hühneraugen auf den Händen. Bewegen
Sie die Scheibe vorsichtig bis zum vollständigen Entfernen der
abgestorbenen Hautschicht.
Zylindrischer Aufsatz (12),
Wird zur Bearbeitung von
Oberflächen von dicken Finger> und Zehennägel verwendet.
Filzscheibe zum Schleifen und Polieren (13).
Wird zum
Polieren der Nageloberfläche nach der Maniküre /Pediküre
benutzt, was einen zusätzlichen Glanz schenkt.
Spitzer Aufsatz (15),
Dient zum Entfernen von abgestorben>
er Haut und zur Befreiung von eingewachsenen Nägeln.
Spatel zum automatischen Anheben der Kutikula (18).
Seien Sie vorsichtig, wenn Sie diesen Aufsatz benutzen, lassen
Sie den Spatel nicht zu tief unter die Haut eindringen. Beginnen
Sie von einer Seite des Nagels und bewegen Sie den Aufsatz
langsam weiter.
Großer kegelförmiger Aufsatz (19).
Wird zum Schleifen
grober Haut, Hühneraugen und zum Schleifen der
Nageloberflächen verwendet. Bewegen Sie diesen Aufsatz
vorsichtig entlang der Haut oder des Nagels.
Bürstchen (21).
Dient zur vorläufigen und zur anschließenden
Reinigung der Nageloberflächen.
Stäbchen zum Anheben der Kutikula (23). Wird zum manuellen
Anheben der Kutikula verwendet.
Ratschläge
Um die Nägel in einem gesunden Zustand zu erhalten und
guter Ergebnisse bei der Anwendung des Maniküre/
Pediküresets zu erzielen, sollten Sie sich an die folgenden
Ratschläge halten:
• Vermeiden die den Kontakt der Hände mit hautreizenden
Chemikalien.
• Schützen Sie die Hände vor Unterkühlung. Tragen Sie bei
kaltem Wetter immer Handschuhe.
• Benutzen Sie keine alkalihaltige Seifen und Übermengen
von Wasser beim Händewaschen.
• Eine gute Befeuchtung für die Nägel ist der Schlüssel zu
gesunden und festen Nägeln, die sich nicht spalten und
nicht abbrechen. Tragen Sie nach der Nagelbearbeitung
stets eine Feuchtigkeitscreme oder Lotion auf.
• Um das Spalten von Nägeln zu vermeiden, sollten Sie auss>
chließlich hochwertige Nagellackprodukte benutzen.
Polieren Sie die Nägel, bevor Sie ein Feuchtigkeitsmittel
verwenden.
• Bevor Sie die Kutikula entfernen, müssen Sie sie zuerst gut
befeuchten, und danach vorsichtig mit dem Aufsatz oder
dem Stäbchen anheben.
• Zum sicheren Entfernen der Kutikula können Sie anstatt
einer Schere eine Manikürezange benutzen.
• Um ein Dünnwerden der Nägel zu vermeiden, sollten Sie die
Nägel nicht öfter als mit Abständen von sieben bis zehn
Tagen durchführen.
EINSCHALTEN DES NAGELLACKTROCKNERS UND DES
FINGERMASSAGEGERÄTES
• Schließen Sie den Stecker des Netzadapters (5) an die
Büchse (3) an.
• Öffnen Sie den Nagellacktrockner, indem Sie den Deckel
(7) senkrecht aufstellen.
• Schalten Sie den Trockner ein, indem Sie den Schalter (4)
in die Position «F» stellen.
• Zum Einschalten der Massagefunktion und des Trockners
stellen Sie den Schalter (4) in die Position «M+F».
• Schalten Sie nach dem Beenden der Prozedur den
Trockner aus, indem Sie den Schalter (4) in die Position
«OFF» stellen.
• Das Trocknerfach kann zur Aufbewahrung von Nagellack
etc. verwendet werden.
PFLEGE UND WARTUNG
• Wischen Sie das Gehäuse des Gerätes mit einem feuchten
Stofftuch ab. Benutzen Sie keine Schleifmittel oder
Lösungsmittel für die Reinigung des Gehäuses des
Gerätes.
• Tauchen Sie das Gerät niemals in Wasser oder in andere
Flüssigkeiten.
• Wischen Sie die Aufsätze regelmäßig mit medizinischem
Alkohol zur Desinfektion ab.
•
Es wird verboten das Gerät selbstständig zu reparieren.
Beim Auffinden von Störungen am gerät oder am
Netzadapter wenden Sie sich an ein autorisiertes Service>
Center, um Reparaturarbeiten durchführen zu lassen.
• Bewahren Sie das Maniküre/Pediküregerät an einem
sicheren, trockenen Ort auf.
Umweltschutz
• Die eingebauten Akkubatterien enthalten Komponenten,
die die Umwelt verschmutzen können.
• Entfernen Sie die Batterien vor der Entsorgung des
Gerätes.
• Werfen Sie die Batterien nicht mit dem Haushaltsmüll weg,
geben Sie sie bitte an speziellen Sammelstellen ab.
Technische Kenndaten
Netzadapter:
Speisespannung
220>230V 50 Hz
Ausgangsspannung
2,8 V 550 mA
Der Produzent behält sich das Recht vor, die Charakteristiken
der Geräte ohne Vorankündigung zu ändern.
Benutzungsdauer der Teekanne nicht weniger als 3
Jahre
Gewährleistung
Ausführliche Bedingungen der Gewährleistung kann man
beim Dealer, der diese Geräte verkauft hat, bekommen. Bei
beliebiger Anspruchserhebung soll man während der Laufzeit
der vorliegenden Gewährleistung den Check oder die
Quittung über den Ankauf vorzulegen.
Das vorliegende Produkt entspricht den
Forderungen der elektromagnetischen
Verträglichkeit, die in 89/336/EWG %Richtlinie
des Rates und den Vorschriften 73/23/EWG über
die Niederspannungsgeräte vorgesehen sind.
DEUTSCH
3
BEAUTY&MANICURE CENTRE
Read these instructions before using the device
DESCRIPTION
1.
Main device body
2.
Transparent cover
3.
Jack for connecting power adapter
4.
Dryer/massager power switch "OFF/F/M+F"
5.
Power adapter
6.
Button for opening cover
7.
Nail dryer cover
8.
Mirror
9.
Nail dryer fan
10. Massage pillow
11. Nail sculpting disc
12. Cylindrical attachment
13. Felt disc for grinding and polishing
14. Brush attachment for eyebrows (A, B, C).
15. Sharp:edged attachment
16. Spherical massager
17. Cosmetic brush
18. Automatic cuticle lifting tool
19. Large cone attachment
20. Foam:rubber sponge
21. Brush
22. Eyelash curling attachment
23. Cuticle lifting tool
24. Adapter for installing rotating attachments
25. Power switch "0/I"
26. Manicure/pedicure device
27. Charging indicator
28. Cosmetic shaver
29. Disc with fine notches for treating nails
SAFETY MEASURES
The Manicure/Pedicure set is designed for domestic use
only.
To insure the proper operation of the device, it is recom:
mended that it be turned off for 15 minutes after each 20
minutes of constant use.
Attention! Observe the following rules in order to
avoid the risk of burns, electric shock and fire:
1.
Before using, make sure that the operating voltage of
the device matches the voltage of your power net:
work.
2.
Store the device out of the reach of children. Be espe:
cially cautious if the device is being used near children
or handicapped persons.
3.
Only use the device for its intended purpose as
explained in these instructions. Only use attachments
that cam together wit the device.
4.
Do not use the device while showering or bathing. Do
not place or store the device in places where it could
fall into the bathtub or a full sink.
5.
Do not submerse the device or power adaptor in water
or any other liquid.
6.
If the device or power adapter is not operating proper:
ly, discontinue using it and contact an authorized serv:
ice center for repair.
7.
Do not carry the device by the power adapter cord.
8.
Never use the device while drowsy or tired.
9.
Do not use the device outside or in places where
aerosol sprays are being used.
10. Do not use the device if you have open wounds or
scratches on your fingers or the soles of your feet.
11. Consult with your doctor before using this device if you
suffer from diabetes or lymphatic system disorders.
CHARGING THE RECHARGEABLE BATTERIES
: Fully charge the rechargeable batteries before first
using the device.
: Make sure that the operating voltage of the power
adapter matches the voltage of your power outlet.
: The initial charging time is no less than 12 hours.
: Consecutive charging cycles should be no less than 6
hours.
• Make sure that the power switch (25) is set to "0."
• Place the device (26) on the stand (1).
• Connect the power adapter plug (5) to the jack (3).
• Insert the power adapter into the outlet; the charging
indicator (27) on the device will light.
• To extend the service life of the rechargeable batteries,
we recommend fully discharging them once every three
months by leaving the device turned on until the motor
stops and then conduct a full charging session.
INSTALLING ATTACHMENTS
: The rotating attachments are installed using an adapter
(24).
: Align the marking on the attachment body (24) with the
marking on the device body (26) and rotate the adapter
clockwise until it stops. To remove the adapter, rotate it
counter:clockwise and remove from the device.
: Choose the desired attachment and install it onto the
adapter spindle (24). To remove the attachment, turn
off the device using the power switch (25), pull upwards
on the attachment and remove it.
: Attachments 22 and 28 install onto the device body with
an adapter (24).
EYELASH CURLING ATTACHMENT
Use the eyelash curling attachment after removing make:
up, but before application of any masks.
• Place the eyelash attachment (22) onto the device (26)
by aligning the markings on the attachment and the
device and then rotating the attachment (22) clockwise.
• Turn on the device using the power switch (25).
• Wait for about a minute until the "heating indicator"
changes color (Pic. 2).
• Do not get the attachment too close to your eyes!
• Move the attachment away from the roots of the eye:
lashes towards the ends and repeat several times until
the eyelashes curl just as you desire. The procedure is
identical for upper and lower eyelashes.
• After curling your eyelashes, turn of the device using
the power switch (25).
• Wait for 3 to 5 minutes after curling your eyelashes for
the attachment to cool and then remove it from the
device.
Attention: The eyelash curling attachment should not be
allowed near the eyes in order to avoid burns.
COSMETIC SHAVER (Pic. 3)
The cosmetic shaver can be used to remove unwanted
facial hair using side (a) and unwanted hair in the bikini
area using side (b).
• Place the cosmetic shaver attachment (28) onto the
device (26). Align the markings on the attachment and
the device and then rotate the attachment (28) clock:
wise.
• Turn on the device using the power switch (25).
To sculpt the eyebrows:
:
Use an eyebrow pencil to draw the desired contour of
the eyebrow.
:
Remove the hair along the drawn contour using side (a)
of the cosmetic shaver (28).
Using the eyebrow brush attachment
The eyebrow brush attachment (14) allows you to cut hairs
to a set length and at a desired angle.
:
Choose the desired attachment (14) and place it
against your eyebrow to choose the needed hair length
and angle.
:
Each attachment (14) has two pairs of guides depend:
ing on the needed length of your eyebrow hair: A : 2/4
mm, B : 6/8 mm, C : 10/12 mm.
:
Use the brush to comb and straighten the eyebrow hair.
:
Install the chosen attachment (14) onto the cosmetic
shaver using the side of the shaver for removal of thin
hair (a).
Slowly move the brush attachment from the edge of the
eyebrow to the beginning hair:growth point. Repeat the
procedure 3 or 4 times until the desired eyebrow hair
length is achieved.
Attention: The brush attachment should be pressed
against the eyebrow during use.
Bikini area
Use the cosmetic shaver attachment (28) side (b) to
remove unwanted hairs in the bikini region.
: Do not use the attachment (28) on sensitive areas of the
skin.
Attention! In order to avoid damaging your skin, do not use
the attachment (28) if the blades are damaged.
USING THE FACIAL COSMETIC BRUSH
The cosmetic brush is used for intensive and mild cleaning
of the face.
: Connect the adapter (24) to the device (26) as indicat:
ed above.
: Attach the cosmetic brush (17) to the spindle adapter
(24).
: Remove excess cosmetics.
: Apply soap, cleansing cream or gel to the brush.
: Turn on the device using the power switch (25).
: Use a circular motion to treat the skin of your face,
avoiding sensitive areas around the eyes.
: When finished with the procedure, remove any excess
cleansing cream or gel and wipe your face with a toning
lotion.
SPHERICAL MASSAGER
The spherical massager can be used for effective applica:
tion to the face of moisturizing cream or gel.
: Place the spherical massager (16) onto the spindle
adapter (24)
: Apply moisturizing cream to the face.
: Turn on the device using the power switch (25) and use
a soft, circular motion to massage your face. This pro:
cedure should last no longer than two minutes and you
should avoid sensitive areas of the skin around the
eyes.
: After the procedure is finished, remove any excess
cream from your face with a paper towel.
FOAM/RUBBER SPONGE
You can achieve an even base coating for makeup using
the foam:rubber sponge.
: Place the attachment (20) on the spindle adapter (24).
: Apply the makeup base to your face.
: Turn on the device with the switch (25) and use a soft,
circular motion to evenly distribute the makeup base on
your face. This procedure should last no longer than
two minutes and you should avoid sensitive areas of the
skin around the eyes.
MANICURE/PEDICURE SET
We offer the following options for using the attachments
for your manicure/pedicure:
Nail sculpting discs (11, 29).
For soft and thin nails, use
the disc with small notches. For thicker nails, start with the
rough notch disc and then finish with the small notch one.
Use these discs for areas with rough skin, like the soles of
the feet or for removing calluses on the hands. Carefully
move the disc for gradual removal of the layer of dead skin.
Cylindrical attachment (12).
Used for treating the sur:
face of thick toenails and fingernails.
Felt disc for grinding and polishing (13).
Used for pol:
ishing the surface of the nail after the manicure/pedicure,
gives it an extra shine.
Sharp/edged attachment (15).
Used for removing dead
skin and cleaning in:grown nails.
Automatic cuticle lifting tool (18).
Be careful when
using this attachment. Do not allow it to penetrate deeply
under the skin. Begin with one side of the nail and gradual:
ly move the attachment.
Large cone attachment (19).
Used for grinding rough
skin and calluses, or for polishing the surface of the nail.
Carefully move the attachment over the treatment area on
the skin or nail.
Brush (21).
Use for preliminary or final cleaning of the nail
surface.
Cuticle/lifting baton (23).
Used to lift the cuticles manu:
ally.
Useful advice
Follow these instructions to keep your nails healthy and to
achieve good results with the manicure/pedicure set:
• Do not allow irritable chemicals to contact your nails.
• Do not subject your hand to extreme cold. Always wear
gloves in cold weather.
• Do not use alkaline soap or excessive amounts of water
when washing your hands.
• Well:moisturized nails : that is the key to healthy and
strong nails that can withstand exfoliation and fragility.
After the nail treatment procedure, use the bubble bath
to restore moisture to the nails and hands. Then apply a
moisturizing cream or lotion.
• To prevent exfoliation, use only high:quality nail polish.
Polish your nails before applying any moisturizing sub:
stances.
• Before removing cuticles, first moisturize them and
then carefully lift with the attachment o baton.
•
Use manicure pinchers instead of scissors for remov:
ing cuticles safely.
• To prevent the thinning of nails, grind and polish them
only every seven to ten days.
TURNING ON THE NAIL DRYER AND FINGER MAS/
SAGER
• Connect the power adapter plug (5) to the jack (3).
• Open the nail dryer by moving the lid (7) to the vertical
position.
• Turn on the dryer of setting the selector (4) to the •F"
position.
• To turn on the massage and dry function, set the selec:
tor (4) to the "M+F" position.
• When the procedure is finished, turn off the dryer by
setting the selector (4) to the "OFF" position.
• The dryer section can be used to store nail polish, etc.
Care and servicing
• Wipe the device body with a soft, damp cloth. Do not
use abrasive cleaners or solvents to clean the device
body.
• Never submerse the device in any kind of liquid.
• Clean the attachments periodically with rubbing alcohol
for disinfection.
• Do not attempt to repair this device yourself. If malfunc:
tion is detected, contact an authorized service center
for repair.
• Store the manicure/pedicure device in a safe, dry
place.
Protecting the environment
• The built:in rechargeable batteries contain compo:
nents that pollute the environment.
• Remove the rechargeable batteries before disposing of
the device.
• Do not throw away the rechargeable batteries along
with the regular trash; turn them in to a special receiving
location.
Technical Specifications
Power Adapter:
Operating Voltage
220:230V ~ 50 Hz
Output Voltage
2.8 B 550 mA
The manufacturer reserves the right to change the char
acteristics of the device without prior warning.
Service life of the unit is not less than 3 years
GUARANTEE
Details regarding guarantee conditions can be obtained
from the dealer from whom the appliance was purchased.
The bill of sale or receipt must be produced when making
any claim under the terms of this guarantee.
This product conforms to the EMC
Requirements as laid down by the Council
Directive 89/336/EEC and to the Low
Voltage Regulation (73/23 EEC)
ENGLISH
2
1
2208.qxd 28.07.05 14:58 Page 1