FRIGORIFICO-
CONGELADOR
FRIDGE-FREEZER
REFRIGERATEUR-
CONGELATEUR
TWEEDEURS-
KOELKAST
ZJB 9476
LIBRO DE INSTRUCCIONES
INSTRUCTION BOOKLET
MODE D’EMPLOI
GEBRUIKSAANWIJZING
2223 214-2
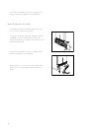
7
ïéãéÑàãúçàä-
åéêéáàãúçàä
àçëíêìäñàü èé ìëíÄçéÇäÖ à
ùäëèãìÄíÄñàà èêàÅéêÄ