Инструкция для ALCATEL ONE TOUCH LINK W800 - 4G -100 MBPS

(скачивание инструкции бесплатно)
Формат файла: PDF
Доступность: Бесплатно как и все руководства на сайте. Без регистрации и SMS.
Дополнительно: Чтение инструкции онлайн
background image


  7 


Tab 2.1 

ATTENTION! DATA TRAFFIC AND OTHER NOTIFICATION TEXT MESSAGES 

SENT BY YOUR SERVICE PROVIDER CAN BE READ ONLY WHEN THIS PAGE 

IS VISIBLE. IF YOU CLOSE OR SEND IT TO BACKGROUND YOU MAY MISS OR 

BE INFORMED LATE BY YOUR IMPORTANT MESSAGES! BLINKING LED 

LIGHTS ALSO INFORM YOU ABOUT INCOMING MESSAGES 

– PLEASE 

CONSULT THE USER’S GUIDE. 
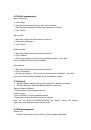
 

3. Quick Setup                                                                                         

user can easily setup other function about PIN,internet,profile, WLAN etc. 
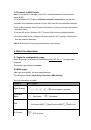
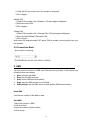
4. Connection                                                                                       


You can move the mouse to "Connection" and click the items you want. In this section, 

the following items are included: 


Connection Status: 

current connection, WAN status, WLAN status. 


Profile  management: 

manage  account  settings,  which  includes  your  preferred 

network connection as well as the Access Point Name (APN). 


Network:

 choose and set up preferred network settings. 


PIN management: 

manage PIN, enable/disable/change/verify.


Connection Mode

: Set the dial mode of this device, default is AUTO.   

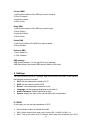
4.1 Connection status 

Current status 


Active profile: Select the profile you want to use from the drop down box.


Duration time: the duration for current connection.


Roaming: display whether you are in roaming network or not.


WAN status 


Network name: the 4G/3G/2G network you used.


Network type: GPRS/EDGE/UMTS/HSDPA/HSUPA/HSPA+/LTE.


Rate: current download speed from 4G/3G network.


IP address: this is the IP address arranged for this device.


WLAN status 


WLAN Status: On or Off the WLAN


SSID: the network name of this device


Security: the cipher type of the Wi-Fi used.


User: the users connected to this device and max capacity .


1
2
3
4
5
6
7
8
9
10
11
12
13
14
15
16
17
18
19
20
Оглавление инструкции
  • Страница 1 из 21
    User Manual 1
  • Страница 2 из 21
    Safety Precautions Read the safety precautions carefully to ensure the correct and safe use of your wireless device. Do not switch on your device when the device use is prohibited or when the device use may cause interference or danger. Follow the rules or regulations in hospitals and health care
  • Страница 3 из 21
    Content Safety Precautions .................................................................................................. 2 1. Overview .............................................................................................................. 5 1.1 System Requirements
  • Страница 4 из 21
    7 Warranty ............................................................................................................. 13 8 Q&A ..................................................................................................................... 14 9 Warning and Precautions
  • Страница 5 из 21
    1. Overview This device allows you to share a secure Mobile Broadband internet connection using Wi-Fi. You can connect most Wi-Fi enabled devices to it (for example PCs, mobile gaming devices, Smart phones, tablet).This device should not be used in a confined space where air flow is limited, for
  • Страница 6 из 21
    1.3 Connect in Wi-Fi mode Step 1: Use the Wi-Fi manager on the Wi-Fi embedded device to select network name (SSID). ◆From a Windows PC: Right-click Wireless network connection on the task bar, and select View Available Networks. Choose SSID from the list of available networks. ◆From a Mac computer:
  • Страница 7 из 21
    Tab 2.1 ATTENTION! DATA TRAFFIC AND OTHER NOTIFICATION TEXT MESSAGES SENT BY YOUR SERVICE PROVIDER CAN BE READ ONLY WHEN THIS PAGE IS VISIBLE. IF YOU CLOSE OR SEND IT TO BACKGROUND YOU MAY MISS OR BE INFORMED LATE BY YOUR IMPORTANT MESSAGES! BLINKING LED LIGHTS ALSO INFORM YOU ABOUT INCOMING
  • Страница 8 из 21
    4.2 Profile management Add a new profile: 1, Click <New>. 2, Input the correct parameters you get from the operator. Note: Profile Name/Number/APN is the mandatory to be filled. 3, Click <Save>. Edit a profile: 1, Select the profile from the connection profile list. 2, Change the parameters. 3,
  • Страница 9 из 21
    2, Enter the PIN you want to set, only number is accepted. 3,Click <Apply>. Disable PIN 1, When PIN is enable, click <Disable>, PIN input page is displayed; 2,Enter the correct PIN; 3,Click <Apply>; Change PIN 1, When PIN is enable, click <Change PIN>,PIN input page is displayed; 2,Enter the Old
  • Страница 10 из 21
    Forward SMS 1,Left click the content of the SMS you want to forward. 2,Click <Forward>. 3,Input the number. 4,Click <Sent>. Reply SMS 1,Left click the content of the SMS you want to reply. 2,Click <Reply>. 3,Input the content. 4,Click <Sent>. Delete SMS 1,Left click the Mark of the SMS you want to
  • Страница 11 из 21
        network. The length of the SSID should be 1-32 characters including “_”. SSID Broadcast: The default setting is “Enable”. Wi-Fi Channel: Different domain has different channels (Channel 1~11 in FCC (US)/IC (Canada); Channel 1~13 in ETSI (Europe); Channel 1~13 in MKK (Japan)). Max Number of
  • Страница 12 из 21
          Router IP Address: The router's IP address on the LAN. The default setting is “192.168.1.1”. Subnet Mask: The router's internal LAN subnet mask. The default setting is “255.255.255.0”. Host Name: Name of web server. DHCP Server: DHCP Server will automatically assign IP addresses to
  • Страница 13 из 21
    Restore the configuration 1,Click <Restore>; 2,Select a file saved previously to restore the settings. Check for Update 1. Click this button to upgrade the SW following the tips 7 Warranty  The device is warranted against any deviation from technical specifications for a period of twelve (12)
  • Страница 14 из 21
    8) Malfunctions caused by external causes (e.g., radio interference from other equipment, power voltage fluctuations), 9) Faulty connections resulting from unsatisfactory radio transmission or caused by the absence of radio relay coverage.  Warranty is also excluded for this device on which
  • Страница 15 из 21
    Android: Settings->Wireless controls->Wi-Fi settings. Choose SSID from the available Networks. 4. Q: How to do if I see the SSID but failed to connect? A: <1, Check the password you entered is the right one; <2, Check if WPS security enabled on your PC? If so, check the device to see if it is
  • Страница 16 из 21
    <4. Delete any unused wireless connections from the Preferred Networks list and click OK. <5. Restart your computer. Mac: Try rebooting your computer 8. Q: How to do if “No SIM” or “SIM invalid” displayed on the Web UI? A: the possible reason as bellow: <1,There is no SIM card inserted or inserted
  • Страница 17 из 21
    A: Login web browser, Go to Connection->Connection status 15. Q: How to check the volume and time i used before? A: Login web browser, Go to Connection-> Connection status ->Usage History 16. Q: How to search the network manually? A: Login web browser, Go to Connection->Network, choose manual for
  • Страница 18 из 21
    Turn off your device near high-precision electronic devices. The wireless device may affect the performance of these devices. Such devices include hearing aids, pacemakers, fire alarm system, automatic gates, and other automatic devices can be affected. If you are using an electronic medical
  • Страница 19 из 21
     The wireless device may interfere with nearby TV sets, radio and PCs.  In accordance with international standards for radio frequency and radiation, use wireless device accessories approved by the manufacturer only. Traffic Safety When driving, do not use the device. When switched on, this
  • Страница 20 из 21
    Always handle this device with care and keep it in a clean and dust-free place. Do not open, dismantle or attempt to repair this device yourself. Do not drop, throw or bend this device. Do not paint it. Collection Point: This symbol on this device means that these products must be taken to
  • Страница 21 из 21