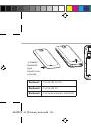
Инструкция для ARCHOS 45 Platinum

(скачивание инструкции бесплатно)
Формат файла: PDF
Доступность: Бесплатно как и все руководства на сайте. Без регистрации и SMS.
Дополнительно: Чтение инструкции онлайн
background image

72

Introduzione

Accensione

1. Premere e tenere premuto il pulsante ON/OFF per accendere il dispositivo. 

Quando si accende il dispositivo, può essere richiesto un codice PIN.

2. Digitare il codice PIN fornito con la scheda SIM.

3. Selezionare "OK".

Spegnimento

Per spegnere il dispositivo, premere e tenere premuto il pulsante ON/

OFF, e quindi selezionare Power off > OK.

Profili di notifica e audio

1. Quando il dispositivo è acceso, premere e tenere premuto il pulsante 

ON/OFF.

2. Selezionare un’opzione.

Suggerimenti: 

Il dispositivo disattiva il touch screen quando non lo si utilizza per un 

periodo determinato. Per attivare lo schermo, premere il pulsante 

ON/OFF. Per impostare la durata, andare su Settings (Impostazioni)> 

Display> Sleep (Sospensione).

Silenzioso Vibrazione

Suono

ARCHOS_45_Platinum_book.indd   72

02/08/2013   11:54:06

1
2
3
4
5
6
7
8
9
10
11
12
13
14
15
16
17
18
19
20
21
22
23
24
25
26
27
28
29
30
31
32
33
34
35
36
37
38
39
40
41
42
43
44
45
46
47
48
49
50
51
52
53
54
55
56
57
58
59
60
61
62
63
64
65
66
67
68
69
70
71
72
73
74
75
76
77
78
79
80
81
82
83
84
85
86
87
88
89
90
91
92
93
94
95
96
97
98
99
100
101
102
103
104
105
106
107
108
109
110
111
112
113
114
115
116
117
118
119
120
121
122
123
124
125
126
127
128
129
130
131
Оглавление инструкции
  • Страница 1 из 132
    EN Table of contents Package contents..........................................................................................................2 Description of the phone...........................................................................................3
  • Страница 2 из 132
    Package Contents Check your product box for the following items: -- ARCHOS 45 Platinum -- Battery -- Headset -- Micro SIM adaptor -- USB cable -- Charger -- Quick start guide -- Warranty Legal & Safety notices The items supplied with your device and available accessories may vary depending on your
  • Страница 3 из 132
    EN Description of the phone 1 Headset jack 1 2 CONFIDENTIAL AC45 PL DRAWING 2 ON/OFF button 3 Loudspeaker 4 Webcam mm scale 1:1 Rev 3 1 22-07-2013 last modification: 4 5 5 Volume buttons CONFIDENTIAL AC45 PL 3 DRAWING scale 1:1 Rev 1 mm 22-07-2013 last modification: ARCHOS_45_Platinum_book.indd 3
  • Страница 4 из 132
    last modification: Rev 1 22-07-2013 Description of the phone scale 1:1 mm DRAWING AC45 PL CONFIDENTIAL 6 Camera 6 7 Flash 7 8 Loudspeaker 9 Micro-USB port 10 Microphone 8 4 ARCHOS_45_Platinum_book.indd 4 9 10 02/08/2013 11:53:50
  • Страница 5 из 132
    EN 11 Home/Recent apps 12 Menu 13 Back TM 14 Google Search 11 12 13 14 Home/Recent apps: short press to return to the Home screen; double press to open the list of recent applications. Menu: open the list of options available on the current screen. Back: return to the previous screen. GoogleTM
  • Страница 6 из 132
    Assembling Opening 1. Use the notch to remove the back cover. Do not bend or twist the back cover excessively. Doing so may damage the cover. 2. Remove the battery. Inserting SIM cards For your 3G SIM card, slide it facing downwards in the 2G/3G slot (slot 1). For your standard SIM card, slide it
  • Страница 7 из 132
    e bottom casing Picture to show how to insert the battery pack Picture to show how to removed the bottom casing Picture to show the scards position Picture to show how to insert the battery pack EN Slot3 Slot2 Slot1 Lift the back cover using the notch Slot1 2G/3G SIM card Slot2 2G SIM card Slot3
  • Страница 8 из 132
    Getting started Turn ON 1. Press and hold the ON/OFF button to turn on the device. When you turn on your device, a PIN code may be requested. 2. Type the PIN code supplied with your SIM card. Beware of typing a wrong PIN code. 3. Select ‘OK’. Turn OFF To turn off your device, press and hold the
  • Страница 9 из 132
    EN Through the wizard The first time you start up your ARCHOS, the installation wizard will help you set up your device: -- Language -- Date & time -- WiFi connection -- Location service options Touch screen actions: Tap: touch once to select or launch a menu, option, or application. Tap and hold:
  • Страница 10 из 132
    3G & WiFi connection 3G connection With your 3G SIM card, you should be connected to the Internet without any further setup. The ARCHOS will only have signal if you are in an area covered by your 3G provider’s 3G or EDGE network. When connected to the 3G network, the 3G icon is displayed in the
  • Страница 11 из 132
    EN WiFi connection WARNING: Make sure that you are in a WiFi zone. You can access the WiFi settings quickly from the status bar. 1. Drag down the status bar. The status dashboard is displayed. 2. Touch the “Settings” icon to open the settings menu. 3. In the “Wireless & networks”section, if the
  • Страница 12 из 132
    Google & Contacts Adding a Google account A Google account lets you take full advantage of any Google apps and services that you may want to use. > “Accounts” > “Add account”. 1. Go to “Settings” 2. Select the account type “Google” to add. 3. Follow the onscreen instructions to enter information
  • Страница 13 из 132
    EN Saving your contacts When your contacts are saved, they are always available on the web and can be synced to any Android phone that’s set up with your Google account. 1. Install the SIM card with your contacts in your phone. 2. From a Home or All Apps screen, select the People app . 3. Touch the
  • Страница 14 из 132
    Hints & tips with AndroidTM The extended home screen: Navigate between different home screen panels by swiping left and right. Home button Short press the Home button to go back to the main screen. Double press the Home button to display all the apps you have opened. Swipe any app left or right to
  • Страница 15 из 132
    EN Creating application folders: Drop one app icon over another on a home screen and the two icons will be combined. Widgets: Touch the “All Apps” icon on your home screen. Touch “Widgets” at the top of the screen. From the main Widget screen, you can move around widgets just as you do for app
  • Страница 16 из 132
    Troubleshooting 16 My phone is frozen or cannot switch on Check the battery contacts, remove and reinstall your battery, then turn your phone on. Check the battery power level, charge for at least 20 minutes. My phone cannot connect to a network or “No service” is displayed Try connecting in
  • Страница 17 из 132
    Table des matières FR Contenu de la boîte.....................................................................................................18 Description du téléphone.........................................................................................19
  • Страница 18 из 132
    Contenu de la boîte Vérifiez que les éléments ci-dessous sont présents dans la boîte : -- ARCHOS 45 Platinum -- Batterie -- Kit piéton -- Adaptateur pour Micro SIM -- Câble USB -- Chargeur -- Guide d’utilisation rapide -- Guide des garanties et des mentions légales Il se peut que les éléments
  • Страница 19 из 132
    Description du téléphone FR 1 Prise kit piéton 1 2 CONFIDENTIAL AC45 PL DRAWING 2 Bouton ON/OFF 3 Haut-parleur 4 Caméra frontale mm scale 1:1 Rev 3 1 22-07-2013 last modification: 4 5 5 Boutons de volume CONFIDENTIAL AC45 PL 19 DRAWING scale 1:1 Rev 1 mm 22-07-2013 last modification:
  • Страница 20 из 132
    last modification: Rev 1 22-07-2013 Description du téléphone scale 1:1 mm DRAWING AC45 PL CONFIDENTIAL 6 Caméra 6 7 Flash 7 8 Haut-parleur 9 Port Micro-USB 10 Micro 8 20 ARCHOS_45_Platinum_book.indd 20 9 10 02/08/2013 11:53:55
  • Страница 21 из 132
    FR 11 Accueil/Applications récentes 12 Menu 13 Retour TM 14 Google Search 11 12 13 14 Accueil/Applications récentes : appui court pour retourner à l’écran d’accueil. Appuyez deux fois successivement pour afficher les applications ouvertes. Menu : affiche une liste d’options disponibles pour un
  • Страница 22 из 132
    Assemblage 22 Ouvrir 1. Utilisez l’encoche pour enlever la coque arrière. Ne pas déformer ou plier la coque arrière excessivement au risque de l’endommager. 2. Enlevez la batterie. Insérer les cartes SIM Pour la carte SIM 3G, glissez-la dans l’emplacement 2G/3G en orientant la face magnétique vers
  • Страница 23 из 132
    e bottom casing Picture to show how to insert the battery pack Picture to show how to removed the bottom casing Picture to show the scards position Picture to show how to insert the battery pack FR Slot3 Slot2 Slot1 Utilisez l’encoche pour enlever la coque arrière Emplacement1 carte SIM 2G/3G
  • Страница 24 из 132
    Mise en route Allumer 1. Faites un appui long sur le bouton ON/OFF pour allumer votre appareil. Lorsque vous allumez votre appareil, il se peut qu’un code PIN vous soit demandé. 2. Saisissez le code PIN de votre carte SIM. Attention : assurez-vous de saisir le bon code PIN. 3. Sélectionnez ‘OK’.
  • Страница 25 из 132
    FR Assistant de démarrage La première fois que vous allumez votre téléphone, l’assistant de démarrage vous permet de le paramétrer : -- Langue -- Date & heure -- Connexion WiFi -- Les options du service de localisation Utilisation de l’écran tactil Appuyer: appuyez une fois pour sélectionner ou
  • Страница 26 из 132
    Connexions 3G & WiFi Connexion 3G Avec votre carte SIM 3G, vous devrez pouvoir vous connecter à Internet sans aucun paramètrage supplémentaire. Votre téléphone n’aura de signal que si vous êtes dans une zone de réseau 3G/EDGE couverte par votre opérateur 3G. Lorsque vous êtes connectés au réseau
  • Страница 27 из 132
    FR Connexion WiFi ATTENTION : assurez-vous d’être dans une zone WiFi. Vous pouvez accéder rapidement aux paramètres WiFi à partir de la barre de statuts. 1. Tirez vers le bas la barre de statuts. Le panneau des statuts s’affiche. 2. Sélectionnez "Paramètres" pour afficher la page des paramètres
  • Страница 28 из 132
    Compte Google & Contacts Ajouter un compte Google Un compte Google vous permet de profiter au maximum des applications et des services Google que vous pourriez utiliser. > “Comptes” > “Ajouter compte”. 1. Sélectionnez “Paramètres” 2. Sélectionnez “Google” pour le type de compte à ajouter. 3. Suivez
  • Страница 29 из 132
    FR Sauvegarder vos contacts Tous vos contacts sont disponibles sur le Web et peuvent être synchronisés sur n’importe quel téléphone Android paramétré avec votre compte Google. 1. Insérer votre carte SIM incluant vos contacts dans votre téléphone. 2. A partir de l’écran d’Accueil ou de l’écran
  • Страница 30 из 132
    Trucs & Astuces avec AndroidTM L’écran d’accueil étendu : Naviguez entre les différents écrans d’accueil en faisant glisser votre doigt vers la gauche ou vers la droite. Bouton Accueil Appui court pour retourner à l’écran d’accueil. Appuyez deux fois successivement pour afficher les applications
  • Страница 31 из 132
    FR Créer des dossiers d’applications : A partir d’un écran d’accueil, déposez une icône sur une autre pour les rassembler. Widgets : Sélectionnez l’icône Toutes les applications. Sélectionnez Widgets en haut de l’écran. A partir de l’écran d’accueil des widgets, vous pouvez déplacer les widgets de
  • Страница 32 из 132
    Dépannage 32 Mon téléphone ne répond pas ou ne s’allume pas Vérifiez que la batterie est bien en place. Enlevez la batterie puis remettez-la en place et rallumez le téléphone. Vérifiez la charge de la batterie et chargez le téléphone pendant 20 minutes minimum. Mon téléphone ne se connecte pas au
  • Страница 33 из 132
    Inhaltsverzeichnis Verpackungsinhalt........................................................................................................34 DE Beschreibung des Geräts............................................................................................35
  • Страница 34 из 132
    Verpackungsinhalt In der Verpackung müssen folgende Elemente enthalten sein: -- ARCHOS 45 Platinum -- Batterie -- Headset -- Micro-SIM-Adapter -- USB-Kabel -- Ladegerät -- Benutzerhandbuch -- Garantie, Impressum und Sicherheitshinweise Die mit Ihrem Gerät mitgelieferten Elemente und das verfügbare
  • Страница 35 из 132
    Beschreibung des Geräts 1 Kopfhöreranschluss 1 2 DE CONFIDENTIAL AC45 PL DRAWING 2 EIN/AUS-Taste 3 Lautsprecher 4 Webcam mm scale 1:1 Rev 3 1 22-07-2013 last modification: 4 5 5 Lautstärketasten CONFIDENTIAL AC45 PL 35 DRAWING scale 1:1 Rev 1 mm 22-07-2013 last modification:
  • Страница 36 из 132
    last modification: Rev 1 22-07-2013 Beschreibung des Geräts scale 1:1 mm DRAWING AC45 PL 7 Blitzlicht 8 Lautsprecher CONFIDENTIAL 6 Kamera 6 7 9 Micro-USB-Anschluss 10 Mikrofon 8 36 ARCHOS_45_Platinum_book.indd 36 9 10 02/08/2013 11:53:58
  • Страница 37 из 132
    11 Home/Letzte Apps DE 12 Menu (Menü) 13 Back (Zurück) TM 14 Google Suche 11 12 13 14 Home/Letzte Apps: Kurz drücken, um zum Homescreen zu gelangen; drücken und halten, um eine Liste der letzten Apps zu öffnen. Menü: Öffnet die Liste verfügbarer Optionen für den aktuellen Bildschirm. Zurück: Zurück
  • Страница 38 из 132
    Montage Öffnen 1. Entfernen Sie die Rückseitenabdeckung. Die Rückseitenabdeckung nicht übermäßig biegen oder verdrehen. Die Abdeckung kann sonst beschädigt werden. 2. Entfernen Sie den Akku. Einlegen von SIM-Karten Um Ihre 3G SIM-Karte einzuführen, diese mit der Vorderseite nach unten in den
  • Страница 39 из 132
    e bottom casing Picture to show how to insert the battery pack Picture to show how to removed the bottom casing Picture to show the scards position Picture to show how to insert the battery pack DE Slot3 Slot2 Slot1 Heben Sie die Rückabdeckung mithilfe der Einkerbung an Slot1 2G/3G-SIM-Karte Slot2
  • Страница 40 из 132
    Erste Schritte Einschalten 1. Drücken und halten Sie die EIN/AUS-Taste, um das Gerät einzuschalten. Beim Einschalten des Geräts muss eine PIN-Nummer eingegeben werden. 2. Geben Sie die mit Ihrer SIM-Karte erhaltene PIN-Nummer ein. 3. Wählen Sie ‘OK’. Ausschalten Um das Gerät auszuschalten, drücken
  • Страница 41 из 132
    Installationsassistent Wenn Sie Ihren ARCHOS das erste Mal in Betrieb nehmen, leitet Sie der Installationsassistent durch einige Bildschirme, um Ihnen dabei zu helfen, die grundlegenden Einstellungen vorzunehmen: -- Sprache -- Datum & Uhrzeit -- WLAN Verbindung -- Standortdienst DE
  • Страница 42 из 132
    3G- & WLAN-Verbindung 3G Mit Ihrer 3G-SIM-Karte sollten Sie ohne weitere Einstellungen mit dem Internet verbunden sein. Beachten Sie, dass der ARCHOS nur dann ein Signal erhält, wenn Sie sich im Bereich des 3G- oder EDGE-Netzwerks Ihres 3G-Anbieters befinden. Ist das Gerät mit dem 3G-Netzwerk
  • Страница 43 из 132
    WLAN ACHTUNG: Stellen Sie sicher, dass Sie sich innerhalb einer WiFi(WLAN)Zone aufhalten. Von der Statusleiste aus können Sie schnell auf die WiFi (WLAN)-Einstellungen zugreifen. 1. Ziehen Sie die Statusleiste herunter. Das Status-Dashboard wird angezeigt. 2. Berühren Sie “Einstellungen”, um das
  • Страница 44 из 132
    Google-Konten & Kontakte Google-Konto hinzufügen Mit einem Google-Konto können Sie Ihre Google-Apps und Dienste in vollem Umfang nutzen. 1. Gehen Sie zu "Settings" > "Accounts" > "Add account" ("Einstellungen" > "Konten & Synchronisierung" > "Konto hinzufügen"). 2. Wählen Sie für das hinzuzufügende
  • Страница 45 из 132
    Speicherung Ihrer Kontakte Alle Ihre Kontakte sind im Web immer verfügbar und können mit jedem Android-Telefon synchronisiert werden, das mit dem gleichen GoogleKonto eingerichtet ist. 1. Legen Sie die SIM-Karte mit Ihren Kontakten in Ihr Telefon ein. 2. Wählen Sie vom Bildschirm „Home“ oder „All
  • Страница 46 из 132
    AndroidTM kennenlernen Der erweiterte Startbildschirm: Wechseln Sie durch Wischen nach links und rechts zwischen verschiedenen «Home»-Bildschirmen. Home-Taste Kurz drücken, um zum Startbildschirm zu gelangen. Doppeltippen, um eine Liste der neuesten Anwendungen zu öffnen. Ein Element vom
  • Страница 47 из 132
    Anwendungsordner erstellen: Ziehen Sie auf einem Startbildschirm ein Anwendungssymbol über ein anderes. Die beiden Symbole werden kombiniert. Widgets: Berühren Sie das «Alle Apps»-Symbol auf dem Startbildschirm. Berühren Sie «Widgets» oben auf dem Bildschirm. Auf dem «Widgets»Hauptbildschirm können
  • Страница 48 из 132
    Fehlerbehebung 48 Mein Telefon ist abgestürzt oder es kann nicht eingeschaltet werden Die Akkukontakte überprüfen, den Akku herausnehmen und wieder einlegen und das Telefon einschalten. Den Ladezustand des Akkus überprüfen und mindestens 20 Minuten aufladen. Mein Telefon kann nicht mit einem
  • Страница 49 из 132
    Índice Contenido de la caja.....................................................................................................50 Descripción del dispositivo........................................................................................51
  • Страница 50 из 132
    Contenido de la caja Compruebe que la caja del producto incluya los elementos siguientes: -- ARCHOS 45 Platinum -- Batería -- Headset -- Micro SIM Adaptador -- USB cable -- Cargador -- Guía de usuario -- Avisos de garantía, legales y de seguridad Los elementos suministrados con su dispositivo y los
  • Страница 51 из 132
    Descripción del dispositivo 1 Conector de headset 1 2 CONFIDENTIAL AC45 PL DRAWING 2 Botón ON/OFF 3 Altavoz 4 Webcam ES 3 mm scale 1:1 Rev 1 22-07-2013 last modification: 4 5 5 Botones de volumen CONFIDENTIAL AC45 PL 51 DRAWING scale 1:1 Rev 1 mm 22-07-2013 last modification:
  • Страница 52 из 132
    last modification: Rev 1 22-07-2013 Descripción del dispositivo scale 1:1 mm DRAWING AC45 PL CONFIDENTIAL 6 Camera 6 7 Flashlight 7 8 Altavoz 9 Puerto micro USB 10 Micrófono 8 52 ARCHOS_45_Platinum_book.indd 52 9 10 02/08/2013 11:54:01
  • Страница 53 из 132
    11 Inicio/ Aplicaciones recientes ES 12 Menú 13 Volver TM 14 Google Search 11 12 13 14 Inicio/Apps recientes: una pulsación breve para volver a la pantalla de inicio; doble pulsación para abrir la lista de aplicaciones recientes. Menú: muestra la lista de opciones disponibles de la pantalla actual.
  • Страница 54 из 132
    Ensamblado Abrir 1. Quite la cubierta posterior. No doble ni fuerce excesivamente la cubierta posterior ya que podría dañarla. 2. Extraiga la batería. Insertar tarjetas SIM Para insertar una tarjeta SIM 3G, introduzca la tarjeta boca abajo en la ranura 2G/3G (ranura 1). Para insertar una tarjeta
  • Страница 55 из 132
    e bottom casing Picture to show how to insert the battery pack Picture to show how to removed the bottom casing Picture to show the scards position Picture to show how to insert the battery pack ES Slot3 Slot2 Slot1 Levante la cubierta posterior utilizando la muesca Ranura1 Tarjeta SIM 2G/3G
  • Страница 56 из 132
    Utilización por primera vez Encendido 1. Mantenga pulsado el botón ON/OFF para encender el dispositivo. Al encender el dispositivo, se le pedirá que introduzca un código PIN. 2. Introduzca el código PIN suministrado con su tarjeta SIM. 3. Haga clic en “OK” [Aceptar]. Apagado Para apagar el
  • Страница 57 из 132
    Asistente de inicio La primera vez que encienda el ARCHOS, el asistente de instalación le ayudará a configurar el dispositivo : -- Idioma -- Fecha y hora -- Conexión WiFi -- El servicio de ubicación ES Acciones de la pantalla táctil Pulsar: Con los dedos, toque una vez para seleccionar o lanzar un
  • Страница 58 из 132
    Conexión 3G & WiFi Conexión 3G Con su tarjeta SIM 3G debería poder conectarse a Internet sin ninguna otra configuración adicional. El ARCHOS podrá conectarse siempre que se encuentre en la zona de cobertura de su proveedor 3G o red EDGE. Al conectarse a la red 3G, aparecerá el icono 3G en la barra
  • Страница 59 из 132
    Conexión WiFi Asegúrese de que se encuentra en una zona WiFi. Puede acceder a los ajustes de WiFi rápidamente desde la barra de estado. ES 1. Arrastre hacia abajo la barra de estado. Aparecerá el panel de control del estado. 2. Toque “Ajustes” para abrir el menú de ajustes de WiFi. 3. En la sección
  • Страница 60 из 132
    Cuenta de Google & Contactos Añadir una cuenta de Google La cuenta de Google le permite aprovechar al máximo cualquier aplicación o servicio de Google que desee utilizar. 1. Vaya a “Settings” [Ajustes] > “Accounts” [Cuentas] > “Add account” [Añadir cuenta]. 2. En tipo de cuenta, seleccione
  • Страница 61 из 132
    Guardar sus contactos Todos sus contactos están disponibles en todo momento en la web y pueden sincronizarse con cualquier teléfono Android configurado con la misma cuenta de Google. 1. Inserte la tarjeta SIM con sus contactos. 2. Desde la pantalla de Inicio o Todas las aplicaciones, seleccione la
  • Страница 62 из 132
    Para familiarizarse con AndroidTM La pantalla de inicio ampliada: Desplácese entre distintos paneles de la pantalla de inicio deslizando el dedo a la izquierda y la derecha. Desplazamiento de un elemento de la pantalla de inicio: Mantenga el dedo sobre él hasta que aparezcan líneas de cuadrícula de
  • Страница 63 из 132
    Creación de carpetas de aplicaciones: Deje caer un icono de aplicación sobre otro en una pantalla de inicio y los dos iconos se combinarán. Widgets: Toque el icono odas las aplicaciones en la pantalla de inicio. Toque Widgets en la parte superior de la pantalla. En la pantalla Widgets principal,
  • Страница 64 из 132
    Resolución de problemas 64 Mi teléfono está bloqueado o no lo puedo encender Verifique los contactos de la batería, retire y vuelva a colocar la batería y luego encienda de nuevo el teléfono. Compruebe el nivel de carga de la batería, recárguela durante al menos 20 minutos. Mi teléfono no puede
  • Страница 65 из 132
    Sommario Contenuto della confezione......................................................................................66 Descrizione del dispositivo........................................................................................67
  • Страница 66 из 132
    Contenuto della confezione Assicurarsi della presenza dei seguenti articoli nella confezione: -- ARCHOS 45 Platinum -- Batteria -- Cuffia -- Adattatore Micro SIM -- Cavo USB -- Caricatore -- Guida dell’utente -- Garanzia, note legali e sulla sicurezza Gli articoli forniti con il dispositivo e gli
  • Страница 67 из 132
    Descrizione del dispositivo 1 Jack per auricolare 1 2 CONFIDENTIAL AC45 PL DRAWING 2 Pulsante ON/OFF 3 Altoparlanti 4 Webcam mm scale 1:1 Rev 3 1 22-07-2013 last modification: 4 IT 5 5 Pulsanti per il volume CONFIDENTIAL AC45 PL 67 DRAWING scale 1:1 Rev 1 mm 22-07-2013 last modification:
  • Страница 68 из 132
    last modification: Rev 1 Descrizione del dispositivo scale 1:1 22-07-2013 mm DRAWING AC45 PL CONFIDENTIAL 6 Fotocamera 6 7 Flash 7 8 Altoparlanti 9 Porta micro-USB 10 Microfono 8 68 ARCHOS_45_Platinum_book.indd 68 9 10 02/08/2013 11:54:04
  • Страница 69 из 132
    11 Home/App recenti 12 Menu IT 13 Indietro TM 14 Google Search 11 12 13 14 Home/App recenti: Premere brevemente per tornare alla schermata principale; premere due volte per aprire l'elenco delle applicazioni recenti. Menu: Aprire la lista di opzioni disponibili sulla schermata corrente. Indietro:
  • Страница 70 из 132
    Assemblaggio Apertura 1. Rimuovere la copertura posteriore. Non piegare o torcere eccessivamente la copertura posteriore. Si potrebbe danneggiare. 2. Rimuovere la batteria. Inserimento schede SIM Per inserire la scheda SIM 3G, farla scorrere rivolta verso il basso e inserirla nello slot 2G/3G (slot
  • Страница 71 из 132
    e bottom casing Picture to show how to insert the battery pack Picture to show how to removed the bottom casing Picture to show the scards position Picture to show how to insert the battery pack Slot3 Slot2 Slot1 IT Sollevare la copertura posteriore facendo leva sulla tacca Slot1 Scheda SIM 2G/3G
  • Страница 72 из 132
    Introduzione Accensione 1. Premere e tenere premuto il pulsante ON/OFF per accendere il dispositivo. Quando si accende il dispositivo, può essere richiesto un codice PIN. 2. Digitare il codice PIN fornito con la scheda SIM. 3. Selezionare "OK". Spegnimento Per spegnere il dispositivo, premere e
  • Страница 73 из 132
    Installazione guidata La prima volta che si avvia ARCHOS, il wizard di installazione aiuterà ad installare il dispositivo : -- Lingua -- Data e ora -- Connessione WiFi -- Il servizio di localizzazione IT Azioni sul touch screen Tocco (Tap): Toccare una volta per selezionare o avviare un menu,
  • Страница 74 из 132
    Connessione 3G & WiFi Connessione 3G Con la scheda SIM 3G, si dovrebbe essere connessi a Internet senza alcuna ulteriore configurazione. Il dispositivo ARCHOS riceverà il segnale solo se si trova in una zona coperta dalla rete 3G o EDGE del proprio provider 3G. Quando è collegato alla rete 3G,
  • Страница 75 из 132
    Connessione WiFi ATTENZIONE: Accertarsi di essere in una zona coperta da WiFi. È possibile accedere rapidamente alle impostazioni WiFi dalla barra di stato. 1. Trascinare verso il basso la barra di stato. Viene visualizzato il dashboard di stato. 2. Selezionare “Impostazioni” per aprire il menù
  • Страница 76 из 132
    Account Google e contatti Aggiunta di un account Google Un account Google consente di sfruttare al meglio tutte le applicazioni e i servizi di Google che è possibile utilizzare. 1. Andare a "Impostazioni" > "Account"> "Aggiungi account". 2. Selezionare il tipo di account "Google" da aggiungere. 3.
  • Страница 77 из 132
    Salvataggio dei contatti Tutti i propri contatti sono sempre disponibili sul web e possono essere sincronizzati con qualsiasi telefono Android che è impostato con lo stesso account Google. 1. Installare la scheda SIM con i contatti presenti nel telefono. IT 2. Da una schermata Home o Tutte le
  • Страница 78 из 132
    Conoscere AndroidTM Schermata iniziale estesa: Navigare tra i vari pannelli della schermata iniziale sfiorando da sinistra o destra. Pulsante Home Premere brevemente per tornare alla schermata principale. Doppio tocco per aprire l’elenco delle applicazioni recenti. Spostare una voce della schermata
  • Страница 79 из 132
    Creare cartelle di applicazioni: Lasciare un’icona di applicazione su un’altra icona della schermata iniziale e le due icone si combineranno. Widget: Selezionare l’icona Tutte le applicazioni della schermata iniziale. Toccare i Widget sulla parte superiore dello schermo. Dalla schermata principale
  • Страница 80 из 132
    Risoluzione dei problemi Il telefono è bloccato o non si accende Controllare i contatti della batteria, rimuovere e reinstallare la batteria, quindi accendere il telefono. Controllare il livello di carica della batteria, caricare per almeno 20 minuti. Il mio telefono non riesce a connettersi a una
  • Страница 81 из 132
    Inhoudsopgave Inhoud van de verpakking.........................................................................................82 Beschrijving van het apparaat..................................................................................83
  • Страница 82 из 132
    Inhoud van de verpakking Controleer of de volgende onderdelen in de verpakking zitten: -- ARCHOS 45 Platinum -- Batterij -- Headset -- Micro SIM-adapter -- USB-kabel -- Lader -- Gebruikershandleiding -- Garantie, wettelijke mededelingen en veiligheidsvoorschriftem De onderdelen die bij het apparaat
  • Страница 83 из 132
    Beschrijving van het apparaat 1 Aansluiting voor headset 2 AAN/UIT-knop 3 Luidspreker 4 Webcam 5 Volumeknoppen 1 2 CONFIDENTIAL AC45 PL DRAWING mm scale 1:1 Rev 3 1 22-07-2013 last modification: 4 5 NL CONFIDENTIAL AC45 PL 83 DRAWING scale 1:1 Rev 1 mm 22-07-2013 last modification:
  • Страница 84 из 132
    last modification: Rev 1 22-07-2013 Beschrijving van het apparaat scale 1:1 mm DRAWING AC45 PL CONFIDENTIAL 6 Camera 6 7 Flits 7 8 Luidspreker 9 Micro-USB-poort 10 Microfoon 8 84 ARCHOS_45_Platinum_book.indd 84 9 10 02/08/2013 11:54:08
  • Страница 85 из 132
    11 Home/Recente apps 12 Menu 13 Vorige TM 14 Google Search 11 12 13 14 NL Home/Recente apps: kort indrukken om terug te keren naar het beginscherm. Dubbelklikken om het overzicht van recente toepassingen weer te geven. Menu: de lijst met menu-opties van het huidige scherm weergeven. Vorige: terug
  • Страница 86 из 132
    Montage Openen 1. Verwijder de achterklep. De achterklep niet buigen of knikken. Anders kunt u de achterklep beschadigen. 2. Verwijder de batterij. SIM-kaarten plaatsen Schuif de 3G SIM-kaart met de voorkant naar beneden in de 2G/3G-sleuf (sleuf 1). Schuif de standaard SIM-kaart met de voorkant
  • Страница 87 из 132
    e bottom casing Picture to show how to insert the battery pack Picture to show how to removed the bottom casing Picture to show the scards position Picture to show how to insert the battery pack Slot3 Slot2 Slot1 NL breng de achterklep voorzichtig omhoog via de inkeping. Sleuf1 2G/3G SIM-kaart
  • Страница 88 из 132
    Aan de slag Inschakelen 1. Houd de AAN/UIT-knop ingedrukt om het apparaat in te schakelen. Mogelijk moet u een pincode invoeren nadat u het apparaat heeft ingeschakeld. 2. Voer de pincode in die is meegeleverd bij uw SIM-kaart. 3. Kies ‘OK’. Uitschakelen Om het apparaat uit te schakelen, houdt u de
  • Страница 89 из 132
    Installatiewizard De eerste keer dat u uw ARCHOS inschakelt, zal de installatiewizard u helpen bij het instellen van uw apparaat : -- Taal -- Datum en tijd -- WiFi-verbinding -- De locatieservice Schermbediening NL Tikken: Eenmaal tikken om een menu, optie of toepassing te kiezen of te starten.
  • Страница 90 из 132
    3G- & WiFi-verbinding 3G-verbindung Via uw 3G SIM-kaart kunt u automatisch verbinding maken met het internet. De ARCHOS heeft alleen signaal in een gebied met dekking door uw 3G-aanbieder of EDGE-netwerk. Wanneer u bent verbonden met het 3G-netwerk wordt het 3G-pictogram weergegeven in de
  • Страница 91 из 132
    WiFi-verbindung WAARSCHUWING: Zorg ervoor dat u zich in een WiFi-zone bevindt. U kunt snel toegang tot de WiFi-instellingen krijgen vanaf de statusbalk. 1. Sleep de statusbalk naar beneden. De statusinformatie wordt weergegeven. 2. Tik op "Instellingen" om het menu WiFiNL instellingen te openen. 3.
  • Страница 92 из 132
    Google account & Contacten Een Google account toevoegen Met een Google account kunt u het meeste uit uw Google apps en voorzieningen halen. > “Accounts” > “Add account” [Account 1. Ga naar“Settings” [Instellingen] toevoegen]. 2. Kies het accounttype "Google" om toe te voegen. 3. Volg de
  • Страница 93 из 132
    Contacten opslaan Uw contacten zijn altijd beschikbaar op internet en kunnen worden gesynchroniseerd met alle Android-telefoons die via hetzelfde Googleaccount zijn geconfigureerd. 1. Plaats de SIM-kaarten met uw contacten in uw telefoon. 2. In het beginscherm of in het scherm "Alle Apps" kiest u
  • Страница 94 из 132
    Vertrouwd raken met AndroidTM 94 Het uitgebreide startscherm: Navigeren tussen de verschillende startschermpanelen door er van links en rechts overheen te vegen. Home-knop: Kort indrukken om terug te keren naar het beginscherm. Dubbel tikken om het overzicht van recente toepassingen weer te geven.
  • Страница 95 из 132
    Het aanmaken van applicatiemappen: Plaats op een startscherm het ene app-pictogram op het andere, en de twee pictogrammen worden gecombineerd. Widgets: Tik in uw startscherm op het pictogram Alle apps. Tik op Widgets aam de bovenkant van het scherm. Vanaf het Widgets-hoofdscherm kunt u NL widgets
  • Страница 96 из 132
    Probleemoplossing Mijn telefoon doet niets meer of kan niet worden ingeschakeld Controleer de batterijcontacten, verwijder de batterij en plaats de batterij weer terug en zet dan uw telefoon aan. Controleer uw batterijlading en laad de batterij ten minste 20 minuten lang op. Mijn telefoon kan geen
  • Страница 97 из 132
    Índice Conteúdo da embalagem........................................................................................98 Descrição do dispositivo..........................................................................................99
  • Страница 98 из 132
    Conteúdo da embalagem Verifique se tem os seguintes itens na embalagem do seu produto: -- ARCHOS 45 Platinum -- Bateria -- Headset -- Micro adaptador de SIM -- Cabo USB -- Carregador -- Guia do usuário -- Garantia, avisos legais e de segurança Os itens fornecidos com o seu dispositivo e os
  • Страница 99 из 132
    Descrição do dispositivo 1 Entrada do auricular 1 2 CONFIDENTIAL AC45 PL DRAWING 2 Ligar/desligar 3 Coluna 4 Webcam mm scale 1:1 Rev 3 1 22-07-2013 last modification: 4 5 PT 5 Botões de volume CONFIDENTIAL AC45 PL 99 DRAWING scale 1:1 Rev 1 mm 22-07-2013 last modification:
  • Страница 100 из 132
    last modification: Rev 1 22-07-2013 Descrição do dispositivo scale 1:1 mm DRAWING AC45 PL CONFIDENTIAL 6 Câmara 7 Flashlight 8 Coluna 9 Porta Micro-USB 6 7 10 Microfone 8 100 ARCHOS_45_Platinum_book.indd 100 9 10 02/08/2013 11:54:11
  • Страница 101 из 132
    11 Início/aplicações recentes 12 Menu 13 Voltar TM 14 Google Search 11 12 13 14 PT Início/aplicações recentes: prima momentaneamente para voltar ao ecrã principal. Prima duas vezes para abrir uma lista com as aplicações recentes. Menu: abrir a lista de opções disponíveis no presente ecrã. Voltar:
  • Страница 102 из 132
    Montagem Abrir 1. Remova a tampa traseira. Não dobre ou torça a tampa traseira em demasia. Isso pode danificar a tampa. 2. Remover a bateria. Inserir cartões SIM Para introduzir o seu cartão SIM 3G, deslize-o com a face virada para baixo na direção da ranhura 2G/3G (ranhura 1). Para introduzir o
  • Страница 103 из 132
    e bottom casing Picture to show how to insert the battery pack Picture to show how to removed the bottom casing Picture to show the scards position Picture to show how to insert the battery pack Slot3 Slot2 Slot1 e levante levemente capa traseira com o encaixe. PT Ranhura1 Cartão SIM 2G/3G Ranhura2
  • Страница 104 из 132
    Preparação Ligar 1. Mantenha premido o botão ligar/desligar para ligar o dispositivo. Pode ser solicitado o código PIN quando liga o seu dispositivo. 2. O código PIN é fornecido com o seu cartão SIM. 3. Selecione "OK". Desligar 1. Mantenha premido o botão ligar/desligar para ligar o dispositivo e
  • Страница 105 из 132
    Assistente de instalação Quando iniciar o ARCHOS pela primeira vez, o assistente de instalação irá ajudá-lo a configurar o seu aparelho: -- Idioma -- Data e hora -- Rede WiFi -- Minha localização Ações no ecrã tátil Tocar: Toque uma vez para selecionar ou abrir um menu, opção ou aplicação. Tocar e
  • Страница 106 из 132
    Ligação 3G & WiFi Ligação 3G Se possuir um cartão SIM 3G, é possível estabelecer ligação à Internet sem passos adicionais. O ARCHOS terá sinal apenas se a área tiver cobertura 3G ou EDGE por parte da sua operadora móvel. Enquanto estiver ligado à rede 3G, o ícone 3G será exibido na barra de
  • Страница 107 из 132
    Ligação WiFi AVISO: Certifique-se de que se encontra numa zona WiFi. Pode aceder rapidamente às definições WiFi a partir da barra do estado. 1. Arrasta a barra de estados para baixo. É exibido o painel de controlo dos estados. 2. Toque em “Definições” para abrir o menu de definições WiFi. 3. Na
  • Страница 108 из 132
    Ecrã da conta Google e contactos Adicionar uma conta Google Uma conta Google garante-lhe o uso de todas as aplicações e serviços Google. 1. Vá a "Settings" (Definições) > “Accounts” (Contas) > “Add account” (Adicionar conta). 2. Selecione “Google” como tipo de conta. 3. Realize os passos que
  • Страница 109 из 132
    Guardar os seus contactos Os contactos ficam sempre disponíveis na Web e podem ser sincronizados com qualquer dispositivo Android configurado com a mesma conta Google. 1. Introduza no dispositivo o cartão SIM que contém os seus contactos. 2. A partir do ecrã principal ou do ecrã de todos os
  • Страница 110 из 132
    Familiarizar-se com AndroidTM O ecrã inicial alargado: Navegue entre os diferentes painéis do ecrã inicial movendo-os para a esquerda e para a direita. Botão Principal: Prima momentaneamente para voltar ao ecrã principal. Toque duplo para abrir uma lista com as aplicações recentes. Mover um item do
  • Страница 111 из 132
    Criar pastas de aplicações: Largue o ícone de uma aplicação sobre outro num ecrã inicial e os dois ícones ficarão combinados. Widgets: Toque no ícone Todas as aplicações no seu ecrã inicial. Toque em Widgets no topo do ecrã. A partir do ecrã Widgets principal, pode movimentar os widgets da mesma
  • Страница 112 из 132
    Resolução de problemas O meu telemóvel está bloqueado e não liga Verifique os contactos da bateria, remova e reinstale a bateria e ligue de novo o telemóvel. Verifique o nível de carga da bateria e ponha-a a carregar durante, pelo menos, 20 minutos. O meu telemóvel não consegue ligar-se a uma rede
  • Страница 113 из 132
    Содержание Содержимое упаковки............................................................................................114 Описание устройства..............................................................................................115
  • Страница 114 из 132
    Содержимое упаковки Проверьте, входят ли в комплект поставки следующие компоненты: -- ARCHOS 45 Platinum -- аккумулятор -- гарнитуре -- Micro SIM адаптер -- Кабель USB -- Зарядное устройство -- Краткое руководство -- Гарантии и инструкции по безопасности Компоненты, входящие в комплект поставки
  • Страница 115 из 132
    Описание устройства 1 Гнездо для гарнитуры 1 2 CONFIDENTIAL AC45 PL DRAWING 2 Кнопка включения и выключения 3 громкоговоритель 4 Веб-камера 5 Кнопки регулировки громкости mm scale 1:1 Rev 3 1 22-07-2013 last modification: 4 5 RU CONFIDENTIAL AC45 PL 115 DRAWING scale 1:1 Rev 1 mm 22-07-2013 last
  • Страница 116 из 132
    last modification: Rev 1 22-07-2013 Описание устройства scale 1:1 mm DRAWING AC45 PL CONFIDENTIAL 6 Камера 6 7 Фонарик 7 8 громкоговоритель 9 Порт micro-USB 10 Микрофон 8 116 ARCHOS_45_Platinum_book.indd 116 9 10 02/08/2013 11:54:14
  • Страница 117 из 132
    11 Главный экран/последние приложения 12 Меню 13 Назад TM 14 Поиск Google 11 12 13 14 Главный экран/последние приложения: нажмите один раз для возврата на главный экран; нажмите дважды для открытия списка последних приложений. Меню: открытие списка функций, доступных на текущем экране. Назад:
  • Страница 118 из 132
    Сборка Открытие 1. Снимите заднюю крышку. Не изгибайте и не скручивайте крышку слишком сильно. Это может привести к ее повреждению. 2. Извлеките батарею. Вставка SIM-карт Чтобы установить 3G SIM-карту, вставьте ее лицевой стороной вниз в гнездо 2G/3G (гнездо 1). Чтобы установить стандартную
  • Страница 119 из 132
    e bottom casing Picture to show how to insert the battery pack Picture to show how to removed the bottom casing Picture to show the scards position Picture to show how to insert the battery pack Slot3 Slot2 Slot1 Снимите заднюю крышку с помощью паза RU Гнездо 1 SIM-карта 2G/3G Гнездо 2 SIM-карта 2G
  • Страница 120 из 132
    Начало работы Включение 1. Нажмите и удерживайте кнопку включения и выключения, чтобы включить устройство. При включении устройства может появиться запрос на ввод PIN-кода. 2. Введите PIN-код, предоставляемый с SIM-картой. 3. Нажмите OK. Выключение Чтобы выключить устройство, нажмите и удерживайте
  • Страница 121 из 132
    Мастер настройки При первом запуске устройства ARCHOS мастер установки поможет выполнить настройку : -- Язык -- Дата и время -- Соединение Wi-Fi -- Опции службы геолокации Действия на сенсорном экране Касание: Коснитесь один раз для выбора или запуска меню, функции или приложения. RU Касание и
  • Страница 122 из 132
    Подключение 3G & Wi-Fi 3G При использовании SIM-карты 3G для подключения к сети Интернет дальнейшая настройка не требуется. Устройство ARCHOS будет принимать сигнал только в зоне покрытия сети 3G или EDGE поставщика услуг связи 3G. При подключении к сети 3G на панели состояния отображается
  • Страница 123 из 132
    Wi-Fi Убедитесь, что Вы находитесь в зоне Wi-Fi. Быстрый доступ к настройкам Wi-Fi осуществляется из строки состояния. 1. Перетащите строку состояния вниз. Будет отображена панель состояния. 2. Нажмите значок WiFi для доступа к настройкам. 3. Если модуль Wi-Fi выключен, в разделе значок Настройки
  • Страница 124 из 132
    Учетная запись Google и контакты Добавление учетной записи Google Учетная запись Google позволяет пользоваться преимуществами любых приложений и услуг Google, которые вы захотите использовать. 1. Перейдите к разделу Settings > Accounts > Add account (Настройки > Учетные записи > Добавить учетную
  • Страница 125 из 132
    Сохранение контактов Все ваши контакты в любой момент доступны в сети и могут быть синхронизированы с любым телефоном Android, настроенным на ту же учетную запись Google. 1. Установите в телефон SIM-карту, на которой записаны контакты. 2. На главном экране или экране All Apps (Все приложения)
  • Страница 126 из 132
    Знакомство с AndroidTM Расширенный домашний экран: Выполняйте переходы между различными панелями домашнего экрана, смещая их влево и вправо. Кнопка Home: Нажмите для возврата к главному экрану. Двойное касание для открытия списка последних приложений. Перемещение элемента домашнего экрана:
  • Страница 127 из 132
    Создание папок приложений: Поместите пиктограмму одного приложения поверх другого на домашнем экране, и две пиктограммы объединятся. Виджеты: Прикоснитесь к пиктограмме «Все приложения» на домашнем экране. Прикоснитесь к позиции Widgets в верхней части экрана. На основном экране Widgets можно
  • Страница 128 из 132
    Устранение неполадок Телефон не реагирует на действия или не включается Проверьте контакты аккумулятора, извлеките и повторно установите аккумулятор, затем снова включите телефон. Проверьте уровень заряда аккумулятора, выполните зарядку в течение не менее 20 минут. Не удается подключить телефон не
  • Страница 129 из 132
    Open Source Software Offer The software bundled with this product includes software files subject to certain open source license requirements. Such open source software files are subject solely to the terms of the relevant open source software license. Such open source software is provided on an
  • Страница 130 из 132
    National restrictions This device is intended for home and office use in all EU countries (and other countries following the EU directive 1999/5/EC) without any limitation except for the countries mentioned below: Country Restriction Reason/remark Bulgaria None General authorization required for
  • Страница 131 из 132
    Russian Federation None Only for indoor applications Note: Frequency 2454-2483.5MHZ are restricted to indoor use in France. Consult the declaration of conformity on http://www.archos.com/products/declaration_conformity.html SAR After the labortory measurement, this mobile phone SAR value is: MAX
  • Страница 132 из 132