Инструкция для ARISTON Diamond 7OFD 610

(скачивание инструкции бесплатно)
Формат файла: PDF
Доступность: Бесплатно как и все руководства на сайте. Без регистрации и SMS.
Дополнительно: Чтение инструкции онлайн
background image

12

GB

detergent, then rinse well and dry with a soft cloth. Do 

not use abrasive products.

•  All accessories can be washed like everyday crockery, 

and are even dishwasher safe.

•  We recommend that detergents are not sprayed directly 

onto the control panel, but that a sponge is used instead.

!

 Never use steam cleaners or pressure cleaners on the 

appliance.

Cleaning the oven door

Clean the glass part of the oven door using a sponge and 

a non-abrasive cleaning product, then dry thoroughly with 

a soft cloth. Do not use rough abrasive material or sharp 

metal scrapers as these could scratch the surface and cause 

the glass to crack. 

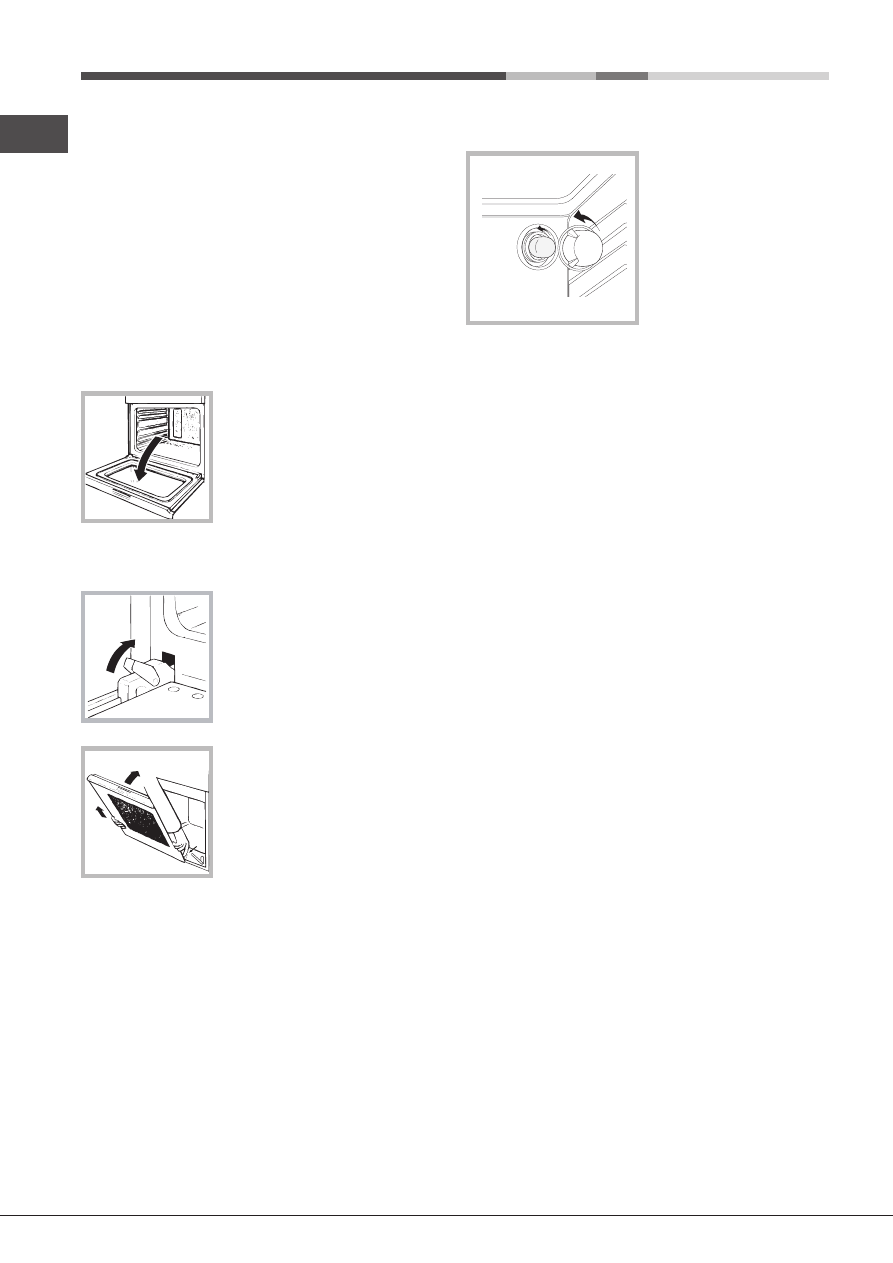
For more thorough cleaning 

purposes, the oven door may be 

removed:

1. Open the oven door fully (see 

diagram).

2. Lift up and turn the small levers located on the two hinges 

(

see diagram

)

3. Grip the door on the two external 

sides and close it approximately 

half way. Unlock the door by 

pressing on the clamps 

F

, then 

pull the door towards you lifting it 

out of its seat (

see diagram

).

To replace the door, reverse this 

sequence.

Inspecting the seals

Check the door seals around the oven regularly. If the seals 

are damaged, please contact your nearest Service Centre 

(see Assistance). We recommend that the oven is not used 

until the seals have been replaced.

F

Replacing the light bulb

To replace the oven light 

bulb:

1.  Remove the glass cover 

of the lamp-holder.

2.  Remove the light bulb 

and replace it with a similar 

one: Wattage 25 W, cap E 

14.

3.  Replace the glass cover 

(see diagram).

!

 Do not use the oven lamp as/for ambient lighting.

*

 Only available on certain models. 

1
2
3
4
5
6
7
8
9
10
11
12
13
14
15
16
17
18
19
20
Оглавление инструкции
  • Страница 1 из 21
    7OFD 610 RU/HA 7OFHR 640 RU/HA English Operating Instructions OVEN Contents Operating Instructions,1 Warnings,2 Assistance,3 Description of the appliance,4 Description of the appliance,5 Installation,6 Start-up and use,8 Modes,8 Precautions and tips,11 Maintenance and care,11 Русскии Руководство по
  • Страница 2 из 21
    Warnings Предупреждения WARNING: The appliance and its accessible parts become hot during use. Care should be taken to avoid touching heating elements. Children less than 8 years of age shall be kept away unless continuously supervised. This appliance can be used by children aged from 8 years and
  • Страница 3 из 21
    Assistance ! Never use the services of an unauthorised technician. Please have the following information to hand: • The type of problem encountered. • The appliance model (Mod.). • The serial number (S/N). The latter two pieces of information can be found on the data plate located on the appliance.
  • Страница 4 из 21
    Description of the appliance 9 Overall view 8 5 7 3 1. 2. 3. 4. 5. 6. 7. 8. 9. POSITION 1 POSITION 2 POSITION 3 POSITION 4 POSITION 5 GUIDES for the sliding racks DRIPPING PAN GRILL Control panel Описание изделия Общии вид 1. 2. 3. 4. 5. 6. 7. 8. 9. 4 ПОЛОЖЕНИЕ 1 ПОЛОЖЕНИЕ 2 ПОЛОЖЕНИЕ 3 ПОЛОЖЕНИЕ 4
  • Страница 5 из 21
    Description of the appliance Описание изделия Control panel Панель управления 1. 2. 3. 4. 5. 1. 2. 3. 4. 5. SELECTOR Knob TIMER Knob* Indicator light THERMOSTAT THERMOSTAT Knob COUNTRY STYLE TIMER Knob* * Only available in certain models. Рукоятка ПРОГРАММЫ Рукоятка ТАЙМЕРА* Индикатор ТЕРМОСТАТА
  • Страница 6 из 21
    Installation ! Please keep this instruction booklet in a safe place for future reference. If the appliance is sold, given away or moved, please make sure the booklet is also passed on to the new owners so that they may benefit from the advice contained within it. ! Please read this instruction
  • Страница 7 из 21
    Fitting the power supply cable 1. Open the terminal board by inserting a screwdriver into the side tabs of the cover. Use the screwdriver as a lever by pushing it down to open the cover (see diagram). L N 2. Install the power supply cable by loosening the cable clamp screw and the three wire
  • Страница 8 из 21
    GB Start-up and use ! When inserting the shelf make sure the backstop is at the rear of the cavity (see image). ! The first time you use your appliance, heat the empty oven with its door closed at its maximum temperature for at least half an hour. Make sure that the room is well ventilated before
  • Страница 9 из 21
    / The Rotisserie* GB TRADITIONAL OVEN mode To operate the rotisserie (see diagram) proceed as follows: 1. Place the dripping pan in position 1. 2. Place the rotisserie support in position 3 and insert the spit in the hole provided on the back panel of the oven. 3. Start the rotisserie using the
  • Страница 10 из 21
    GB Cooking advice table Modes Foods Weight (in kg) Rack position Preheating time (minutes) Recommended temperature Cooking duration (minutes) 1 1 1 1 3 3 3 3 3 15 15 15 15 15 200 200 200 180 180 65-75 70-75 70-80 15-20 30-35 15 10 10 15 10 10 10 10 10 10 15 230 180 180 200 180 170 190 180 170 170
  • Страница 11 из 21
    Precautions and tips ! This appliance has been designed and manufactured in compliance with international safety standards. The following warnings are provided for safety reasons and must be read carefully. General safety • The appliance was designed for domestic use inside the home and is not
  • Страница 12 из 21
    GB detergent, then rinse well and dry with a soft cloth. Do not use abrasive products. • All accessories can be washed like everyday crockery, and are even dishwasher safe. • We recommend that detergents are not sprayed directly onto the control panel, but that a sponge is used instead. ! Never use
  • Страница 13 из 21
    Установка ! Важно сохранить данное руководство для его последующих консультации. В случае продажи, передачи изделия или при переезде на новое место жительства необходимо проверить, чтобы руководство оставалось вместе с изделием, для того чтобы его новыи владелец мог ознакомиться с правилами
  • Страница 14 из 21
    RS Электрическое подключение Духовые шкафы, укомплектованные трехполюсным сетевым кабелем, расчитаны на функционирование с переменным током с напряжением и частотой электропитания, указанными на паспортной табличке с данными (см. ниже). Подсоединение сетевого кабеля 1. Откройте зажимную коробку,
  • Страница 15 из 21
    Включение и эксплуатация ! При установке решетки проверьте, чтобы упор находился в задней части ниши (см. изображение). ! При первом включении духового шкафа рекомендуем прокалить его примерно в течение 30 минут при максимальной температуре с закрытой дверцей. Затем выключите духовой шкаф, откройте
  • Страница 16 из 21
    RS / Программы ! Для всех программ можно задать температуру от 60°C до МАКС кроме: • ГРИЛЬ (рекомендуется устанавливать только МАКС. температуру); • ПОДРУМЯНИВАНИЕ (рекомендуется не превышать температуру 200°C). / ДУХОВКА Программа КОНДИТЕРСКАЯ ВЫПЕЧКА Включается задний нагревательный элемент и
  • Страница 17 из 21
    ПИЦЦА RS • Используйте противень из легкого алюминия, устанавливая его на прилагающуюся решетку. При использовании противеня время выпечки удлиняется, что затрудняет получение хрустящей пиццы. • В случае выпечки пиццы с обильной начинкой рекомендуется положить на пиццу сыр моццарелла в середине
  • Страница 18 из 21
    RS Предосторожности и рекомендации ! Изделие спроектировано и изготовлено в соответствии с международными нормативами по безопасности. Необходимо внимательно прочитать настоящие предупреждения, составленные в целях вашеи безопасности. Общие требования к безопасности • Данное изделие предназначается
  • Страница 19 из 21
    Техническое обслуживание и уход 2. поднимите и поверните шпонки на двух шарнирах (см. схему); Отключение электропитания Перед началом какой-либо операции по обслуживанию или чистке отсоедините изделие от сети электропитания. Чистка изделия • Причиной незначительных различий в оттенках на фасаде
  • Страница 20 из 21
    195102382.01 06/2012 - XEROX FABRIANO RS 20
  • Страница 21 из 21