Инструкция для ARISTON LBF 517

(скачивание инструкции бесплатно)
Формат файла: PDF
Доступность: Бесплатно как и все руководства на сайте. Без регистрации и SMS.
Дополнительно: Чтение инструкции онлайн
background image

EN

26

Assistance

Before contacting Assistance:

• Check whether the problem can be resolved using the Troubleshooting guide (

see Troubleshooting

).

• Restart the programme to check whether the problem has ceased to exist.

• If  the  problem  persists,  contact  the  Authorised  Technical  Assistance  Service.

Never use the services of unauthorised technicians.

Please  have  the  following  information  to  hand:

• The  type  of  malfunction.

• The appliance model (Mod.).

• The serial number (S/N).

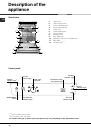
This information can be found on the appliance data plate (

see Description of the appliance

).

We care about our consumers and we always try to provide the highest level of service. We keep

improving our products to make your contact with the appliance simple and pleasant.

Accessories

Extend the life of your appliance and decrease the possibility of its breakdown.

Try out the Indesit Professional accessories range for an easy and effective care about your domestic

appliances.

Indesit Professional accessories are made in Italy in accordance with European standards of quality, ecology

and safety, and in compliance with long-term experience of the producer.

Learn more on the website  

www.hotpoint-ariston.ru

 or in the shops in your town.

Authorized service centers

To be closer to our consumers we have created a wide service network with well-trained and honest service

professionals. Today it consists of about 350 service centers in Russia and CIS.

The contacts are available in your service certificate and on the website 

www.hotpoint-ariston.ru

If you need to call to the service center:

Att! Always ask for original spare parts for your repair.

Service news and other useful information you may find on  

www.hotpoint-ariston.ru

1
2
3
4
5
6
7
8
9
10
11
12
13
14
15
16
17
18
19
20
21
22
23
24
25
26
27
28
Оглавление инструкции
  • Страница 1 из 29
    Руководство по эксплуатации CIS EN ПОСУДОМОЕЧНАЯ МАШИНА Содержание Монтаж, 2-3-4 Русский, 1 English,15 Расположение и нивелировка Водопроводное и электрическое подсоединение Предупреждения по первому использованию машины Технические данные Описание изделия, 5 Общий вид Панель управления Загрузка
  • Страница 2 из 29
    Монтаж CIS Важно сохранить данное руководство для его последующих консультации. В случае продажи, передачи или переезда проверьте, чтобы данное техническое руководство сопровождало изделие. Внимательно прочитайте инструкции: в них содержатся важные сведения об установке изделия, его эксплуатации и
  • Страница 3 из 29
    Защита против затопления Пленка защиты от конденсата * Во избежание затопления посудомоечная машина: - оснащена системой, перекрывающей подачу воды в случае аномалии или внутренних утечек. После установки посудомоечной машины в нишу кухонного элемента откройте ее дверцу и наклейте прозрачную
  • Страница 4 из 29
    CIS Изделие: Посудомоечная машина Торговая марка: Торговый знак изготовителя: Модель: LBF 517 Изготовитель: Indesit Company Страна-изготовитель: Польша - POLAND Загрузка 12 столовых наборов Размеры ширина 60 см высота 85 см глубина 60 см Номинальное значение напряжения электропитания или диапазон
  • Страница 5 из 29
    Описание изделия Общий вид CIS 1. 2. 3. 4. 5. 6. 7. 8. 9. 10. 11. 12. Верхняя корзина Верхний ороситель Откидные полки Регулятор высоты корзины Нижняя корзина Нижний ороситель Корзинка для столовых приборов Фильтр мойки Бачок соли Дозаторы моечного средства и дозатор ополаскивателя Паспортная
  • Страница 6 из 29
    Загрузка корзин CIS Перед загрузкой корзин удалите с посуды остатки пищи, вылейте оставшееся содержимое из стаканов и чашек. Загрузив посуду, проверьте, чтобы лопасти оросителей могли свободно вращаться. Верхняя корзина В эту корзину помещается хрупкая и легкая посуда: стаканы, чашки, блюдца,
  • Страница 7 из 29
    Включение и эксплуатация Запуск посудомоечной машины 1. Откройте водопроводный кран. 2. Нажмите кнопку ВКЛ.-ВЫКЛ.: все индикаторы на панели управления загорятсяна несколько секунд. 3. Откройте дверцу и поместите в дозатор моющее вещество (см. ниже). 4. Загрузите посуду в корзины (см. Загрузка
  • Страница 8 из 29
    Программы CIS Описание ДОПОЛНИТЕЛЬНЫХ ФУНКЦИЙ смотрите в таблице Дополнительных функций на странице разделов Запуск и эксплуатация. Количество и тип программ и дополнительных функций варьирует в зависимости от модели посудомоечной машины. Рекомендации по выбору программы Очень загрязненная посуда и
  • Страница 9 из 29
    Ополаскиватель и регенерирующая соль Используйте только специальные средства для посудомоечных машин. Не используйте поваренную или промышленную соль и моющие средства для ручного мытья посуды. Следуйте инструкциям, приведенным на упаковке моющего средства. Если вы используете многофункциональное
  • Страница 10 из 29
    Техническое обслуживание и уход CIS Отключение воды и электрического тока • Перекрывайте водопроводный кран после каждой мойки во избежание опасности утечек. • Выньте штепсельную вилку машины из электророзетки перед началом чистки и технического обслуживания. Чистка посудомоечной машины • Для
  • Страница 11 из 29
    Предупреждения и рекомендации Изделие спроектировано и изготовлено в соответствии с международными нормативами по безопасности. Необходимо внимательно прочитать настоящие предупреждения, составленные в целях вашей безопасности. Экономия электроэнергии и охрана окружающей среды Экономия воды и
  • Страница 12 из 29
    Неисправности и методы их устранения CIS В случае обнаружения аномалий в работе изделия проверьте следующие пункты перед тем, как обратиться в Сервис технического обслуживания. Неисправности: Возможные причины / Методы устранения: Посудомоечная машина не запуска • Выключите м ашин у при п омощи
  • Страница 13 из 29
    Сервисное обслуживание Мы заботимся о своих покупателях и стараемся сделать сервисное обслуживание наиболее качественным. Мы постоянно совершенствуем наши продукты, чтобы сделать Ваше общение с техникой простым и приятным. Уход за техникой Продлите срок эксплуатации и снизьте вероятность поломки
  • Страница 14 из 29
    CIS 14
  • Страница 15 из 29
    Operating instructions DISHWASHER EN Contents Installation, 16-17 English,15 Positioning and levelling Connecting the water and electricity supplies Advice regarding the first wash cycle Technical data Description of the appliance, 18 Overall view Control panel Loading the racks, 19 Lower rack
  • Страница 16 из 29
    Installation EN Keep this instruction manual in a safe place for future reference. If the appliance is sold, given away or moved, please ensure the manual is kept with the machine, so that the new owner may benefit from the advice contained within it. Please read this instruction manual carefully:
  • Страница 17 из 29
    Anti-flooding protection Anti-condensation strip* Some models are also equipped with the supplementary safety device New Acqua Stop*, which guarantees antiflooding protection even in the event of a supply hose rupture. Advice regarding the first wash cycle To ensure floods do not occur, the
  • Страница 18 из 29
    Description of the appliance EN Overall view 1. 2. 3. 4. 5. 6. 7. 8. 9. 10. 11. 12. Upper rack Upper sprayer arm Tip-up compartments Rack height adjuster Lower rack Lower sprayer arm Cutlery basket Washing filter Salt dispenser Detergent and rinse aid dispensers Data plate Control Panel*** Control
  • Страница 19 из 29
    Loading the racks Before loading the racks, remove all food residue from crockery and empty liquids from glasses and cups. After loading the appliance, make sure that the sprayer arms can rotate freely. Upper rack Load this rack with delicate and lightweight crockery: glasses, cups, saucers and
  • Страница 20 из 29
    Start-up and use EN Starting the dishwasher 1. Turn the water tap on. 2. Press the ON/OFF button: all the indicator lights on the control panel will light up for a few seconds. 3. Open the door and pour in a suitable amount of detergent (see below). 4. Load the racks (see Loading the racks) and
  • Страница 21 из 29
    Wash cycles If the crockery is only lightly soiled or if it has been rinsed with water before being placed in the dishwasher, reduce the amount of detergent used accordingly. EN The number and type of wash cycles and options may vary depending on the dishwasher model. Wash cycle selection
  • Страница 22 из 29
    Rinse aid and refined salt EN Only use products which have been specifically designed for dishwashers. Do not use table salt or industrial salt, or washing up liquid. Follow the instructions given on the packaging. If using a multi-functional product it is not necessary to add rinse aid; however,
  • Страница 23 из 29
    Care and maintenance Shutting off the water and electricity supplies • Always unplug the appliance when cleaning it and when performing maintenance work. Clean the water inlet filter at the tap outlet regularly. - Turn off the water tap. - Unscrew the end of the water inlet hose, remove the filter
  • Страница 24 из 29
    Precautions and advice EN This appliance was designed and manufactured in compliance with current international safety standards. The following information has been provided for safety reasons and should therefore be read carefully. General safety • This appliance is not intended for use by persons
  • Страница 25 из 29
    Troubleshooting Whenever the appliance fails to work, check for a solution from the following list before calling for Assistance. Problem: Possible causes / Solutions: The dishwasher does not start or cannot be controlled • Switch off the appliance by pressing the ON/OFF button, switch it back on
  • Страница 26 из 29
    Assistance EN We care about our consumers and we always try to provide the highest level of service. We keep improving our products to make your contact with the appliance simple and pleasant. Accessories Extend the life of your appliance and decrease the possibility of its breakdown. Try out the
  • Страница 27 из 29
    EN 27
  • Страница 28 из 29
    195081952.03 09/2011 - Xerox Fabriano EN 28
  • Страница 29 из 29