EN
26
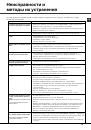
Troubleshooting
Whenever the appliance fails to work, check for a solution from the following list before calling for
Assistance.
*
Only available in selected models.
Problem:
Possible causes / Solutions:
The dishwasher does not start or
cannot be controlled
• Switch off the appliance by pressing the ON/OFF button, switch it back on after
approximately one minute and reset the program.
• The appliance has not been plugged in properly.
• The dishwasher door has not been shut properly.
The door won’t close
• The lock was released. Strongly push the door until a “clacking” noise is heard.
No water drains out from the
dishwasher.
• The dishwasher cycle has not yet finished.
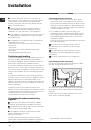
• The water inlet hose is bent (see
Installation).
• The drain duct is blocked.
• The filter is clogged up with food residues.
The dishwasher makes excessive
noise.
• The dishes are rattling against each other or against the sprayer arms.
• An excessive amount of foam has been produced: the detergent has not been
measured out correctly or it is not suitable for use in dishwashers (see Start-up
and use).
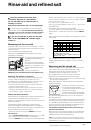
The dishes and glasses are
covered in a white film or
limescale deposits.
• The level of the refined salt is low or the dosage setting is not suited to the
hardness of the water (see
Rinse aid and salt).
• The lid on the salt dispenser is not closed properly.
• The rinse aid has been used up or the dosage is too low.
The dishes and glasses are
streaked or have a bluish tinge.
• The rinse aid dosage is too high.
The crockery has not been dried
properly.
• A wash cycle without a drying program has been selected.
• The rinse aid has been used up or the dosage is too low (see
Rinse aid and
salt).
• The rinse aid dispenser setting is not suitable.
• The crockery is made from non-stick material or plastic.
The dishes are not clean.
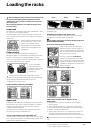
• The racks are overloaded (see Loading the racks).
• The crockery has not been arranged well.
• The sprayer arms cannot move freely.
• The wash cycle is too gentle (see
Wash cycles).
• An excessive amount of foam has been produced: the detergent has not been
measured out correctly or it is not suitable for use in dishwashers (see Start-up
and use).
• The lid on the rinse aid compartment has not been shut correctly.
• The filter is dirty or blocked (see Care and maintenance).
• The refined salt level is low (see Rinse aid and salt).
The dishwasher does not take any
water in - Tap shut-off alarm
(several short beeps are emitted
*
)
(the Drying and End indicator lights
flash).
• There is no water in the mains supply.
• The water inlet hose is bent (see Installation).
• Turn on the tap and the appliance will start after a few minutes.
• The appliance lock has been activated because no action was taken when the
beeps
*
sounded. Switch off the appliance using the ON/OFF button, turn on the
tap and switch the appliance back on after 20 seconds by pressing the same
button. Re-program the appliance and restart the wash cycle.
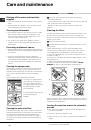
Water inlet hose alarm / Water inlet
filter blocked
(the Washing, Drying and End
indicator lights flashes).
• Switch off the appliance by pressing the ON/OFF button. Shut off the water tap
to eliminate the risk of flooding and remove the plug from the electrical socket.
Make sure the water inlet filter has not become blocked by impurities (see “Care
and maintenance” chapter).