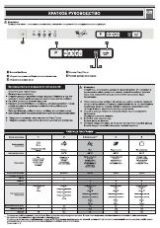
Страница 8 из 29 Ïðîãðàììû +15 Îïèñàíèå ÄÎÏÎËÍÈÒÅËÜÍÛÕ ÔÓÍÊÖÈÉ ñìîòðèòå â òàáëèöå Äîïîëíèòåëüíûõ ôóíêöèé íà ñòðàíèöå ðàçäåëîâ Çàïóñê è ýêñïëóàòàöèÿ. Êîëè÷åñòâî è òèï ïðîãðàìì è äîïîëíèòåëüíûõ ôóíêöèé âàðüèðóåò â çàâèñèìîñòè îò ìîäåëè ïîñóäîìîå÷íîé ìàøèíû. Рекомендации по выб ору программы Моющее средство (А) =
Страница 11 из 29 Ïðåäóïðåæäåíèÿ è ðåêîìåíäàöèè Èçäåëèå ñïðîåêòèðîâàíî è èçãîòîâëåíî â ñîîòâåòñòâèè ñ ìåæäóíàðîäíûìè íîðìàòèâàìè ïî áåçîïàñíîñòè. Íåîáõîäèìî âíèìàòåëüíî ïðî÷èòàòü íàñòîÿùèå ïðåäóïðåæäåíèÿ, ñîñòàâëåííûå â öåëÿõ âàøåé áåçîïàñíîñòè. Îáùèå òðåáîâàíèÿ ê áåçîïàñíîñòè Äàííûé ýëåêòðîïðèáîð íå ìîæåò áûòü
Страница 12 из 29 Íåèñïðàâíîñòè è ìåòîäû èõ óñòðàíåíèÿ +15  ñëó÷àå îáíàðóæåíèÿ àíîìàëèé â ðàáîòå èçäåëèÿ ïðîâåðüòå ñëåäóþùèå ïóíêòû ïåðåä òåì, êàê îáðàòèòüñÿ â Ñåðâèñ òåõíè÷åñêîãî îáñëóæèâàíèÿ. Неисправности: Возможные причины / Методы устранения: Посудомоечная машина не запускается. • Штепсельная вилка машины
Страница 13 из 29 Ñåðâèñ Òåõíè÷åñêîãî Îáñëóæèâàíèÿ Ìû çàáîòèìñÿ î ñâîèõ ïîêóïàòåëÿõ è ñòàðàåìñÿ ñäåëàòü ñåðâèñíîå îáñëóæèâàíèå íàèáîëåå êà÷åñòâåííûì. Ìû ïîñòîÿííî ñîâåðøåíñòâóåì íàøè ïðîäóêòû, ÷òîáû ñäåëàòü Âàøå îáùåíèå ñ òåõíèêîé ïðîñòûì è ïðèÿòíûì. +15 Óõîä çà òåõíèêîé Ïðîäëèòå ñðîê ýêñïëóàòàöèè è ñíèçüòå
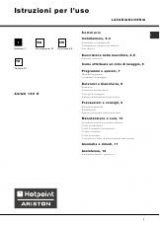
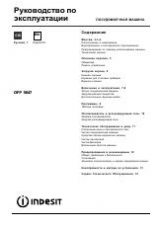
Страница 15 из 29 Operating instructions DISHWASHER EN English,15 Contents EN Installation, 16-17 Positioning and levelling Connecting the water and electricity supplies Advice regarding the first wash cycle Technical data Description of the appliance, 18 Overall view Control panel Loading the racks, 19 Lower rack
Страница 16 из 29 Installation EN Keep this instruction manual in a safe place for future reference. If the appliance is sold, given away or moved, please ensure the manual is kept with the machine, so that the new owner may benefit from the advice contained within it. Please read this instruction manual carefully:
Страница 17 из 29 Connecting the water outlet hose Connect the outlet hose (without bending it) to a drain duct with a minimum diameter of 4 cm. Alternatively, rest it over a sink or tub; the free end of the hose should not remain immersed in water. The special plastic elbow* makes it easier to find the best layout:
Страница 18 из 29 Description of the appliance EN Overall view 1. 2. 3. 4. 5. 6. 7. 8. 9. 10. 11. 12. Upper rack Upper sprayer arm Tip-up compartments Rack height adjuster Lower rack Lower sprayer arm Cutlery basket Washing filter Salt dispenser Detergent and rinse aid dispensers Data plate Control Panel*** Control
Страница 19 из 29 Loading the racks Before loading the racks, remove all food residues from the crockery and empty liquids from glasses and cups. Arrange the crockery so that it is held in place firmly and does not tip over. After loading the appliance, check that the sprayer arms can rotate freely. Lower rack The
Страница 20 из 29 Start-up and use EN Starting the dishwasher 1. Turn the water tap on. 2. Open the door and press the ON/OFF button: you will hear a short beep and the display and option indicator lights switch on. 3. Measure out the detergent (see below). 4. Load the racks (see Loading the racks). 5. Select the
Страница 21 из 29 Wash options If an option is not compatible with the selected was cycle (see Table of wash cycles), the corresponding LED flashes rapidly 3 times and 2 short beeps will sound. Delayed start It is possible to delay the start time of the cycle by 3, 6 or 9 hours. 1. Press the DELAYED START button:
Страница 22 из 29 Wash cycles EN For available OPTIONS please refer to the Table of options on the Start-up and use page. The number and type of wash cycles and options may vary depending on the dishwasher model. Detergent (A) = compartment A (B) = compartment B Options Wash cycle duration (tolerance ±10%) Hrs. Min.
Страница 23 из 29 Rinse aid and refined salt Only use products which have been specifically designed for dishwashers. Do not use table salt or industrial salt, or washing up liquid. Follow the instructions given on the packaging. If using a multi-functional product it is not necessary to add rinse aid; however, we
Страница 24 из 29 Care and maintenance EN Shutting off the water and electricity supplies Turn off the water tap after every wash cycle to avoid leaks. Always unplug the appliance when cleaning it and when performing maintenance work. Cleaning the dishwasher The external surfaces of the machine and the control
Страница 25 из 29 Precautions and advice This appliance was designed and manufactured in compliance with current international safety standards. The following information has been provided for safety reasons and should therefore be read carefully. General safety This appliance is not intended for use by persons
Страница 26 из 29 Troubleshooting EN Whenever the appliance fails to work, check for a solution from the following list before calling for Assistance. Malfunction: Possible causes / Solutions: The dishwasher does not start. • The plug h as not been ins erted int o t he elec t ric al s oc k et pr operly, or t here is
Страница 27 из 29 Assistance We care about our consumers and we always try to provide the highest level of service. We keep improving our products to make your contact with the appliance simple and pleasant. EN Accessories Extend the life of your appliance and decrease the possibility of its breakdown. Try out the