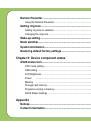
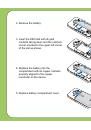
Инструкция для ASUS P735

(скачивание инструкции бесплатно)
Формат файла: PDF
Доступность: Бесплатно как и все руководства на сайте. Без регистрации и SMS.
Дополнительно: Чтение инструкции онлайн
background image

1

Safety Information

Phone care

You should never

 attempt to open the phone casing. There are no user-serviceable parts inside and you 

might damage sensitive electronic circuits and components. Unauthorized disassembly will void the warranty.

You should never

 leave your phone in the window of your car or otherwise expose it to strong sunlight or 

excessive heat for a prolonged period. This may damage it.

You should never

 handle your phone with wet hands or expose it to moisture or liquids of any kind. 

Continuous changes from a cold to a warm environment may lead to condensation inside the phone, resulting 
in corrosion and possible damage.

If you pack your phone in your suitcase during travel, beware of damage. Cramming a suitcase may crack the 
LCD display. Remember to switch off your wireless connections during air travel.

As with all other radio devices, touching the built-in antenna area during telephone conversation may impair the 
quality and lead to shorter standby time due to increased power consumption.
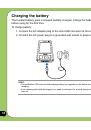
The battery

Your phone is equipped with a high-performance Li-Ion battery. Optional battery types may be available; check 
with your local retailer. Observe the maintenance guidelines and your battery should give you a long service 
life.

•   At the beginning of the battery’s life, fully charge and discharge (let it go flat) three times.

•   Do not overcharge the Li-Ion battery, as this can result in a reduction in battery performance and 

lifespan. The recommended maximum charge time is three hours.

•   Avoid repeated short charging. It is preferable to let the battery go flat and then recharge it completely.

•   Avoid charging in strong heat or extreme cold. Ambient room temperature is preferable. The battery has 

its optimum performance in an ambient temperature of +5 °C to +50 °C.

•   Don’t store a battery near a fire or heat source.

1
2
3
4
5
6
7
8
9
10
11
12
13
14
15
16
17
18
19
20
21
22
23
24
25
26
27
28
29
30
31
32
33
34
35
36
37
38
39
40
41
42
43
44
45
46
47
48
49
50
51
52
53
54
55
56
57
58
59
60
61
62
63
64
65
66
67
68
69
70
71
72
73
74
75
76
77
78
79
80
81
82
83
84
85
86
87
88
89
90
91
92
93
94
95
96
97
98
99
100
101
102
103
104
105
106
107
108
109
110
111
112
113
114
115
116
117
118
119
120
121
122
123
124
125
126
127
128
129
130
131
132
133
134
135
136
137
138
139
140
141
142
143
144
145
146
147
148
149
150
Оглавление инструкции
  • Страница 1 из 151
    P735 User Manual
  • Страница 2 из 151
    E3161 Second Edition April 2007 Copyright © 2007 ASUSTeK Computers, Inc. All Rights Reserved. On part of this manual, including the products and software described in it, may be reproduced, transmitted, transcribed, stored in a retrieval system, or translated into any language in any form or by any
  • Страница 3 из 151
    Table of Contents P735 specifications................................................................................ 8 Package contents................................................................................... 9 Chapter 1: Getting started Getting to know your
  • Страница 4 из 151
    Chapter 2: Entering data Using the Input Panel.......................................................................... 28 Using the Block Recognizer........................................................................... 28 Using the On-screen
  • Страница 5 из 151
    Making calls from Call History........................................................................ 50 Using the Speed Dial..................................................................................... 51 Making and Receiving a video
  • Страница 6 из 151
    Unlocking My Secrets.................................................................................... 76 Locking My Secrets........................................................................................ 77 My Secrets
  • Страница 7 из 151
    Remote Presenter................................................................................115 Using the Remote Presenter.........................................................................115 Setting ring
  • Страница 8 из 151
    P735 specifications Processor PXA270 processor, 520MHz Operating System Microsoft® Windows Mobile™ 6 professional Pocket PC Phone Edition Memory 256 MB NAND Flash ROM 64 MB SDRAM Display 2.8-inch, 65, 536-color, 240 x 320-resolution, TFT touch screen LCD Frequency band UMTS 2100 MHz, Tri-band GSM
  • Страница 9 из 151
    Package contents Check your P735 package for the following items: P ASUS P735 device P Battery P AC Adapter P Mini-USB cable P Headset P Stylus P Protection case P Getting Started CD P User Manual P Quick Start Guide P Warranty Card NOTE: If any of the above items is damaged or missing, contact
  • Страница 10 из 151
    10
  • Страница 11 из 151
    Chapter Getting started 1 • Getting to know your P735 • Getting your device ready • Starting up • The Today screen 11
  • Страница 12 из 151
    Getting to know your P735 Components: Layout 3 2 1 3 Stylus I 4 Camera button Top features 7 1 MiniSD slot 2 Power button 5 Volume controller 6 Reset button 9 8 7 Notification LED 4 8 Earpiece receiver 9 Sub camera lens 10 LCD touch screen 11 Call key 5 10 12 Left Soft key 13 Video call button 14
  • Страница 13 из 151
    Getting to know your P735 Components: 19 Camera flash light 20 Self-portrait mirror 20 19 24 22 21 25 21 Camera lens 22 Speaker 23 Battery compartment 24 Voice commander/record button 25 Hold button 26 Earphone slot 23 27 Mini-USB connector 28 Mic Right side features Rear features 26 27 Bottom
  • Страница 14 из 151
    Device components description No. 14 Item Description 1 MiniSD slot Allows you to insert a MiniSD storage card. 2 Power button Press to turn the power ON or to set suspend mode or to wake device from sleep mode. Press and hold to turn the power OFF. 3 Stylus Use the stylus to write, draw, or select
  • Страница 15 из 151
    Device components description No. Item Description 14 Navigation buttons Use to move through menus. Press the center to run an application or in camera mode, press to take a picture. 15 Action button Press to carry out the task of selected item. 16 Right Soft key Performs the task indicated above
  • Страница 16 из 151
    Getting your device ready Installing the SIM card and battery Before you can make a phone call using your P735, you need to install a Subscriber Identity Module (SIM) card. The SIM card contains your phone number, subscriber details, phone book, and additional phone memory. Your P735 comes with a
  • Страница 17 из 151
    2. Remove the battery. 3. Insert the SIM card with its gold contacts facing down and the notched corner oriented to the upper left corner of the slot as shown. 4. Replace the battery into the compartment with its copper contacts properly aligned to the copper conductor on the device. 5. Replace
  • Страница 18 из 151
    Charging the battery The bundled battery pack is shipped partially charged. Charge the battery up to four (4) hours before using for the first time. To charge battery: 1. Connect the AC adapter plug to the mini-USB connector at the bottom of the device. 2. Connect the AC power plug to a grounded
  • Страница 19 из 151
    Starting up Powering your device Make sure that your P735 is fully-charged before starting the device for the first time. To turn on power: 1. Press and hold the power button. Power button 2. Follow onscreen instructions to align screen and set the local time zone. Using the stylus The stylus is a
  • Страница 20 из 151
    Calibrating P735 Calibrating your device ensures that the item you tap on the screen is activated. This involves tapping in the center of targets that appear in various coordinates on the screen. To calibrate your screen: 1. Tap Start > Settings > System tab then tap Screen icon. 2. On the General
  • Страница 21 из 151
    The Today screen The Today screen displays information useful to you. You can configure the Today screen to have all the important information you need. • To access the Today screen, tap Start > Today. • To personalize the Today screen, tap Start > Settings > Personal tab > Today. The following
  • Страница 22 из 151
    Status indicators Refer to the table below for the Today screen icon status indicators. Icon Description General Packet Radio Services (GPRS) available. Connecting via GPRS. Connected via GPRS. Connecting with ActiveSync ActiveSync connection not active. ActiveSync synchronization in progress.
  • Страница 23 из 151
    Status indicators Icon Description New voice mail. No cellular phone service. No signal. Searching for cellular phone service. Indicates signal strength. Sound OFF. Sound ON. Battery low. Battery extremely low. Battery partially charged. Battery charging. Battery fully charged. Searching Wi-Fi
  • Страница 24 из 151
    Status indicators Icon Description Wi-Fi active. Roaming service. This icon appears only if you have international roaming feature. Vibrate or meeting mode on. Bluetooth headset connected. Bluetooth headset connected with sound. Appears when you set the alarm No SIM installed. Notice indicator. Tap
  • Страница 25 из 151
    Screen orientation You can set the screen to three different orientations: 1. Portrait 2. Landscape (right-handed) 3. Landscape (left-handed) Set to Portrait mode to get a better view or better operation of certain applications on your device. Set to Landscape when viewing pictures, video or
  • Страница 26 из 151
    Start menu The Start menu contains various programs and applications that you commonly use. Tap Start to display the start menu items: Portrait mode Landscape mode You can also customize the items that appear in the Start menu. To do this: 1. Tap Start > Settings > Personal tab > Menus. 2. Select
  • Страница 27 из 151
    Chapter Entering data 2 • Using the Input Panel • Writing and drawing on the screen • Recording voice • Using ActiveSync™ • Synchronizing with Exchange Server • Searching information • Getting Help 27
  • Страница 28 из 151
    Using the Input Panel When you start an application or select a field that requires text, symbols, or numbers, the Input Panel icon appears on the menu bar. The Input Panel allows you to select various input methods including: Block Recognizer, Keyboard, Letter Recognizer, and Transcriber. Using
  • Страница 29 из 151
    Using the On-screen keyboard With the on-screen keyboard, you can key in text, symbols, numbers, or other special characters when input is possible. To input text using the on-screen keyboard: 1. In an application, tap the Input Panel arrow, then tap Keyboard. 2. Key in text by tapping keys on the
  • Страница 30 из 151
    Using the Letter Recognizer With the Letter Recognizer you can write individual letters, numbers, or special characters, which are converted into typed text. To use the Letter Recognizer: 1. In an application, tap the Input Panel arrow, then tap Letter Recognizer. 2. Write letters, numbers,
  • Страница 31 из 151
    Using the Transcriber Transcriber is a handwriting recognition program that allows you to write in cursive, print, or mixed styles. It reliably recognizes not only written text but also numbers and symbols. Make sure to write legibly. See Help for more information on the Transcriber. To use the
  • Страница 32 из 151
    Writing and drawing on the screen You can write or draw directly on the screen and save notes in your own handwriting. If you prefer to use your own handwriting or use drawings in your notes, set the default input mode to Writing. If you prefer text, set the default mode to Typing. To set the
  • Страница 33 из 151
    Recording voice At any time, whether your phone is on stand-by or active mode, you can record sound, voice, or add a recording to a note while using your device. To start a voice recording: 1. Press and hold Record button to launch voice recorder application. 2. Tap the record icon to begin
  • Страница 34 из 151
    To add a recording to a saved note: 1. Tap Start > Programs > Notes. 2. From the Notes list, tap to open a saved note. 3. If you do not see the recording toolbar, tap Menu > View Recording Toolbar. 4. Tap the record icon to begin recording. 5. Place the receiver near your mouth or source of sound.
  • Страница 35 из 151
    Using ActiveSync™ ActiveSync™ allows you to synchronize data in your device with data in your computer. ActiveSync can also synchronize over a wireless or cellular network with Microsoft Exchange Server, provided that your cellular phone service or company is running Microsoft Exchange Server with
  • Страница 36 из 151
    If you wish to synchronize your device with Exchange Server through your company or service provider, obtain the name of the Exchange Server, user name, password, and domain name from your network administrator before starting the Sync Setup Wizard. To install and configure ActiveSync in your
  • Страница 37 из 151
    Synchronizing via mini-USB You can connect to your device using the bundled mini-USB cable to synchronize to your computer. To synchronize your device via mini-USB: 1. After installing ActiveSync to your computer, connect the mini-USB plug to the mini-USB connector at the bottom of the device. 2.
  • Страница 38 из 151
    Synchronizing via Bluetooth You can connect your device to your computer using the Bluetooth wireless technology. To synchronize your device via Bluetooth: 1. Configure Bluetooth in your computer to support ActiveSync. Refer to the ActiveSync Help in your computer for instructions. 2. Turn on
  • Страница 39 из 151
    Synchronizing with Exchange Server To synchronize your device with Exchange Server: 1. From the ActiveSync menu, tap Menu > Add Server Source. 2. In the Server Address field, input the address of the server running Exchange Server then tap Next. If necessary, tap the check box This server requires
  • Страница 40 из 151
    3. Input your name, password, and domain then tap Next. 4. Tap the check boxes to select the data items that you want to synchronize with Exchange Server. To change the available synchronization settings, select a data item then tap Settings. Tap Finish when done. 5. Start the sync process. 40
  • Страница 41 из 151
    Setting the synchronization schedule To set the synchronization with Exchange Server: 1. From the ActiveSync screen, tap Menu > Schedule. 2. Refer to the table for input details. Recommended setup High Select a shorter interval in the Peak times list. Low Select As items arrive option or a longer
  • Страница 42 из 151
    Searching information Using the search tool, you can search for files and other items stored in your device or the external MiniSD card. You can search by file name or by words located in various applications including the Calendar, Contacts, Excel Mobile, Word Mobile, Outlook Mobile, Help,
  • Страница 43 из 151
    Getting Help You can easily find Help for using any program on the device. To get help for a program: • From the Today screen or program, tap Start > Help. A page will open with links to topics that explain how to use the program. 43
  • Страница 44 из 151
    44
  • Страница 45 из 151
    Chapter Phone features 3 • Using the phone • Making a call • Receiving a call 45
  • Страница 46 из 151
    Using the phone Like a standard cellular phone, you can use your P735 to make and receive calls. You can also keep a history of calls made and received, send SMS or MMS messages, take notes while talking, call from Contacts, and copy data from installed SIM card to your device. Phone pad The phone
  • Страница 47 из 151
    Adjusting the device volume To adjust the device volume: 1. Tap the speaker icon. 2. From the volume menu, you can: • Adjust the phone volume or device volume by moving the slider to the desired volume level. • Tap On, Vibrate, or Off to change the system and ringer volume settings. You can also
  • Страница 48 из 151
    Making a call You can make a phone call using the phone pad. You can also make calls directly from the Contacts, Call History, Speed Dial, or Voice Commander. Using the phone pad To make a call using the phone pad: 1. Tap Start > Phone. 2. From the phone pad, tap the number of the party you want to
  • Страница 49 из 151
    Phone pad features Operator name Press to delete number or symbol to the left Numeric keypad Press to make a video Call Press to make call Press to launch Contacts list and History calls/All Calls/Speech Dial Press to launch menu Displays the current call status Press to mute Press to launch
  • Страница 50 из 151
    Making calls from Contacts To make a call directly from Contacts: 1. Tap Start > Phone. 2. Tap the contact showing above the phone pad, and then tap Call. You can also launch Contacts from the Today screen by tapping Contacts on the menu bar or pressing the Right soft key. 3. You can do any of the
  • Страница 51 из 151
    Using the Smart Dialer With Smart Dialer you can find a contact more quickly. For example, if you want to call a contact named ‘Clara’, you can simply tap contact list and display the matched contact. , and your device smartly matches it with your To use the Smart Dialer: 1. On the Phone pad, tap
  • Страница 52 из 151
    Making and Receiving a Video call Your device allows you to make calls with live images. To make a video call: • On the Phone pad, tap , or • From Call History, tap and hold a contact, then from the sub-menu tap Video Call. You can adjust the image on the screen by tapping “Self to small/large”
  • Страница 53 из 151
    Using Voice Commander To make a phone call using voice commander: 1. Press the record button found on the right side of your device. Voice Commander/ Record button 2. From the following screen, your device asks you to “Say command.” 3. Audibly say “Call <Contact> at <Home/ Work/Mobile>”. 4. Say
  • Страница 54 из 151
    Receiving a call When you receive a call, a message will appear giving you the option to answer or reject the incoming call. To answer or reject an incoming call: • Tap Answer or press Call key to receive a call. • Tap Ignore or press End key to reject a call. TIP: Press and hold Call key to switch
  • Страница 55 из 151
    Chapter Wireless features 4 • Using the Wireless Manager • Using Bluetooth® • Using WLAN (IEEE 802.11b/g) • Setting a 3G/GPRS connection 55
  • Страница 56 из 151
    Using the Wireless Manager The Wireless Manager allows you to turn the power off or on to your wireless connections in a single location. This is a quick way to preserve battery power or to prepare your device for an airplane flight. To use the Wireless Manager: 1. Tap Start > Settings >
  • Страница 57 из 151
    Using Bluetooth® Overview Bluetooth® is a short-range wireless communications technology that allows devices with Bluetooth capabilities to exchange data within a radius of about 10 meters (30 feet) without requiring a physical connection. With Bluetooth enabled in your device, you can: • Connect
  • Страница 58 из 151
    Configuring Bluetooth To configure Bluetooth in your device: 1. Start > Settings > Connections tab then tap the Bluetooth icon. 2. From the Bluetooth screen, you can access the following tabs: • General - allows you to set the user profile, turn Bluetooth on or off, displays the Bluetooth status,
  • Страница 59 из 151
    Using a Bluetooth-enabled headset Mono headset setup 1. Make sure that Bluetooth is enabled on your device. 2. Tap on the Today screen then on the shortcut menu tap Bluetooth Manager. 3. From the Bluetooth Manager, tap New. 4. From the Bluetooth Connection Wizard, tap Hands-free/Headset setup then
  • Страница 60 из 151
    5. Make sure that your headset device is in pairing mode and ready to receive incoming connection requests then tap Next. 6. Tap the name of your Bluetoothenabled headset device then tap Next. 7. In Passkey, input the alphanumeric passkey of your headset device then tap . You can find this in the
  • Страница 61 из 151
    Stereo headset setup P735 supports A2DP (Advanced Audio Distribution Profile), which is used by Bluetooth-enabled stereo headsets. Make sure that your stereo headset also supports A2DP. 1. Tap on the Today screen then on the shortcut menu tap Bluetooth Manager. 2. From the Bluetooth manager screen,
  • Страница 62 из 151
    5. Tap Finish to initiate connection. NOTES: • To answer a phone call using your stereo headset, make sure that you have mono and stereo connection at the same time. • To use voice commander while using a headset, press the answer button* on the headset then follow succeeding voice instructions.
  • Страница 63 из 151
    Using WLAN (IEEE 802.11b/g) Introduction WLAN (IEEE 802.11b/g), refers to certain types of wireless local area network (WLAN) that use specifications in the 802.11 family. Activating WLAN in your device To activate WLAN in your device: 1. Tap Start > Settings > Connections tab then tap the Wi-Fi
  • Страница 64 из 151
    Configuring WLAN To configure WLAN in your device: 1. Start > Settings > Connections tab then tap the Wi-Fi Manager icon. 2. From the Wi-Fi Manager screen, you can access the following tabs: • Wi-Fi Status • Setting • IP Info • Site Survey NOTE: Tap ? for Wi-Fi Help. Wi-Fi Status Displays the Wi-Fi
  • Страница 65 из 151
    IP Info Displays the network information and allows you to renew or ping a network connection. Site Survey Shows the available wireless networks in the area. 65
  • Страница 66 из 151
    Setting a 3G/GPRS connection Your P735 allows you to connect via 3G and General Packet Radio Service (GPRS). They support a wide range of bandwidths that allows sending and receiving small bursts of data, such as email and web browsing. To set a 3G/GPRS connection in your device: 1. From the Today
  • Страница 67 из 151
    4. From the Connections screen, tap Add a new modem connection. 5. Input a unique name for the connection then select Cellular Line (GPRS) from the modem list. 67
  • Страница 68 из 151
    6. Input the Access point name. 7. Input your user name, password, and domain then tap Finish. Contact your network administrator for assistance. NOTE: The GPRS and USB connections can not be used at the same time. 68
  • Страница 69 из 151
    Connecting 3G/GPRS To connect 3G/GPRS: 1. Tap Start > Settings > Connections tab then tap Connections icon. 2. From the Connections screen, tap Manage existing connections. 3. Tap and hold on an existing connection then from the pop-up menu tap Connect. Tap Delete if you want to delete selected
  • Страница 70 из 151
    If you have set a default 3G/GPRS connection, it automatically connects when you launch an application that connects to the Internet. 1. Launch any application that connects to the Internet (e.g. Internet Explorer). The device will automatically connect your default 3G/GPRS connection. A pop-up
  • Страница 71 из 151
    Using the Network Setting Tool The Network Setting Tool allows you to conveniently select and connect to your 3G/GPRS service provider. To connect via Network Setting: 1. Tap Start > Settings > Connections tab then tap the Network Setting icon. or on the You can also tap status bar then tap
  • Страница 72 из 151
    72
  • Страница 73 из 151
    Chapter My Secrets 5 • Using My Secrets 73
  • Страница 74 из 151
    Using My Secrets My Secrets is a secret archive to keep your classified documents, pictures and videos. The items placed in the My Secrets folder are encrypted for protection. A user-defined password is required to unlock the folder or change the settings. Enabling My Secrets To enable My Secrets
  • Страница 75 из 151
    3. Key in a 4-digit password. 4. When prompted, key in the same password again to confirm. 5. Tap Finish. When finished, the My Documents\My Secrets becomes an encrypted folder. You can now start using this folder. IMPORTANT: • When locked, the My Secrets folder is hidden. Use password to unlock
  • Страница 76 из 151
    Unlocking My Secrets To unlock My Secrets: 1. Tap the My Secrets Today screen. icon on the 2. From the shortcut menu, tap Unlock. 3. Key in correct password. You can now use My Secrets folder. 76
  • Страница 77 из 151
    Locking My Secrets To lock My Secrets: 1. Tap the My Secrets Today screen. icon on the 2. From the shortcut menu, tap Lock. The My Secrets icon changes to indicating that the My Secrets folder is locked. 77
  • Страница 78 из 151
    My Secrets setting To modify the My Secrets settings: 1. Tap the My Secrets Today screen. icon on the 2. From the shortcut menu, tap My Secrets Setting. 3. Key in correct password. My Secrets Setting allows you to modify any of the following: • Security setting • Password • Password Hint 78
  • Страница 79 из 151
    Security Setting Security setting allows you to enable or disable autolock when the device enters sleep mode, lock the device now, or stop security. Password The Password tab allows you to change the password and password type. 79
  • Страница 80 из 151
    Hint Set a hint in case you forget your password. • Tap check box to enable or disable use of hint to unlock the device. • Select one of the predefined questions then key in answer. 4. Tap 80 when finished.
  • Страница 81 из 151
    Disabling My Secrets To disable My Secrets: 1. From Today screen, tap Start > Programs > My Secrets or Tap the My Secrets icon on the Today screen and from the shortcut menu, tap My Secrets Setting. 2. Key in correct password. Select Security Setting tab, then tap Stop Security. 81
  • Страница 82 из 151
    3. When prompted, tap Yes to confirm. 4. Tap Next to stop all running programs. 82
  • Страница 83 из 151
    5. Tap Next to start decrypting files in My Secrets folder. 6. Tap Done when finished. 83
  • Страница 84 из 151
    84
  • Страница 85 из 151
    Chapter Multimedia features 6 • Using the camera • Viewing pictures and videos 85
  • Страница 86 из 151
    Using the camera The built-in two-megapixel camera allows you to take photos and record audio/video clips. Launching the camera To start using the camera: • Tap Start > Programs > Pictures & Videos > Camera icon or • Press the Camera button on the left side of your device. Camera/shutter button
  • Страница 87 из 151
    Navigation button functions in camera mode The following describes the navigation button functions in Camera mode: Up ENTER/ACTION Button Backward Forward Down Up In camera preview mode, press for video mode. In the camera or video option menu, press to select menu items. Down In video preview
  • Страница 88 из 151
    Available capture modes Your device camera can be set to two capture modes: • Camera mode - Camera mode allows you to take photos, and save them to your device or MiniSD. You can also configure the camera to match an environment, set picture size, select magnification, adjust the picture quality,
  • Страница 89 из 151
    Camera mode screen The following describes the screen icons in Camera mode: Capture mode icon Picture quality icon Flash light status Macro mode status Default storage icon Scene mode icon Timer icon Burst mode status Effects icon Picture resolution Tap to close camera Tap to launch Pictures and
  • Страница 90 из 151
    Camera mode icons • Capture mode icon [ / ] - indicates the current capture mode. • Picture quality icon [ / / • Flash light status icon [ • Macro mode icon [ / ]- indicates the picture quality used. / ] - indicates the camera flash status. ] - this icon appears when the camera is in macro mode. •
  • Страница 91 из 151
    Camera options menu The camera options menu allows you to change various camera and picture settings. To launch options menu: 1. Tap Menu from the camera screen. 2. From the shortcut menu, tap an icon to display contents. Camera options shortcut menu 91
  • Страница 92 из 151
    Change Mode The Change Mode option allows you to set capture mode into Camera or Video mode. Scene The Scene option allows you to select presets appropriately for a night scene or sports event. Select Auto to use best setting for any scene. Picture Size Allows you to set the frame size of picture.
  • Страница 93 из 151
    Picture Quality This option provides three picture quality presets: Normal, Fine, and Super Fine. The picture quality is set to Super Fine by default. Flash Mode This option allows you to change the flash mode to suit a variety of lighting situations. Macro Mode Enables or disables the macro
  • Страница 94 из 151
    Zoom Allows you to change the maximum magnification allowed. SelfTimer Sets the delay of shutter release to 5 or 10 seconds after you have pressed the camera/shutter button. Burst Allows you to take 4 or 9 pictures in succession with one press of the camera/ shutter button. 94
  • Страница 95 из 151
    Frame Allows you to set a frame. This feature is only available when the resolution is set to 320x240. Effect The Effect option allows you to apply some effects to the subject. Select from the following configuration options: Black-White, Negative, and Sepia. Set to Normal for no effect. Save to
  • Страница 96 из 151
    Advanced This option allows you to set the following: - Filename prefix format - Filename prefix - File number - Date and time stamp - Shutter sound - Burst interval 96
  • Страница 97 из 151
    Taking photos After launching the camera, your device is set to Camera mode by default. If set otherwise, tap Menu > Change Mode > Camera Mode then tap Done. You can also set to camera mode by tapping the camera mode icon on the screen. To take a photo: 1. Aim device to your subject then half-press
  • Страница 98 из 151
    Video mode screen The following describes the screen icons in Video mode: Capture mode icon Remaining video recording time Default storage icon Video resolution Tap to close camera Tap to launch Pictures and Videos Recording indicator Green: Ready Red: Recording Tap to zoom in Capture mode icons:
  • Страница 99 из 151
    Video mode icons • Capture mode icon [ / ] - indicates the current capture mode. • Flash light status icon [ • Macro mode icon [ ] - this icon appears when the flash light is enabled. ] - this icon appears when the video is in macro mode. • Default storage icon [ / • Effects icon [ ] - indicates
  • Страница 100 из 151
    Video options menu The video options menu allows you to change various video and playback settings. To launch video options menu: 1. Tap Menu from the video screen. 2. From the shortcut menu, tap an icon to display contents. Video options shortcut menu 100
  • Страница 101 из 151
    Change Mode The Change Mode option allows you to set your device into Camera or Video capture mode. Zoom Allows you to change the maximum magnification allowed. Video Size Allows you to set the frame size of video. 101
  • Страница 102 из 151
    Flash Mode This option allows you to change the flash mode to suit a variety of lighting situations. Macro Mode Enables or disables the macro photography feature. Save to Allows you to select the default storage location for recorded video. NOTE: Prepare a MiniSD card before setting default storage
  • Страница 103 из 151
    Effect The Effect option allows you to apply some effects to the subject. Select from the following configuration options: Black-White, Negative, and Sepia. Set to Normal for no effect. Advanced Tap to display more options This option allows you to set the following: - Video filetype - Filename
  • Страница 104 из 151
    Recording videos Set the device to video capture mode to record videos. To set video mode: • Tap Menu > Change Mode > Video Mode then tap Exit. • You can also set the video mode by tapping the video mode icon on the screen as shown. Video mode icon To record video: 1. Aim device to your subject
  • Страница 105 из 151
    2. Full-press the camera/shutter button or press the navigation button action button to begin recording. The record indicator turns from green to red while video is recording. 3. Full-press the camera/shutter button or press the navigation button action button again to stop recording. Record
  • Страница 106 из 151
    Viewing pictures and videos Use the Pictures and Videos Application to preview stored images and playback video clips. Viewing pictures and videos To view pictures and videos: 1. Tap Start > Programs > Pictures and Videos. 2. Tap the picture or video clip you want to see. • To view pictures or
  • Страница 107 из 151
    Chapter Other features • Windows Live • Biz Card Recognition • Meeting Time Planner • Clean Reset • Internet Share • Flashlight • Remote Presenter • Setting ring tone 7 • Wake-up setting • Mode switcher • System information • Restoring factory default settings 107
  • Страница 108 из 151
    Windows Live Windows Live Windows Live on your device provides you a set of windows live service, including email, IM, and search. • See who among your contacts is online and chat with them by sending and receiving instant messages. • Access your hotmail account, if you have one, and send and
  • Страница 109 из 151
    2. Tap Sign in to Windows Live. From the screen appears, tap Accept. 3. Enter your e-mail address and password. Then tap Next. Windows Live Search: With Windows live search, you can quickly search the web for information, directions, maps and images. 1. Tap Start > Programs > Windows Live icon 2.
  • Страница 110 из 151
    Biz Card Recognition Biz Card Recognition is a character recognition utility that scans and analyzes the appearance of character details on a taken picture of a business card. It then subsequently identifies and categorizes the information then converts them to modifiable text on your Contacts
  • Страница 111 из 151
    IMPORTANT: • Make sure to clean the camera lens and provide enough lighting before taking a picture of business card. • Keep a “1600x1200” resolution when taking a picture of business card. 3. Take a clear picture of the business card. 4. If the picture is clear enough for processing, tap
  • Страница 112 из 151
    7. Tap Export to save the information in Contacts. Refer below for other screen options and features. Tap to change Category Tap the check box to include or exclude data field Tap the corresponding arrow to change data field Tap to add a data field Tap to save information to Contacts 8. Tap 112 to
  • Страница 113 из 151
    Meeting Time Planner Meeting Time Planner allows you to find a suitable time to have a video conference, telephone or net meeting with participants in different time zones. Using the Meeting Time Planner To use the Meeting Time Planner: 1. Tap Start > Programs > Meeting Time Planner. 2. Select the
  • Страница 114 из 151
    Clean Reset Clean Reset allows you to delete all data and restore the default factory settings. To perform a Clean Reset: 1. Press and hold the up button then reset using the stylus. 2. From the warning screen, press reset, or press to exit. 114 to do clean
  • Страница 115 из 151
    Internet Sharing With Internet Sharing, your computer can use your P735 as a modem for connecting to the Internet. To use the Internet Sharing: 1. Connect your device to the computer using Bluetooth or a USB cable. 2. Tap Start > Programs > Internet Sharing. 3. Select the PC connection type. 4.
  • Страница 116 из 151
    Flashlight The integrated flashlight allows you to use your device as a torch in the dark. To use the flashlight: 1. Press and hold the mode switcher button to turn on the flashlight. 2. A torch icon appears on the today screen. Tap switcher button again to turn off the flashlight. or press and
  • Страница 117 из 151
    Remote Presenter From your P735 device, Remote Presenter allows you to remotely control PowerPoint™ presentations running on your desktop or notebook. Operating over a Bluetooth wireless connection, it promotes convenience and freedom of movement during your presentation. It also enables you to
  • Страница 118 из 151
    The following describes the Remote Presenter menu on your computer screen. PowerPoint .ppt file path Tap to change path Tap to start or stop Bluetooth COM port 3. From the list of Bluetooth devices found, select the name of computer containing your PowerPoint presentation then tap Next. 118 Tap to
  • Страница 119 из 151
    5. From the Remote Controller menu on your computer, click to establish a connection. Tap to exit reminder. 6. When the connection is established, tap Connect. 119
  • Страница 120 из 151
    7. Your device prompts if the connection is successful or not. Repeat from step 1, if the connection failed. 8. Tap the name of PowerPoint (.ppt) file to show then tap Select. 120
  • Страница 121 из 151
    Upon selection, Microsoft® PowerPoint is automatically launched on your computer with the selected file open. 121
  • Страница 122 из 151
    9. You can now remotely control the PowerPoint presentation on your computer using your device. The following describes the control menu on your device. Slide number Tap to exit Tap to select slide Indicates Bluetooth® signal Timer Tap to toggle between Normal and Slide Show view Previous slide
  • Страница 123 из 151
    Setting ring tone With P735 you can add and configure your favorite music as your phone ring tone. You can easily configure your favorite song or sound as your ring tone with the following compatible audio formats: aac, amr, .mp3, .wav, .wma, and .mid. Adding ring tone to selection To add ring tone
  • Страница 124 из 151
    Changing the ring tone To change the ring tone: 1. Tap Start > Settings > Personal > Phone icon. 2. Select a ring tone from the Ring tone list box. The songs or sounds that you added as ring tone appears on this list along with the default ring tones that came with the device. Tap 3. Tap 124 to try
  • Страница 125 из 151
    Wake-up setting You can set the wake-up actions whenever your device is in sleep mode. To set the wake-up action: 1. Tap Start > Settings > Personal > Wakeup source icon. 2. Select from the available wake-up actions. Tap Select All to select all actions or tap Select None to deselect all available
  • Страница 126 из 151
    Mode switcher Mode switcher allows you to easily switch between applications and tasks. To use the mode switcher, press the mode switcher button on your device keypad. Press again to shift between applications. You can also use the mode switcher button to turn the flash light on or off. Press and
  • Страница 127 из 151
    System information The System Information contains important device information including the current device settings and version. To launch the System Information: 1. Tap Start > Settings > System > System Information icon. 2. Tap the Device Info tab for device hardware information. 3. Tap Version
  • Страница 128 из 151
    Restoring default factory settings This option allows you to restore the default factory settings. To restore default settings: 1. Tap Start > Settings > System tab > Default Settings. 2. Input ‘1234’ in the Password field to confirm that you want to restore to default settings. 3. Tap Ok. You can
  • Страница 129 из 151
    129
  • Страница 130 из 151
    Chapter 8 Device components status • ASUS Status icon 130
  • Страница 131 из 151
    ASUS status icon The ASUS status icon allows you to easily check and see the current status of the following device components: CPU, USB, LCD brightness, Battery power, Memory, MiniSD card, and storage. To check the status of these components, tap the ASUS Status icon on the Today screen. CPU:
  • Страница 132 из 151
    CPU mode setting Allows you to select the CPU mode (Turbo, Standard, Power Saving). Tap to check Automatic Mode to automatically change the CPU speed according to the CPU loading. USB setting Allows you to set the USB connection mode. • ActiveSync (Turbo mode) - allows a high speed serial
  • Страница 133 из 151
    LCD Brightness Adjusts the LCD brightness on battery power and external power. Power Displays the battery power status. The Advanced settings allows you to set a time when to turn-off the device if not used. 133
  • Страница 134 из 151
    Memory Displays the total, in use and free memory. Storage card memory Displays the total, in use, and available storage card memory. 134
  • Страница 135 из 151
    Programs running in memory Allows you to activate or stop any program running on memory. IMPORTANT: When you exit a running program, you are actually only minimizing it and the program remains in the memory. You can stop these programs from running in the background using this option. ASUS Status
  • Страница 136 из 151
    136
  • Страница 137 из 151
    Appendix • RF Exposure Information (SAR) • Notices • Safety information • Contact information 137
  • Страница 138 из 151
    RF Exposure Information (SAR) THIS MODEL MEETS INTERNATIONAL GUIDELINES FOR EXPOSURE TO RADIO WAVES Your mobile device is a radio transmitter and receiver. It is designed not to exceed the limits for exposure to radio waves recommended by international guidelines. These guidelines were developed by
  • Страница 139 из 151
    Additional Information can be found on the websites of the World Health Organization (http://www.who.int/emf). * The tests are carried out in accordance with international guidelines for testing. The limit incorporates a substantial margin for safety to give additional protection for the public and
  • Страница 140 из 151
    Notices Replaceable batteries If an equipment is provided with a replaceable battery and if replacement by an incorrect type could result in an explosion (e.g. with some lithium batteries), the following applies: – The battery is placed in an OPERATOR ACCESS AREA, there shall be a marking close to
  • Страница 141 из 151
    Operator access with a tool If a TOOL is necessary to gain access to an OPERATOR ACCESS AREA, either all other compartments within that area containing a hazard shall be inaccessible to the OPERATOR by the use of the same TOOL, or such compartments shall be marked to discourage OPERATOR access. An
  • Страница 142 из 151
    WARNING The user needs to switch off the device when exposed to areas with potentially explosive atmospheres such as petrol stations, chemical storage depots and blasting operations. 142
  • Страница 143 из 151
    ASUS Address: 15 Li-Te Road, Peitou, Taipei, Taiwan Tel: 886-2-2894-3447; Fax: 886-2-2890-7698 Declaration We declare that the IMEI codes for this product, P735, are unique to each unit and only assigned to this model. The IMEI of each unit is factory set and cannot be altered by the user and that
  • Страница 144 из 151
    Safety Information Phone care You should never attempt to open the phone casing. There are no user-serviceable parts inside and you might damage sensitive electronic circuits and components. Unauthorized disassembly will void the warranty. You should never leave your phone in the window of your car
  • Страница 145 из 151
    • Use only the battery approved by the manufacturer. • Never replace the battery with a non-approved battery. • Never soak the battery in water or any other fluid. • Never try to open the battery as it contains substances that might be harmful if swallowed or allowed to come into contact with
  • Страница 146 из 151
    Cleaning and storing • Your phone should always be handled with care and protected from dirt, dust and dampness. To avoid scratches, never place your phone face down. • If cleaning is necessary, switch the phone off and wipe carefully with a soft, slightly damp (not wet) cloth. Use a cotton swab
  • Страница 147 из 151
    Electronic devices Most modern electronic equipment is shielded from RF energy. However, certain electronic equipment may not be shielded against the RF signals from your Pocket PC phone. Pacemakers The Health Industry Manufacturers’ Association recommends that a minimum separation of six (6”)
  • Страница 148 из 151
    Vehicles RF signals may affect improperly installed or inadequately shielded electronic systems in motor vehicles. Check with the manufacturer or its representative regarding your vehicle. You should also consult the manufacturer of any equipment added to your vehicle. Posted facilities Turn your
  • Страница 149 из 151
    Sparks in such areas could cause an explosion or fire resulting in bodily injury or even death. Areas with a potentially explosive environment are often, but not always, clearly marked. They include fuelling areas such as gas stations, below decks on boats, fuel or chemical transfer or storage
  • Страница 150 из 151
    Contact information ASUSTeK COMPUTER INC. (Taiwan) Hotline: 0800-093-456 (Toll-Free call from Taiwan only) Fax: 886-2-2895-9254 E-mail: http://vip.asus.com/eservice/techserv.aspx WWW: http://tw.asus.com ASUSTeK COMPUTER INC. (Asia-Pacific) Hotline: 886-2-2894-3447 Fax: 886-2-2890-7698 E-mail:
  • Страница 151 из 151