Каталог инструкций
/
Производители
/
BENQ
/
FP581
Инструкция для BENQ FP581
Скачать инструкцию
(скачивание инструкции бесплатно)
Формат файла:
PDF
Доступность:
Бесплатно как и все руководства на сайте. Без регистрации и SMS.
Дополнительно:
Чтение инструкции онлайн
Benq FP581
LCD Color Monitor
15.0" (38.1cm) LCD Panel Size
User's Manual
Страница:
(
1
из 21)
навигация
1
2
3
4
5
6
7
8
9
10
11
12
13
14
15
16
17
18
19
20
21
Оглавление инструкции
Document Outline
Benq FP581
LCD Color Monitor
15.0" (38.1cm) LCD Panel Size
User's Manual
1. The AC adapter isolates this equipment from the AC supply.
2. Unplug this product from the wall outlet before cleaning. Do not use liquid or aerosol cleaner...
3. Slots and openings on the back or top of the cabinet are provided for ventilation. They must n...
4. This product should be operated from the type of power indicated on the marking label. If you ...
5. Never push objects of any kind, or spill liquid of any kind into this product.
6. Do not attempt to service this product yourself, as opening or removing covers may expose you ...
7. The power supply cord serves as a power disconnect device for pluggable equipment. The socket ...
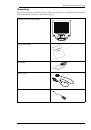
Unpacking
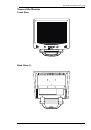
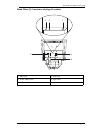
Views of the Monitor
Front View
Back View (1)
Back View (2): Locations of plugs & sockets
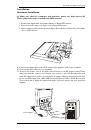
Installation
Hardware Installation
A . Make sure that the computer and monitor’s power are both turned off. Please follow the steps ...
Software Installation
A . Microsoft® Windows® 95 / 98 / 2000
Windows 95
1. Insert “Benq LCD Monitor” CD-ROM into your CD-ROM Driver.
2. Click “Start” then “Settings”.
3. Double click the “display” icon in the control panel.
4. From the “Display properties” window, select the “Settings” tab. Click the “Advanced Propertie...
5. Select the “Monitor” tab. Click the “Change” button in the top right corner.
6. Now click the “Have disk” button in the bottom right corner. Another window appears, select th...
7. The drive selection is located at the bottom of the window in the center. Insert the CD suppli...
8. In the field above the drive selection, change to the "Drivers” folder. The current driver fil...
9. By pressing “OK” again in the next window you will be given a list of compatible devices. Sele...
10. Now you are back to “Advanced Display Properties". Close this window by clicking “OK “ and co...
Windows98
1. Open the control panel and double-click "Display" icon.
2. From the "Display Properties" window, select the "Settings" tab. Click the "Advanced Propertie...
3. Select the "Monitor" tab. Click the "Change" button in the top right corner.
4. Now the "Update Device Driver Wizard" opens. Confirm by clicking "Next".
5. Select "Display a list of all drivers in a specific location, so you can select the driver you...
6. Now click the “Have disk” button in the bottom right corner. Another window appears, select th...
7. The drive selection is located at the bottom of the window in the center. Insert the CD suppli...
8. By pressing “OK” again in the next window you will be given a list of compatible devices. Sele...
9. A “Insert Disk” dialogue box appears. Click “OK”, and then click “Skip File”.
10. Close “Update Device Driver Wizard” by click “Finish” to complete the installation.
Windows 2000
1. Insert “Benq LCD Monitor” CD-ROM into your CD-ROM Driver.
2. Click “Start” then “Settings”.
3. Open the control panel and double click on the “Display” icon.
4. From the “Display Properties” window, select the “Settings” tab. Click the “Advanced Propertie...
5. Select “Monitor” then click “Properties”.
6. Select “Driver” tab then click “Update Driver”.
7. The “Upgrade Device Driver Wizard” will pop up. Then Click “Next”.
8. Select “Display a list of the known drivers for this device so that I can choose a specific dr...
9. In the next window, click “Have Disk”, then “Install From Disk” window will pop up, click “Bro...
10. In this window, click on the arrow (6) of ‘Look in” box, then select your CD ROM Drive.
11. In the list of CD-ROM, select “Drivers” folder then click “Open” twice, then click “OK”, Sele...
12. The “Digital Signature Not Found” window will appear, click “Yes”, then click “Finish”.
13. Now the new drivers are installed to your computer.
Windows ME
1. Click “Start”, “Settings”, “Control Panel” and then double-click “Display”.
2. In the Display Properties window, click the “Settings” tab and click “Advanced...”.
3. Click the “Monitor” tab and then click “Change”.
4. “Update Device Driver Wizard” dialogue box appears. Choose “Specify the location of the driver...
5. Choose “Display a list of all the drivers in a specific location, so you can select the driver...
6. Choose “Monitor” from the list and then click “Next”.
7. Choose “Display a list of all the drivers in a specific location, so you can select the driver...
8. Click “Have disk” and then click “Browse...”.
9. Insert “Benq LCD monitor” into your CD-ROM and type d:\ (change the driver letter to match you...
10. Back to “Install From disk” and click “OK”. The dialogue box “Update Device Driver Wizard” ap...
11. Click “Next”.
12. Click “Finish” to complete the installation.
B. Choosing the best resolution
1. Double-click the "Display" icon in the control panel.
2. From the "Display Properties" window, select the "Settings" tab. There is a slider on the righ...
3. Set a resolution of 1024x768.
4. In the subsequent windows press: "Apply", "OK" and "Yes".
5. You can now close "Display Properties".
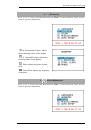
C. Refresh Rate Selection
1. Double click the "Display" icon in the control panel.
2. From the "Display Properties" window, select the "Settings" tab. Click the "Advanced propertie...
3. Select the "Adapter” tab. The refresh rate selection field is located in the center at the bot...
4. Choose a refresh rate from the table with the factory modes, which can be found in the user’s ...
5. In the subsequent windows press "Change", "OK" and "Yes".
6. You can now close "Display Properties".
D. Picture Optimization
1. Start the auto.exe program from the CD, supplied with the monitor. A test pattern appears.
2. Now press the ikey. The device carries out an automatic adjustment. In most cases optimal resu...
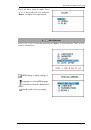
1. To do this restart the auto.exe test pattern, which is the best way of observing possible chan...
2. You can access the OSD menu by pressing the Enter button on the monitor.
3. Using the “<” or “>” key on the monitor, navigate to the submenu for the Geometry values and t...
4. Adjust the “Pixel Clock” by pressing “<” or “>” key to optimize the picture quality.
5. To Exit Clock submenu by pressing Exit twice (Geometry submenu).
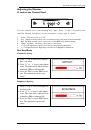
Adjusting the Monitor
A Look at the Control Panel
1. “Power”: Turn the power on or off.
2. “iKey” : Adjust vertical position, phase, horizontal position and pixel clock automatically.
3. “Exit” key: Back to main menus, save menu or exist OSD menu without saving.
4. “Enter” key: Enter sub-menus, select items or save items.
5. “<”: For Left adjustment. Left key is the hot key for Contrast adjustment.
6. “>”: For Right adjustment. Right key is the hot key for Brightness adjustment.
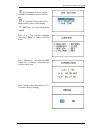
Hot Key Mode
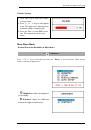
Main Menu Mode
1. Luminance
2. Geometry
3. Color Adjustment
4. Miscellaneous
5. Auto Setup
Troubleshooting
Frequently Asked Questions (FAQ)
Need More Help?
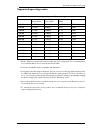
Supported operating modes
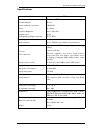
Specifications
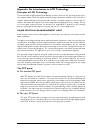
Appendix: An Introduction to LCD Technology
Principles of LCD Technology
The TFT panel
A. The standard TFT panel
B . The super TFT panel
C . Comparison of standard and super TFT display
Important LCD parameters
A . Viewing angle
B . Contrast
C . Response time
D . Brightness
Display errors
A . Pixel errors
B . Blurred image
C . Multifrequency as opposed to Multiscan
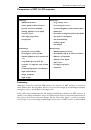
Comparison of CRT & LCD monitors
Summary
Инструкции и руководства похожие на BENQ FP581
BENQ DC C740i
BENQ BL902M
BENQ BL902M
BENQ MP523
BENQ MP720
BENQ FP531
BENQ fp92wa
BENQ t921
BENQ FP71G
Другие инструкции и руководства из категории ЖК-монитор
PHILIPS 247E4LHAB/01
PHILIPS 220E1SB/00
PHILIPS 277E6LDAD/00
PHILIPS 227E6LDSD/05
PHILIPS 276E7QDSW/00
BENQ FP71GX+
BENQ FP557 v2
BENQ FP567 s