10.
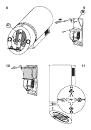
Recuerde que en la versión filtrante es necesario el filtro de carbón, por tanto, si no está instalado, proceda a su
instalación apoyándolo en el borde inferior del filtro y girándolo hacia el interior de la campana (Fig. 8).
11.
Vuelva a montar el filtro antigrasa.
funcionAMiento
Mandos de la Fig. 11:
p1:
presión breve enciende/apaga las luces inferiores
presión larga(>2”) enciende/apaga los LEDs (si los hay)
p2:
activa/desactiva la función AUTOMÁTICO
p3:
con el motor APAGADO no hace nada
con el motor ENCENDIDO, con presión breve, disminuye la velocidad hasta el apagado (4^?3^?2^?1^?OFF)
si la alarma de los filtros está activa, con presión larga (>2”), restablece la alarma de los filtros
p4:
con el motor APAGADO, enciende el motor;
con el motor ENCENDIDO, aumenta la velocidad.
p5:
con el motor APAGADO, enciende el motor a la velocidad memorizada en fase de apagado o primera velocidad.
si se presiona por 2’’, desactiva todas las cargas (luces inferiores, LED, motor) memorizando la velocidad del motor.
NOTA. El conteo de horas para el cambio de los filtros se mantiene incluso en caso de faltar la corriente.
Alarma filtros:
Después de 30h de funcionamiento del motor, el segmento central del visor se enciende por 30’’ cada vez que se
apaga el motor.
Después de 120h de funcionamiento del motor, el segmento central del visor destella por 30’’ cada vez que se apaga
el motor.
Para efectuar el RESET de la alarma de los filtros, presione P3 (presión larga) cuando los mismos estén activos.
Visor:
1) indica la velocidad en curso
2) con el motor apagado, indica la alarma FILTROS: 30 horas segmento central fijo, 120 horas segmento central
destellante
función AutoMÁtico
Una vez configurada la función
AutoMÁtico
, el sensor configura automáticamente la velocidad; este modo de
funcionamiento se indica en el visor con una “A”. Cuando se activa/desactiva la función
AutoMÁtico
, el motor se
apaga. Cuando se realiza un cambio de velocidad, el visor muestra la velocidad actual destellando por 5” y luego,
vuelve a aparecer la “A”. Durante el funcionamiento
AutoMÁtico
es posible intervenir sobre la velocidad del motor.
Si se apaga el motor (por medio de P3 o P5) cuando la función
AutoMÁtico
está activa, esta función se desactiva.
Configuración de la SENSIBILIDAD
•
Con el motor apagado y la función AUTOMÁTICO desactivada, presione P2 (presión larga) hasta que el visor
muestra la sensibilidad actual.
•
Seleccione la sensibilidad con P3 (-) y P4 (+). El valor puede programarse de 1 a 9.
•
Para memorizar la sensibilidad nueva, presione P2.
AtenciÓn: pArA eVitAr DAñAr eL sensor, ¡no use proDuctos siLicÓnicos
cercA De LA cAMpAnA!
filtro antigrasa:
hay que prestar suma atención al filtro antigrasa, que debe limpiarse periódicamente.
Aproximadamente cada 2 meses, limpie el filtro antigrasa cuando aparezca la alarma (para instrucciones sobre la
alarma de los filtros, consulte el párrafo de los mandos).
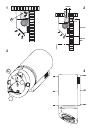
Desmontaje del filtro antigrasa: empuje la manilla hacia fuera y tire del filtro hacia abajo (Fig. 3). Lave el filtro con
detergente neutro.
filtro de carbón:
si el aparato se utiliza en versión filtrante, es necesario sustituir periódicamente el filtro de carbón.
Aproximadamente cada 6 meses, según el uso, sustituya el filtro de carbón cuando aparezca la alarma de los filtros
(para instrucciones sobre la alarma de los filtros, consulte el párrafo de los mandos). Desmontaje del filtro de carbón:
extraiga el filtro antigrasa empujando la manilla hacia fuera y tirando del filtro hacia abajo (Fig.3); luego, quite el filtro
de carbón tirando de la lengüeta y girando el filtro hacia abajo (Fig. 8).
iluminación
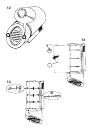
: para cambiar las lámparas halógenas, abra la tapa haciendo palanca sobre las hendiduras apropiadas
(Fig.12). Sustitúyalas con lámparas del mismo tipo.
sustitución de los LeDs:
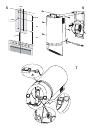
retire el panel delantero (Fig. 13-C), retire los tornillos de fijación (Fig. 13-B).
Retire el tornillo del estribo de fijación (Fig. 14-A), desconecte la conexión (Fig. 14-B).
Sustituya por LEDs del mismo tipo.