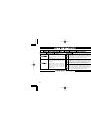
Инструкция для BOSS TU-2 Chromatic Tuner

(скачивание инструкции бесплатно)
Формат файла: PDF
Доступность: Бесплатно как и все руководства на сайте. Без регистрации и SMS.
Дополнительно: Чтение инструкции онлайн
background image

26

Specifications

TU-2: Chromatic Tuner

Reference Pitch .......... A4 = 438 to 445 Hz (1 Hz step)
Tuning Range ............. C0 (16.35 Hz) to C8 (4186 Hz)
Tuning Accuracy ........ +/-3 cents
Input Impedance ........ 1 M

Controls ..................... STREAM/CENT select switch, MODE select switch, Pedal switch
Indicators ................... Meter, Note name/String number indicator, Tuning guide indicators,

Check indicator

Connectors ................ Input jack, Output jack, Bypass jack, DC 9V In jack, DC 9V Out jack
Power Supply ............. DC 9V: Dry battery (6F22/9V), AC Adaptor (PSA-Series: Optional)
Current Draw ............. 55 mA (Max.)

* Expected battery life under continuous use:

Carbon:

1.5 hours (When the tuner is continuously on)
6 hours

(When the tuner is on for one minute and off
for three minutes)

Alkaline: 6 hours

(When the tuner is continuously on)

These figures will vary depending on the actual conditions of use.

1
2
3
4
5
6
7
8
9
10
11
12
13
14
15
16
17
18
19
20
21
22
23
24
25
26
27
28
29
30
31
32
33
34
35
36
Оглавление инструкции
  • Страница 1 из 37
    Owner’s Manual AC DC AC & BATTERY POWERED FET 1
  • Страница 2 из 37
    Thank you, and congratulations on your choice of BOSS TU-2 Chromatic Tuner. Before using this unit, carefully read the sections entitled: “USING THE UNIT SAFELY” and “IMPORTANT NOTES” (p. 28–34; 5–7). These sections provide important information concerning the proper operation of the unit.
  • Страница 3 из 37
    Features • The ideal tuner for use in live concert situations. • Since the TU-2 uses the same shape and structure as other Boss compact effect units, it features excellent durability and allows neat connection with other effect units. • The OUTPUT is muted when the tuning function is on, allowing
  • Страница 4 из 37
    • In Guitar/Bass mode, you can also use Flat tuning (a semitone down) or Doubleflat tuning (a whole step down). • When the tuner is off, a battery conservation function minimizes power consumption. • By using an AC adapter (sold separately) with the DC 9V in/out jacks, you can supply power to other
  • Страница 5 из 37
    IMPORTANT NOTES In addition to the items listed under “USING THE UNIT SAFELY” on page 28–34, please read and observe the following: Power Supply: Use of Batteries • Do not use this unit on the same power circuit with any device that will generate line noise (such as an electric motor or variable
  • Страница 6 из 37
    • This device may interfere with radio and television reception. Do not use this device in the vicinity of such receivers. • Do not expose the unit to direct sunlight, place it near devices that radiate heat, leave it inside an enclosed vehicle, or otherwise subject it to temperature extremes.
  • Страница 7 из 37
    • Never strike or apply strong pressure to the display. • When connecting / disconnecting all cables, grasp the connector itself—never pull on the cable. This way you will avoid causing shorts, or damage to the cable’s internal elements. • To avoid disturbing your neighbors, try to keep the unit’s
  • Страница 8 из 37
    1. DC 9V In jack Panel Description 2 An AC adapter (BOSS PSA series: sold separately) can be connected to this jack. If an AC adapter is used, you will be able to play for extended periods without worrying about battery life. * As soon as you connect the AC adapter, the unit is turned ON. 1 8 5 3 7
  • Страница 9 из 37
    3. Meter The meter indicates the pitch deviation of the input sound from the note name or string number that is shown in the note name / string number indicator. CENT display The LED that is lit will be further toward the left as the input pitch is flat, and further toward the right as the input
  • Страница 10 из 37
    5. Tuning guide indicators 6. MODE select switch These will light to roughly indicate the tuning. This switch changes the tuning mode. When this switch is first pressed, the meter will blink to indicate the current mode. If you press the switch again, the meter will cycle through the following
  • Страница 11 из 37
    7. STREAM/CENT select switch 9. INPUT jack This switches the meter display method. The meter will indicate the selected display method for approximately two seconds after the method has been switched. Use this jack to connect the electric guitar / electric bass that you wish to tune. 8. CHECK
  • Страница 12 из 37
    11. BYPASS jack Connect your amp or another effect unit to this jack. This jack will always output the signal from the instrument connected to the Input jack. Use this jack if you want to be heard while you tune. 12. Pedal switch Pressing this switch will turn the tuner on/off. 13. Thumbscrew When
  • Страница 13 из 37
    Connections * Before connecting or disconnecting any patch cords, be sure all the volume controls in your system are set to minimum. This will help prevent any damage to system components. * To prevent malfunction and/or damage to speakers or other devices, always turn down the volume, and turn off
  • Страница 14 из 37
    Turning on the power * Always make sure to have the volume level of your amp turned down before switching on power. Even with the volume all the way down, you may still hear some sound when the power is switched on, but this is normal, and does not indicate a malfunction. If you are using an AC
  • Страница 15 из 37
    Tuning in chromatic mode * If you wish to change the standard pitch, do so before you begin tuning (page 20). 1. Press the MODE select switch several times to make “CHROMATIC” light. * When the TU-2 is shipped from the factory Chromatic mode is selected. 3. Play a single note on your instrument.
  • Страница 16 из 37
    Tuning in Guitar mode * If you wish to change the standard pitch, do so before you begin tuning (page 20). 1. Press the MODE select switch several times to make “GUITAR” light. If you are using flat tuning (semitone down) make “ ” light. If you are using double flat tuning (whole step down) make “
  • Страница 17 из 37
    2. If the tuner is not on (CHECK should be lit), press the pedal to turn it on. 3. Play a single note on your instrument. The string number closest to the pitch of the input sound will appear in the note name / string number indicator, and the meter will indicate the pitch deviation. (String number
  • Страница 18 из 37
    Tuning in Bass mode * If you wish to change the standard pitch, do so before you begin tuning (page 20). 1. Press the MODE select switch several times to make “BASS” light. If you are using flat tuning (semitone down) make “ ” light. If you are using double flat tuning (whole step down) make “ ”
  • Страница 19 из 37
    2. If the tuner is not on (CHECK should be lit), press the pedal to turn it on. 3. Play a single note on your instrument. The string number closest to the pitch of the input sound will appear in the note name / string number indicator, and the meter will indicate the pitch deviation. (String number
  • Страница 20 из 37
    Adjusting the standard pitch 1. Simultaneously press the MODE select switch and the STREAM/CENT select switch. 440 441 442 443 439 438 445 444 When you press the STREAM/CENT select switch, the standard pitch will change as follows. 2. The first digit of the currently selected standard pitch (0, if
  • Страница 21 из 37
    Memorizing the standard pitch With the factory settings, the TU-2 will return to a standard pitch of 440 Hz when the power is turned off. If you wish to leave the standard pitch at a setting of other than 440 Hz, you can use the following procedure to memorize the standard pitch. 1. Turn on the
  • Страница 22 из 37
    Storefront demo display 1. Turn on the power while holding down the STREAM/CENT select switch. 2. Continue holding down the switch for approximately two seconds. 3. The storefront demo display mode will begin. Release the switch. 4. The demo will continue until you turn the power off and on again,
  • Страница 23 из 37
    Changing the battery When the CHECK indicator goes dim or no longer lights while an effect is on, it means that the battery is nearly dead and must be replaced. Replace the battery following the steps below. Thumbscrew Pedal Spring Base Coil Spring Battery Snap Cord 1. Loosen the thumbscrew at the
  • Страница 24 из 37
    Various types of tuning By using Chromatic mode you can tune in a variety of ways. First, tune normally to get each string in tune. Then refer to the following tables and adjust each string to the appropriate note name. 6th string 5th string 4th string 3rd string 2nd string 1st string 24 — — — — —
  • Страница 25 из 37
    Drop D Raise / Lower 6th string 5th string 4th string 3rd string 2nd string 1st string — — — — — Note name D A D G B E DADGAD Raise / Lower 6th string 5th string 4th string 3rd string 2nd string 1st string — — — Note name D A D G A D Semitone flat (Guitar is also possible) 1 and a half steps flat
  • Страница 26 из 37
    Specifications TU-2: Chromatic Tuner Reference Pitch .......... A4 = 438 to 445 Hz (1 Hz step) Tuning Range ............. C0 (16.35 Hz) to C8 (4186 Hz) Tuning Accuracy ........ +/-3 cents Input Impedance ........ 1 MΩ Controls ..................... STREAM/CENT select switch, MODE select switch,
  • Страница 27 из 37
    Dimensions ................ 73 (W) x 129 (D) x 59 (H) mm 2-7/8 (W) x 5-1/8 (D) x 2-3/8 (H) inches Weight ....................... 420 g / 15 oz (including battery) Accessories ................ Owner's Manual Dry battery; 6F22/9V (Carbon) Leaflet (“USING THE UNIT SAFELY,” “IMPORTANT NOTES,” and
  • Страница 28 из 37
    Used for instructions intended to alert the user to the risk of death or severe injury should the unit be used improperly. Used for instructions intended to alert the user to the risk of injury or material damage should the unit be used improperly. * Material damage refers other adverse effects
  • Страница 29 из 37
    004 001 • Before using this unit, make sure to read the instructions below, and the Owner's Manual. ............................................................................... 002c • Do not open (or modify in any way) the unit or its AC adaptor.
  • Страница 30 из 37
    008b Use only the specified AC adaptor (PSA series), and make sure the line voltage at the installation matches the input voltage specified on the AC adaptor’s body. Other AC adaptors may use a different polarity, or be designed for a different voltage, so their use could result in damage,
  • Страница 31 из 37
    012c 014 • Immediately turn the power off, remove the AC adaptor from the outlet, and request servicing by your retailer, the nearest Roland Service Center, or an authorized Roland distributor, as listed on the "Information" page when: • The AC adaptor or the power-supply cord has been damaged; or
  • Страница 32 из 37
    019 • Batteries must never be recharged, heated, taken apart, or thrown into fire or water. ............................................................................... 101b • The unit and the AC adaptor should be located so their location or position does not interfere with their proper
  • Страница 33 из 37
    106 111: Selection • Never climb on top of, nor place heavy objects on the unit. • If used improperly, batteries may explode or leak and cause damage or injury. In the interest of safety, please read and observe the following precautions (p. 23). 1 • Carefully follow the installation instructions
  • Страница 34 из 37
    6 • Never keep batteries together with metallic objects such as ballpoint pens, necklaces, hairpins, etc. ............................................................................... 112 • Used batteries must be disposed of in compliance with whatever regulations for their safe disposal that may
  • Страница 35 из 37
    For EU Countries This product complies with the requirements of European Directive 89/336/EEC. For the USA FEDERAL COMMUNICATIONS COMMISSION RADIO FREQUENCY INTERFERENCE STATEMENT This equipment has been tested and found to comply with the limits for a Class B digital device, pursuant to Part 15 of
  • Страница 36 из 37
    36 G6017441R0 7RTC
  • Страница 37 из 37