Инструкция для BROTHER STAR 35

(скачивание инструкции бесплатно)
Формат файла: PDF
Доступность: Бесплатно как и все руководства на сайте. Без регистрации и SMS.
Дополнительно: Чтение инструкции онлайн
background image

25

KNOWING YOUR SEWING MACHINE

KENNENLERNEN IHRER MASCHINE

КРАТКОЕ ТЕХНИЧЕСКОЕ ОПИСАНИЕ МАШИНЫ

РЕКОМЕНДУЕМАЯ ДЛИНА СТЕЖКА

(Модели PS-53)

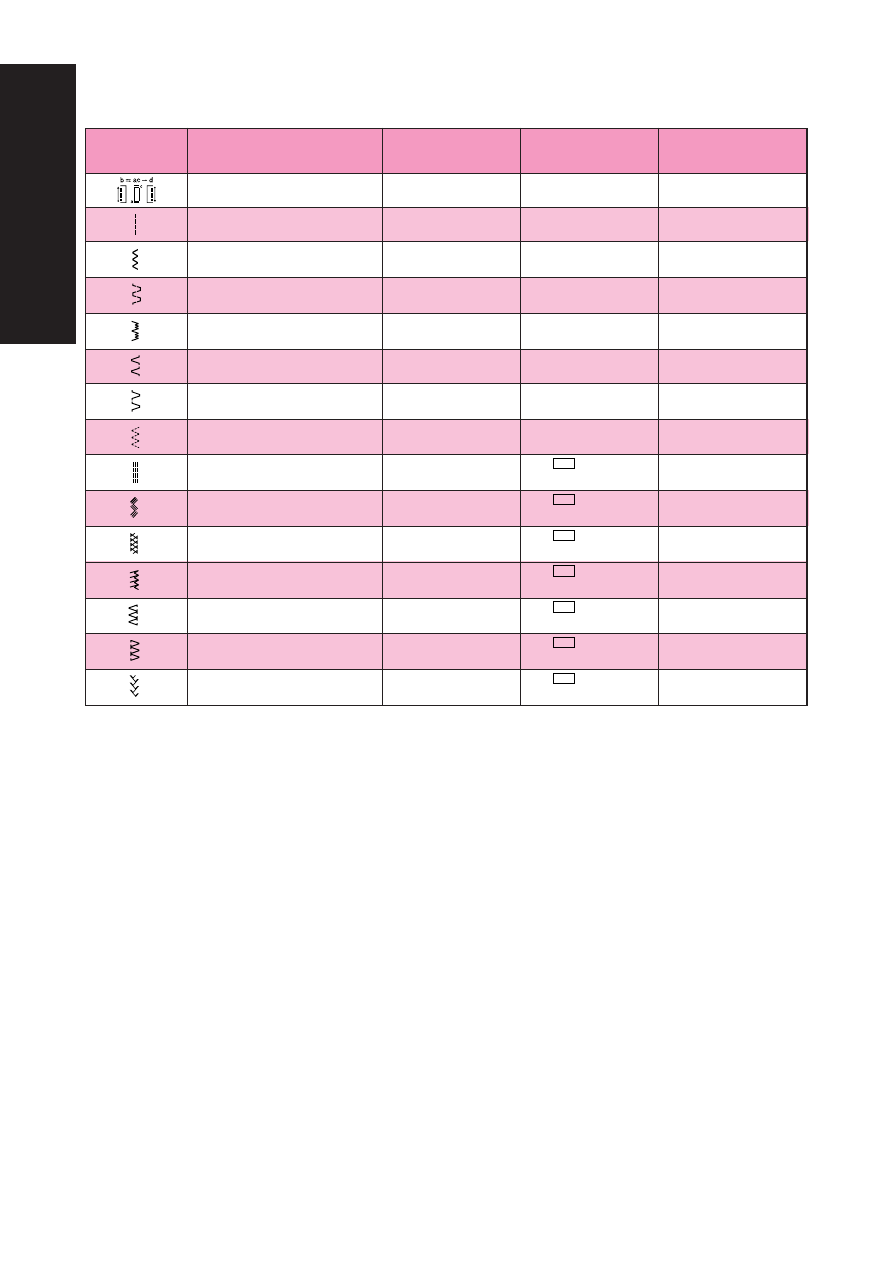
СТРОЧКА

   НАИМЕНОВАНИЕ СТЕЖКА

ЗАДАННАЯ ШИРИНА

РЕКОМЕНДУЕМАЯ ДЛИНА

НОМЕР СТРАНИЦЫ

[мм(дюймы)]

[ мм(дюймы)]

РУКОВОДСТВА

4-СТУПЕНЧАТОЕ АВТОМАТИЧЕСКОЕ 3-5 (Отметки на ручке 4-7)

F-1,5

64

ОБМЕТЫВАНИЕ ПЕТЛИ

(1/8-3/16)

(1/64-1/16)

ПРЯМОЙ СТЕЖОК

6,5

1-4,5

51, 74, 75

(1/4)

(3/64-3/16)

ЗИГЗАГООБРАЗНЫЙ

0-6,5

F-4,5

53, 72, 76, 78

СТЕЖОК

(0-1/4)

(1/64-3/16)

СТЕЖОК С ДВОЙНЫМ

3-6,5

F-3

57

ЭФФЕКТОМ

(1/8-1/4)

(1/64-1/8)

ПОДШИВОЧНАЯ

3-6,5

F-1,5

54

ТРИКОТАЖНАЯ СТРОЧКА

(1/8-1/4)

(1/64-1/16)

ПОТАЙНОЙ

3-6,5

F-2

54

ПОДРУБОЧНЫЙ ШОВ

(1/8-1/4)

(1/64-1/16)

ПОДШИВОЧНАЯ СТРОЧКА

3-6,5

F-3

55

(1/8-1/4)

(1/64-1/8)

ЭЛАСТИЧНАЯ СТРОЧКА

3-6,5

F-2,5

56

(1/8-1/4)

(1/64-3/32)

ТРОЙНАЯ ТРИКОТАЖНАЯ

6,5

SS

 Фиксир.

51

СТРОЧКА

(1/4)

2,5 (3/32)

ТРОЙНАЯ ТРИКОТАЖНАЯ »

3-6,5

SS

 Фиксир.

62

СТРОЧКА «ЗИГЗАГ

(1/8-1/4)

2,5 (3/32)

СОЕДИНИТЕЛЬНЫЙ

3-6,5

SS

 Фиксир.

60

СТЕЖОК

(1/8-1/4)

2,5 (3/32)

СТРОЧКА «ГРЕБЕШОК»

3-6,5

SS

 Фиксир.

61

(1/8-1/4)

2,5 (3/32)

ЭЛАСТИЧНАЯ ОВЕРЛОЧНАЯ

3-6,5

SS

 Фиксир.

61

 СТРОЧКА

(1/8-1/4)

2,5 (3/32)

ЭЛАСТИЧНАЯ ОВЕРЛОЧНАЯ

3-6,5

SS

 Фиксир.

61

СТРОЧКА

(1/8-1/4)

2,5 (3/32)

ПЕРИСТРЫЙ СТЕЖОК

3-6,5

SS

 Фиксир.

62

(1/8-1/4)

2,5 (3/32)

1
2
3
4
5
6
7
8
9
10
11
12
13
14
15
16
17
18
19
20
21
22
23
24
25
26
27
28
29
30
31
32
33
34
35
36
37
38
39
40
41
42
43
44
45
46
47
48
49
50
51
52
53
54
55
56
57
58
59
60
61
62
63
64
65
66
67
68
69
70
71
72
73
74
75
76
77
78
79
80
81
82
83
84
85
86
87
88
89
90
91
92
93
94
95
96
97
98
99
100
101
102
103
104
105
106
107
108
109
110
111
Оглавление инструкции
  • Страница 1 из 112
    Instruction Manual Bedienungsanleitung Руководство по эксплуатации
  • Страница 2 из 112
    Kabelanschlüsse 1. Schließen Sie das Netzkabel an der Maschine an. 2. Stecken Sie den Netzstecker in eine Netzsteckdose. VORSICHT 1. Schalten Sie die Maschine mit dem Netzschalter aus oder ziehen Sie den Netzstecker aus der Steckdose, wenn Sie die Nähmaschine nicht benutzen oder unbeaufsichtigt
  • Страница 3 из 112
    KNOWING YOUR SEWING MACHINE KENNENLERNEN IHRER MASCHINE КРАТКОЕ ТЕХНИЧЕСКОЕ ОПИСАНИЕ МАШИНЫ (Model STAR 240E, STAR 230E) Main Power/Sewing Light Switch This switch turns the main power/sewing light on or off. 1 Turn on (toward the “I” mark) 2 Turn off (toward the “O” mark) 1 2 (Model PS-57, PS-55,
  • Страница 4 из 112
    When the foot controller is depressed lightly, the machine will run at a low speed. When the pressure on the foot controller is increased, the machine’s speed will increase. When pressure on the foot controller is released, the machine will stop. Care should be taken that nothing is placed on the
  • Страница 5 из 112
    KNOWING YOUR SEWING MACHINE KENNENLERNEN IHRER MASCHINE КРАТКОЕ ТЕХНИЧЕСКОЕ ОПИСАНИЕ МАШИНЫ Checking the Needle The sewing needle must always be straight and sharp for smooth sewing. To Check the Needle Correctly: To check the needle, place the flat side of the needle on a flat surface. Check the
  • Страница 6 из 112
    Проверка иглы Die Nähnadel muß für problemloses Nähen immer gerade und spitz sein. Во избежание проблем в процессе шитья швейная игла всегда должна быть строго прямолинейной и остро заточенной. Richtiges Überprüfen der Nadel: Um die Nadel zu überprüfen, legen Sie sie mit der abgeflachten Seite auf
  • Страница 7 из 112
    KNOWING YOUR SEWING MACHINE KENNENLERNEN IHRER MASCHINE КРАТКОЕ ТЕХНИЧЕСКОЕ ОПИСАНИЕ МАШИНЫ Changing the Presser Foot CAUTION • • • Always turn off the power before changing the presser foot. If the power is on and the Start/Stop button is pressed or foot controller is stepped on, the machine will
  • Страница 8 из 112
    The accessories are stored in a compartment under the flat bed attachment cover, which can be opened by flipping it toward you. Anschiebetisch (mit Zubehörfach) Платформа-приставка Das Zubehör wird in einem Fach unter der Abdeckung des Anschiebetisches aufbewahrt. Die Abdeckung kann nach vorne
  • Страница 9 из 112
    KNOWING YOUR SEWING MACHINE KENNENLERNEN IHRER MASCHINE КРАТКОЕ ТЕХНИЧЕСКОЕ ОПИСАНИЕ МАШИНЫ 1 2 3 4 5 6 7 8 9 10 11 12 13 14 15 16 17 18 19 STAR 240E PS-57 20 21 22 23 24 25 26 27 28 29 30 31 32 33 34 35 36 37 VARIOUS CONTROLS Pattern Selection Dial 3 1 CAUTION When you use the Pattern Selection
  • Страница 10 из 112
    2 3 4 5 6 7 8 9 KNOWING YOUR SEWING MACHINE KENNENLERNEN IHRER MASCHINE КРАТКОЕ ТЕХНИЧЕСКОЕ ОПИСАНИЕ МАШИНЫ 1 10 11 12 13 14 STAR 230E PS-55 15 16 17 18 19 20 21 22 23 24 25 26 27 1 2 3 4 5 6 7 8 9 10 11 12 13 14 15 PS-53 VERSCHIEDENE REGLER ОРГАНЫ НАСТРОЙКИ Stichmuster-Einstellrad Ручка выбора
  • Страница 11 из 112
    KNOWING YOUR SEWING MACHINE KENNENLERNEN IHRER MASCHINE КРАТКОЕ ТЕХНИЧЕСКОЕ ОПИСАНИЕ МАШИНЫ RECOMMENDED WIDTHS AND LENGTHS FOR STITCHES (Model STAR 240E, PS-57) PATTERN RECOMMENDED WIDTH [mm(inch)] RECOMMENDED LENGTH [mm(inch)] 3-5 (Dial 4-7) (1/8-3/16) 6.5 (1/4) 0-6.5 (0-1/4) F-1.5 (1/64-1/16)
  • Страница 12 из 112
    KNOWING YOUR SEWING MACHINE KENNENLERNEN IHRER MASCHINE КРАТКОЕ ТЕХНИЧЕСКОЕ ОПИСАНИЕ МАШИНЫ RECOMMENDED WIDTHS AND LENGTHS FOR STITCHES (Model STAR 230E, PS-55, STAR-50, RSR-55, XRX-55) PATTERN RECOMMENDED WIDTH [mm(inch)] RECOMMENDED LENGTH [mm(inch)] 3-5 (Dial 4-7) (1/8-3/16) 6.5 (1/4) 0-6.5
  • Страница 13 из 112
    "IMPORTANT SAFETY INSTRUCTIONS" When using this machine, basic safety precautions should always be taken , including the following: "Read all instructions before using." DANGER – To reduce the risk of electric shock: 1. The machine should never be left unattended when plugged in. Always unplug this
  • Страница 14 из 112
    ANSCHLIESSEN AN DAS STROMNETZ ACHTUNG • • Als Stromquelle darf nur gewöhnlicher Haushaltsstrom verwendet werden. Das Verwenden andersartiger Stromquellen kann Brand, elektrischen Schlag und Beschädigungen der Maschine zur Folge haben. Schalten Sie die Maschine in den folgenden Situationen am
  • Страница 15 из 112
    «УКАЗАНИЯ ПО ТЕХНИКЕ БЕЗОПАСНОСТИ» При пользовании швейной машиной всегда необходимо соблюдать рекомендации по технике безопасности, включающие следующие положения: “Перед началом работы на машине внимательно изучите настоящее руководство.” ВНИМАНИЕ – Для того, чтобы уменьшить риск поражения
  • Страница 16 из 112
    FOR USERS IN UK, EIRE, MALTA AND CYPRUS ONLY. If this machine is fitted with a 3 pin non-rewireable BS plug then please read the following. IMPORTANT (in the United Kingdom) Main supply (AC 230/240V~, 50Hz) DO NOT cut off the main plug from equipment. If the plug fitted is not suitable for the
  • Страница 17 из 112
    (Model PS-57, PS-55, STAR-50, RSR-55, XRX-55, PS-53) 1 2 1. Connect the power cord or three-prong plug into the machine. 2. Connect the electrical supply plug into a wall outlet. - When leaving the machine unattended, the main switch of the machine should be switched off or the plug must be removed
  • Страница 18 из 112
    PLEASE READ BEFORE USING THIS MACHINE For safe operation 1. Be sure to keep your eye on the needle while sewing. Do not touch the balance wheel, thread take-up, needle, or other moving parts. 2. Remember to turn off the power switch and unplug the cord when: • Operation is completed • Replacing or
  • Страница 19 из 112
    BITTE VOR BENUTZUNG DIESER MASCHINE LESEN Für sicheren Betrieb: 1. Behalten Sie während des Nähens immer die Nadel im Auge. Handrad, Fadenhebel, Nadel und andere bewegliche Teile dürfen nicht berührt werden. 2. Denken Sie daran, den Netzschalter auszuschalten und den Stecker aus der Steckdose zu
  • Страница 20 из 112
    ПОЖАЛУЙСТА, ПРОЧИТАЙТЕ ПЕРЕД НАЧАЛОМ ЭКСПЛУАТАЦИИ МАШИНЫ В целях безопасности 1. Всегда следите за иглой во время шитья. Не прикасайтесь к маховику, механизму подтягивания нитки, игле или иным движущимся деталям машины. 2. Помните о необходимости выключить выключатель питания и отсоединить шнур
  • Страница 21 из 112
    TABLE OF CONTENTS KNOWING YOUR SEWING MACHINE PRINCIPAL PARTS ......................................................... 1 ACCESSORIES ............................................................... 5 Optional Accessories .............................................. 5 OPERATING YOUR SEWING MACHINE
  • Страница 22 из 112
    INHALT KENNENLERNEN IHRER MASCHINE KNOPFLÖCHER UND KNÖPFE NÄHEN HAUPTBESTANDTEILE ........................................................ 2 ZUBEHÖR ................................................................................ 6 Optionales Zubehör
  • Страница 23 из 112
    ОГЛАВЛЕНИЕ КРАТКОЕ ТЕХНИЧЕСКОЕ ОПИСАНИЕ МАШИНЫ ОСНОВНЫЕ ЧАСТИ МАШИНЫ .................................... 2 ПРИНАДЛЕЖНОСТИ ..................................................... 6 Дополнительные принадлежности ..................... 6 ПОЛЬЗОВАНИЕ МАШИНОЙ ......................................... 8
  • Страница 24 из 112
    KNOWING YOUR SEWING MACHINE KENNENLERNEN IHRER MASCHINE КРАТКОЕ ТЕХНИЧЕСКОЕ ОПИСАНИЕ МАШИНЫ 5 4 3 2 PRINCIPAL PARTS 1 (Model STAR 240E, STAR 230E) 1 BOBBIN WINDER (Page 33) Winds the thread onto the bobbin to be used for the lower thread. 2 STITCH LENGTH DIAL (Page 15, 26) Controls the length of
  • Страница 25 из 112
    ОСНОВНЫЕ ЧАСТИ МАШИНЫ (Modell STAR 240E, STAR 230E) (Модели STAR 240E, STAR 230E) 1 SPULER (Seite 34) Spult den Faden auf die Unterfadenspule. 2 STICHLÄNGEN-EINSTELLRAD (Seite 16, 27) Stellt die Stichlänge ein. 3 GARNROLLENSTIFT UND -HALTER (Seite 34, 40) 4 STICHBREITEN-EINSTELLRAD (Seite 28)
  • Страница 26 из 112
    KNOWING YOUR SEWING MACHINE KENNENLERNEN IHRER MASCHINE КРАТКОЕ ТЕХНИЧЕСКОЕ ОПИСАНИЕ МАШИНЫ 5 4 3 2 1 PRINCIPAL PARTS (Model PS-57, PS-55, STAR-50, RSR-55, XRX-55, PS-53) 1 BOBBIN WINDER (Page 33) Winds the thread onto the bobbin to be used for the lower thread. 2 STITCH LENGTH DIAL (Page 15, 26)
  • Страница 27 из 112
    ОСНОВНЫЕ ЧАСТИ МАШИНЫ (Модели PS-57, PS-55, STAR-50, RSR-55, XRX-55, PS-53) 1 SPULER (Seite 34) Spult den Faden auf die Unterfadenspule. 2 STICHLÄNGEN-EINSTELLRAD (Seite 16, 27) Stellt die Stichlänge ein. 3 GARNROLLENSTIFT UND -HALTER (Seite 34, 40) 4 STICHBREITEN-EINSTELLRAD (Seite 28) Regelt die
  • Страница 28 из 112
    KNOWING YOUR SEWING MACHINE KENNENLERNEN IHRER MASCHINE КРАТКОЕ ТЕХНИЧЕСКОЕ ОПИСАНИЕ МАШИНЫ 1 X59370-051 3 X57117-051 2 SA156 XA5539-051 4 X57521-001 5 XA4911-151 (STAR 240E, STAR 230E PS-57, PS-55, STAR-50, RSR-55, XRX-55) X59369-251 (PS-53) ACCESSORIES 1 Zipper Foot (1 pc.) 2 Bobbin (3 pcs.)
  • Страница 29 из 112
    ПРИНАДЛЕЖНОСТИ 1 Reißverschlußfuß (1 St.) 2 Spule (3 St.) SA156 (für die USA) XA5539-051 (andere Länder) Ersatzteile (10-teiliges Set) 3 Nadel-Set (Normale Einfach-Nadel Nr. 14) (3 St.) 4 Doppelnadel (1 St.) 5 Knopflochfuß (1 St.) 6 Garnrollenkappe (Groß) (1 St.) 7 Garnrollenkappe (Klein) (1 St.) 8
  • Страница 30 из 112
    KNOWING YOUR SEWING MACHINE KENNENLERNEN IHRER MASCHINE КРАТКОЕ ТЕХНИЧЕСКОЕ ОПИСАНИЕ МАШИНЫ OPERATING YOUR SEWING MACHINE (Model STAR 240E, STAR 230E) Connecting Plugs 1. Connect the power cord plug into the machine. 2. Connect the power supply plug into a wall outlet. (Model PS-57, PS-55, STAR-50,
  • Страница 31 из 112
    KNOWING YOUR SEWING MACHINE KENNENLERNEN IHRER MASCHINE КРАТКОЕ ТЕХНИЧЕСКОЕ ОПИСАНИЕ МАШИНЫ RECOMMENDED WIDTHS AND LENGTHS FOR STITCHES (Model PS-53) PATTERN RECOMMENDED WIDTH mm (inch) RECOMMENDED LENGTH mm (inch) ZIGZAG STITCH 3-5 (Dial 4-7) (1/8-3/16) 6.5 (1/4) 0-6.5 (0-1/4) F-1.5 (1/64-1/16)
  • Страница 32 из 112
    KNOWING YOUR SEWING MACHINE KENNENLERNEN IHRER MASCHINE КРАТКОЕ ТЕХНИЧЕСКОЕ ОПИСАНИЕ МАШИНЫ EMPFOHLENE STICHLÄNGEN UND STICHBREITEN (Modell STAR 240E, PS-57) STICHMUSTER VOREINGESTELLTE BREITE [mm (Zoll)] EMPFOHLENE LÄNGE [mm (Zoll)] 3-5 (Drehschalter 4-7) (1/8-3/16) 6,5 (1/4) 0-6,5 (0-1/4) F-1,5
  • Страница 33 из 112
    KNOWING YOUR SEWING MACHINE KENNENLERNEN IHRER MASCHINE КРАТКОЕ ТЕХНИЧЕСКОЕ ОПИСАНИЕ МАШИНЫ EMPFOHLENE STICHLÄNGEN UND STICHBREITEN (Modell STAR 230E, PS-55, STAR-50, RSR-55, XRX-55) STICHMUSTER VOREINGESTELLTE BREITE [mm (Zoll)] EMPFOHLENE LÄNGE [mm (Zoll)] 3-5 (Drehschalter 4-7) (1/8-3/16) 6,5
  • Страница 34 из 112
    KNOWING YOUR SEWING MACHINE KENNENLERNEN IHRER MASCHINE КРАТКОЕ ТЕХНИЧЕСКОЕ ОПИСАНИЕ МАШИНЫ EMPFOHLENE STICHLÄNGEN UND STICHBREITEN (Modell PS-53) STICHMUSTER VOREINGESTELLTE BREITE [mm (Zoll)] EMPFOHLENE LÄNGE [mm (Zoll)] ZICKZACKSTICH 3-5 (Drehschalter 4-7) (1/8-3/16) 6,5 (1/4) 0-6,5 (0-1/4)
  • Страница 35 из 112
    KNOWING YOUR SEWING MACHINE KENNENLERNEN IHRER MASCHINE КРАТКОЕ ТЕХНИЧЕСКОЕ ОПИСАНИЕ МАШИНЫ РЕКОМЕНДУЕМАЯ ДЛИНА СТЕЖКА (Модели STAR 240E, PS-57) СТРОЧКА 23 НАИМЕНОВАНИЕ СТЕЖКА ЗАДАННАЯ ШИРИНА [мм(дюймы)] РЕКОМЕНДУЕМАЯ ДЛИНА [ мм(дюймы)] НОМЕР СТРАНИЦЫ РУКОВОДСТВА 1-СТУПЕНЧАТОЕ АВТОМАТИЧЕСКОЕ 3-5
  • Страница 36 из 112
    (Модели STAR 230E, PS-55, STAR-50, RSR-55, XRX-55) СТРОЧКА НАИМЕНОВАНИЕ СТЕЖКА ЗАДАННАЯ ШИРИНА [мм(дюймы)] 1-СТУПЕНЧАТОЕ АВТОМАТИЧЕСКОЕ 3-5 (Отметки на ручке 4-7) ОБМЕТЫВАНИЕ ПЕТЛИ (1/8-3/16) 6,5 ПРЯМОЙ СТЕЖОК (1/4) ЗИГЗАГООБРАЗНЫЙ 0-6,5 СТЕЖОК (0-1/4) ПОТАЙНОЙ ПОДРУБОЧНЫЙ ШОВ РЕКОМЕНДУЕМАЯ ДЛИНА [
  • Страница 37 из 112
    KNOWING YOUR SEWING MACHINE KENNENLERNEN IHRER MASCHINE КРАТКОЕ ТЕХНИЧЕСКОЕ ОПИСАНИЕ МАШИНЫ РЕКОМЕНДУЕМАЯ ДЛИНА СТЕЖКА (Модели PS-53) СТРОЧКА НАИМЕНОВАНИЕ СТЕЖКА ЗАДАННАЯ ШИРИНА [мм(дюймы)] 4-СТУПЕНЧАТОЕ АВТОМАТИЧЕСКОЕ 3-5 (Отметки на ручке 4-7) ОБМЕТЫВАНИЕ ПЕТЛИ (1/8-3/16) 6,5 ПРЯМОЙ СТЕЖОК (1/4)
  • Страница 38 из 112
    Depending on your selected stitch, you may need to adjust the stitch length for best results. The numbers marked on the Stitch Length Dial represent the length of the stitch in millimeters (mm). THE HIGHER THE NUMBER, THE LONGER THE STITCH. The “0” setting does not feed the material. This is used
  • Страница 39 из 112
    KNOWING YOUR SEWING MACHINE KENNENLERNEN IHRER MASCHINE КРАТКОЕ ТЕХНИЧЕСКОЕ ОПИСАНИЕ МАШИНЫ 1 2 3 4 3 · 2 · 1 A · 4 · 3 · 2 · 1 · F · 0 ................. SS Stichlängen-Einstellrad Ручка регулирования длины стежка Abhängig vom gewählten Stich kann es sein, daß Sie für beste Ergebnisse die
  • Страница 40 из 112
    Depending on the stitch selected, you may need to adjust the stitch width. The numbers marked on the dial represent the stitch width. THE HIGHER THE NUMBER, THE WIDER THE STITCH. 1 1 Stitch width dial CAUTION Do not adjust the stitch width while the needle is in the fabric. Otherwise, the needle or
  • Страница 41 из 112
    KNOWING YOUR SEWING MACHINE KENNENLERNEN IHRER MASCHINE КРАТКОЕ ТЕХНИЧЕСКОЕ ОПИСАНИЕ МАШИНЫ Reverse Sewing Lever Reverse sewing is used for back tacking and reinforcing seams. (Model PS-57, PS-55, STAR-50, RSR-55, XRX-55, PS-53) To sew in reverse, push the Reverse Sewing Lever in as far as possible
  • Страница 42 из 112
    Use the Feed Dog Position Switch to raise or lower the feed dogs according to the job that is being done. When monogramming, embroidering, darning or sewing on buttons, the feed dogs should be lowered. (The garment will not be fed.) NOTE: When raising or lowering the feed dogs, move the Feed Dog
  • Страница 43 из 112
    KNOWING YOUR SEWING MACHINE KENNENLERNEN IHRER MASCHINE КРАТКОЕ ТЕХНИЧЕСКОЕ ОПИСАНИЕ МАШИНЫ (Model STAR 240E, STAR 230E) Start/Stop Button Pressing the Start/Stop Button once starts the machine; pressing the button again stops the machine. • • 1 The machine sews at a slow speed when sewing with the
  • Страница 44 из 112
    Sewing Speed Controller Controls the speed range. When the foot controller is used, you can control maximum speed with the sewing speed controller. The sewing speed controller should be set at right (fastest) position for normal usage with foot controller. 1 Sewing speed controller 1 Converting to
  • Страница 45 из 112
    KNOWING YOUR SEWING MACHINE KENNENLERNEN IHRER MASCHINE КРАТКОЕ ТЕХНИЧЕСКОЕ ОПИСАНИЕ МАШИНЫ THREADING THE MACHINE 1 Winding the Bobbin 2 CAUTION • • (Model STAR 240E, STAR 230E) If the thread spool and/or spool cap are set incorrectly, the thread may tangle on the spool pin. Use the spool cap
  • Страница 46 из 112
    ЗАПРАВКА НИТОК Aufspulen Намотка ниток на шпульку VORSICHT • • Inkorrektes Aufsetzen der Garnrolle bzw. Garnrollenkappe kann dazu führen, daß der Faden sich auf dem Garnrollenstift verwickelt. Verwenden Sie eine Garnrollenkappe (groß, mittel oder klein), die in ihrer Größe am besten zur Garnrolle
  • Страница 47 из 112
    KNOWING YOUR SEWING MACHINE KENNENLERNEN IHRER MASCHINE КРАТКОЕ ТЕХНИЧЕСКОЕ ОПИСАНИЕ МАШИНЫ (Model STAR 240E, STAR 230E) (Model STAR 240E, STAR 230E) 4. Slide the sewing speed controller to its maximum (as far to the right as possible). 5. Push the Start/Stop button. The machine will stop
  • Страница 48 из 112
    1 Hebel für den Geschwindigkeitsbereich VORSICHT Zerren Sie beim Abnehmen der Spule nicht zu fest an der Spulenträgerplatte. Der Spuler könnnte beschädigt werden. 7. Schneiden Sie Faden ab, schieben Sie den Spuler zurück nach links und entnehmen Sie die volle Spule. (Модели STAR 240E, STAR 230E) 4.
  • Страница 49 из 112
    KNOWING YOUR SEWING MACHINE KENNENLERNEN IHRER MASCHINE КРАТКОЕ ТЕХНИЧЕСКОЕ ОПИСАНИЕ МАШИНЫ Lower Threading CAUTION Setting the bobbin improperly may cause the thread tension to loosen, breaking the needle and resulting in injury. 1 1 Wound evenly 2 Wound poorly 2 CAUTION Be sure to turn off the
  • Страница 50 из 112
    VORSICHT Fehlerhaftes Einsetzen der Spule kann zur Folge haben, dass die Fadenspannung zu locker ist und die Nadel hierdurch abbricht, was zu Verletzungen führen kann. 1 Gleichmäßig gewickelt 2 Ungleichmäßig gewickelt VORSICHT Immer die Maschine ausschalten. Falls Sie versehentlich die Start/
  • Страница 51 из 112
    KNOWING YOUR SEWING MACHINE KENNENLERNEN IHRER MASCHINE КРАТКОЕ ТЕХНИЧЕСКОЕ ОПИСАНИЕ МАШИНЫ 1 4 5 2 3 Upper Threading 1. Raise the presser foot using the Presser Foot Lever. 2. Raise the needle to its highest position by turning the balance wheel toward you (counterclockwise). 1 Presser foot lever
  • Страница 52 из 112
    KNOWING YOUR SEWING MACHINE KENNENLERNEN IHRER MASCHINE КРАТКОЕ ТЕХНИЧЕСКОЕ ОПИСАНИЕ МАШИНЫ 1 4 5 2 3 Oberfadenführung Заправка верхней нитки 1. Heben Sie den Nähfuß mit dem Nähfußhebel. 2. Bringen Sie die Nadel auf die höchste Position, indem Sie das Handrad auf sich zu bewegen (entgegen dem
  • Страница 53 из 112
    KNOWING YOUR SEWING MACHINE KENNENLERNEN IHRER MASCHINE КРАТКОЕ ТЕХНИЧЕСКОЕ ОПИСАНИЕ МАШИНЫ Using Needle Threader 1 Turn power switch to “O”. 1. Lower the presser foot lever. 2. Turn the balance wheel toward you (counter-clockwise) to raise the needle holder to the highest position. 2 1 Needle
  • Страница 54 из 112
    Hauptschalter auf “O” stellen. 1. Senken Sie den Nähfußhebel. 2. Drehen Sie das Handrad zu sich hin (gegen den Uhrzeigersinn), um den Nadelhalter in höchste Position zu bringen. 1 Nadelhalter 2 Fadeneinfädelungshebel VORSICHT Bei Verwendung der Fadeneinfädelung achten Sie bitte immer darauf, daß
  • Страница 55 из 112
    KNOWING YOUR SEWING MACHINE KENNENLERNEN IHRER MASCHINE КРАТКОЕ ТЕХНИЧЕСКОЕ ОПИСАНИЕ МАШИНЫ Manually Drawing Up Lower Thread When sewing gathers or darts, the lower thread can be manually drawn up so that it will have some excess. 1. Pass the thread along the groove in the direction of the arrow,
  • Страница 56 из 112
    Your machine is designed for twin needle sewing, which allows you to sew with two top threads. You can use the same color or two different colors of thread for making decorative stitches. Any of the patterns, except the buttonhole pattern, can be sewn with the twin needle. When using the Straight
  • Страница 57 из 112
    KNOWING YOUR SEWING MACHINE KENNENLERNEN IHRER MASCHINE КРАТКОЕ ТЕХНИЧЕСКОЕ ОПИСАНИЕ МАШИНЫ PLACING THE EXTRA SPOOL PIN Place the vertical spool pin in the hole found on top of the machine near the horizontal spool pin. Place the second spool of thread onto the vertical spool pin as shown in fig.
  • Страница 58 из 112
    Thread Tension 2 Thread tension will affect the quality of your stitches. It may need to be adjusted when you change fabric or thread type. 1 5~4~ 3 3 5 NOTE: It is recommended that a test sample be made on a fabric scrap before sewing on your project. 4 B Possible misadjustments and their results.
  • Страница 59 из 112
    KNOWING YOUR SEWING MACHINE KENNENLERNEN IHRER MASCHINE КРАТКОЕ ТЕХНИЧЕСКОЕ ОПИСАНИЕ МАШИНЫ FABRIC/THREAD/NEEDLE COMBINATIONS Thread Type Fabric Medium weight fabric Lightweight fabric Heavyweight fabric Stretch fabric Broadcloth Taffeta Flannel, Gabardine Lawn, Batiste Georgette Challis, Satin
  • Страница 60 из 112
    Ткань Ткани среднего веса Легкие ткани Тяжелые ткани Трикотаж Тонкое сукно Тафта Фланель, Габардин Батист Жоржет Шелковая, Атласная Хлопчатобумажная ткань с саржевым переплетением Обычная ткань с продольным рубчиком Твид Джерси Трико Для обработки лицевой стороны ткани Швейная нитка Тип Хлопковая
  • Страница 61 из 112
    PLEASE READ BEFORE SEWING CAUTION • • • • • • • To avoid injury, pay special attention to the needle while the machine is in operation. Keep your hands away from moving parts while the machine is in operation. Do not stretch or pull the fabric during sewing. Doing so may lead to injury. Do not use
  • Страница 62 из 112
    Straight Stitching Pattern (Straight Stitch) Stitch Length Stitch Width 1-4.5 6.5 SS STARTING SEWING 1. Turn the Pattern Selection Dial to show your desired stitch in the Pattern Indication Window. Setting the Pattern Selection Dial to Straight Stitch or Triple Stretch Stitch is required. 2. Raise
  • Страница 63 из 112
    Geradstich Stichmuster STRAIGHT AND ZIGZAG STITCHING GERAD- UND ZICKZACKSTICH НОРМАЛЬНАЯ ПРЯМАЯ И ЗИГЗАГООБРАЗНАЯ СТРОЧКА (Geradstich) Stichlänge Прямой стежок Stichbreite Стежок 1-4,5 (Прямой стежок) Длина стежка Ширина стежка 1-4,5 6,5 (Stretch-Geradstich) NÄHBEGINN 1. Drehen Sie am
  • Страница 64 из 112
    REMOVING THE MATERIAL FROM THE MACHINE (Model PS-57, PS-55, STAR-50, RSR-55, XRX-55, PS-53) 1. Stop the machine. Raise the needle to its highest position and make sure that the thread take-up lever is also in its highest position. (Model PSTAR 240E, STAR 230E) 1. Press the Start/Stop Button again.
  • Страница 65 из 112
    Zigzag Stitching Pattern (Zigzag Stitch) Stitch Length Stitch Width F-4.5 0-6.5 ZIGZAG STITCH Select the Zigzag Stitch using the Pattern Selection Dial. Then, select the Stitch Length and the Stitch Width. It is recommended to sew using the Straight Stitch at the beginning and end of the Zigzag
  • Страница 66 из 112
    Blind Hem Stitching Pattern Stitch Length (Blind Hem Stitch) Stitch Width F-2 3-6.5 (Stretch Blind Hem Stitch) F-1.5 The Blind Hem Stitch is used to finish the edge of a project like the hem of a pair of pants without the stitch showing. Use the Blind Hem Stitch for any non-stretch fabrics and the
  • Страница 67 из 112
    Shell Tuck Stitching Pattern (Shell Tuck Stitch) Stitch Length Stitch Width F-3 3-6.5 The Shell Tuck Stitch can be used to sew a picot (lace like) edge on a lightweight fabric. 1. Set the Pattern Selection Dial to Shell Tuck Stitch. 2. Sew the fabric on the bias, placing it under the presser foot
  • Страница 68 из 112
    A Elastic Stitching Pattern Stitch Length Stitch Width F-2.5 3-6.5 (Elastic Stitch) The Elastic Stitch can be used for 3 functions: mending, sewing elastic or joining fabric. Each is explained below. Set the Pattern Selection Dial to Elastic Stitch. B MENDING 1. Place the reinforcement fabric under
  • Страница 69 из 112
    Double Action Stitching Pattern Stitch Length Stitch Width F-3 3-6.5 SS 3-6.5 (Double Action Stitch) (Bridging Stitch) (Rampart Stitch) (Decorative Hem Stitch) These stitches are used for joining two pieces of fabric, for example, when making patchwork. Set the Pattern Selection Dial to Double
  • Страница 70 из 112
    Scallop Stitching Pattern (Scallop Stitch) Stitch Length Stitch Width F-1.5 3-6.5 This machine automatically produces a Scallop Stitch which may be used as a decorative edging. 1. Set the Pattern Selection Dial to Scallop Stitch. 2. Sew the Scallop Stitch along the edge of the material. 3. If
  • Страница 71 из 112
    Decorative Stitching Pattern Stitch Length Stitch Width (Bead Stitch) (Arrowhead Stitch) 3-6.5 (Parallelogram Stitch) (Triangle Stitch) F-1 (Lighting Stitch) (Square Stitch) 6.5 (Decorative Stitch) (Decorative Stitch) (Decorative Stitch) 3-6.5 SS 6.5 These stitches can be used for making decorative
  • Страница 72 из 112
    Patchwork Pattern Stitch Length Stitch Width SS 3-6.5 (Fagoting Stitch) (Link Stitch) These stitches are used to join two pieces of fabric while leaving a space between their edges. 1. Fold over the edges of the two pieces of fabric for the hem and baste the edges to a thin piece of paper leaving a
  • Страница 73 из 112
    A Overedge Stitching Pattern (Elastic Shell Tuck Stitch) Stitch Length Stitch Width F-3 (Elastic Overlock Stitch)* (Elastic Overlock Stitch) 3-6.5 SS (Comb Stitch) B These stitches are used to join together seams and finish them in one operation. The Elastic Overlock Stitches are useful when sewing
  • Страница 74 из 112
    Feather Stitching Pattern (Feather Stitch) Stitch Length Stitch Width SS 3-6.5 Use the Feather Stitch as a decorative top stitch or when hemming blankets, tablecloths or draperies or when embroidering. 1. Set the Pattern Selection Dial to Feather Stitch. 2. Place the fabric right side up and sew 1
  • Страница 75 из 112
    A (Model STAR 240E, STAR 230E, PS-57, PS-55, STAR-50, RSR-55, XRX-55) Making a Buttonhole (For 1-step BH Type) A 1 2 Pattern B Stitch Length Stitch Width Foot F-1.5 3-5 (Dial 4-7) Buttonhole Foot NOTE: 1. It is recommended to practice making a buttonhole on a scrap piece of fabric before attempting
  • Страница 76 из 112
    (Modell STAR 240E, STAR 230E, PS-57, PS-55, STAR-50, RSR-55, XRX-55) (Модели STAR 240E, STAR 230E, PS-57, PS-55, STAR-50, RSR-55, XRX-55) Knopfloch nähen (Für 1-Stufen-Knopfloch BH-Typ) Обметывание петель (Для 1-ступенчатого обметывания петли) Stichlänge Stichbreite Fuß F-1,5 3-5 (Drehschalter 4-7)
  • Страница 77 из 112
    (Model STAR 240E, STAR 230E, PS-57, PS-55, STAR-50, RSR-55, XRX-55) Odd-shaped buttons that do not fit into the button holder plate Add the button diameter to its thickness, then set the buttonhole presser foot scale to this measurement. The distance in the scale between two lines of the same
  • Страница 78 из 112
    (Model PS-53) Making a Buttonhole (For 4-step BH Type ) Pattern Stitch Length Stitch Width Foot F-1.5 3-5 (Dial 4-7) Buttonhole Foot NOTE: 1. It is recommended to practice making a buttonhole on a scrap piece of fabric before attempting it on the actual garment. 2. When making buttonholes on soft
  • Страница 79 из 112
    MAKING A BUTTONHOLE Step Sewn Portion Step 1 (Front bar tack) Pattern 1. Set the pattern selection dial to “a”. 2. Lower the presser foot and sew 5 to 6 stitches. 3. Stop the machine when the needle is at the left side of the stitches, then raise the needle from the material. a 1. Turn the pattern
  • Страница 80 из 112
    (Model STAR 240E, STAR 230E, PS-57, PS-55, STAR-50, RSR-55, XRX-55, PS-53) SECURING THE STITCHING AND CUTTING THE BUTTONHOLE 1. To secure the stitching, turn the material 90 degrees counterclockwise and sew Straight Stitches to the end of the front bar tack of the buttonhole. 2. Remove the material
  • Страница 81 из 112
    Buttonhole Fine Adjustment If the stitching on the two sides of the buttonhole do not appear uniform, the following adjustments can be made. 1 2 3 1. Set the Stitch Length Dial at “F-1.5” and stitch the right side of the buttonhole on a scrap of fabric while observing how the material is fed. 2. If
  • Страница 82 из 112
    Wenn die Stiche zu beiden Seiten des Knopfloches nicht einheitlich erscheinen, können die folgenden Einstellungen vorgenommen werden. 1. Stellen Sie den Stichlängen-Einstellrad auf “F-1,5” und nähen Sie auf einem Stoffrest die rechte Raupe des Knopfloches, während Sie beobachten, wie das Material
  • Страница 83 из 112
    A B For 1-Step BH Type (Model STAR 240E, STAR 230E, PS-57, PS-55, STAR-50, RSR-55, XRX-55) When the buttonhole is not sewn correctly: There are two different procedures for correcting buttonhole sewing, depending on which part of the buttonhole is not sewn correctly. Correction Procedure 1 (See
  • Страница 84 из 112
    Button Sewing Pattern Stitch Length (Zigzag Stitch) Stitch Width Foot Less than 6.5 Zigzag Presser Foot 0 1. Measure the distance between the holes and set the appropriate stitch width using the Stitch Width Dial. For example, if the distance between the holes is 1.5 mm, set the stitch width to
  • Страница 85 из 112
    USING ATTACHMENTS AND APPLICATIONS HEFTEN UND APPLIZIEREN ИСПОЛЬЗОВАНИЕ ПРИСПОСОБЛЕНИЙ И ИЗГОТОВЛЕНИЕ АППЛИКАЦИЙ Zipper Insertion A Pattern 1 2 3 B Stitch Length Stitch Width Foot 2-3 3.5 (center) Zipper Foot (Straight Stitch) The zipper foot is used to sew various types of zippers and can easily
  • Страница 86 из 112
    Stichmuster Stichlänge Stichbreite 2-3 3,5 (Mitte) (Geradstich) Вшивание застежек-молний Fuß Cтежок Reißverschlußfuß (Прямой стежок) Der Reißverschlußfuß wird benutzt, um verschiedene Reißverschlüsse einzunähen und kann einfach auf der linken oder rechten Seite der Nadel montiert werden. Wenn Sie
  • Страница 87 из 112
    USING ATTACHMENTS AND APPLICATIONS HEFTEN UND APPLIZIEREN ИСПОЛЬЗОВАНИЕ ПРИСПОСОБЛЕНИЙ И ИЗГОТОВЛЕНИЕ АППЛИКАЦИЙ Darning Pattern (Straight Stitch) Stitch Length Any Foot Feed Dog Zigzag Presser Down Position Foot 1. Lower the feed dogs by setting the Feed Dog Position Switch to the Down Position as
  • Страница 88 из 112
    Pattern Stitch Length (Zigzag Stitch) F-2 An appliqué is created by cutting a contrasting piece of fabric into a shape to be used as a decoration on a garment or project. 1. Baste the cut design to the fabric in the location where desired. 2. Carefully sew around the edge of the cutout design with
  • Страница 89 из 112
    USING ATTACHMENTS AND APPLICATIONS HEFTEN UND APPLIZIEREN ИСПОЛЬЗОВАНИЕ ПРИСПОСОБЛЕНИЙ И ИЗГОТОВЛЕНИЕ АППЛИКАЦИЙ Monogramming and Embroidering Pattern (Zigzag Stitch) Stitch Length Stitch Width Foot Any Any Feed Dog None Down Position PREPARING FOR MONOGRAMMING AND EMBROIDERING 1. Lower the feed
  • Страница 90 из 112
    Stichmuster (Zickzackstich) Stichläng Stichbreite Fuß Transporteur Beliebig Beliebig Kein Position unten VORBEREITUNG FÜR MONOGRAMME UND STICKARBEITEN 1. Versenken Sie den Transporteur, indem Sie den Transporteurhebel in die Absenkposition stellen, wie auf Seite 30 gezeigt. 2. Stellen Sie das
  • Страница 91 из 112
    USING ATTACHMENTS AND APPLICATIONS HEFTEN UND APPLIZIEREN ИСПОЛЬЗОВАНИЕ ПРИСПОСОБЛЕНИЙ И ИЗГОТОВЛЕНИЕ АППЛИКАЦИЙ OPTIONAL ACCESSORIES Using the Walking Foot A 1 Pattern Stitch Length (Straight Stitch) Stitch Width 3-4 1-4.5 (Zigzag Stitch) 0-6.5 This foot is very useful for sewing materials such as
  • Страница 92 из 112
    ДОПОЛНИТЕЛЬНЫЕ ПРИНАДЛЕЖНОСТИ Einsatz des Obertransporteurs Использование шагающей лапки Stichmuster Stichlänge (Geradstich) Stichbreite 3-4 Стежок 1-4,5 (Zickzackstich) 0-6,5 NOTIZEN: Diesen Fuß können Sie nur für Geradstich und Zickzackstich und nicht für andere Stichmuster verwenden. 1. Schalten
  • Страница 93 из 112
    USING ATTACHMENTS AND APPLICATIONS HEFTEN UND APPLIZIEREN ИСПОЛЬЗОВАНИЕ ПРИСПОСОБЛЕНИЙ И ИЗГОТОВЛЕНИЕ АППЛИКАЦИЙ A OPTIONAL ACCESSORIES Using the Spring-action Quilting Foot Pattern Stitch Length Stitch Width Feed Dog Any 3.5 (center) Down position (Straight Stitch) The Spring -action Quilting Foot
  • Страница 94 из 112
    ДОПОЛНИТЕЛЬНЫЕ ПРИНАДЛЕЖНОСТИ Einsatz des Stopffußes Использование лапки штопкивышивки Stichmuster (Geradstich) Stichlänge Stichbreite Transporteur Beliebig 3,5 (Mitte) Position unten Der Stopffuß eignet sich für Stopfarbeiten und für manuelles Steppen. 1. Ziehen Sie den Netzstecker aus der
  • Страница 95 из 112
    USING ATTACHMENTS AND APPLICATIONS HEFTEN UND APPLIZIEREN ИСПОЛЬЗОВАНИЕ ПРИСПОСОБЛЕНИЙ И ИЗГОТОВЛЕНИЕ АППЛИКАЦИЙ OPTIONAL ACCESSORIES A Using the 1/4-Inch Quilting Foot Pattern (Straight Stitch) Stitch Length Stitch Width 2-2.5 3.5 (center) The 1/4-Inch Quilting Foot is used to sew fixed seam
  • Страница 96 из 112
    ДОПОЛНИТЕЛЬНЫЕ ПРИНАДЛЕЖНОСТИ Einsatz des Patchworkfuß Использование направляющей лапки 1/4 дюйма (6,5 мм) Stichmuster Stichlänge Stichbreite 2-2,5 3,5 (Mitte) (Geradstich) Der Patchworkfuß wird benutzt, um z. B. bei Stepparbeiten mit einer festen Nahtzugabe von 6,5 mm zu nähen (siehe Abb. A). 1.
  • Страница 97 из 112
    Changing the Light Bulb CAUTION • • A Turn off the main power switch and unplug the machine before changing the light bulb. If the main power switch is on when the light bulb is changed, an electric shock may result. If the machine is on and Start/Stop button is pressed or foot controller is
  • Страница 98 из 112
    VORSICHT • • Schalten Sie den Netzschalter aus und ziehen Sie vor dem Auswechseln der Glühbirne den Netzstecker aus der Steckdose. Wenn der Netzschalter auf Ein “ON” steht, wenn die Glühlampe gewechselt wird, besteht die Gefahr elektrischer Schläge. Wenn die Maschine eingeschaltet ist und die
  • Страница 99 из 112
    A Cleaning CAUTION Be sure to unplug the machine before cleaning it. Otherwise, electric shock or injury may result. 1. Remove the power supply plug from the outlet. 2. Raise the needle and the presser foot. 3. Loosen the presser foot screw and the needle clamp screw to remove the presser foot
  • Страница 100 из 112
    Reinigung VORSICHT Ziehen Sie zum Reinigen der Nähmaschine das Netzkabel aus der Steckdose, da Sie sonst der Gefahr von Verletzung und Stromschlag ausgesetzt sind. 1. Ziehen Sie den Netzstecker aus der Steckdose. 2. Bringen Sie die Nadel auf die höchste Position und heben Sie den Nähfuß an. 3.
  • Страница 101 из 112
    PERFORMANCE CHECK LIST Whenever sewing difficulties are encountered, review the section in this instruction manual that details the operation you are performing to make sure you are correctly using the machine. If the problem continues, the following check list may help you to improve the
  • Страница 102 из 112
    NEEDLE BREAKS MACHINE IS NOISY OR SLOW MACHINE DOES NOT START Stitch Length Dial is set at no feeding. ("0") Needle is not correctly inserted. Lint is clinging to the bottom of the needle plate. Power supply plug is removed from outlet. Page 26 No The combination of needle size/thread size/fabric
  • Страница 103 из 112
    CHECKLISTE Wann immer Sie beim Nähen auf Schwierigkeiten stoßen, lesen Sie den Abschnitt dieser Anleitung, die den Vorgang beschreibt, den Sie gerade durchführen, um sicherzugehen, daß Sie die Nähmaschine richtig bedienen. Wenn das Problem dadurch nicht gelöst wurde, kann die folgende Checkliste
  • Страница 104 из 112
    NADEL BRICHT MASCHINE IST LAUT ODER LANGSAM MASCHINE LÄUFT NICHT AN StichlängenEinstellrad ist auf niedrigster Stellung. (“0”) Nadel ist nicht richtig eingesetzt. Unter der Stichplatte befinden sich Fasern oder Fusseln. Der Netzstecker steckt nicht in der Steckdose. Seite 27 Nein Die Kombination
  • Страница 105 из 112
    ТАБЛИЦА ВОЗМОЖНЫХ НЕИСПРАВНОСТЕЙ Если в процессе работы возникли какие-либо проблемы, обратитесь к соответствующему разделу настоящего руководства, чтобы убедиться в том, что та или иная операция выполняется Вами правильно. Если и после этого не удается устранить возникшие проблемы, обратитесь к
  • Страница 106 из 112
    ПОЛОМКА ИГЛЫ ЧРЕЗМЕРНЫЙ ШУМ И НИЗКАЯ СКОРОСТЬ В РАБОТЕ МАШИНЫ МАШИНА НЕ ЗАПУСКАЕТСЯ Ручка регулирования длины стежка установлена в положение нулевой подачи. (“0”) Игла установлена неправильно. Налипание пуха на нижнюю поверхность игольной пластины. Штепсель шнура питания не вставлен в розетку.
  • Страница 107 из 112
    (Model PS-57, PS-55, PS-53) Repacking the Machine Keep the carton and packing materials for future use. It may become necessary to reship the machine. Improper packing or improper packing material could result in damage during shipping. Instructions for repacking the machine are illustrated. * Hard
  • Страница 108 из 112
    A Page N Accessories .................................................................... 5 Appliqués ..................................................................... 76 Arrowhead Stitch .......................................................... 59 Needle Inspection
  • Страница 109 из 112
    Seite Seite A N Anschiebetisch & Zubehörfach ....................................... 14, 32 Applizieren ............................................................................ 76 Aufspulen .............................................................................. 34 Automatischer Einfädler
  • Страница 110 из 112
    Страница Страница А О Аппликации ................................................................. 76 Обметочный стежок .................................................. 61 Обметывание петель ................................................. 64 Обойма
  • Страница 111 из 112
    ENGLISH DEUTSCH  194277-213 Printed in Taiwan
  • Страница 112 из 112