Инструкция для CANDY FXE 629 VNX

(скачивание инструкции бесплатно)
Формат файла: PDF
Доступность: Бесплатно как и все руководства на сайте. Без регистрации и SMS.
Дополнительно: Чтение инструкции онлайн
background image

5.1 BEFORE USING THE OVEN FOR THE 
      FIRST TIME

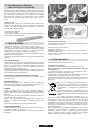
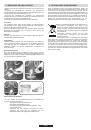
• PRELIMINARY CLEANING

-Clean the oven before using for the first time:
-Wipe over external surfaces with a damp soft cloth.
-Wash all accessories and wipe inside the oven with a solution of hot water 
and washing up liquid.
-Set the empty oven to the maximum temperature and leave on for about 1 
hour, this will remove any lingering smells of newness. Ensure that the 
room is well ventilated while this is being done.

• THINGS TO REMEMBER
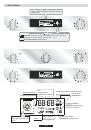
Confirmation of operation on timer

Modification must be confirmed by pressing the button.

Stopping the oven: 

This may be necessary if you have input an incorrect instruction.
To  stop  the  oven  ....  turn  back  the  function  selector  knob  to  the  Stop 
Position.

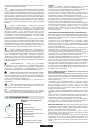
Child safety device:


To  lock  the  oven  controls,  select  the  child  safety  device.  Refer  to  the 
section entitled “Programming - The child safety device”.
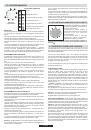
The cooling fan :

This protects the control panel and electronics from heat damage.
It begins and then stops automatically even when the oven is switched off.
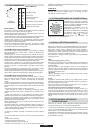
Oven lighting :

By turning to the light symbol, you can switch on the oven light when it is 
not in use.
When the oven is in use, the light stays on during all of the oven functions 
and when the door is opened.
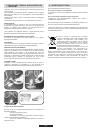
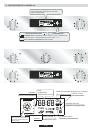
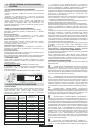
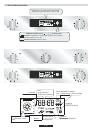
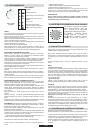
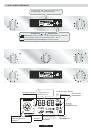
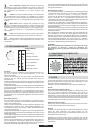
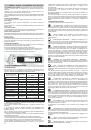
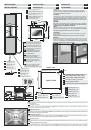
• CLOCK SETTING

When the oven is connected to the electricity supply or after a long power 
cut, the clock must be re-set.

To set the clock :

1 - Turn the control knob to the “Clock” symbol :
2 - Set the clock with the central button by turning to the “-” or “+”,
3 - Turn back the control knob to the STOP position.

3- A cooking time and an end of cooking time can be programmed by 

turning the programme selector knob to “cooking time” or “end of cooking 

time”.
The “cooking time” or “end of cooking time” display starts flashing. Using 

the  central  button,  modify  the  settings  as  required  and  on  the  timer 

confirm.
When you have done this, do not forget to turn the programme selector 

knob back to “stop position” to confirm the new setting.

For  more  details  about  programming,  refer  to  the  chapter  5.3 

entitled PROGRAMMES.

4- At the end of the cooking cycle, turn the function selector knob back to 

“stop position”.
The indicator flashes again, it will remain also turned on after having 

extinguished the oven and it will estinguish when the inside temperature 

of the oven is sufficiently low.
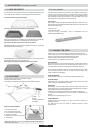
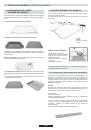
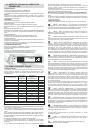
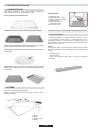
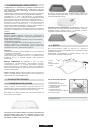
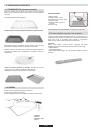
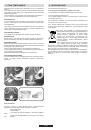
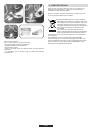
• COOKING MODE

All cooking should be carried out with the door closed.

BOTTOM  +  FAN  -  The  combination  of  the  bottom  heating 

element  and  fan  is  ideal  for  fruit  flans,  tarts,  quiches  and  pastries.  It 

prevents food from becoming too dry and encourages bread dough to 

rise. Place the shelf in the bottom position in the oven.

BOTTOM  -  Using  the  lower  element.  Ideal  for  cooking  all 

pastry  based  dishes.  Use  this  for  flans,  quiches,  tarts,  pâté  and  any 

cooking that needs more heat  from below.

BOTTOM + TOP  -  Both top and bottom heating elements are 

in use. This method is ideal for all traditional roasting and baking.When 

cooking red meat, roast beef, leg of lamb, game, bread or foil wrapped 

foods.

BOTTOM  +  TOP  +  FAN  -  Both  top  and  bottom  heating 

elements are used in conjunction with the fan, which circulates hot air 

throughout the oven.We recommend this method for poultry, pastries, 

fish  and  vegetables.  By  using  this  method  better  heat  penetration  is 

achieved and cooking and preheating times are also reduced. The fan 

cooking option allows you to cook different foods together at different 

positions  in  the  oven  all  at  the  same  time,  providing  even  heat 

distribution  but  without  the  risk  of  mingling  tastes  and  smells.  When 

cooking different foods at the same time allow a further 10 minutes.

CIRCULAR  HEATING  ELEMENT 

+  FAN  - Air  that  has  been 

heated is blown by the fan onto the different levels. It is ideal for cooking 

different  types  of  food  at  the  same  time  (e.g.  Meet  and  fish)  without 

mixing  tastes  and  smell.  It  cooks  very  gently  and  is  ideal  for  sponge 

cakes, pastries, etc. 

GRILL - Using the top heating element. Success is guaranteed 

for mixed grills, kebabs and gratin dishes. The grill should be pre-heated 

to  a  high  temperature  for  5  minutes.  White  meats  should  always  be 

placed  at  some  distance  from  the  grill  element,  the  cooking  time  is 

slightly longer but the meat will be more succulent. Red meat and fish 

fillets  can  be  placed  directly  onto  the  shelf  with  the  drip  tray  placed 

beneath on lower shelf position.

GRILL + FAN - The top heating element is used in conjunction 

with the fan which circulates the hot air around the oven. Pre heating is 

recommended  for  red  meats  but  is  not  necessary  for  white  meats. 

Grilling is ideal for cooking thicker food items such as pork or poultry. 

Food to be grilled should be placed directly at the centre of the middle 

shelf.
By sliding the drip tray underneath the shelf it will ensure that any juices 

are collected. For best results always make sure that the food is not too 

close to the grill element and turn the food over half way through the 

cooking time.

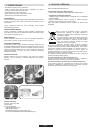
GRILL + TURNSPIT + FAN - The advantage of using the top 

oven element at the same time as the fan and rotisserie is that the food is 

evenly  cooked,  preventing  it  from  becoming  dry  and  tasteless.  The 

rotisserie  is  programmed  to  continue  rotating  for  approximately  five 

minutes after cooking, making full use of the residual oven heat.No pre-

heating is required for rotisserie cooking.

DEFROST  -  When  the  dial  is  set  to  this  position.  The  fan 

circulates  hot  air  around  the  frozen  food  so  that  it  defrosts  in  a  few 

minutes without the protein content of the food being changed or altered.
The temperature is preset in 40°C constant, no regulation is possible.

KEEP  WARM  -  This  is  recommended  to  reheat  precooked 

foodstuff, positioning the shelf on the second level from top, or to defrost 

bread pizza or pastry by positioning the shelf on the lower level.  
The temperature is preset in 60°C constant, no regulation is possible.

PIZZA  -  With  this  function  hot  air  circulated  in  the  oven  to 

ensure perfect result for dishes such as pizza or cake.

PYRO - The oven takes care of the entire inside oven cleaning 

-Two choices are possible ECO, SUPER

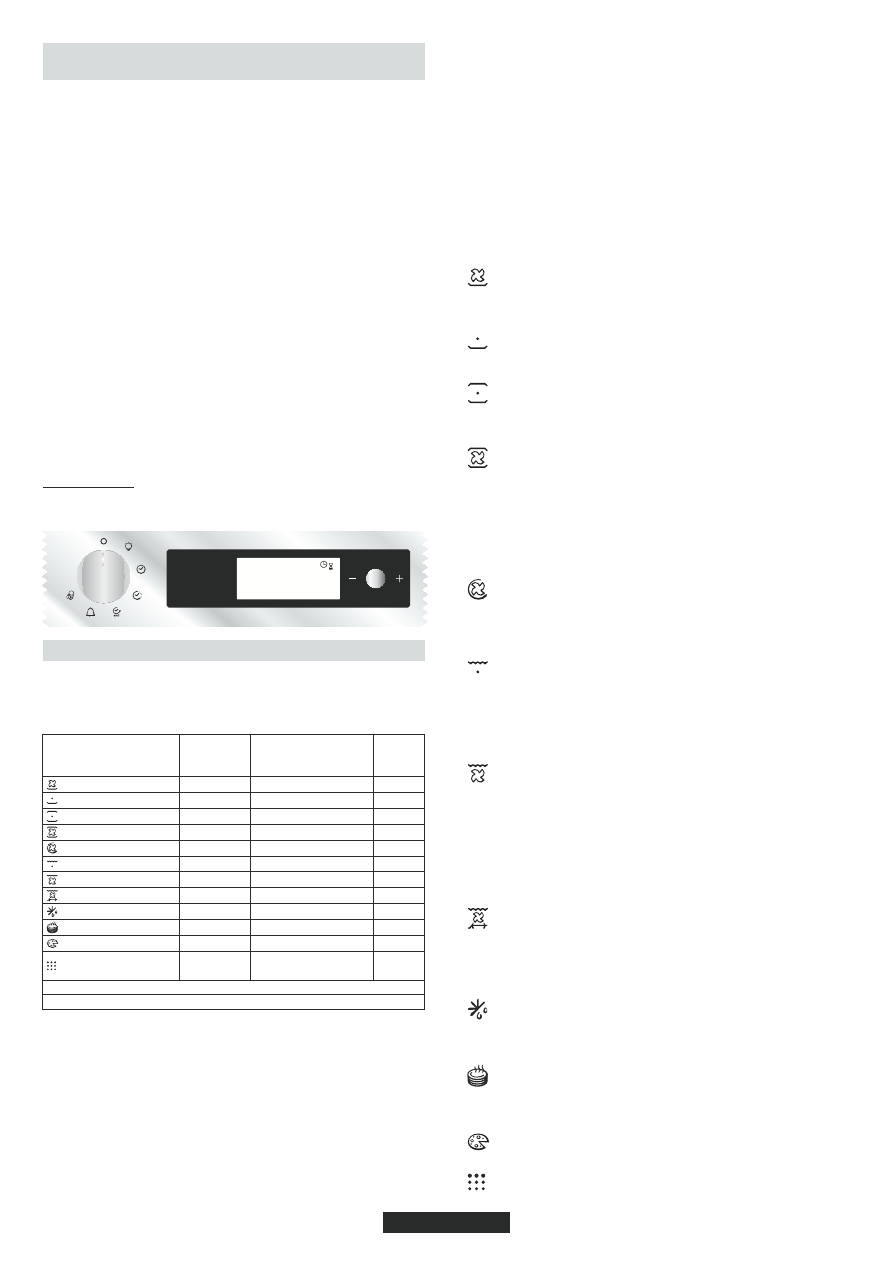
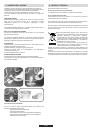
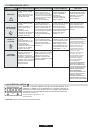
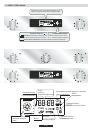
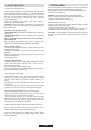
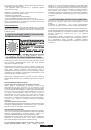
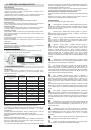
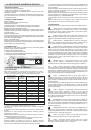
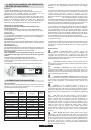
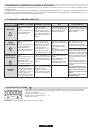
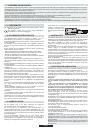
5.2 HOW TO USE THE OVEN
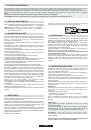
•THE MANUAL MODE

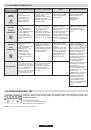
The cooking methods suggested in manual mode are set out in the table 
below. A temperature is also suggested for each cooking method. This can 
be modified within a pre-determined range.

1-  Turn the oven selector knob to the function required to the cooking.
The heating elements in operation for the selected cooking method are 
displayed.
2-  The  appropriate  temperature  according  to  the  cooking  method 
selected is displayed. It can be modified within a pre-determined range  - 
see the table above.
To modify the temperature setting, turn the central button and on the 
timer confirm the setting by pressing the same button.
...  the  temperature  display  is  fixed  but  can  be  modified  during  the 
cooking cycle.
The oven will start cooking and will start to heat up.
The  indicator  light  flashes  until  the  selected  temperature  has  been 
reached. An audible signal sounds at the end of this operation and the 
indicator light becomes fixed.

09 GB

10:30

Bottom + Fan
Bottom

Function Mode 

according to the oven 

model

Pre-set

Temperature

o

C

Pre-determined

o

Temperature  C

Function
Booster*

210
160

50-220
50-220

Booster

Bottom + Top + Fan
Circular Heating Element  + Fan
Grill
Grill + Fan
Grill + Turnspit + Fan
Defrost
Keep Warm

*Booster: rapid temperature raised

210
180

L2

190
240

40
60

50-230
50-230

L1-L3

50-200

180-240

No
No

Booster
Booster

**Oven must have this function

Bottom + Top

220

50-240

Pizza

230

230

**

Booster

Pyro

Pyro

ECO: 425 / 
SUP: 425 / 1h 30min

65min

**

1
2
3
4
5
6
7
8
9
10
11
12
13
14
15
16
17
18
19
20
21
22
23
24
25
26
27
28
29
30
31
32
33
34
35
36
37
38
39
40
41
42
43
44
45
46
47
48
49
50
51
52
53
54
55
56
57
58
59
60
61
62
63
64
65
66
67
68
69
70
71
72
73
74
75
76
77
78
79
80
81
82
83
84
85
86
87
88
89
90
91
92
93
94
95
96
97
98
99
100
101
102
103
104
105
106
107
108
109
110
111
112
113
114
115
116
Оглавление инструкции
  • Страница 1 из 117
    OVENS USER INSTRUCTIONS FORNI ISTRUZIONI PER L'USO HORNOS EMPOTRABLES INSTRUCCIONES DE USO PIEKARNIKI DO ZABUDOWY INSTRUKJA OBSŁUGI TROUBY NÁVOD K OBSLUZE ДУХОВКИ РУКОВОДСТВО ПОЛЬЗОВАТЕЛЯ PEČICE NAVODILA ZA UPORABO PEĆNICE KORIŠTENJE PRIRUČNIK EINBAUBACKÖFEN BEDIENUNGSANLEITUNG ANKASTRE FIRIN
  • Страница 2 из 117
    CONTENTS GB Safety Instructıons ......................................................................04 1. General warnings ...................................................................05 1.1 Declaration of compliance .......................................................05 1.2 Safety hints
  • Страница 3 из 117
    VSEBINA SL Varnostna Navodıla ...................................................................59 1. Splošna Opozorila ...................................................................60 1.1 Izjava O Skladnosti ................................................................60 1.2 Varnostni
  • Страница 4 из 117
    SAFETY INSTRUCTIONS WARNING: The appliance and its accessible parts become hot during use. Care should be taken to avoid touching heating elements. • Children under 8 Year of age must be kept away from the appliance unless they are continuously supervised. • This appliance can be used by children
  • Страница 5 из 117
    1. GENERAL WARNINGS Read the instructions carefully to make the most of your oven. We recommend you keep the instructions for installation and use for later reference, and before installing the oven, note its serial number in case you need to get help from the after-sales service. When you have
  • Страница 6 из 117
    2. ACCESSORIES (According to model) 2.1 OVEN EQUIPMENT 2.3 LED VISION Is an illumination system which replaces the traditional « light bulb ». 14 LED (for non-pyrolitic versions) or 10 High Power LED (for pyrolitic versions) lights are integrated within the door. These produce white high quality
  • Страница 7 из 117
    4. SERVICE CENTRE Before calling the Service Centre. If the oven is not working, we recommend that: •Check that, if the oven is properly plugged into the power supply. If the cause of the fault cannot be detected: •Disconnect the oven from the mains, do not touch the oven and call the after sales
  • Страница 8 из 117
    5. DESCRIPTION OF THE DISPLAY Display panel : time, programming of cooking mode, indicator lights, cooking temperature function and shelf positioning BUTTON FOR REGULATION AND CONFIRMATION Settings: temperature, programming cooking and end of cooking time Regulated by turning the button towards “ -
  • Страница 9 из 117
    3- A cooking time and an end of cooking time can be programmed by turning the programme selector knob to “cooking time” or “end of cooking time”. The “cooking time” or “end of cooking time” display starts flashing. Using the central button, modify the settings as required and on the timer confirm.
  • Страница 10 из 117
    - set the cooking duration time to 45 minutes - set the end of cooking time to 12:30. Cooking will start automatically at 11:45 (12:30 minus 45 mins) and will continue until the pre-set end-ofcooking-time, when the oven will switch itself off automatically. 5.3 PROGRAMMES DISPLAY SYMBOLS Lamp Time
  • Страница 11 из 117
    5.7 USE OF TOUCH CONTROL CLOCK PROGRAMMER FUNCTION MINUTE MINDER COOKING TIME END OF COOKING KEY LOCK HOW TO ACTIVATE IT HOWTO SWITCH ITOFF WHAT IT DOES WHAT IT IS FOR •Push the central button 1 times •Press the buttons "-" "+" to set the required time •Release all the buttons •When the set time as
  • Страница 12 из 117
    6. PYROLYTIC CYCLE 7. CHILD SAFETY **Oven must have this function This function is essential, especially when children are around. It prevents children from switching the oven on or altering the preset programmes. This safety system locks the oven control panel while it is operating. The oven is
  • Страница 13 из 117
    INDICAZIONI DI SICUREZZA • ATTENZIONE: l'apparecchio e le parti accessibili diventano calde durante l'uso. Prestare attenzione a non toccare le parti calde. • I bambini al di sotto di 8 anni dovrebbero essere tenuti a distanza se non continuamente supervisionati. • L'apparecchio può essere usato da
  • Страница 14 из 117
    1. AVVERTENZE GENERALI Per utilizzare in modo ottimale il forno, è consigliabile leggere con attenzione queste istruzioni e conservarle in un luogo sicuro in modo da poterle consultare in caso di bisogno. Prima di installare il forno, prendere nota del numero di serie in modo da poterlo comunicare
  • Страница 15 из 117
    2. TECNOLOGIA PRO/EXP'R (A SECONDA DEI MODELLI) 2.1 ACCESSORI DEL FORNO (A SECONDA DEI MODELLI) MODALITÀ UTILIZZO GIRARROSTO Prima di utilizzare il forno per la prima volta, è necessario pulire tutti gli accessori, lavandoli con una spugna bagnata, sciacquandoli e asciugandoli. 1. Svitare i ganci
  • Страница 16 из 117
    4. ASSISTENZA TECNICA 3. PULIZIA DEL FORNO 4. RISOLUZIONE DEI PROBLEMI Prima di rivolgersi all'assistenza tecnica: •Attendere che il forno si raffreddi prima di effettuare operazioni di pulizia manuali. •Non utilizzare mai detergenti abrasivi, pagliette di ferro o oggetti appuntiti per la pulizia
  • Страница 17 из 117
    5. DESCRIZIONE DEL DISPLAY Display: orario, programmazione della modalità di cottura, indicatori luminosi, temperatura di cottura e posizionamento delle mensole. PULSANTE PER REGOLARE - + CONFERMARE Impostazioni: temperatura, programmazione del ciclo di cottura e della fine del ciclo di cottura,
  • Страница 18 из 117
    3-Per programmare il tempo di cottura e l'ora di fine del ciclo di cottura, è sufficiente ruotare il selettore dei programmi e posizionarlo sul “tempo di cottura” o “l'ora di fine del ciclo di cottura” desiderati. L'icona del “tempo di cottura” o “dell'ora di fine del ciclo di cottura” inizia a
  • Страница 19 из 117
    La cottura inizierà alle 11.45 (ovvero 12.30 meno 45 minuti) e continuerà fino all'ora precedentemente impostata; il forno si spegnerà automaticamente al termine del tempo impostato. 5.3 THE PROGRAMMATION SIMBOLI VISUALIZZATI SUL DISPLAY Luce ATTENZIONE: Se la funzione "FINE della cottura" è stata
  • Страница 20 из 117
    5.7 TIMER ELETTRONICO A SFIORAMENTO FUNZIONE CONTAMINUTI DURATA COTTURA FINE COTTURA BLOCCO BAMBINO COME SI ATTIVA COME SI SPEGNE •Premere il tasto centrale 1 volta. •Premere i tasti "- " "+" per regolare la durata •Lasciare i tasti •Al termine della durata impostata la funzione si spegne da sola
  • Страница 21 из 117
    6. CICLO PIROLITICO (A SECONDA DEI MODELLI) 7. DISPOSITIVO DI PROTEZIONE Questa funzione deve sempre essere attivata se nell'abitazione ci sono dei bambini, perché impedisce loro di accendere il forno o di modificare i programmi pre-impostati. Questa funzione di sicurezza impedisce l'uso del
  • Страница 22 из 117
    INSTRUCCIONES PARA UN USO SEGURO ADVERTENCIA: El aparato y sus componentes accesibles se calientan durante el uso. Se debe tener cuidado de no tocar los elementos calefactores. • Los niños menores de 8 años deben permanecer alejados o supervisados de forma continuada por una persona adulta. • Este
  • Страница 23 из 117
    1. ADVERTENCIAS GENERALES Leer las instrucciones detalladamente para sacar el mejor partido del horno. Recomendamos conservar las instrucciones de instalación y utilización para futuras consultas. Antes de instalar el horno anote el número de serie por si necesitase contactar con el servicio de
  • Страница 24 из 117
    2. TECNOLOGÍA PRO/EXP’R (DEPENDE DEL MODELO) 2.1 EQUIPAMIENTO DEL HORNO (DEPENDE DEL MODELO) 2.2 ASADOR (DEPENDE DEL MODELO) No se requiere calentamiento previo del horno para esta función. Cocinar con la puerta cerrada. El consumo de energía es de un 90-95% menos que con el sistema tradicional. Es
  • Страница 25 из 117
    4. SERVICIO TÉCNICO 3. LIMPIEZA DEL HORNO •Esperar a que se enfríe el horno antes de limpiarlo manualmente. •No limpiar el horno con limpiadores abrasivos, estropajo de metal o cuchillas. El esmalte tampoco ya que podría resultar dañado. •Utilizar sólo agua con jabón o limpiadores con lejía
  • Страница 26 из 117
    5. DESCRIPCIÓN DE LA PANTALLA Pantalla: tiempo, programación del modo de cocción, luces de indicación, temperatura de cocinado y posición de la bandeja. BOTÓN DE REGULACIÓN Y CONFIRMACIÓN Configuraciones: temperatura, programación de cocción y finalización del tiempo de cocción – Se regula girando
  • Страница 27 из 117
    selector de programa a “tiempo de cocción” o “final del cocción”. Empieza a parpadear en la pantalla el “tiempo de cocinado” o “final del cocción”. Utilizar el botón central para modificar las configuraciones y confirmar el temporizador. Una vez hecho esto, no olvidar girar el selector de programa
  • Страница 28 из 117
    minutos) y continuará hasta el fin del tiempo de cocción preestablecido, cuando el horno se apagará automáticamente. 5.3 PROGRAMACIÓN SÍMBOLOS DE LA PANTALLA ADVERTENCIA: Si se selecciona el final de la cocción sin fijar la duración del tiempo de cocción, el horno empezará inmediatamente a cocinar
  • Страница 29 из 117
    5.7 TEMPORIZADOR TÁCTIL FUNCIÓN MINUTERO DURACIÓN DE LA COCCIÓN FIN DE LA COCCIÓN BLOQUEO PARA NIÑOS: MODO DE ACTIVACIÓN MODO DE DESCONEXIÓN FUNCIONAMIENTO •Pulse el botón central 1 vez •Pulse las teclas"-" "+" para ajustar la duración •Suelte las teclas •Cuando transcurre el tiempo seleccionado,
  • Страница 30 из 117
    La pirólisis deja restos blancos en las paredes. Esperar a que el horno se enfríe completamente, luego limpiar el interior del horno con una esponja húmeda y retirar los restos. 6. CICLO PIROLÍTICO (DEPENDE DEL MODELO) PYRO .El horno se ocupa de la limpieza del interior. -Hay dos opciones posibles,
  • Страница 31 из 117
    INSTRUKCJE BEZPIECZEŃSTWA UWAGA: Podczas pracy urządzenie oraz jego elementy są gorące. Należy zachowac ostrożność i nie dotykać gorących części. • Dzieci w wieku do 8 lat nie mogą zbliżać się do urządzenia chyba że pozostaja one pod ciągłym nadzorem. • Dzieci w wieku powyżej 8 lat oraz ososby z
  • Страница 32 из 117
    1. WSKAZÓWKI OGÓLNE W celu pełnego wykorzystania możliwości piekarnika dokładnie zapoznaj się z niniejszą instrukcją. Przechowuj instrukcję w dostępnym miejscu, aby w razie potrzeby zawsze można było skorzystać z zawartych w niej wskazówek. Przed zainstalowaniem piekarnika spisz jego numer seryjny
  • Страница 33 из 117
    PODŁĄCZENIE DO ZASILANIA: Piekarnik wyposażony jest w przewód zasilający przystosowany do zasilania napięciem między fazami lub między fazą i przewodem neutralnym równym 230V. Przed podłączeniem piekarnika sprawdź: - napięcie zasilania wskazywane na mierniku, - ustawienie wyłącznika automatycznego.
  • Страница 34 из 117
    4. CENTRUM SERWISOWE 3. CZYSZCZENIE PIEKARNIKA •Przed przystąpieniem do czyszczenia należy odczekać aż piekarnik ostygnie. •Nie używać do czyszczenia piekarnika środków ściernych, wełny stalowej lub ostrych przedmiotów mogących uszkodzić trwale emalię. •Należy stosować wyłącznie wodę z mydłem lub
  • Страница 35 из 117
    5. PANEL STEROWANIA Wyświetlacz: czas, tryb programowania pieczenia, symbole, temperatura pieczenia i położenie półek. POKRĘTŁO REGULACJI I POTWIERDZENIA WYBORU Ustawienia: ilość/ciężar, temperatura, programowanie pieczenia i koniec czasu pieczenia. Obracanie pokrętła w kierunku “-” lub “+”
  • Страница 36 из 117
    3. Aby zaprogramować czas pieczenia i koniec czasu pieczenia ustaw pokrętło programatora w położenie oznaczone symbolem "czas pieczenia" lub "koniec pieczenia" - wybrany symbol zacznie migać. Obracając środkowy przycisk ustaw i następnie potwierdź ustawioną temperaturę. Pamiętaj o zatwierdzeniu
  • Страница 37 из 117
    - ustaw czas gotowania na 45 minut - ustaw zakończenie czasu gotowania na godz. 12:30. Gotowanie rozpocznie się automatycznie o godz. 11:45 (45 minut przed godz. 12:30), a zakończy o uprzednio wybranej godzinie, kiedy to piekarnik wyłączy się automatycznie. 5.3 PROGRAMOWANIE SYMBOLE WYŚWIETLACZA
  • Страница 38 из 117
    5.7 ZEGAR DOTYKOWY •Wcisnąć przycisk środkowy (centralny) 1 raz •Ustawić czas trwania pieczenia wciskając Przyciski "-" "+" • Zwolnić przyciski. • Po zakończeniu ustawionego czasu, funkcja sama się wyłączy i rozlegnie się sygnał dźwiękowy, który wyłączy się po chwili. Aby wyłączyć natychmiast
  • Страница 39 из 117
    ostygnie. 6. CZYSZCZENIE PYROLITYCZNE (W ZALEZNOŚCI OD MODELU) Pod koniec cyklu wskaźnik ponownie zacznie migać, zgaśnie natomiast gdy piekarnik osiągnie odpowiednio niską temperaturę. ** Jeśli piekarnik wyposażony jest w funkcję. Po zakończeniu czyszczenia pyrolitycznego na ściankach piekarnika
  • Страница 40 из 117
    BEZPEČNOSTNÍ POKYNY UPOZORNĚNÍ: Spotřebič a jeho přístupné části se během použití zahřívají. Nedotýkejte se topných prvků. • Děti do 8 let držte mimo dosah spotřebiče, pokud nejsou neustále pod dohledem. • Tento spotřebič smí používat děti starší 8 let a osoby se sníženými fyzickými, senzorickými
  • Страница 41 из 117
    1. VŠEOBECNÁ UPOZORNĚNÍ Přečtěte si pozorně tyto pokyny pro maximální využití trouby. Odložte si tyto pokyny na bezpečném místě pro instalaci a použití v budoucnosti a před instalací trouby si poznačte sériové číslo pro případ pomoci servisního střediska. Po vybalení trouby se ujistěte, zda není
  • Страница 42 из 117
    2. PRO/EXP'R TECHNOLOGIE 2.1 VYBAVENÍ TROUBY Před prvním použitím je nutné vyčistit veškeré příslušenství. Opláchněte pomocí houbičky. Opláchněte a vysušte. POUŽITÍ ROŽNĚ Na rošty můžete postavit nádobí a mísy. 1. Vyšroubujte háky 2. Napíchněte maso na rožeň 3. Upevněte maso pomocí háků 4. Utáhněte
  • Страница 43 из 117
    4. SERVISNÍ STŘEDISKO 3. ČIŠTĚNÍ TROUBY • Před čištěním nechte troubu vychladnout. • Nikdy nečistěte troubu drsnými čističi, drátěnkami ani ostrými předměty, neboť můžete poškodit smalt. • Používejte pouze vodu se saponátem. • Nikdy nezakrývejte stěny trouby hliníkovou fólií. • Nepoužívejte
  • Страница 44 из 117
    5. POPIS DISPLEJE Displej: čas, programování přípravy, kontrolky, funkce teploty a pozice roštu TLAČÍTKO K NASTAVENÍ A POTVRZENÍ Nastavení: teplota, programování přípravy a ukončení přípravy Otočením tlačítka směrem k „-" nebo „+". Potvrzení nastavení: stiskněte tlačítko 220 PYRO Kontrolka:
  • Страница 45 из 117
    5.1 PŘED PRVNÍM POUŽITÍM TROUBY tlačítka upravte nastavení podle potřeby a potvrďte. Po nastavení nezapomeňte vrátit volič programů zpět do pozice „stop" k potvrzení nového nastavení. Pro podrobnější informace o programování viz kapitola 5.3 PROGRAMOVÁNÍ. 4 Na konci cyklu přípravy nastavte volič
  • Страница 46 из 117
    5.3 PROGRAMOVÁNÍ Příprava se automaticky spustí v 11:45 (12:30 minus 45 minut) a pokračuje do konce přednastavené doby, kdy se trouba automaticky vypne. SYMBOLY DISPLEJE Kontrolka UPOZORNĚNÍ. Pokud zvolíte čas ukončení přípravy bez nastavení doby přípravy, trouba začne péct ihned a skončí v
  • Страница 47 из 117
    5.7 VYUŽITÍ ČASU dotykové ovládání PROGRAMMER - PROGRAMOVÁNÍ MINUTKA DOBA PEČENÍ KONEC PEČENÍ DĚTSKÁ POJISTKA Jak vypnout Jak aktivovat Funkce • Stiskněte centrální tlačítko Stiskněte středové tlačítko Když nastavený čas jako 1 krát. uplynulý zvukový alarm je • Stisknutím tlačítka "-" "+" aktivován
  • Страница 48 из 117
    7. DĚTSKÝ ZÁMEK 6. CICLO PIROLITICO Tato funkce je důležitá, zejména pokud jsou v domácnosti děti. Brání dětem v zapnutí trouby nebo změně předvolených programů. Tento bezpečnostní systém zamyká ovládací panel během provozu. Jsou dvě úrovně bezpečnosti: **Trouba musí obsahovat tuto funkci. Trouba
  • Страница 49 из 117
    ПРАВИЛА ТЕХНИКИ БЕЗОПАСНОСТИ • ПРЕДУПРЕЖДЕНИЕ: Бытовой электроприбор и его открытые части во время работы могут нагреваться до высокой температуры. Соблюдайте осторожность, не дотрагивайтесь до них. • Дети моложе 8 лет не должны приближаться к бытовому прибору без постоянного надзора. • Данным
  • Страница 50 из 117
    1. ОБЩИЕ МЕРЫ ПРЕДОСТОРОЖНОСТИ Чтобы добиться наилучших результатов при эксплуатации духовки, внимательно прочтите это руководство. Рекомендуется сохранить данное руководство по установке и эксплуатации и обращаться к нему по мере необходимости. В случае обращения за помощью в сервисный центр
  • Страница 51 из 117
    1.5 ПОДКЛЮЧЕНИЕ К ЭЛЕКТРОСЕТИ ПОДКЛЮЧЕНИЕ К ЭЛЕКТРОСЕТИ ДОЛЖНО ВЫПОЛНЯТЬСЯ СОТРУДНИКОМ УТВЕРЖДЕННОГО СЕРВИСНОГО ЦЕНТРА ИЛИ СПЕЦИАЛИСТОМ, ИМЕЮЩИМ СООТВЕТСТВУЮЩУЮ КВАЛИФИКАЦИЮ. Подключение к электросети должно выполняться в соответствии с действующими электротехническими правилами и нормами.
  • Страница 52 из 117
    2.3 СВЕТОДИОДНОЕ ОСВЕЩЕНИЕ (ИМЕЕТСЯ НЕ ВО ВСЕХ МОДЕЛЯХ) В духовке вместо обычной лампочки накаливания используется светодиодная система освещения. В дверцу духовки встроено14 светодиодов (для моделей без системы пиролитической очистки) или 10 мощных светодиодов (для моделей с системой
  • Страница 53 из 117
    5. ОПИСАНИЕ ДИСПЛЕЯ Дисплей: время, программирование режима приготовления пищи, световые индикаторы, температура приготовления пищи, и положение полки КНОПКА ДЛЯ РЕГУЛИРОВКИ И ПОДТВЕРЖДЕНИЯ Установки: температура, программирование режима приготовления пищи, и время окончания приготовления пищи.
  • Страница 54 из 117
    1 - Установите ручку выбора функции в положение, соответствующее нужному вам режиму приготовления пищи". На дисплее отображаются символы нагревательных элементов, работающихввыбранномвамирежимеприготовленияпищи. 2 - На дисплее отображается температура приготовления пищи для выбранного метода
  • Страница 55 из 117
    осуществляется циркуляция горячего воздуха в духовке. Это метод приготовленияпищисвентилятором. ТАЙМЕР: Таймер не управляет работой нагревательных элементов духовки. Он используется только для индикации времени. •Установите ручку программирования в положение "таймер". На дисплее появляется символ
  • Страница 56 из 117
    вы не сделаете этого, символы "время приготовления пищи" и STOP будут продолжать мигать. • Эта функция обычно используется с функцией «время приготовления пищи». бисквиты могут осесть. Вы можете проверить, готова ли выпечка, проколов ее в центре ножом или металлической вязальной спицей. Если лезвие
  • Страница 57 из 117
    5.7 ТАЙМЕР С СЕНСОРНЫМ УПРАВЛЕНИЕМ Что выполняет • Нажмите центральную кнопку 1 раза • Когда установленное время истечет, раздастся звуковой сигнал. По истечении сигнал прекратится автоматически, он также может быть остановлен нажатием кнопки Select. • В ходе процесса на дисплее отражается
  • Страница 58 из 117
    6. ЦИКЛ ПИРОЛИТИЧЕСКОЙ ЧИСТКИ выключается. Через 15 с подается звуковой сигнал, извещающий вас о том, что цикл пиролитической чистки закончился, и начинают мигать индикаторы "время" и "стоп". • Установите ручку выбора функции в положение СТОП. Если вы этого не сделаете, то символы будут продолжать
  • Страница 59 из 117
    VARNOSTNA NAVODILA OPOZORILO: Aparat in njegovi dostopni deli se med uporabo segrejejo. Pazite, da se ne dotaknete grelcev! • Otroci, mlajši od 8 let, naj se aparatu ne približujejo nenadzorovani. • Otroci, starejši od 8 let, ter osebe z zmanjšanimi fizičnimi, zaznavnimi ali umskimi sposobnostmi
  • Страница 60 из 117
    1. SPLOŠNA OPOZORILA Pozorno preberite navodila, da boste lahko izrabili vse možnosti, ki vam jih ponuja pečica. Priporočamo, da navodila za priključitev in uporabo shranite. Pred vgradnjo pečice si zapišite serijsko številko, saj jo boste potrebovali, ko boste potrebovali pomoč pooblaščenega
  • Страница 61 из 117
    2. TEHNOLOGIJA PRO/EXP'R 2.1 OPREMA PEČICE (odvisno od modela) Pred prvo uporabo pečice očistite vse površine z blago raztopino čistila, nato pa z gobico izperite površine s čisto vodo in jih obrišite s suho krpo. UPORABA RAŽNJA 1.Odvijte držala 2.Potisnite raženj v meso. 3.Pritrdite meso s pomočjo
  • Страница 62 из 117
    4. SERVISIRANJE 3. ČIŠČENJE PEČICE • Pred kakršnim koli ročnim čiščenjem počakajte, da se pečica ohladi. • Nikoli ne čistite pečice z jedkimi čistili, blazinicami iz jeklene volne ali ostrimi pripomočki, saj bi lahko nepopravljivo poškodovali emajl. • Za čiščenje uporabljajte samo milnico ali
  • Страница 63 из 117
    5. OPIS PRIKAZOVALNIKA Prikazovalnik: čas, programiran način pečenja, indikatorji, temperature pečenja in višina vodila. GUMB ZA NASTAVLJANJE IN POTRDITEV Nastavitve: temperature, programiranja pečenja in konec pečenja – obračanje gumba v smeri – ali + Potrditev nastavitve: pritisk na gumb 220 PYRO
  • Страница 64 из 117
    pečenja in trajanje pečenja. Utripati začne indikator izbranega načina. S pomočjo osrednjega gumba po potrebi spreminjate nastavitve in nastavitev potrdite s pritiskom na gumb. Če ste uporabili ta način, na koncu ne smete pozabiti obrniti gumba za nastavitve nazaj v položaj STOP, da potrdite novo
  • Страница 65 из 117
    nadaljuje do predhodno nastavljenega časa za konec pečenja, ko se pečica samodejno izklopi. 5.3 PROGRAMIRANJE PRIKAZ SIMBOLOV OPOZORILO Če izberete funkcijo Konec pečenja, ne da bi nastavili čas za Trajanje pečenja, začne pečica delovati takoj in se izklopi ob času, nastavljenem za Konec pečenja.
  • Страница 66 из 117
    5.7 UPORABA PROGRAMSKE URE Z UPRAVLJANJEM NA DOTIK FUNKCIJA •Po preteku nastavljenega časa se oglasi zvočni signal. • Med odštevanjem je na prikazovalniku prikazan čas do izteka nastavljenega časa. •2-krat pritisnite na srednji gumb. • S pomočjo tipk "-" or "+" nastavite želeno trajanje pečenja. •
  • Страница 67 из 117
    6. PIROLIZA (odvisno od modela) 7. SISTEM ZA VARNOST OTROK ** To velja samo za pečice, ki imajo to funkcijo! Varnost je zelo pomembna, še predvsem, če so v družini otroci. Ta funkcija preprečuje, da bi otrok slučajno vklopil pečico ali spremenil nastavitve. Sistem omogoča, da onemogočite delovanje
  • Страница 68 из 117
    SIGURNOSNE UPUTE UPOZORENJE: tijekom korištenja, uređaj i njegovi dostupni dijelovi postaju vrući. Budite oprezni i ne dirajte vruće dijelove. • Djecu mlađu od 8 godina drižite podalje od uređaja, odnosno neka budu pod stalnim nadzorom. • Ovaj uređaj nije namijenjen za uporabu osobama (uključujući
  • Страница 69 из 117
    1. OPĆENITA UPOZORENJA Molimo da pažljivo pročitati upute sadržane u ovoj knjižici kako bi u radu s pećnicom postigli najbolje rezultate. Savjetujemo da čuvate ove upute za korištenje i ugradnju pećnice jer će Vam trebati i ubuduće. Prije instalacije pećnice zapišite serijski broj uređaja u slučaju
  • Страница 70 из 117
    2. PRO/EXP'R TEHNOLOGIJA (ZAVISNO O MODELU) 2.1 OPREMA PEĆNICE (ZAVISNO O MODELU) Prije prve uporabe očistite svu opremu isporučenu uz pećnicu. Operite vodom i spužvom, isperite i potpuno osušite. KORIŠTENJE RAŽNJA Polica služi za držanje posuda i plitica za pečenje. 1. Uklonite (odvrnite) kuke 2.
  • Страница 71 из 117
    4. OVLAŠTENI SERVIS 3. CLEANING THE OVEN •Prije ručnog čišćenja, pričekajte da se pećnica u potpunosti ohladi i isključite je iz električnog napajanja. •Nikada nemojte čistiti pećnicu abrazivnim sredstvima, žičanom vunom ili oštrim predmetima jer će se emajl nepopravljivo oštetiti. •Koristite
  • Страница 72 из 117
    5. OPIS EKRANA Ekran prikazuje: vrijeme, programiranje načina kuhanja, svjetlosne indikatore, temperaturu kuhanja i položaj polica. GUMB ZA REGULIRANJE POTVRDU (SREDIŠNJI GUMB) Postavke: temperatura, programiranje kuhanja i kraja vremena kuhanja – Reguliranje se izvodi okretanjem gumba prema „ – „
  • Страница 73 из 117
    3 – Vrijeme kuhanja i kraj vremena kuhanja mogu se programirati tako da gumb za izbor programira okrenete na položaj „vrijeme kuhanja“ ili „kraj vremena kuhanja“. Svjetlosni indikatori „vrijeme kuhanja“ ili „kraja vremena kuhanja“ počet će treptati. Korištenjem središnjeg gumba, promijenite
  • Страница 74 из 117
    - odaberite željenu funkciju, - podesite vrijeme trajanja kuhanja (dužinu) na 45 minuta, - podesite vrijeme kraja kuhanja na 12:30, Kuhanje će se automatski pokrenuti u 11:45 (12:30 minus 45 min.) i nastavit će se sve dok ne istekne pred-podešeno vrijeme kuhanja, nakon isteka vremena pećnica će se
  • Страница 75 из 117
    select 75 HR
  • Страница 76 из 117
    6. PYROLYTIC CYCLE ** Samo modeli pećnica koji imaju ovu funkciju. Pećnica je opremljena sustavom čišćenja pod nazivom piroliza, koji pomoću vrlo visoke temperature uništava svu prljavštinu i ostatke hrane. Prilikom čišćenja nastaju dim i pare koje se pročišćavaju prolaskom kroz „pirolizer“ koji se
  • Страница 77 из 117
    SICHERHEITSVORSCHRIFTEN WARNUNG: Das Gerät und die zugänglichen Teile des Gerätes werden während des Betriebs heiß. Das Berühren der heißen Geräteteile sollte vermieden werden. • Kinder unter 8 Jahren sollten ohne Aufsicht nicht in die Nähe des Gerätes gelassen werden. • Dieses Gerät ist nicht
  • Страница 78 из 117
    1. ALLGEMEINE HINWEISE Lesen Sie diese Bedienungsanleitung aufmerksam durch: sie enthält wichtige Hinweise zur korrekten Benutzung Ihres Gerätes. Bewahren Sie dieses Dokument zur späteren Benutzung sorgfältig auf. Notieren Sie die Seriennummer Ihres Gerätes im Falle, dass Sie Hilfe vom Kundendienst
  • Страница 79 из 117
    2. ZUBEHÖR (Modellabhängig) Wie benutzt man den Drehspieß: 2.1 BACKOFEN ZUBEHÖR 1.Lösen Sie die Schrauben vom Haken 2.Setzen Sie den Spieß in das Fleisch 3.Fixieren Sie das Fleisch mit den Haken 4.Ziehen Sie die Schrauben zu 5.Legen Sie den Spieß in den Ofen 6.Demontieren Sie den Griff Vor dem
  • Страница 80 из 117
    4. TECHNISCHER KUNDENDIENST 3. REINIGUNG DES BACKOFENS • Warten Sie bis der Ofen herunterkühlt um den Ofen mit der Hand zu reinigen. •Vermeiden Sie unbedingt den Gebrauch von scheuernden Reinigungsmitteln in Pulverform, da diese die Emaille des Backofens und die äußeren Zierteile beschädigen
  • Страница 81 из 117
    5. DISPLAYBESCHREIBUNG Displayanzeige: Zeit, Funktionen programmieren, Symbolanzeige und Temperaturanzeige BEDIENTASTE BESTÄTIGUNG Einstellungen: Temperatur, Backfunktionen und Backzeitende – Funktionen werden eingestellt indem man die Bedientaste dreht “-” oder “+” Um die Einstellungen zu
  • Страница 82 из 117
    1- Drehen Sie den Wahlschalter zu der gewünschten Funktion. Die Beheizung zu der ausgewählten Funktion wird auf dem Display angezeigt. 5.1 NÜTZLICHE HINWEISE VOR DEM ERSTEN BETRIEB DES BACKOFENS Reinigung -Reinigen Sie den Backofen vor der ersten Nutzung: -Wischen Sie die Außenoberfläche mit einem
  • Страница 83 из 117
    •Drehen Sie den Wahlschalter auf die Position Stop zurück. Wenn Sie dies nicht tun, blinken beide Symbole die Backdaueranzeige und das Stop Symbol fortlaufend. Grill + Drehspieß + Umluft: Der Vorteil alle 3 Funktionen gleichzeitig zu nutzen Grill, Drehspieß und Umluft ist, dass das Gericht
  • Страница 84 из 117
    5.6 KONTRAST DES DISPLAYS EINSTELLEN Der Kontrast des Displays kann jederzeit angepasst werden. Die Standardeinstellung ist "C5". Um die Einstellungen anzupassen gehen Sie wie folgt vor: Drehen Sie den Wahlschalter auf die Position „Licht“ und den Funktionsschalter auf „0“. Drücken Sie die
  • Страница 85 из 117
    6. PYROLYTISCHE REINIGUNG 7. KINDERSICHERUNG ** Der Backofen muss mit dieser Funktion ausgestattet sein. Diese Funktion ist wichtig, vor allem wenn Kinder in der Umgebung sind. Es verhindert, dass die Kinder den Backofen einschalten oder Änderungen an den voreingestellten Funktionen vornehmen.
  • Страница 86 из 117
    GÜVENLİK UYARILARI UYARI: Cihaz ve aparatları kullanım sırasında ısınır. Isınmış parçalara dokunmaktan kaçınınız. • 8 yaşın altındaki çocukları cihazdan uzakta tutmalı ve sürekli denetlemelisiniz. • Bu cihaz, 8 yaş ve üzeri çocuklar ve fiziksel, duyusal veya zihinsel yetenekleri veya bilgi ve
  • Страница 87 из 117
    1. GENEL UYARILAR Fırından en iyi verimi alabilmek için talimatları dikkatle okuyun. İleride gerekli olabileceğini düşünerek kurulum ve kullanım talimatlarını saklamanız ve satış sonrası servis hizmetlerinden faydalanabilmeniz için fırını kurmadan önce seri numarasını not etmeniz tavsiye olunur.
  • Страница 88 из 117
    2. AKSESUARLAR (Modele göre) ŞİŞ ÇEVİRMENİN KULLANIMI 2.1 FIRIN EKİPMANI 1. Kancaların vidalarını çıkarın 2. Çevirme elemanını ete geçirin 3. Eti kancalarla sabitleyin 4. Vidaları sıkın 5. Çevirme elemanını motor deliğine geçirin 6. Tutamağı çıkarın Ekipmanları ilk kez kullanmadan önce her birini
  • Страница 89 из 117
    4. SERVİS MERKEZİ 3. FIRIN TEMİZLENMESİ •Elle herhangi bir temizlik işlemi yapmadan önce fırının soğumasını bekleyin. •Fırını temizlerken kesinlikle aşındırıcı temizlik maddeleri, bulaşık teli veya keskin nesneler kullanmayın, aksi takdirde emaye onarılamaz şekilde hasar görebilir. •Yalnızca
  • Страница 90 из 117
    5. EKRAN AÇIKLAMASI Ekran paneli: süre, pişirme modunun programlanması, gösterge ışıkları, pişirme sıcaklığı fonksiyonu ve raf konumu AYARLAMA VE ONAY DÜĞMESİ Ayarlar: sıcaklık, pişirme ve pişirme bitiş süresinin programlanması -Düğmenin "-" veya "+" konumlarına döndürülmesiyle ayarlanır. Ayarı
  • Страница 91 из 117
    Ortadaki düğmeyi kullanarak ayarları gerektiği gibi değiştirin ve zamanlayıcı üzerinde onaylayın. Bunu yaptığınızda yeni ayarı onaylamak için program seçme düğmesini "durdurma konumuna" geri çevirmeyi unutmayın. Programlama hakkında ayrıntılı bilgi için 5.3 PROGRAMLAMA başlıklı bölüme bakın. 4-
  • Страница 92 из 117
    UYARI Pişirme BİTİŞ süresi, pişirme süresinin uzunluğu ayarlanmadan seçilirse, fırın hemen çalışmaya başlar ve ayarlanan pişirme BİTİŞ süresinde durur. 5.3 PROGRAMLAMA EKRAN SEMBOLLERİ Lamba 5.4 PİŞİRME SÜRESİ ZAMANLAYICISININ AYARLANMASI Zaman ayarı Bu kontrol istenen pişirme süresinin
  • Страница 93 из 117
    5.7 DOKUNMATİK ZAMANLAYICI PROGRAM ZAMAN SAYACI PİŞİRME SÜRESİ PROGRAMI PİŞİRME SONU PROGRAMI ÇOCUK KİLİDİ DEVREYE SOKULMASI DEVREDEN ÇIKARILMASI İŞLEVİ NE İÇİN KULLANILDIĞI •Orta düğmeye 1 kez basınız •Arzu ettiğiniz süreyi ayarlamak için "-" "+" düğmelerine basın. •Bütün düğmelere basmaya son
  • Страница 94 из 117
    7. ÇOCUK EMNİYETİ 6. PİROLİTİK DÖNGÜ **Fırın bu fonksiyona sahip olmalıdır Özellikle de etrafta çocuklar varken bu özellik büyük önem kazanmaktadır. Çocukların fırını açmasını veya önceden ayarlanmış programları değiştirmesini engeller. Bu emniyet sistemi fırın çalışır haldeyken fırın kumanda
  • Страница 95 из 117
    Yetkili servislerimizden hizmet talebiniz olduğunda ekteki servis listesinden size en yakın yetkili servisimize ulaşabilirsiniz. Servis hizmeti ve ürünlerimiz ile ilgili genel öneri ve talepleriniz için aşağıdaki numaradan müşteri hizmetleri merkezimize ulaşabilirsiniz. 444 03 98 Müşteri
  • Страница 96 из 117
    CONSEILS DE SÉCURITÉ • AVERTISSEMENT: L'appareil et les parties accessibles deviennent chauds pendant l'utilisation. Des précautions doivent être prises pour éviter de toucher les éléments chauffants. • Les enfants de moins de 8 ans doivent être tenus à l'écart à moins d'être surveillés
  • Страница 97 из 117
    1. INSTRUCTIONS GENERALES Lire attentivement les instructions contenues dans cette brochure, elles fournissent d’importantes indications sur la sécurité d’installation, l’emploi du four et son entretien. Conserver soigneusement cette notice d’utilisation pour toutes consultations ultérieures. -
  • Страница 98 из 117
    2. EQUIPEMENT DU FOUR (PAR MODÈLE) COMMENT UTILISER TOURNEBROCHE? 2.1 EQUIPEMENT DU FOUR 1. Dévisser les crochets 2. Insérer la broche dans la viande à cuire 3. Fixer la viande grâce aux crochets 4. Serrer les vis 5. Insérer la broche dans le trou où se trouve le moteur 6. Enlever le poignée Avant
  • Страница 99 из 117
    3. ENTRETIEN GENERAL DU FOUR •Attendre le refroidissement du four, avant de réaliser une opération de nettoyage manuel. •Ne jamais utiliser de produits abrasifs, d’éponges métalliques ou d’objets tranchants pour nettoyer de four, l’émail serait irrémédiablement abîmé. •N’utiliser que de l’eau
  • Страница 100 из 117
    5. PRESENTATION DU TABLEAU DE BORD Cadran affichage: heure, programmation mode de cuisson, voyants, température fonction cuisson et positionnement du plat. TOUCHE DE REGLAGE ET DE VALIDATION Ajustement des données: température, programmation durée et heure de fin - Réglage possible en tournant la
  • Страница 101 из 117
    5.1 CONSEILS AVANT LA PREMIERE UTILISATION •UN PREMIER NETTOYAGE doit être réalisé avant la première utilisation -passer un chiffon doux et humide sur les surfaces extérieures de l'appareil. -nettoyer avec une éponge additionnée de produit lessiviel, les accessoires et l'intérieur du four. Rincer
  • Страница 102 из 117
    5.3 LA PROGRAMMATION •Le four calcule automatiquement l'heure de départ (heure de fin moins la durée). Lorsque l'heure de fin est atteinte, le four se coupe automatiquement. Pendant 15 secondes, un bip sonore retentit pour vous avertir et les symboles Durée et STOP clignotent. •Ramener la manette
  • Страница 103 из 117
    5.6 REGLAGE DU CONTRASTE DU CADRAN D’AFFICHAGE Le contraste du cadran d’affichage peut être réglé à tout moment. Par défaut le niveau du contrate est “C5”. Pour modifier ce réglage, suivre la procédure suivante : •Positionner la manette de programmation sur “Eclairage” et le sélecteur des modes de
  • Страница 104 из 117
    6. PYROLYSE Le four est équipé d'un système de nettoyage par pyrolyse, c'est-àdire par destruction à haute température des salissures. Cette opération se fait automatiquement au moyen du programmateur. Les fumées en résultant sont rendues "propres" par passage sur un pyrolyseur dont l'action
  • Страница 105 из 117
    VEILIGHEIDSVOORSCHRIFTEN WAARSCHUWING: Het apparaat en de bereikbare delen worden heet tijdens het gebruik. Zorg ervoor dat u de warmingselementen niet aanraakt. • Kinderen jonger dan 8 jaar niet bij het apparaat llaten mits onder continue toezicht. • Dit apparaat kan op een veilige manier worden
  • Страница 106 из 117
    1. ALGEMENE AANWIJZINGEN De handleiding aandachtig lezen zodat u de oven optimaal kan gebruiken. Wij raden u aan de installatie- en gebruikshandleiding voor een latere raadpleging te bewaren en er, vóór de installatie van de oven, het serienummer van het toestel op te noteren voor de aanvraag van
  • Страница 107 из 117
    2. ACCESSOIRES (naar gelang model) 2.1 UITRUSTING VAN DE OVEN 2.3 LED VISION Alvorens u de verschillende accessoires een eerste keer gaat gebruiken, raden we u aan die met een spons schoon te maken, te spoelen en te drogen. Het eenvoudige rooster dient als steun voor vormen en schotels. De lekbak
  • Страница 108 из 117
    4. DIENSTEN SERVICE Indien de oven niet werkt, raden wij u aan om na te gaan of het apparaat goed is aangesloten. Indien u de oorzaak niet kunt ontdekken, bel dan de Service Dienst. Noteert u, voordat u de Service Dienst belt, het typenummer van uw oven (zie binnenzijde van de ovendeur). Kenmerken
  • Страница 109 из 117
    5. VOORSTELLING VAN HET SCHERM Het scherm: Uur, programmeermodus van het koken, verlichting, Temperatuur bereidingsfunctie en richting van de schotel. Instellingtoets en bevestiging Gegevens instellen: temperatuur, tijdsduur programma's en tijdseinde – Instelling mogelijk dankzij de toets die naar
  • Страница 110 из 117
    5.1 TIPS VOORAFGAANDE AAN EEN EERSTE GEBRUIK Een eerste reinigingdient te worden uitgevoerd vóór de oven een eerste keer wordt gebruikt: -maak met een zachte en vochtige doek de buitenvlakken schoon van het apparaat; -de accessoires en de binnenkant van de oven maakt u schoon met een spons en wat
  • Страница 111 из 117
    midden van de oven op middenhoogte plaatsen. De lekbak onder het rooster schuiven om zo de vetten op te vangen. Zeker zijn dat het gerecht niet te dicht bij de grill staat. Halfweg het te bakken stuk omdraaien. GEVENTILEERD DRAAISPIT Gebruik van de onderweerstand, van de turbine, en van het
  • Страница 112 из 117
    oven stoppen. Tijdens het bakken: Nooit in de eetwaren prikken tijdens het bakken , ook niet wanneer u ze omdraait: het sap loopt eruit en het vlees wordt droog. Halfweg het te bakken stuk omdraaien, behalve bij het draaispit omdat de rotatie zelf voor het bakken van de schotel zorgt.
  • Страница 113 из 117
    6. PYROLYSE De oven is uitgerust met een systeem voor schoonmaak via pyrolyse, wat betekent dat vuil tegen zeer hoge temperaturen wordt vernietigd.Deze operatie gebeurt automatisch via de programmeerdraaiknop.De rook die ontstaat bij dit proces wordt “gewassen” door een pyrolysator die in actie
  • Страница 114 из 117
    INSTALLATION GB INSTALACIÓN ES INSTALACE CZ INSTALLAZIONE IT INSTALACJA PL УСТАНОВКА RU ATTENTION ! Applying torque more than needed to fix the screws can close the ventilation channels on both sides. Please be sure that, these ventilation channels are 2mm open after installation to furniture. GB
  • Страница 115 из 117
    VGRADNJA PEČICE SL UGRADNJA HR KURULUM TR INSTALLATION DE INSTALLATION DU FOUR FR INSTALLATIE NL SL V visoko omarico (mere v mm) VGRADNJA POZOR! Če privijete vijake z večjim navorom, kot je to res potrebno, lahko zaprete odprtini za zračenje na obeh straneh. Poskrbite, da po vgradnji v pohištvo
  • Страница 116 из 117
    03.2013 • REV:0 • 42810610 GB The manufacturer will not be responsible for any inaccuracy resulting from printing or transcript errors contained in this brochure. We reserve the right to carry out modifications to products as required, including the interests of consumption, without prejudice to
  • Страница 117 из 117