1
2
3
4
日本語
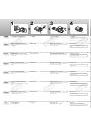
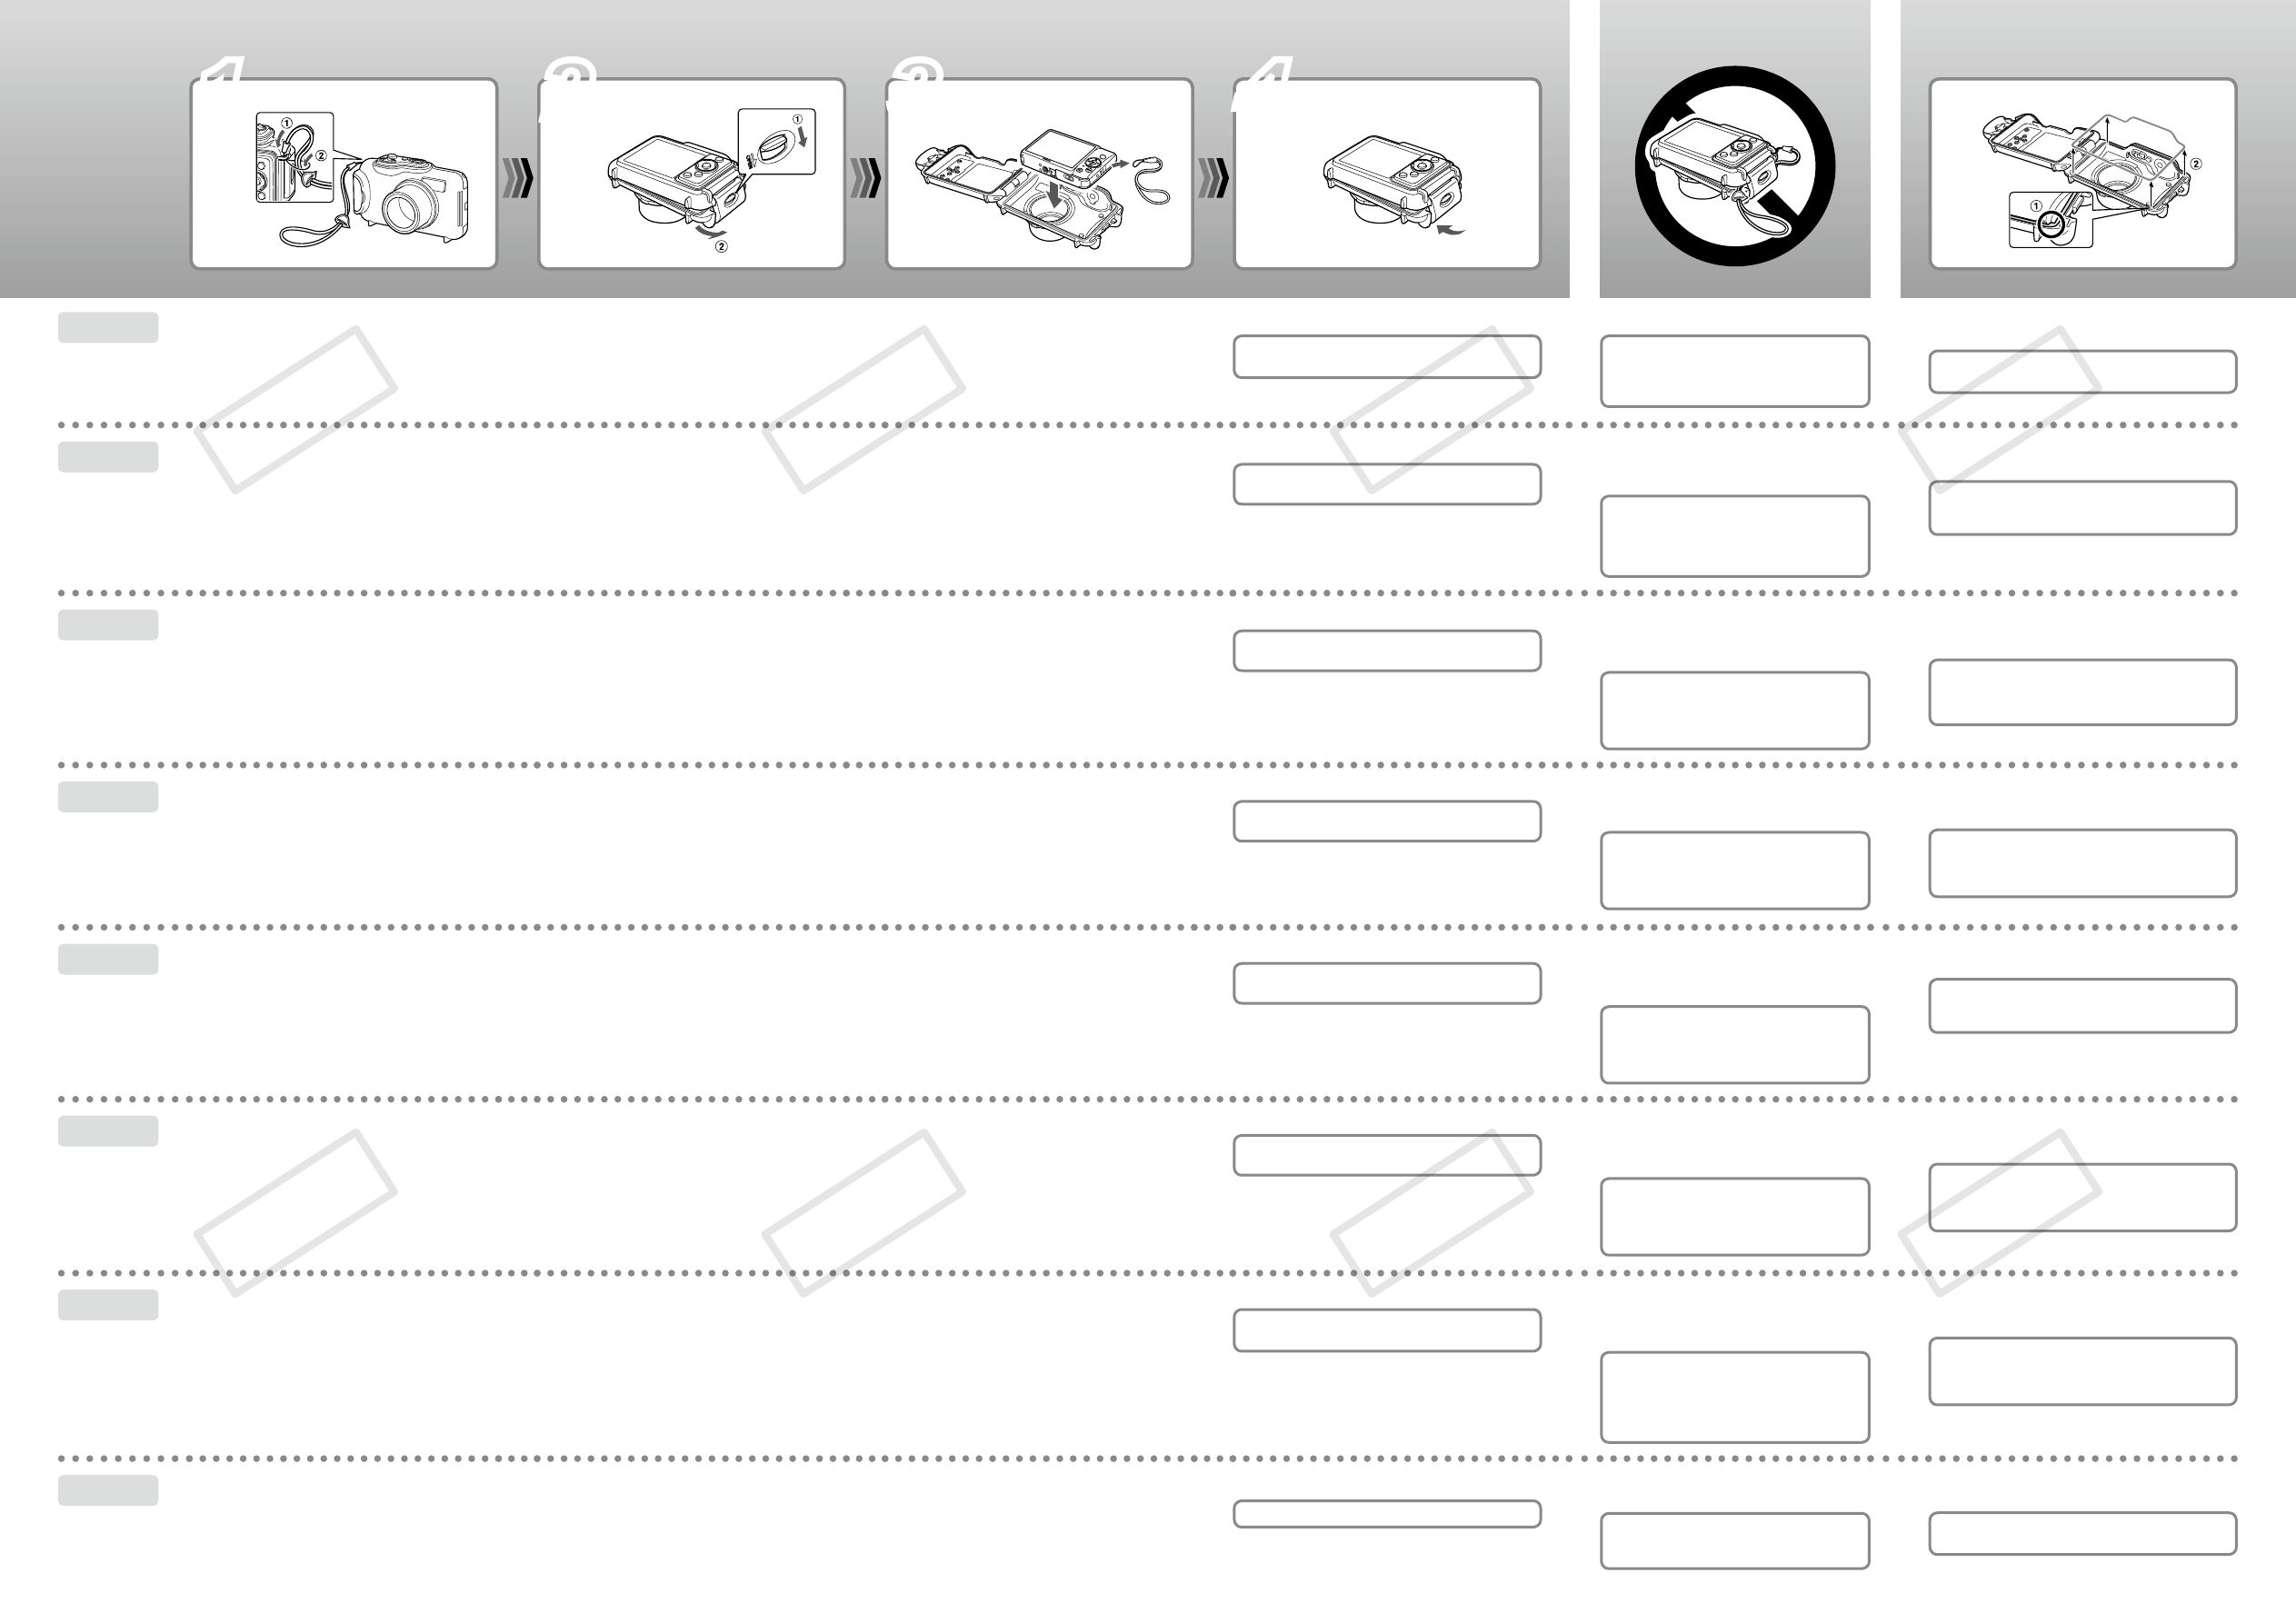
ケースに付属のストラップを取り付ける
ケースに付属のストラップ以外は取り付けないでください。
ケースを開く
ケースにカメラを入れる
カメラのストラップをはずし、バッテリーとカードが入っている
ことを確認してください。
ケースを閉じる
ストロボを光らせて撮影すると、画面の周辺が暗くなる
ことがあります。
ケースにストラップやゴミをはさみこまない
使用後は、ケースについているゴミや砂、頭髪な
どを取り除いてからカメラを取り出してください。
また、ケースを閉じて真水でよく洗い流し、塩分
などが残らないようにしてください。
防水パッキンの取り外しかた
①の部分に指をかけて、②の方向へ取り外します。
防水性能を維持するために、1 年に 1 度は防水パッキンの
交換をおすすめします。修理受付窓口にご相談ください。
English
Attach the strap included with the case.
Do not attach any straps except for the ones included with the
Waterproof Case.
Open the case.
Insert the camera into the case.
Remove the strap from the camera, and make sure the battery
and memory card are inserted.
Close the case.
If you shoot with the flash turned on, the image edges may
darken.
When closing the case, make sure that
the strap is not caught in the waterproof
seal, and that the seal is free of debris.
After using the Waterproof case, please make sure
to remove any dirt, sand, hair or other debris from the
case before removing the camera. Additionally, after
removing the camera, close the case and thoroughly
wash it with clean water to remove any salt deposits.
Remove the waterproof seal.
Hook your finger under the seal (
①
), and lift up to remove it (
②
).
To ensure that the case remains watertight, you should
replace the seal once a year. Contact a Canon Customer
Support Help Desk for
replacement seals.
Deutsch
Befestigen Sie die im Lieferumfang des Gehäuses
enthaltene Schlaufe.
Benutzen Sie nur die im Lieferumfang des Unterwassergehäuses
enthaltenen Schlaufen.
Öffnen Sie das Gehäuse.
Setzen Sie die Kamera in das Gehäuse ein.
Entfernen Sie die Schlaufe von der Kamera, und stellen Sie sicher,
dass sich der Akku und eine Speicherkarte in der Kamera befinden.
Schließen Sie das Gehäuse.
Bei Aufnahmen mit eingeschaltetem Blitz werden die Ecken
des Bilds möglicherweise dunkler.
Stellen Sie beim Schließen des Gehäuses
sicher, dass sich die Schlaufe nicht im
Dichtungsring verfängt und der Dichtungsring
frei von Fremdkörpern ist.
Säubern Sie das Unterwassergehäuse nach der Verwendung
von Schmutz, Sand, Haaren und anderen Fremdkörpern, bevor
Sie die Kamera entnehmen. Schließen Sie das Gehäuse nach
dem Entnehmen der Kamera, und waschen Sie es gründlich
mit sauberem Wasser, um Salzablagerungen zu entfernen.
Entfernen Sie den Dichtungsring.
Haken Sie Ihren Finger unter den Dichtungsring (
①
) und drücken
nach oben, um ihn zu entfernen (
②
).
Damit das Unterwassergehäuse wasserdicht bleibt, sollten Sie
den Dichtungsring einmal pro Jahr auswechseln. Wenden Sie
sich an Ihren Canon-Kundendienst, um Ersatz-Dichtungsringe
zu erhalten.
Español
Monte la correa incluida con el estuche.
No monte ninguna correa, excepto las que se incluyen en el estuche
impermeable.
Abra el estuche.
Inserte la cámara en el estuche.
Retire la correa de la cámara y asegúrese de que la batería y la
tarjeta de memoria se encuentran insertadas.
Cierre el estuche.
Si dispara con el flash encendido, los bordes de la imagen
podrían oscurecerse.
Al cerrar el estuche, asegúrese de que la
correa no queda atrapada en la junta hermética
y de que el cierre no tiene restos de suciedad.
Después de usar el estuche impermeable, asegúrese de
eliminar todo resto de suciedad, arena, pelo o cualquier otro
resto del estuche antes de sacar la cámara. Además, después
de sacar la cámara, cierre el estuche y lávelo minuciosamente
con agua limpia para eliminar todo resto de sal.
Retire la junta hermética.
Meta el dedo debajo de la junta (
①
) y tire hacia arriba para quitarla
(
②
).
Para asegurar la estanqueidad del estuche, se recomienda
reemplazar anualmente la junta hermética. Póngase en
contacto con el Servicio de asistencia al cliente de Canon para
obtener la junta hermética.
Français
Fixez la dragonne fournie avec le boîtier.
N'utilisez pas de dragonnes autres que celles fournies avec le
boîtier étanche.
Ouvrez le boîtier.
Insérez l’appareil photo dans le boîtier.
Retirez la dragonne et vérifiez que la batterie et la carte mémoire
sont insérées dans l’appareil photo.
Fermez le boîtier.
Si vous prenez des photos avec le flash, les bords de l’image
peuvent devenir sombres.
Lorsque vous fermez le boîtier, assurez-vous
que la dragonne n’est pas coincée dans le
joint d’étanchéité et qu’il n’y a pas de corps
étrangers sur le joint.
Après avoir utilisé le boîtier étanche, éliminez les saletés,
le sable, les cheveux ou autres particules du boîtier
avant de sortir l’appareil photo. Une fois l’appareil photo
sorti, fermez le boîtier et lavez-le abondamment à l’eau
courante afin de faire disparaître tous les dépôts de sel.
Retirez le joint d'étanchéité.
Glissez un doigt sous le joint (
①
) et soulevez pour le retirer (
②
).
Pour garantir l'étanchéité du boîtier, il est recommandé de
remplacer le joint une fois par an. Pour le remplacement du
joint, contactez le service clientèle Canon.
Italiano
Non collegare la cinghietta in dotazione con la
fotocamera.
Non collegare cinghiette diverse da quelle fornite con la custodia
subacquea.
Aprire la custodia.
Inserire la fotocamera nella custodia.
Rimuovere la cinghietta dalla fotocamera e assicurarsi che la
batteria e la scheda di memoria siano inserite.
Chiudere la custodia.
Se si effettuano le riprese con il flash attivato, i bordi
dell'immagine possono risultare scuri.
Quando si chiude la custodia, assicurarsi che
la cinghietta non si incastri nella guarnizione
impermeabile e che non siano presenti
particelle estranee sulla guarnizione.
Dopo aver utilizzato la custodia subacquea, assicurarsi di
eliminare eventuali residui di sporcizia, sabbia, capelli o altre
particelle estranee prima di rimuovere la fotocamera. Inoltre,
dopo aver rimosso la fotocamera chiudere la custodia e lavarla a
fondo con acqua dolce per rimuovere eventuali depositi di sale.
Rimuovere la guarnizione impermeabile.
Inserire il dito sotto la guarnizione (
①
) e sollevarla verso l'alto per
rimuoverla (
②
).
Per garantire l'impermeabilità della custodia, sostituire
la guarnizione una volta all'anno. Per informazioni sulle
guarnizioni sostitutive, contattare l'Help Desk del Supporto
Clienti Canon.
Русский
Закрепите ремень, прилагаемый к футляру.
Не закрепляйте никаких других ремней, кроме входящих в
комплект водонепроницаемого футляра.
Откройте футляр.
Установите камеру в футляр.
Снимите ремень с камеры и убедитесь, что установлены карта
памяти и аккумулятор.
Закройте футляр.
При съемке с включенной вспышкой края изображения
могут выглядеть темными.
Закрывая футляр, убедитесь, что ремень
не защемился в водонепроницаемой
прокладке и что на прокладке нет
посторонних частиц.
После использования водонепроницаемого
футляра перед извлечением камеры обязательно
очистите футляр от грязи, песка, волос и другого
мусора. Кроме того, после извлечения камеры
закройте футляр и тщательно промойте его в
чистой воде для удаления всех солевых отложений.
Снимите водонепроницаемую прокладку.
Подцепите прокладку пальцем (
①
), поднимите и снимите ее
(
②
).
Для поддержания водонепроницаемости футляра
необходимо заменять прокладку один раз в год. За
запасными прокладками обращайтесь в службу поддержки
клиентов компании Canon.
中文
为防水套安装附带的腕带。
请只安装防水套附带的腕带。
打开防水套。
将相机装入防水套中。
从相机上摘掉腕带,并确认已安装电池及存储卡。
关闭防水套。
如果使用闪光灯拍摄,可能造成拍摄的画面边缘过暗。
关闭防水套时,请确认防水套未夹住腕带,
并确保防水封条上未粘附灰尘。
使用后,请在清除防水套上粘附的灰尘、沙粒、毛
发等杂物后再取出相机。另外,请用清洁、流动的
自来水仔细清洗,将残留的盐分冲洗干净。
取下防水封条。
用手指从下方钩住防水封条 (
①
), 然后抬起并将其取下 (
②
)。
为保证防水套的防水性能,建议每年更换一次防水封条。
更换时,请与佳能热线中心联系。
COP
Y
COP
Y
COP
Y
COP
Y
COP
Y
COP
Y
COP
Y
COP
Y