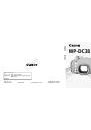
Страница 14 из 99 English Read This First • Make sure you read this guide before using the Waterproof Case. • Store this guide safely so that you can use it in the future. Checking the Package Contents Check if the following items are included in your Waterproof Case package. If anything is missing, contact the
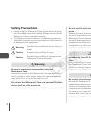
Страница 15 из 99 Safety Precautions • Before using the Waterproof Case, please ensure that you read the safety precautions below. Always ensure that the Waterproof Case is operated correctly. • The safety precautions noted on the following pages are intended to prevent injuries to yourself and other persons, or
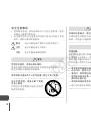
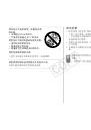
Страница 16 из 99 • Do not insert the camera with the strap attached. • Do not press the buttons or lever with unnecessary force when using the case underwater. • Do not spray the waterproof seal with tap-water. • Do not damage the waterproof seal, or allow dirt to accumulate between the waterproof seal and the
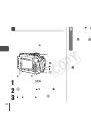
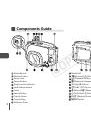
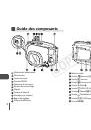
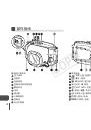
Страница 17 из 99 Components Guide 4 Strap Mounts Shutter Button Zoom Lever Power Button Ring Function Selector Lock Release Switch Catch Lens Window Tripod Socket Control Ring Diffusion Plate C Y P O Mode Dial (Shortcut)/ c (Direct Print) Button 1 (Playback) Button b (Exposure Compensation)/ d (Jump)/o Button h
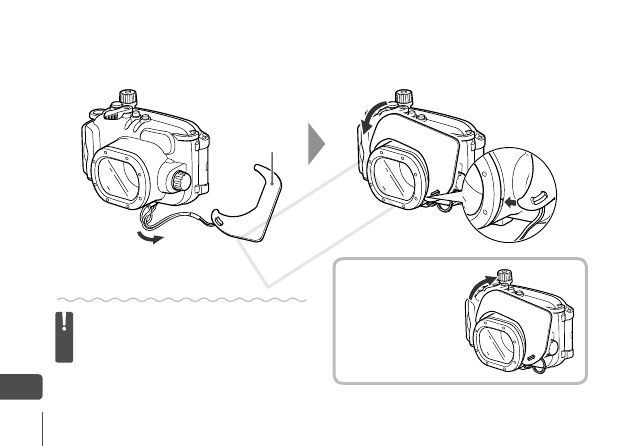
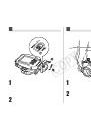
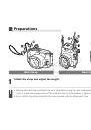
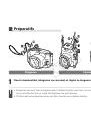
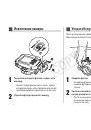
Страница 18 из 99 Preparations Wrist Strap 1 C Y P O Neck Strap Attach the strap and adjust the length. • Remove the neck strap and attach the wrist strap before using the case underwater. Using the neck strap may cause it to become wrapped around the neck and result in strangulation or other injuries. • Do not
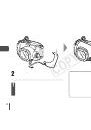
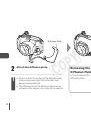
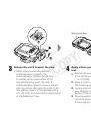
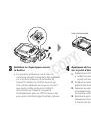
Страница 19 из 99 Diffusion Plate 2 Attach the diffusion plate. C Y P O • Do not scratch the surface of the diffusion plate, as this may prevent light from the flash from being properly diffused. • The effectiveness of the diffusion plate may be impaired if the subject is too close to the camera. 6 Removing the
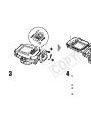
Страница 20 из 99 Waterproof Seal 3 Release the catch to open the case. C • When using commercially available anticondensation products, the anticondensation solution should only be applied to the inside surface of the lens window using a soft, dry cloth. If anticondensation solution comes in contact with any
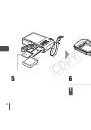
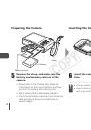
Страница 21 из 99 Preparing the Camera Inserting the Camera Into the Case Strap Battery Memory Card 5 8 C Y P O Remove the strap, and make sure the battery and memory card are in the camera. • Please refer to the Camera User Guide for information on the correct battery, and how to insert the battery and memory card.
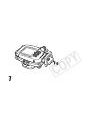
Страница 22 из 99 7 Close the case. C Y P O • Make sure that the waterproof seal is free of debris. • Make sure that the catch is securely locked. 9
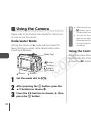
Страница 23 из 99 Using the Camera Please refer to the Camera User Guide for instructions on how to use the camera. Underwater Mode Setting the camera to S mode will tone down the blues, letting you obtain more natural colors when shooting underwater. Mode Dial q Button 1 2 3 10 p Button Set the mode dial to K.
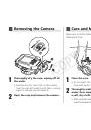
Страница 24 из 99 Removing the Camera Care and Maintenance Make sure to do the following after using the Waterproof Case. 1 C Thoroughly dry the case, wiping off all the water. • Remove any dirt, sand, hair or other debris from the case and wash it with clean, running water to remove any salt deposits. 2 Open the
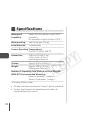
Страница 25 из 99 Specifications Waterproof Capability: Meets IEC/JIS protection rating “IPX8” equivalent For use within a depth of 40m (130 ft.) Waterproofing: Seal (crimp-type O-ring) Body Materials: Polycarbonate Camera Operating Temperatures: 0 to 40 °C (32 to 104 °F) Dimensions: 140.6 x 91.5 x 85.1 mm (5.54 x
Страница 26 из 99 Deutsch Bitte zuerst lesen Stellen Sie vor dem Gebrauch des Unterwassergehäuses sicher, dass es ordnungsgemäß funktioniert und kein Leck hat. Zur Prüfung auf Lecks schließen Sie das Kameragehäuse, bevor Sie die Kamera einsetzen, und halten es etwa drei Minuten lang in einer Tiefe von ca. 15 cm
Страница 27 из 99 Sicherheitsvorkehrungen Verwenden Sie den Trageriemen nicht unter Wasser. Nehmen Sie den Trageriemen ab, und bringen Sie die Handschlaufe an, bevor Sie das Unterwassergehäuse unter Wasser verwenden. Bei der Verwendung des Trageriemens besteht die Gefahr, dass sich der Riemen am Hals verheddert und
Страница 28 из 99 • Vergewissern Sie sich, dass die Handschlaufe von der Kamera entfernt ist, bevor Sie sie in das Gehäuse einsetzen. • Betätigen Sie die Tasten und den Hebel des Gehäuses unter Wasser nicht mit Gewalt. • Spritzen Sie den Dichtungsring nicht mit Leitungswasser ab. • Beschädigen Sie den Dichtungsring
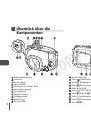
Страница 29 из 99 Überblick über die Komponenten Riemenbefestigung Auslöser Zoom-Hebel Taste ON/OFF Wahltaste für Steuer-Ring Entriegelungstaste Verriegelung Objektivfenster Stativgewinde Steuer-Ring Streuscheibe 4 C Y P O Modus-Wahlrad Taste (Direktwahl)/ c (Direktdruck) Taste 1 (Wiedergabe) Taste b
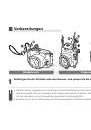
Страница 30 из 99 Vorbereitungen Handschlaufe 1 C Y P O Trageriemen Befestigen Sie die Schlaufe oder den Riemen, und passen Sie die Länge an. • Nehmen Sie den Trageriemen ab, und bringen Sie die Handschlaufe an, bevor Sie das Gehäuse unter Wasser verwenden. Bei der Verwendung des Trageriemens besteht die Gefahr,
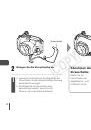
Страница 31 из 99 Streuscheibe 2 Bringen Sie die Streuscheibe an. C Y P O • Vermeiden Sie Kratzer auf der Oberfläche der Streuscheibe, da dies die gleichmäßige Streuung des Blitzlichts verringert. • Die Effektivität der Streuscheibe kann beeinträchtigt werden, wenn sich das Motiv zu nah an der Kamera befindet. 6
Страница 32 из 99 Dichtungsring 3 C Lösen Sie die Verriegelung, um das Gehäuse zu öffnen. • Falls Sie eine handelsübliche Antibeschlaglösung verwenden, tragen Sie sie mit einem weichen, trockenen Tuch nur auf die Innenseite des Objektivfensters auf. Sollte die Antibeschlaglösung versehentlich mit anderen Teilen in
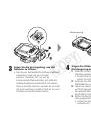
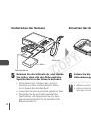
Страница 33 из 99 Vorbereiten der Kamera Einsetzen der Kamera in das Gehäuse Schlaufe Akku Speicherkarte 5 8 C Y P O Nehmen Sie die Schlaufe ab, und stellen Sie sicher, dass sich der Akku und eine Speicherkarte in der Kamera befinden. • Informationen zum richtigen Akku und zum Einsetzen von Akku und Speicherkarte
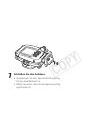
Страница 34 из 99 7 Schließen Sie das Gehäuse. C Y P O • Vergewissern Sie sich, dass der Dichtungsring frei von Fremdkörpern ist. • Stellen Sie sicher, dass die Verriegelung richtig geschlossen ist. 9
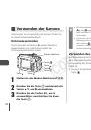
Страница 35 из 99 • Bei Unterwasseraufnahmen mit den Modi E , G, M, B oder D empfiehlt es sich, den Weißabgleich über das Menü FUNC. auf S (Unterwasser) festzulegen. • Sie können den Weißabgleich manuell durch Betätigung einer einzelnen Taste festlegen, wenn Sie (Custom Weißabgleich) der Taste die Funktion zuweisen.
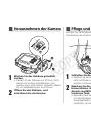
Страница 36 из 99 Herausnehmen der Kamera Pflege und Wartung Befolgen Sie nachstehende Anweisungen nach der Verwendung des Unterwassergehäuses. 1 2 C Wischen Sie das Gehäuse gründlich trocken. • Säubern Sie das Gehäuse von Schmutz, Sand, Haaren und anderen Fremdkörpern, und waschen Sie es unter klarem, laufenden
Страница 37 из 99 Technische Daten Wasserdichtfähigkeit: Entspricht dem IEC/JIS-Schutzgrad „IPX8“ Für den Einsatz bis zu einer Tiefe von 40 m Wasserabdichtung: Dichtungsring (eingepresster O-Ring) Gehäusematerial: Polykarbonat Betriebstemperaturen der Kamera: 0 bis 40 °C Abmessungen: 140,6 x 91,5 x 85,1 mm (ohne
Страница 38 из 99 Español Lea esta sección antes de empezar • Asegúrese de leer esta guía antes de utilizar el estuche impermeable. • Guarde esta guía en un lugar seguro de modo que la pueda utilizar en el futuro. Comprobación del contenido del paquete Compruebe que el paquete del estuche impermeable incluye los
Страница 39 из 99 Precauciones de seguridad • Antes de comenzar a utilizar el estuche impermeable, asegúrese de leer las precauciones de seguridad que se describen a continuación. Asegúrese siempre de que el estuche impermeable se utiliza correctamente. • Las precauciones de seguridad que se indican en las páginas
Страница 40 из 99 • No introduzca la cámara con la correa montada. • No presione los botones ni la palanca demasiado fuerte cuando esté dentro del agua. • No rocíe la junta hermética con agua corriente. • No dañe la junta hermética ni permita que la suciedad se acumule entre la misma y el estuche. • No desarme ni
Страница 41 из 99 Guía de componentes Anillas para la correa Botón de disparo Palanca del zoom Botón ON/OFF Selector de la función del anillo Interruptor para liberar el bloqueo Cierre Ventana del objetivo Rosca para el trípode Anillo de control Placa de difusión 4 C Y P O Dial de modo Botón (acceso directo)/c
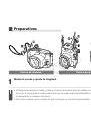
Страница 42 из 99 Preparativos Correa de muñeca 1 C Y P O Correa para el cuello Monte la correa y ajuste la longitud. • Extraiga la correa para el cuello y coloque la correa de muñeca antes de utilizar el estuche debajo del agua. El uso de la correa para el cuello puede hacer que se quede enganchada alrededor del
Страница 43 из 99 Placa de difusión 2 Monte la placa de difusión. C • No raye la superficie de la placa de difusión, ya que esto podría evitar que la luz del flash se difundiese adecuadamente. • La efectividad de la placa de difusión puede reducirse si el motivo está demasiado cerca de la cámara. 6 Y P O Extracción
Страница 44 из 99 Junta hermética 3 C Suelte el cierre para abrir el estuche. • Cuando utilice algún producto contra la condensación de los que hay disponibles en el mercado, la solución contra condensación se deberá aplicar sólo a la superficie interior del objetivo usando un paño suave y seco. Si la solución
Страница 45 из 99 Preparación de la cámara Introducción de la cámara en el estuche Correa Batería Tarjeta de memoria 5 8 C Y P O Retire la correa y asegúrese de que la batería y la tarjeta de memoria se encuentran en la cámara. • Consulte la Guía del usuario de la cámara para obtener información sobre cuál es la
Страница 46 из 99 7 Cierre el estuche. C Y P O • Asegúrese de que la junta hermética no tiene restos de suciedad. • Asegúrese de que el cierre está bien bloqueado. 9
Страница 47 из 99 Uso de la cámara Consulte la Guía del usuario de la cámara para obtener las instrucciones sobre cómo usar la cámara. Modo Bajo el Agua Al ajustar la cámara en el modo S se disminuirán los tonos azules, permitiendo obtener unos colores más naturales cuando se fotografía bajo el agua. Dial de modo
Страница 48 из 99 Extracción de la cámara Cuidado y mantenimiento Asegúrese de hacer lo siguiente después de utilizar el estuche impermeable. 1 2 C Seque el estuche meticulosamente, eliminando toda el agua. • Elimine cualquier suciedad, arena, pelo y demás partículas del estuche y lávelo con agua corriente limpia
Страница 49 из 99 Especificaciones Capacidad de Cumple la evaluación de protección impermeabilidad: de IEC/JIS equivalente a “IPX8” Para utilizarse a una profundidad de 40 m (130 pies) Impermeabilidad: Junta (junta tórica rizada) Material del cuerpo: Policarbonato Temperaturas de funcionamiento de la cámara: 0 a 40
Страница 50 из 99 Français À lire en priorité Avant d'utiliser ce boîtier étanche, assurez-vous qu'il fonctionne correctement et qu'il n'y a pas d’infiltration d'eau. Pour cette vérification, fermez le boîtier avant d'y installer l'appareil photo et tenez-le sous l'eau à une profondeur de 15 cm (5,9 pouces) pendant
Страница 51 из 99 Précautions de sécurité • Avant d'utiliser le boîtier étanche, veuillez lire attentivement les précautions de sécurité exposées ci-après. Veillez à toujours utiliser le boîtier étanche de manière appropriée. • Les précautions de sécurité reprises aux pages suivantes ont pour but d'éviter tout
Страница 52 из 99 • Ne placez pas l'appareil photo dans le boîtier avec la dragonne. • N'appuyez pas trop fort sur les touches et le levier quand le boîtier étanche est immergé. • Ne vaporisez pas d'eau du robinet sur le joint d'étanchéité. • Prenez soin de ne pas abîmer le joint d'étanchéité et veillez à ne pas
Страница 53 из 99 Guide des composants Attaches de bandoulière Déclencheur Levier du zoom Touche ON/OFF Sélecteur de fonctions Bouton de verrouillage Cliquet Fenêtre d’objectif Filetage pour trépied Bague de réglage Plaque de diffusion 4 C Y P O Molette modes Touche (Raccourci)/ c (Impression directe) Touche 1
Страница 54 из 99 Préparatifs Dragonne 1 C Y P O Courroie Fixez la bandoulière (dragonne ou courroie) et réglez sa longueur. • Enlevez la courroie et fixez la dragonne avant d'utiliser le boîtier sous l'eau. La courroie pourrait s'enrouler autour du cou et présenter ainsi un risque d'étranglement ou autre blessure.
Страница 55 из 99 Plaque de diffusion 2 Fixez la plaque de diffusion. C • Veillez à ne pas rayer la surface de la plaque de diffusion au risque d'empêcher le flash d'être diffusé correctement. • L'efficacité de la plaque de diffusion peut être réduite si le sujet est trop proche de l'appareil. 6 Y P O Retrait de la
Страница 56 из 99 Joint d’étanchéité 3 Relâchez le cliquet pour ouvrir le boîtier. C • Les produits antibuée en vente dans le commerce doivent uniquement être appliqués sur la surface intérieure de la fenêtre de l'objectif à l'aide d'un chiffon doux et sec. Si la solution antibuée se trouve en contact avec toute
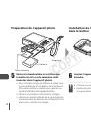
Страница 57 из 99 Préparation de l'appareil photo Dragonne Batterie Carte mémoire 5 8 C Installation de l'appareil photo dans le boîtier Y P O Retirez la bandoulière et vérifiez que la batterie et la carte mémoire sont insérées dans l'appareil photo. • Pour connaître le type de batterie à utiliser ainsi que les
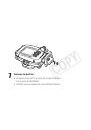
Страница 58 из 99 7 Fermez le boîtier. C Y P O • Assurez-vous qu'il n'y a pas de corps étrangers sur le joint d'étanchéité. • Vérifiez que le cliquet est correctement fermé. 9
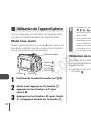
Страница 59 из 99 Utilisation de l'appareil photo Pour en savoir plus sur l'utilisation de l'appareil photo, consultez le Guide d'utilisation de l'appareil photo. Mode Sous-marin Réglez l'appareil photo sur le mode S pour adoucir les tons bleus et obtenir ainsi des couleurs plus naturelles lors de vos prises de vue
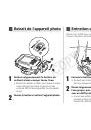
Страница 60 из 99 Retrait de l'appareil photo Entretien du boîtier Prenez soin d'effectuer les opérations suivantes après chaque utilisation du boîtier étanche. 1 2 C Séchez soigneusement le boîtier en veillant à bien essuyer toute l'eau. • Éliminez les saletés, le sable, les cheveux et autres corps étrangers du
Страница 61 из 99 Caractéristiques Capacité d'étanchéité à l'eau : Conforme à la protection IEC/JIS de classe équivalente à « IPX8 ». Pour utiliser à une profondeur de 40 mètres (130 pieds) maximum. Étanchéité : Joint (joint torique de sertissage) Matériau du corps : Polycarbonate Températures de fonctionnement de
Страница 62 из 99 Italiano Informazioni preliminari • Leggere con attenzione la presente guida prima di utilizzare la custodia subacquea. • Conservare la guida in un luogo sicuro per riferimento futuro. Prima di utilizzare la custodia subacquea, assicurarsi che funzioni correttamente e che non vi siano infiltrazioni
Страница 63 из 99 Precauzioni per la sicurezza Non utilizzare cinghia tracolla da collo sott'acqua. Prima di utilizzare la custodia subacquea sott'acqua, rimuovere la cinghia tracolla e collegare la cinghietta da polso. La cinghia tracolla utilizzata in queste condizioni potrebbe causare soffocamento o altre
Страница 64 из 99 • Non inserire la fotocamera quando è collegata la cinghia. • Non premere i pulsanti né la leva esercitando una forza eccessiva quando si utilizza la custodia sott'acqua. • Non spruzzare acqua del rubinetto sulla guarnizione impermeabile. • Non danneggiare la guarnizione impermeabile e accertarsi
Страница 65 из 99 Guida ai componenti Attacchi per le cinghie Pulsante dell'otturatore Leva dello zoom Pulsante ON/OFF Selettore di modalità Interruttore di rilascio blocco Fermo Finestra dell'obiettivo Attacco del treppiede Ghiera di controllo Diffusore 4 C Y P O Ghiera di selezione Pulsante (Scelta rapida)/ c
Страница 66 из 99 Operazioni preliminari Cinghietta da polso 1 C Y P O Cinghia tracolla Collegare la cinghia e regolarne la lunghezza. • Prima di utilizzare la custodia sott'acqua, rimuovere la cinghia tracolla e collegare la cinghietta da polso. La cinghia tracolla utilizzata in queste condizioni potrebbe causare
Страница 67 из 99 Diffusore 2 Collegare il diffusore. C • Non graffiare la superficie del diffusore, poiché ciò potrebbe impedire alla luce del flash di diffondersi correttamente. • L'efficacia del diffusore potrebbe risultare comunque ridotta se il soggetto è troppo vicino alla fotocamera. 6 Y P O Rimozione del
Страница 68 из 99 Guarnizione impermeabile 3 C Rilasciare il fermo per aprire la custodia. • Quando si utilizzano prodotti anticondensa disponibili in commercio, applicare la soluzione anticondensa solo all'interno della superficie dell'obiettivo, usando un panno morbido e asciutto. Se la soluzione anticondensa
Страница 69 из 99 Preparazione della fotocamera Inserimento della fotocamera nella custodia Cinghia Batteria Scheda di memoria 5 8 C Y P O Rimuovere la cinghia e assicurarsi che la batteria e la scheda di memoria siano inserite nella fotocamera. • Per informazioni sulla scelta della corretta batteria e
Страница 70 из 99 7 Chiudere la custodia. C Y P O • Assicurarsi che la guarnizione impermeabile sia priva di residui. • Assicurarsi che il fermo sia correttamente chiuso. 9
Страница 71 из 99 Utilizzo della fotocamera Per istruzioni sull'utilizzo della fotocamera, consultare la Guida dell'utente della fotocamera. Modalità Subacqueo Impostando la fotocamera sulla modalità S, le tonalità di blu risulteranno attenuate e sarà possibile ottenere colori più naturali durante le riprese
Страница 72 из 99 Rimozione della fotocamera Manutenzione Dopo avere utilizzato la custodia subacquea, eseguire le seguenti operazioni. 1 2 Asciugare completamente la custodia, rimuovendo tutta l'acqua. C • Rimuovere la polvere, la sabbia, i capelli o altro tipo di sporcizia dalla custodia e lavarla con acqua
Страница 73 из 99 Specifiche tecniche Proprietà di resistenza Conforme alla classe di protezione all'acqua: IEC/JIS equivalente a "IPX8" Da utilizzarsi entro il limite di profondità di 40 m Impermeabilizzazione: Guarnizione (O-ring crimpato) Materiali del corpo: Policarbonato Temperature di funzionamento della
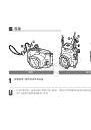
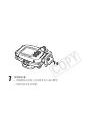
Страница 74 из 99 Русский Прочитайте это в первую очередь • Перед использованием водонепроницаемого футляра обязательно ознакомьтесь с данным Руководством. • Уберите это Руководство в надежное место для будущего использования. Ограничение ответственности Проверка комплектности Проверьте комплект поставки
Страница 75 из 99 Меры предосторожности • Перед использованием водонепроницаемого футляра обязательно прочтите приведенные ниже правила техники безопасности. Строго следите за соблюдением правил надлежащего обращения с водонепроницаемым футляром. • Рассматриваемые на последующих страницах меры предосторожности
Страница 76 из 99 • Не устанавливайте кам еру с закрепленным на ней ремнем. • При использовании футляра под водой не нажимайте на кнопки или рычаги с излишним усилием. • Не брызгайте на водонепроницаемую прокладку водой из-под крана. • Не допускайте повреждения водонепроницаемой прокладки, а также накопления грязи
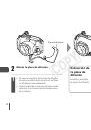
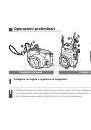
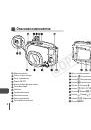
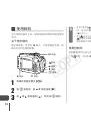
Страница 77 из 99 Описание компонентов Крепления ремня Кнопка спуска затвора Рычаг зумирования Кнопка ON/OFF Кнопка выбора функции кольца Рычаг фиксатора Защелка Окно для объектива Штативное гнездо Кольцо управления Рассеивающая пластина 4 C Y P O Диск установки режима (Быстрый вызов)/ c (Прямая печать) Кнопка 1
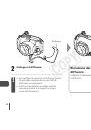
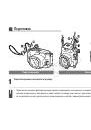
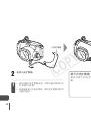
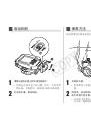
Страница 78 из 99 Подготовка Наручный ремень 1 C Y P O Ремень Закрепите ремень и настройте его длину. • Перед использованием футляра под водой снимите надеваемый на шею ремень и закрепите наручный ремень. При использовании надеваемого на шею ремня он может обмотаться вокруг шеи и вызвать удушение или привести к
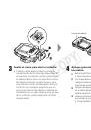
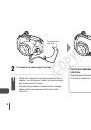
Страница 79 из 99 Рассеивающая пластина 2 Установите рассеивающую пластину. C Y P O • Оберегайте поверхность рассеивающей пластины от царапин, так как они могут привести к неправильному рассеиванию света вспышки. • Если объект расположен слишком близко к камере, эффективность рассеивающей пластины может снизиться. 6
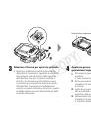
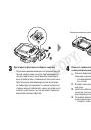
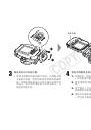
Страница 80 из 99 Водонепроницаемая прокладка 3 C Для открытия футляра освободите защелку. • При использовании имеющихся в продаже средств против конденсации наносите противоконденсатный раствор только на внутреннюю поверхность окна для объектива с помощью мягкой сухой ткани. При попадании противоконденсатного
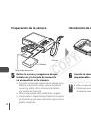
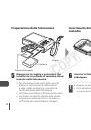
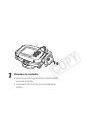
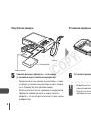
Страница 81 из 99 Подготовка камеры Установка камеры в футляр Ремень Аккумулятор Карта памяти 5 C Y P O Снимите ремень и убедитесь, что в камеру установлены карта памяти и аккумулятор. • Сведения об используемом аккумуляторе, а также о порядке установки аккумулятора и карты памяти см. в Руководстве пользователя
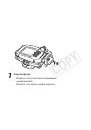
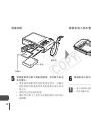
Страница 82 из 99 7 Закройте футляр. C Y P O • Убедитесь в отсутствии грязи на водонепроницаемой прокладке. • Убедитесь, что защелка надежно закрылась. 9
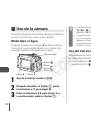
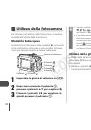
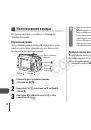
Страница 83 из 99 Использование камеры Инструкции по работе с камерой см. в Руководстве пользователя камеры. Подводный режим При установке в камере режима S уменьшается интенсивность синих тонов, позволяя получать более естественные цвета при подводной съемке. Диск установки режима Кнопка Кнопка o Кнопка r Кнопка m
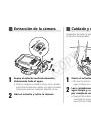
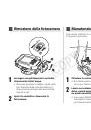
Страница 84 из 99 Извлечение камеры Уход и обслуживание После использования водонепроницаемого футляра обязательно выполните следующие операции. 1 C Тщательно просушите футляр, стерев с него всю воду. • Удалите с футляра всю грязь, песок, волосы или другой мусор, затем промойте его чистой проточной водой для
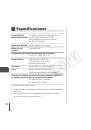
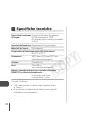
Страница 85 из 99 Технические характеристики Степень водонепроницаемости: Удовлетворяет требованиям, эквивалентным уровню защиты «IPX8» стандарта IEC/JIS Для использования на глубине до 40 м Гидроизоляция: Прокладка (обжимная кольцевая прокладка) Материалы корпуса: Поликарбонат Диапазон рабочих температур камеры: 0