q
r
English
Deutsch
Español
Français
Italiano
Русский
中文
11
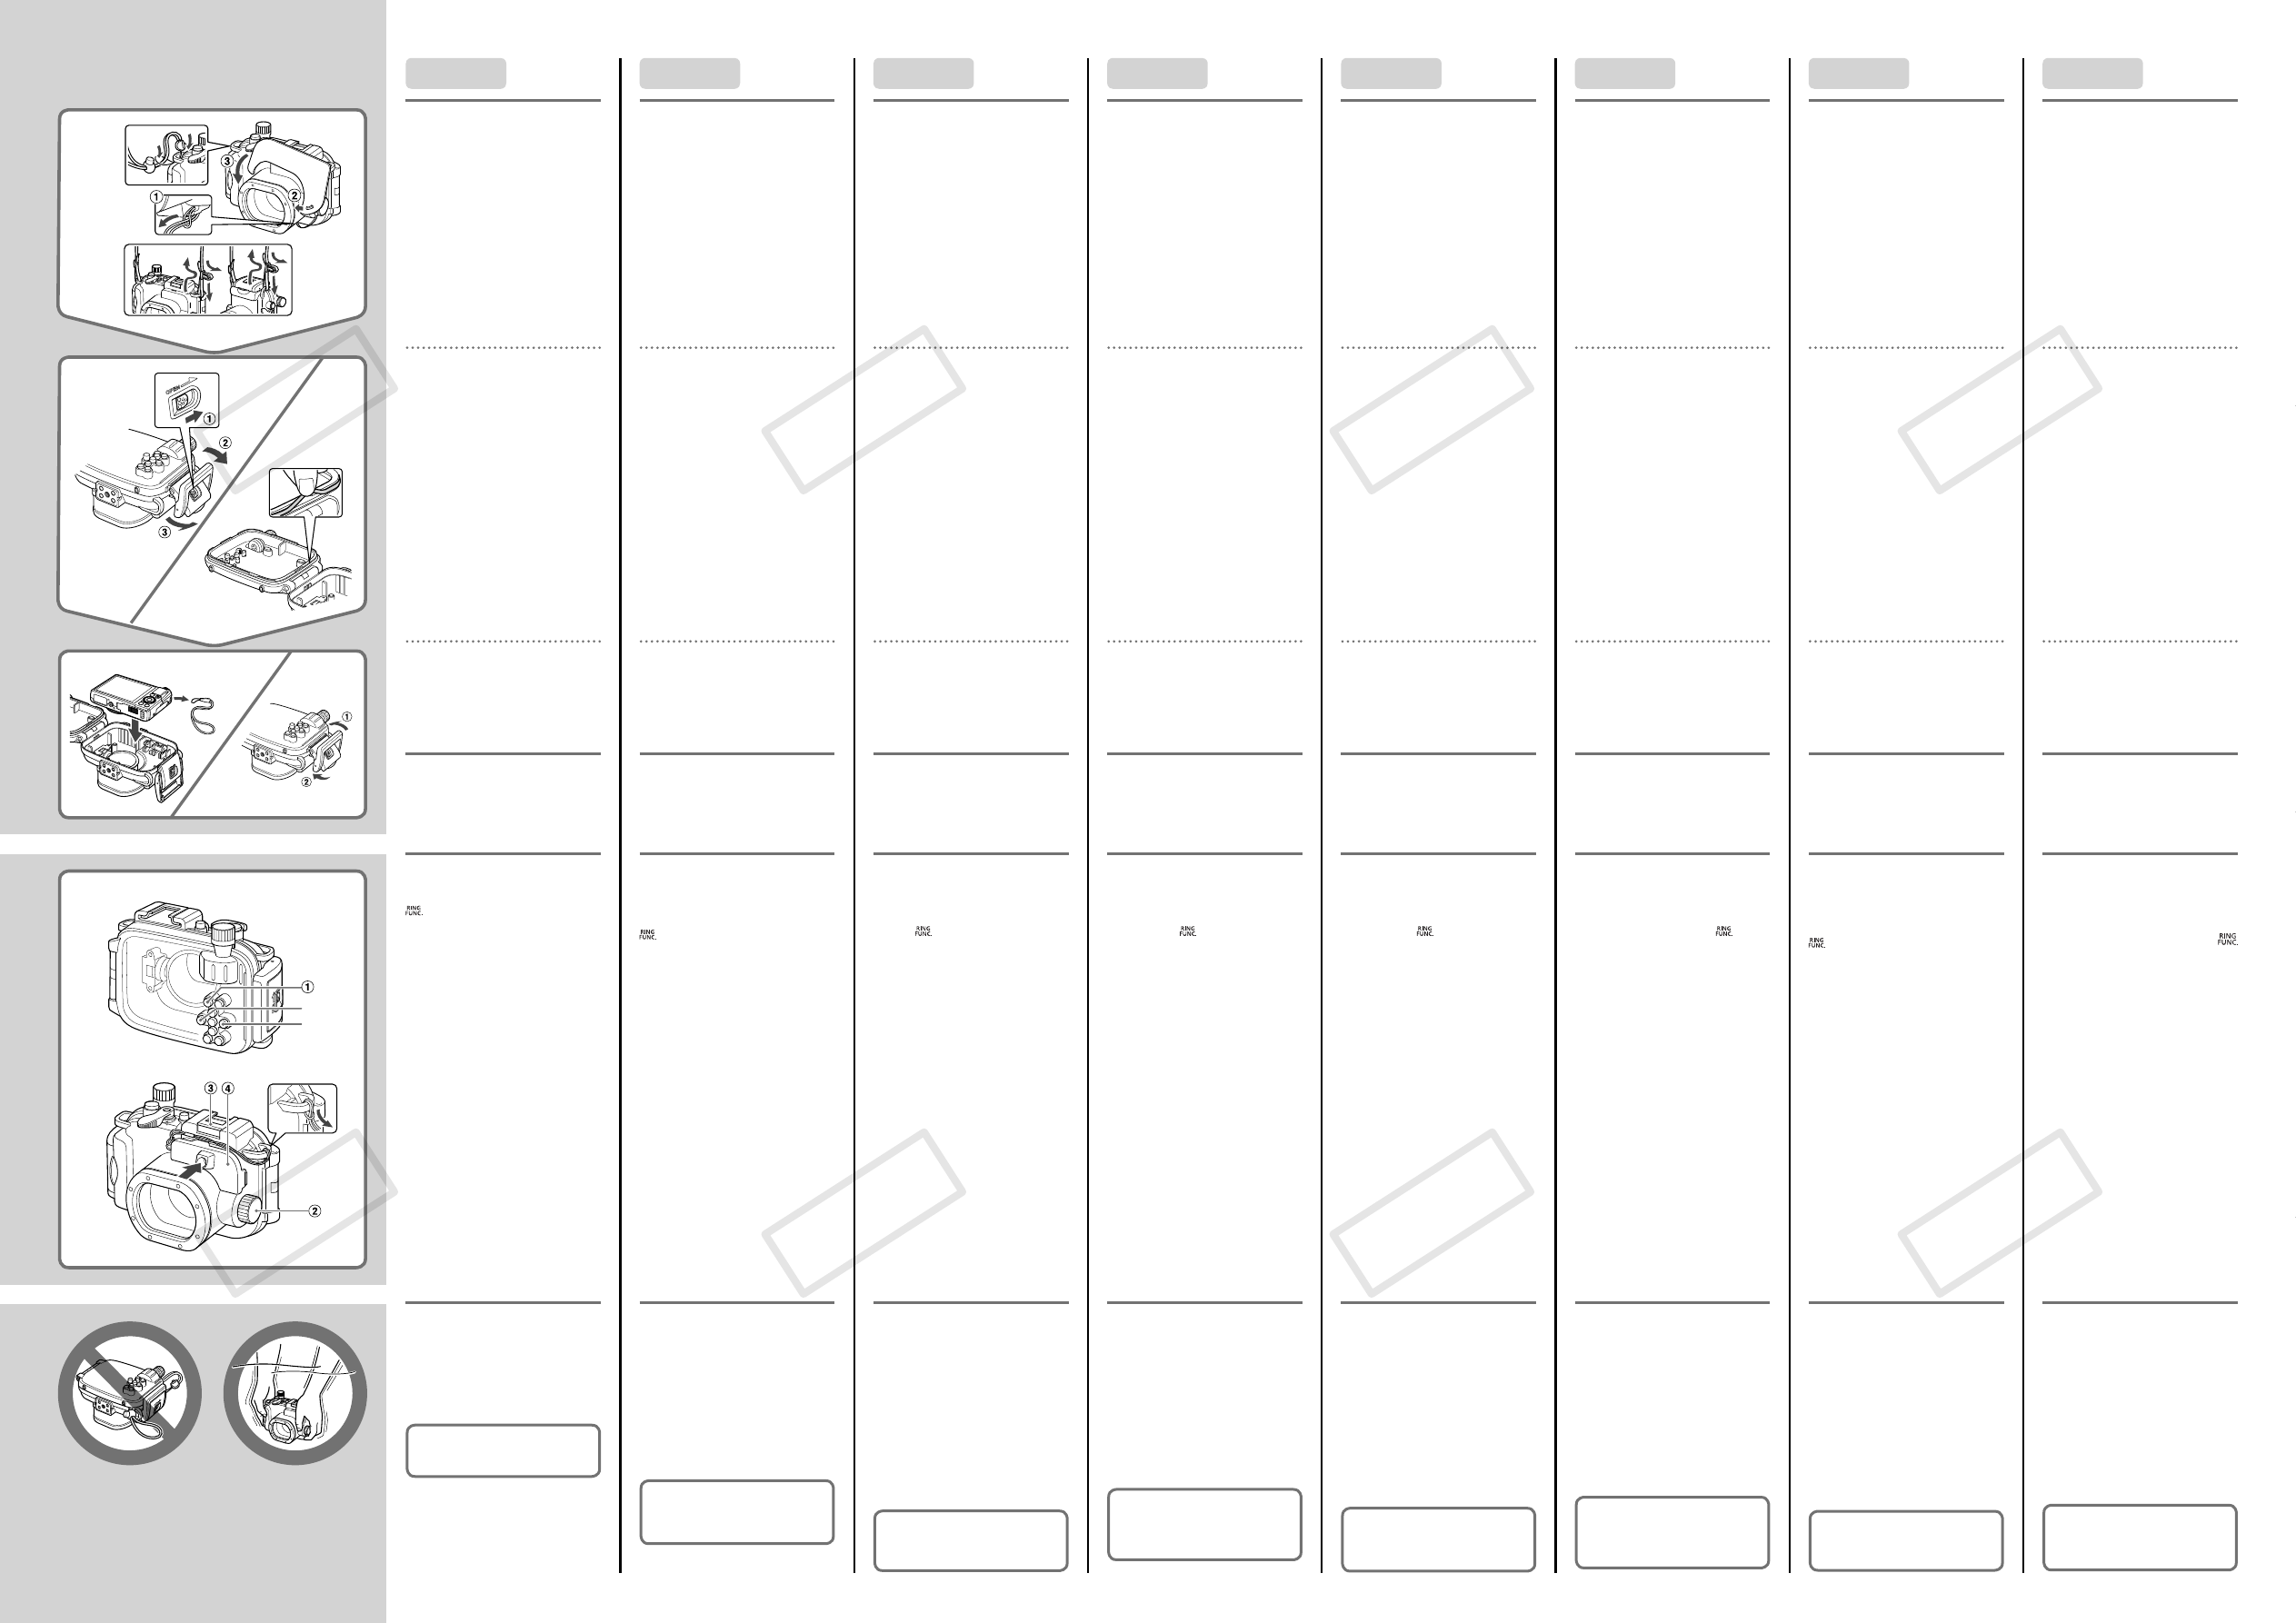
Attach the strap and diffusion
plate included with the case.
Do not attach any straps except for the
ones included with the Waterproof Case.
Remove the neck strap and attach the
wrist strap before using the Waterproof
Case underwater. Using the neck strap
may cause it to become wrapped around
the neck and result in strangulation or
other injuries.
Do not scratch the surface of the diffusion
plate as this may prevent light from the
fl
ash from being properly diffused.
The effectiveness of the diffusion plate
may be impaired if the subject is too close
to the camera.
Befestigen Sie die im Lieferumfang
des Gehäuses enthaltene Schlaufe
und Streuscheibe.
Benutzen Sie nur die im Lieferumfang des
Unterwassergehäuses enthaltenen Schlaufen.
Nehmen Sie den Trageriemen ab, und
bringen Sie die Handschlaufe an, bevor Sie
das Unterwassergehäuse unter Wasser
v e r w e n d e n . B e i d e r V e r w e n d u n g d e s
Trageriemens besteht die Gefahr, dass sich
der Riemen am Hals verheddert und zu
Strangulation oder anderen Verletzungen führt.
Vermeiden Sie Kratzer auf der Oberfläche
der Streuscheibe, da dies die gleichmäßige
Streuung des Blitzlichts verringert.
Die Effektivität der Streuscheibe kann
beeinträchtigt werden, wenn sich das Motiv zu
nah an der Kamera be
fi
ndet.
Monte la correa y la placa de
difusión incluidas con el estuche.
No monte ninguna correa, excepto las que se
incluyen en el estuche impermeable.
Extraiga la correa para el cuello y coloque la
correa de muñeca antes de utilizar el estuche
impermeable bajo el agua. El uso de la correa
para el cuello puede hacer que se quede
enganchado alrededor del mismo y producir
una estrangulación o cualquier otra lesión.
No raye la super
fi
cie de la placa de difusión,
ya que esto podría evitar que la luz del
fl
ash
se difundiese adecuadamente.
La efectividad de la placa de difusión puede
reducirse si el motivo está demasiado cerca
de la cámara.
Fixez la dragonne et la plaque de
diffusion fournies avec le boîtier.
N’utilisez pas de dragonnes autres que celles
fournies avec le boîtier étanche.
Enlevez la courroie et
fi
xez la dragonne avant
d’utiliser le boîtier étanche sous l’eau. La
courroie pourrait s’enrouler autour du cou et
présenter ainsi un risque d’étranglement ou
de blessure autre.
Veillez à ne pas rayer la surface de la plaque
de diffusion au risque d’empêcher le flash
d’être diffusé correctement.
L’ef
fi
cacité de la plaque de diffusion peut être
réduite si le sujet est trop proche de l’appareil.
Collegare la cinghietta e il diffusore
in dotazione con la fotocamera.
Non collegare cinghiette diverse da quelle
fornite con la custodia subacquea.
Prima di utilizzare la custodia subacquea
sott’acqua, rimuovere la cinghia tracolla e
collegare la cinghietta da polso. La cinghia
tracolla utilizzata in queste condizioni
potrebbe causare soffocamento o altre lesioni.
Non graffiare la superficie del diffusore,
poiché ciò potrebbe impedire alla luce del
flash di diffondersi correttamente. L’efficacia
del diffusore
potrebbe risultare comunque ridotta se il
soggetto è troppo vicino alla fotocamera.
Закрепите
ремень
и
установите
рассеивающую
пластину
,
входящие
в
комплект
поставки
футляра
.
Н е
з а к р е п л я й т е
н и к а к и х
д р у г и х
ремней
,
кроме
входящих
в
комплект
водонепроницаемого
футляра
.
Перед
использованием
водонепроницаемого
футляра
под
водой
снимите
шейный
ремень
и
закрепите
ремень
для
запястья
.
При
использовании
шейного
ремня
,
учтите
,
что
он
может
обмотаться
вокруг
шеи
и
вызвать
удушение
или
привести
к
другим
травмам
.
Оберегайте
поверхность
рассеивающей
пластины
от
царапин
,
так
как
они
могут
привести
к
неправильному
рассеиванию
света
вспышки
.
Если
объект
расположен
слишком
близко
к
камере
,
эффективность
рассеивающей
пластины
может
снизиться
.
安装防水套附送的相机带
和闪光扩散板。
请只安装防水套附带的腕带。
在水下使用防水套之前,请取
下背带,然后系上腕带。使用
背带可能会导致其缠绕在颈
部,从而导致窒息或其他伤害。
请勿刮擦闪光扩散板表面。否
则可能会阻碍闪光灯的光线正
确扩散。
如果被摄体过于接近相机,则
闪光扩散板的效果可能会被削
弱。
22
Open the case, and apply silicon
grease to the waterproof seal.
1. Remove the waterproof seal as shown.
Do not dig your
fi
ngernails into the seal,
or pull on it forcibly.
2. Using a cotton swab, wipe off any
debris in the mounting groove.
3. Apply a small amount (droplet) of grease
to your fingertip, and evenly coat the
entire surface of the waterproof seal.
4. Place the waterproof seal back in the
seal mounting groove.
Take care not to twist it.
To ensure that the case remains watertight,
you should replace the seal once a year.
Please contact a Canon Customer Support
Help Desk for replacement seals.
Öffnen Sie das Gehäuse und tragen Sie
Silikon-Paste auf den Dichtungsring auf.
1. Entfernen Sie den Dichtungsring, wie in
der Abbildung gezeigt.
Drücken Sie nicht Ihre Fingernägel in den
Dichtungsring hinein, und ziehen Sie nicht
gewaltsam am Dichtungsring.
2. Entfernen Sie Ablagerungen mit einem
Wattestäbchen aus der Nut.
3. G e b e n S i e e t w a s ( e i n e n T r o p f e n )
Silikon-Paste auf Ihre Fingerspitze, und
überziehen Sie die gesamte Ober
fl
äche des
Dichtungsrings gleichmäßig mit der Paste.
4. Setzen Sie den Dichtungsring wieder
ordnungsgemäß in die Nut ein.
Achten Sie darauf, dass er dabei nicht
verdreht wird.
Damit das Kameragehäuse auch wasserdicht
bleibt, sollten Sie den Dichtungsring einmal pro
Jahr auswechseln.
Wenden Sie sich an Ihren Canon-Kundendienst,
um Ersatz-Dichtungsringe zu erhalten.
Abra el estuche y aplique grasa de
silicona a la junta hermética.
1. Retire la junta hermética tal como se
muestra.
No clave las uñas en la junta ni tire de ella
con fuerza.
2. Con la ayuda de un bastoncillo de
algodón, retire cualquier sustancia extraña
que se encuentre en la ranura de montaje.
3. Aplique una pequeña cantidad (una gota)
de grasa en la punta del dedo y recubra
uniformemente toda la superficie de la
junta hermética.
4. Vuelva a colocar la junta hermética en la
ranura de montaje de la junta.
Tenga cuidado de no retorcerla.
Para asegurar la estanqueidad del estuche,
se recomienda reemplazar anualmente la
junta hermética.
Póngase en contacto con el Servicio de
asistencia al cliente de Canon para obtener la
junta hermética.
Ouvrez le boîtier et appliquez de la
graisse au silicone sur le joint
d’étanchéité.
1. Retirez le joint d’étanchéité comme
illustré.
Veillez à ne pas enfoncer vos ongles dans
le joint et à ne pas tirer trop fort dessus.
2. À l’aide d’un coton-tige, enlevez les corps
étrangers présents dans la rainure de
montage du joint.
3. Déposez une goutte de graisse sur votre
doigt et enduisez toute la surface du joint
d’étanchéité de manière uniforme.
4. Réinsérez le joint d’étanchéité dans la
rainure prévue pour l’accueillir.
Prenez soin de ne pas le tordre.
Pour garantir l’étanchéité du boîtier, il est
recommandé de remplacer le joint une fois
par an.
Pour le remplacement du joint, contactez le
service clientèle Canon.
Aprire la custodia e applicare
grasso al silicone alla guarnizione
impermeabile.
1. Rimuovere la guarnizione impermeabile
come mostrato.
Non inserirvi le unghie né estrarla con
forza.
2. Rimuovere eventuali residui presenti
nella scanalatura di avvitamento con un
batuffolo di cotone.
3. Applicare una goccia di grasso sulla punta
delle dita e spalmarla uniformemente
su tutta la superficie della guarnizione
impermeabile.
4. Riposizionare la guarnizione impermeabile
nella relativa scanalatura di avvitamento.
Prestare attenzione a non piegarla.
Per garantire l’impermeabilità della custodia,
sostituire la guarnizione una volta all’anno.
Per informazioni sulle guarnizioni sostitutive,
contattare l’Help Desk del Supporto Clienti
Canon.
Откройте
футляр
и
нанесите
силиконовую
смазку
на
водонепроницаемую
прокладку
.
1.
С н и м и т е
в о д о н е п р о н и ц а е м у ю
прокладку
,
как
показано
на
рисунке
.
Не
прищипывайте
водонепроницаемую
прокладку
ногтями
и
не
тяните
ее
с
силой
.
2.
Ватной
палочкой
удалите
из
монтажной
канавки
всю
грязь
.
3.
Нанесите
небольшое
количество
(
каплю
)
смазки
на
кончик
пальца
и
равномерно
покройте
смазкой
всю
поверхность
водонепроницаемой
прокладки
.
4.
У с т а н о в и т е
в о д о н е п р о н и ц а е м у ю
прокладку
обратно
в
монтажную
канавку
.
С л е д и т е
,
ч т о б ы
п р о к л а д к а
н е
перекручивалась
.
Для
поддержания
водонепроницаемости
футляра
необходимо
заменять
прокладку
один
раз
в
год
.
За
запасными
прокладками
обращайтесь
в
службу
поддержки
клиентов
компании
Canon.
打开防水套,将硅润滑脂
涂在防水封条上。
1. 如图所示,将防水封条取出。
请勿用指甲挑起,或强行拉
伸防水封条。
2. 请使用棉签擦除安装凹槽内
的所有碎屑。
3. 用手指沾上少许 ( 一小滴 )
润滑脂,然后将润滑脂均匀
地涂满整个防水封条表面。
4. 将防水封条装回安装凹槽内。
请注意不要扭曲。
为保证防水套的防水性能,建
议每年更换一次防水封条。
更换时,
请与佳能热线中心联系。
33
Insert the camera into the case,
then close it.
Remove the strap from the camera, and
make sure the battery and memory card
are inserted.
Setzen Sie die Kamera in das
Gehäuse ein. Schließen Sie das
Gehäuse.
Entfernen Sie die Schlaufe von der Kamera,
und stellen Sie sicher, dass sich der Akku und
eine Speicherkarte in der Kamera be
fi
nden.
Inserte la cámara en el estuche y
ciérrelo.
Retire la correa de la cámara y asegúrese
de que la batería y la tarjeta de memoria se
encuentran insertadas.
Insérez l’appareil photo dans le
boîtier et fermez-le.
Retirez la dragonne et véri
fi
ez que la batterie
et la carte mémoire sont insérées dans
l’appareil photo.
Inserire la fotocamera nella
custodia e chiuderla.
Rimuovere la cinghietta dalla fotocamera
e assicurarsi che la batteria e la scheda di
memoria siano inserite.
Установите
камеру
в
футляр
,
затем
закройте
его
.
Снимите
ремень
с
камеры
и
убедитесь
,
что
установлены
карта
памяти
и
аккумулятор
.
将相机放入防水套后,关
闭防水套。
从相机上摘掉腕带,并确认已
安装电池及存储卡。
Number of Separately Sold
Waterproof Case Weights (WW-
DC1) Recommended Mounting:
When in sea water: 1 weight
When in fresh water: 1 weight
Empfohlene Anzahl der gesondert
erhältlichen Gewichte (WW-DC1)
für das Unterwassergehäuse:
Im Meerwasser: 1 Gewicht
Im Süßwasser: 1 Gewicht
Número de lastres para estuche
impermeable (WW-DC1, se venden
aparte) que se recomienda montar:
En agua del mar: 1 lastre
En agua dulce: 1 lastre
Nombre de poids vendus séparément
pour ce boîtier étanche (WW-DC1) et
recommandés pour le montage :
Dans l’eau de mer : 1 poids
Dans l’eau douce : 1 poids
Numero consigliato di pesi per
custodia subacquea (WW-DC1)
venduti separatamente:
In acqua di mare: 1 peso
In acqua dolce: 1 peso
Рекомендуемое
количество
грузов
для
водонепрони
цаемого
футляра
(WW-DC1):
В
морской
воде
: 1
груз
В
пресной
воде
: 1
груз
配重器 WW-DC1( 选购 )
建议安装数目:
海水时:1 个
淡水时:1 个
q
r
Using the Control Dial
Use of the control dial with the waterproof
case differs slightly from that of the camera
itself.
Press the
qr
buttons while pressing the
(
) button.
Using the Control Ring
Turn the control ring (
).
Using the External Underwater
Flash (commercially available)
Attach the external under water flash
(commercially available) to the cold shoe ( ).
When using the optical
fi
ber cable, attach the
covering attachment (
) with a click sound
as shown, and insert the optical
fi
ber cable
into the hole. Please read the corresponding
manuals for details on how to attach the
external
fl
ash and optical
fi
ber cable.
Using the Touch Panel
Touch operations are not possible when
the camera is in a case.
Using the Wireless LAN Function
When using the Waterproof Case, it may
be difficult for the camera to receive
wireless LAN signals. Additionally, the
camera may not receive signals when
underwater or when the case is wet.
Verwenden des Einstellungs-Wahlrads
Die Verwendung des Einstellungs-Wahlrads
mit dem Unterwassergehäuse weicht leicht
vom Einstellungs-Wahlrad der Kamera ab.
Drücken Sie gleichzeitig die Tasten
qr
und
die Taste
(
).
Verwenden des Steuer-Rings
Drehen Sie den Steuer-Ring (
).
Verwenden des externen Unterwasser-
Blitzgeräts (im Handel erhältlich)
Bringen Sie das externe Unterwasser-Blitzgerät
(im Handel erhältlich) am Zubehörschuh an
(
). Wenn Sie das Glasfaserkabel verwenden,
bringen Sie den Abdeckungsaufsatz (
) wie
dargestellt an, so dass er hörbar einrastet, und
führen Sie das Glasfaserkabel in die Öffnung
ein. Einzelheiten zum Anbringen des externen
Blitzgeräts und des Glasfaserkabels
fi
nden Sie
in den zugehörigen Handbüchern.
Verwenden des Touchscreens
Wenn sich die Kamera in dem Gehäuse
be
fi
ndet, kann der Touchscreen nicht bedient
werden.
Verwenden der Wireless-LAN-
Funktion
Im Unterwassergehäuse hat die Kamera
möglicherweise Schwierigkeiten beim
Empfang von Wireless-LAN-Signalen. Wenn
sich die Kamera zudem unter Wasser be
fi
ndet
oder wenn das Gehäuse nass ist, empfängt
die Kamera möglicherweise keine Signale.
Uso del dial de control
El uso del dial de control con el estuche
impermeable es ligeramente diferente al de la
propia cámara.
Pulse los botones
qr
a la vez que mantiene
pulsado el botón
(
).
Uso del anillo de control
Gire el anillo de control (
).
Uso del
fl
ash subacuático externo
(disponible en el mercado)
Sujete el
fl
ash subacuático externo (disponible
en el mercado) a la zapata (
). Cuando use
el cable de fibra óptica, monte la cubierta de
conexión (
) como se muestra hasta que
haga clic e introduzca el cable de
fi
bra óptica
en el ori
fi
cio. Consulte los detalles sobre cómo
sujetar el flash externo y el cable de fibra
óptica en los correspondientes manuales.
Uso del panel táctil
Las operaciones táctiles no son posibles
cuando la cámara se encuentra en un
estuche.
Uso de la función LAN inalámbrica
Cuando utilice el estuche impermeable, puede
que a la cámara le resulte difícil recibir señales
de red LAN inalámbrica. Además, es posible
que la cámara no reciba señales cuando se
encuentre bajo el agua o cuando el estuche
esté húmedo.
Utilisation de la molette de sélection
L’utilisation de la molette de sélection avec le
boîtier étanche est légèrement différente de
celle de l’appareil photo.
Appuyez sur les touches
qr
en même temps
que sur la touche
(
).
Utilisation de la bague de réglage
Tournez la bague de réglage (
).
Utilisation du
fl
ash externe sous-
marin (disponible dans le commerce)
Attachez le
fl
ash externe sous-marin (disponible
dans le commerce) à la griffe (
). Lorsque
vous utilisez le câble en
fi
bres optiques,
fi
xez le
couvercle (
) jusqu’au déclic comme indiqué,
puis insérez le câble en fibres optiques dans
l’orifice. Lisez les manuels correspondants
pour savoir comment attacher le
fl
ash externe
et le câble en
fi
bres optiques.
Utilisation de l’écran tactile
Les opérations tactiles ne sont pas disponibles
lorsque l’appareil photo est dans le boîtier.
Utilisation de la fonction LAN sans
fi
l
Lors de l’utilisation du boîtier étanche, l’appareil
photo peut éprouver des dif
fi
cultés à capter les
signaux du LAN sans fil. En outre, il se peut
que l’appareil photo ne puisse pas capter les
signaux sous l’eau ou si le boîtier est mouillé.
Utilizzo della ghiera di controllo
L’utilizzo della ghiera di controllo con la
custodia subacquea differisce leggermente da
quello della fotocamera.
P r e m e r e i p u l s a n t i
q r
e p r e m e r e
contemporaneamente il pulsante
(
).
Utilizzo della ghiera anteriore
Ruotare la ghiera anteriore (
).
Utilizzo del
fl
ash esterno subacqueo
(disponibile in commercio)
Collegare il
fl
ash esterno subacqueo (disponibile
in commercio) alla slitta (
). Se si utilizza un
cavo in fibra ottica, collegare l’accessorio di
copertura (
) con uno scatto come illustrato,
quindi inserire il cavo in fibra ottica nel foro.
Consultare i relativi manuali per informazioni
dettagliate su come collegare il
fl
ash esterno e il
cavo in
fi
bra ottica.
Utilizzo del pannello a tocco
Quando la fotocamera è inserita in una
custodia, il pannello a tocco non può essere
utilizzato.
Utilizzo della funzione LAN wireless
L’uso della custodia subacquea può ostacolare
la ricezione dei segnali della LAN wireless
da parte della fotocamera. La fotocamera
potrebbe inoltre non ricevere i segnali quando è
sott’acqua o quando la custodia è bagnata.
Использование
диска
управления
И с п о л ь з о в а н и е
д и с к а
у п р а в л е н и я
с
водонепроницаемым
футляром
немного
отличается
от
использования
этого
диска
на
самой
камере
.
Нажимайте
кнопки
qr
при
нажатой
кнопке
(
).
Использование
кольца
управления
Поворачивайте
кольцо
управления
(
).
Использование
внешней
подводной
вспышки
Установите
внешнюю
подводную
вспышку
(
имеется
в
продаже
)
на
холодный
башмак
(
).
При
использовании
волоконно
-
оптического
кабеля
установите
крышку
(
)
до
щелчка
,
как
показано
на
рисунке
,
а
затем
введите
волоконно
-
оптический
кабель
в
отверстие
.
Подробные
сведения
об
установке
внешней
вспышки
и
оптического
кабеля
см
.
в
соответствующих
руководствах
.
Использование
сенсорной
панели
Работа
с
сенсорной
панелью
невозможна
,
когда
камера
находится
в
футляре
.
Использование
функции
беспроводной
ЛВС
При
использовании
водонепроницаемого
футляра
возможны
проблемы
с
приемом
камерой
сигналов
беспроводной
ЛВС
.
Кроме
того
,
камера
,
возможно
,
не
будет
принимать
сигналы
под
водой
или
в
мокром
футляре
.
使用控制转盘
安装防水套后,控制转盘的使
用方法与相机机身上的控制转
盘略有不同。
按下
qr
按钮的同时按下
(
) 按钮。
使用控制环
转动控制环 (
)。
使用外接水下闪光灯(市售)
将外接水下闪光灯 ( 市售 ) 安
装到冷靴(
)上。使用光缆时,
请按照图示安装覆盖附件 (
)
直到发出咔嚓声,然后将光缆
插入孔中。有关外接闪光灯和
光缆安装方法的详细信息,请
阅读相关手册。
使用触摸面板
当相机位于防水套中时,无法
进行触摸操作。
使用无线局域网功能
使用防水套时,相机可能难以
接收无线局域网信号。此外,
在水下或防水套潮湿时,相机
可能无法接收信号。
When closing the case, make
sure that the strap is not caught
in the waterproof seal, and that
the seal is free of debris.
Failing to do so could cause leaks.
After using the case, close it, and
thoroughly wash it with clean
water.
If the case is not sufficiently cleaned and
maintained, salt deposits may not be
removed, which could lead to malfunctions.
After using the Waterproof case,
please make sure to remove any dirt,
sand, hair or other debris from the case
before removing the camera.
Stellen Sie beim Schließen des
Gehäuses sicher, dass sich die
Schlaufe nicht im Dichtungsring
verfängt und der Dichtungsring frei
von Fremdkörpern ist.
Hierdurch könnten Lecks verursacht werden.
Wird das Gehäuse nicht mehr
benötigt, schließen Sie es und spülen
es gründlich mit sauberem Wasser ab.
Wenn das Gehäuse nicht entsprechend
g e r e i n i g t u n d g e p f l e g t w i r d , k ö n n e n
Salzuablagerungen unter Umständen nicht
mehr beseitigt werden. Dies beeinträchtigt die
Funktionsweise der Kamera.
Säubern Sie das Unterwassergehäuse
nach der Verwendung von Schmutz, Sand,
Haaren und anderen Fremdkörpern, bevor
Sie die Kamera entnehmen.
Al cerrar el estuche, asegúrese de
que la correa no queda atrapada
en la junta hermética y de que el
cierre no tiene restos de suciedad.
Si no sigue estas indicaciones, podrían
producirse in
fi
ltraciones.
Después de utilizar el estuche,
ciérrelo y lávelo minuciosamente
con agua limpia.
S i s e d e s c u i d a n l a l i m p i e z a y e l
mantenimiento, podrían quedar depósitos de
sal y causar un mal funcionamiento.
Después de usar el estuche impermeable,
asegúrese de eliminar todo resto de
suciedad, arena, pelo o cualquier otro
resto del estuche antes de sacar la
cámara.
Lorsque vous fermez le boîtier,
assurez-vous que la dragonne
n’est pas coincée dans le joint
d’étanchéité et qu’il n’y a pas de
corps étrangers sur le joint.
Le non-respect de ces instructions pourrait
provoquer des in
fi
ltrations.
Après utilisation du boîtier,
fermez-le et lavez-le soigneusement
avec de l’eau propre.
Si le boîtier n’est pas correctement nettoyé
et entretenu, des dépôts de sel risquent
de subsister, ce qui pourrait provoquer des
dysfonctionnements.
Après avoir utilisé le boîtier étanche,
éliminez les saletés, le sable, les
cheveux ou autres particules du boîtier
avant de sortir l’appareil photo.
Quando si chiude la custodia, assicurarsi
che la cinghietta non si incastri nella
guarnizione impermeabile e che non siano
presenti particelle estranee sulla guarnizione.
In caso contrario, si potrebbero causare
in
fi
ltrazioni.
Dopo avere utilizzato la custodia,
chiuderla e lavarla accuratamente
con acqua dolce.
Se la custodia non viene pulita in modo
adeguato, potrebbe non essere possibile
rimuovere i depositi di sale, con conseguente
rischio di malfunzionamento.
D o p o a v e r u t i l i z z a t o l a c u s t o d i a
subacquea, assicurarsi di eliminare
eventuali residui di sporcizia, sabbia,
capelli o altre particelle estranee prima di
rimuovere la fotocamera.
Закрывая
футляр
,
убедитесь
,
что
ремень
не
защемился
в
водонепроницаемой
прокладке
и
что
на
прокладке
нет
посторонних
частиц
.
Невыполнение
этого
требования
может
привести
к
протечкам
.
После
использования
футляра
закройте
его
и
тщательно
промойте
чистой
водой
.
Недостаточная
чистка
и
ненадлежащий
уход
за
футляром
могут
привести
к
отложению
остатков
соли
и
,
в
результате
,
к
неполадкам
в
работе
.
После
использования
водонепроницаемого
футляра
перед
извлечением
камеры
обязательно
очистите
футляр
от
грязи
,
песка
,
волос
и
другого
мусора
.
关闭防水套时,请确认防
水套未夹住腕带,并确保
防水封条上未粘附灰尘。
否则可能会导致防水套漏水。
使用完防水套后将其关闭,
并用清洁的水彻底清洗。
如果未能充分清洁和保养防水
套,可能无法去除盐渍,并可
能由此引发故障。
使用后,请在清除防水套上
粘附的灰尘、沙粒、毛发等
杂物后再取出相机。
COP
Y
COP
Y
COP
Y
COP
Y
COP
Y
COP
Y
COP
Y
COP
Y