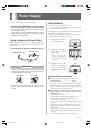
Инструкция для CASIO LK-125

(скачивание инструкции бесплатно)
Формат файла: PDF
Доступность: Бесплатно как и все руководства на сайте. Без регистрации и SMS.
Дополнительно: Чтение инструкции онлайн
background image

LK120/125ES1A

ES

USER’S GUIDE
GUÍA DEL USUARIO

Please keep all information for future reference.
Guarde toda información para tener como referencia futura.

1
2
3
4
5
6
7
8
9
10
11
12
13
14
15
16
17
18
19
20
21
22
23
24
25
26
27
28
29
30
31
32
33
34
35
36
37
Оглавление инструкции
  • Страница 1 из 38
    ES USER’S GUIDE GUÍA DEL USUARIO Please keep all information for future reference. Guarde toda información para tener como referencia futura. LK120/125ES1A
  • Страница 2 из 38
    GUIDELINES LAID DOWN BY FCC RULES FOR USE OF THE UNIT IN THE U.S.A. (not applicable to other areas). NOTICE This equipment has been tested and found to comply with the limits for a Class B digital device, pursuant to Part 15 of the FCC Rules. These limits are designed to provide reasonable
  • Страница 3 из 38
    Safety Precautions Before using the instrument, be sure to carefully read through the instructions contained in this manual. Symbols Various symbols are used in this user’s guide and on the product itself to ensure that the product is used safely and correctly, and to prevent injury to the user and
  • Страница 4 из 38
    DANGER Alkaline Batteries Perform the following steps immediately if fluid leaking from alkaline batteries ever gets into your eyes. 1. Do not rub your eyes! Rinse them with water. 2. Contact your physician immediately. Leaving alkaline battery fluid in your eyes can lead to loss of sight. WARNING
  • Страница 5 из 38
    Do not incinerate the product. Never throw the product into fire. Doing so can cause it to explode, creating the risk of fire and personal injury. Water and Foreign Matter Water, other liquids, and foreign matter (such as pieces of metal, pencils, etc.) getting into the product create the risk of
  • Страница 6 из 38
    CAUTION AC Adaptor ● Misuse of the AC adaptor creates the risk of fire and electric shock. Always make sure you observe the following precautions. • Do not locate the electric cord near a stove or other sources of heat. • Never pull on the cord when unplugging from the electrical outlet. Always
  • Страница 7 из 38
    Display Screen • Never push on the display screen’s LCD panel or subject it to strong impact. Doing so can cause the LCD panel’s glass to crack, creating the risk of personal injury. • Should the LCD panel ever crack or break, never touch the liquid inside of the panel. LCD panel liquid can cause
  • Страница 8 из 38
    Main Features ❐ On-screen fingering and timing indicators • Easy-to-understand on-screen indicators help to simplify keyboard play, even for novices. ❐ 100 amazingly realistic tones ❐ Enhanced auto-accompaniment function for greater versatility • 50 built in auto-accompaniment patterns. ❐ 100
  • Страница 9 из 38
    Contents Safety Precautions ................ E-1 3-Step Lesson System ........ E-20 Using 3-Step Lesson System .................. E-20 Main Features ........................ E-6 General Guide ........................ E-8 Attachment of Score Stand ........................ E-9 Voice Fingering Guide
  • Страница 10 из 38
    General Guide 1 2 3 4 5 6 7 8 C 9 0 A B 8 D E F I J G H K L M E-8 LK120_e_08-12.p65 8 10.3.19, 5:27 PM N
  • Страница 11 из 38
    1 POWER/MODE selector E RHYTHM button 2 VOLUME slider F TONE button 3 SYNCHRO/FILL-IN button G SONG BANK button 4 START/STOP button H Number buttons 5 DEMO button ● 3-STEP LESSON 6 KEY LIGHT button I STEP 1 button 7 TEMPO/VALUE buttons J STEP 2 button 8 Speakers K STEP 3 button 9 100 SONG BANK list
  • Страница 12 из 38
    Quick Reference This section provides a quick overview of keyboard operation using steps one and two of the 3-step lesson feature. See page E-20 for detailed explanations of these steps. 1 1 Set the POWER/MODE selector to NORMAL. 5 2 3 4 5 5 Play the melody part on the keyboard. <If you pressed the
  • Страница 13 из 38
    Power Supply Prepare a household power outlet or batteries. IMPORTANT! • Be sure to comply with the “Safety Precautions” provided in this manual. Incorrect use of this product creates the risk of electric shock and fire. • Always make sure that the Digital Keyboard is turned off before plugging in
  • Страница 14 из 38
    Auto Power Off The Digital Keyboard will turn off automatically to preserve power if you do not perform any operation for about six minutes. To disable Auto Power Off Hold down the TONE button while turning on the keyboard to disable Auto Power Off. ❚ NOTE • When Auto Power Off is disabled, the
  • Страница 15 из 38
    Connections Phones/Output Jack Accessories and Options Before connecting headphones or other external equipment, be sure to first turn down the volume settings of the keyboard and the connected equipment. You can then adjust volume to the desired level after connections are complete. Use only the
  • Страница 16 из 38
    Basic Operations POWER/MODE DEMO VOLUME TEMPO/VALUE TONE Number buttons RHYTHM START/STOP SYNCHRO/FILL-IN This part of the manual provides you with the basic information you need to use your keyboard. To switch power on and off 1. Set the POWER/MODE selector to NORMAL. 2. Press the keyboard keys.
  • Страница 17 из 38
    BASS DRUM RIDE BELL SIDE STICK TAMBOURINE ACOUSTIC SNARE SPLASH CYMBAL To change the key of the keyboard HAND CLAP COWBELL ELECTRIC SNARE CRASH CYMBAL 2 LOW TOM 2 CLAVES CLOSED HI-HAT RIDE CYMBAL 2 The transpose feature of this keyboard lets you raise or lower its key in semitone increments. This
  • Страница 18 из 38
    ❚ NOTE ❚ NOTE • If you leave the transpose screen on the display for about five seconds without doing anything, the screen is automatically cleared. • You cannot change the transpose setting while the keyboard is in the Song Bank Mode. • In step 2 of the above operation, you could also use the
  • Страница 19 из 38
    6. ❚ NOTE • Only the following buttons are enabled while a Song Bank tune is being played. • VOLUME slider • Number buttons • START/STOP button • POWER/MODE selector (OFF) • DEMO button • KEY LIGHT button • SPEAK button • You cannot change the tone being used for the melody of a Song Bank tune. •
  • Страница 20 из 38
    5. Using the CASIO CHORD system The CASIO CHORD system lets you easily play the four main types of chords. Play of chords is simplified as shown in the chart below. Keys Type 6. Example Pressing one Major accompaniment chord key C (C Major Chord) Pressing two Minor accompaniment chord keys Cm (C
  • Страница 21 из 38
    IMPORTANT! • If you play one or two notes only in the left hand, or three notes that do not make up a recognizable chord formation, no sound will be produced. The FINGERED mode requires a conventional three or four-note chord formation to produce an auto-accompaniment. Also, note that autochords
  • Страница 22 из 38
    3-Step Lesson System KEY LIGHT TONE SONG BANK SPEAK ONE KEY PLAY STEP 1 START/STOP Using 3-Step Lesson System Even individuals who cannot play the keyboard at all can follow along with the 100 built-in Song Bank tunes with the ONE KEY PLAY buttons. You can also use the 3-Step Lesson System to learn
  • Страница 23 из 38
    5. 6. To stop Song Bank tune play, press the START/ STOP button again. To exit the Song Bank Mode, press the SONG BANK button again. Crossed Finger Indications The display also shows when you have to cross fingers to play notes, and in which direction your fingers should cross. Example: Display for
  • Страница 24 из 38
    Key Lighting System Operation and Display Contents During 3-step Lesson Play Whenever you select an Auto Accompaniment tune (00 to 83) for 3-step lesson play, the key lighting system shows you which keys to press, while the display shows you the fingerings. Note Pitch The keyboard key that should
  • Страница 25 из 38
    Turning Off Key Lighting Step 1: Master the timing 1. 1. Press the KEY LIGHT button. • The KEY LIGHT indicator disappears when the key light system is turned off. • Press the KEY LIGHT button again to turn key lighting back on. Press the STEP 1 button. • When you do, the STEP 1 indicator appears. •
  • Страница 26 из 38
    Step 2: Master the melody Step 3: Play at normal speed 1. 1. Press the STEP 2 button. • When you do, the STEP 2 indicator appears. • After a count sounds, the keyboard stands by and waits for you to play the first note of the tune. If the tune includes intro measures, the keyboard enters standby
  • Страница 27 из 38
    To practice the left hand part Once you master right hand part play, you can use the twohand tunes (numbers 84 through 99) to practice left hand part. 1. Press the SONG BANK button until the SONG BANK indicator appears. • This causes the number and name of the currently selected Song Bank tune to
  • Страница 28 из 38
    Technical Reference Troubleshooting Be sure to check the following table whenever you experience problems with keyboard operation. Symptom Cause • No sound when keyboard keys are pressed. 1. Power supply problem. 2. Volume setting is too low. 3. Headphones are plugged into the keyboard. 4. The
  • Страница 29 из 38
    Symptom Cause Action • Cannot change TRANSPOSE/ TUNE settings. • Keyboard is in the Song Bank Mode. • Demo tune play is in progress. • Press the SONG BANK button to return to the normal mode. • Stop demo tune play. A tone’s quality and volume sounds slightly different depending where it is played
  • Страница 30 из 38
    Specifications Model: LK-120/LK-125 Keyboard: 61 standard-size keys; 5 octaves Key Light System: Can be turned on and off (up to 4 keys can be lit at the same time) Tones: 100 presets Polyphony: 12 notes maximum 3-Step Lesson System: Number of simultaneosly lit keys; 4 3-Steps 1 tune repeat
  • Страница 31 из 38
    Operating Precautions Be sure to read and observe the following operating precautions. ❐ Location Avoid the following locations for this product. • Areas exposed to direct sunlight and high humidity • Areas subjected to temperature extremes • Near a radio, TV, video deck, or tuner The above devices
  • Страница 32 из 38
    Appendix/Apéndice Tone List Lista de sonidos PIANO 00 01 02 03 04 05 06 07 08 09 PIANO 1 PIANO 2 HONKY-TONK STUDIO PIANO ELEC PIANO 1 ELEC PIANO 2 ELEC PIANO 3 ELEC PIANO 4 HARPSICHORD CLAVELECTRO ORGAN 10 11 12 13 14 15 16 17 18 19 ELEC ORGAN 1 ELEC ORGAN 2 ELEC ORGAN 3 ELEC ORGAN 4 CHURCH ORGAN
  • Страница 33 из 38
    Rhythm List Lista de ritmos DANCE/FUNK POPS I 00 CLUB POP 26 TECHNO 01 FUNKY POP 27 TRANCE 02 SOUL BALLAD 28 DISCO 03 POP BALLAD 29 FUNK 04 LITE POP 30 RAP POPS II EUROPEAN 05 16 BEAT FUNK 31 POLKA 06 8 BEAT POP 32 MARCH 07 POP ROCK 33 WALTZ 08 DANCE POP 34 SLOW WALTZ 09 POP FUSION 35 TANGO 10
  • Страница 34 из 38
    Fingered Chord Charts Cuadros de acordes digitados This table shows the left-hand fingerings (including inverted forms) for a number of often-used chords. Esta tabla muestra las digitaciones (incluyendo las formas invertidas) para varios de los acordes más a menudo usados. 5 432 1 : Left hand
  • Страница 35 из 38
    * Cannot be specified in FINGERED setting because of accompaniment keyboard limitations, but augmented and diminished (seventh) chords made up of the same component notes (with different base note) can be used instead.   Chords with same component notes as B aug ........... D aug, F aug  Chords
  • Страница 36 из 38
    Song List / Lista de canciones SONG BANK / BANCO DE CANCIONES 00 01 02 03 04 05 06 07 08 09 10 11 12 13 14 15 16 17 18 19 20 21 22 23 24 25 26 27 28 29 30 31 32 33 34 35 36 37 38 39 40 41 42 43 44 45 46 47 48 49 JUPITER FROM “THE PLANETS” DECK THE HALL WE WISH YOU A MERRY CHRISTMAS JINGLE BELLS
  • Страница 37 из 38
    This recycle mark indicates that the packaging conforms to the environmental protection legislation in Germany. Esta marca de reciclaje indica que el empaquetado conforma a la legislación de protección ambiental en Alemania. CASIO COMPUTER CO.,LTD. 6-2, Hon-machi 1-chome Shibuya-ku, Tokyo 151-8543,
  • Страница 38 из 38