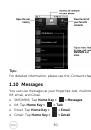
Инструкция для DELL XCD35 Smartphone

(скачивание инструкции бесплатно)
Формат файла: PDF
Доступность: Бесплатно как и все руководства на сайте. Без регистрации и SMS.
Дополнительно: Чтение инструкции онлайн
background image

    83                                           


Tips:

 You can adjust the ringer volume quickly by pressing 

Volume Keys

 from any screen. 

Notes:

 If you want to adjust the notification volume together 

with ringer volume, select the 

Use incoming call volume 

for notifications

 check box. 

Adjusting Media Volume 

You can adjust the media volume for FM radio as well as 

the music and video players. 
1.


Select 

Media volume 

from 

Sound & display settings.


2.


Adjust the media volume and tap 

OK

 to save. 

Tips: 

Press 

Volume Keys

 to quickly adjust the media volume 

when you are watching videos, or listening to music and 

FM radio. 

Touch Tones 

You can set your phone to play tones when touching the 

keys in 

Dialer

Select the 

Audible touch tones

 check box from 

Sound & 

display


settings.


Screen Selection Tones 

You can set your phone to play tones when making a 

touching selection on the screen. 
Select the 

Audible selection

 check box from 

Sound & 

display settings. 
 

1
2
3
4
5
6
7
8
9
10
11
12
13
14
15
16
17
18
19
20
21
22
23
24
25
26
27
28
29
30
31
32
33
34
35
36
37
38
39
40
41
42
43
44
45
46
47
48
49
50
51
52
53
54
55
56
57
58
59
60
61
62
63
64
65
66
67
68
69
70
71
72
73
74
75
76
77
78
79
80
81
82
83
84
85
86
87
88
89
90
91
92
93
94
95
96
Оглавление инструкции
  • Страница 1 из 97
    XCD35 User Manual
  • Страница 2 из 97
    Notes and Warnings NOTE: A NOTE indicates important information that helps you make better use of your computer. WARNING: A WARNING indicates a potential for property damage, personal injury, or death. Information in this document is subject to change without notice. © 2010 Dell Inc. All rights
  • Страница 3 из 97
    For Your Safety Product Safety Information Read the Safety Information section of this user guide on this page Do not use while re-fuelling Do not use hand-held while driving This device may produce a bright or flashing light For body-worn operation maintain a separation of 15 mm Do not dispose of
  • Страница 4 из 97
    Switch off when instructed in hospitals and medical facilities Do not attempt to disassemble Switch off when instructed in aircrafts and airports Do not rely on this device for emergency communications Switch off in explosive environments Only use approved accessories RF Exposure General Statement
  • Страница 5 из 97
    to assure the protection of all persons, regardless of age and health. The guidelines use a unit of measurement known as Specific Absorption Rate, or SAR. The SAR limit for mobile devices is 2 W/kg and the highest SAR value for this device when tested at the ear was 1.58 W/kg*. As mobile devices
  • Страница 6 из 97
    Limiting Exposure to Radio Frequency (RF) Fields For individuals concerned about limiting their exposure to RF fields, the World Health Organization (WHO) provides the following advice: Precautionary measures: Present scientific information does not indicate the need for any special precautions for
  • Страница 7 из 97
    to an accident. You must comply with local laws and regulations restricting the use of wireless devices while driving. Operating Machinery Full attention must be given to operating the machinery in order to reduce the risk of an accident. Product Handling General Statement on Handling and Use You
  • Страница 8 из 97
    • • • • • • Do not use harsh chemicals, cleaning solvents, or aerosols to clean the device or its accessories. Do not paint your phone or its accessories. Do not attempt to disassemble your phone or its accessories, only authorized personnel should do so. Do not expose your phone or its accessories
  • Страница 9 из 97
    Electrostatic Discharge (ESD) Do not touch the SIM card’s metal connectors. Antenna GPS antenna Bluetooth antenna Antenna Do not touch the antenna unnecessarily. Normal Use Position When placing or receiving a phone call, hold your phone to your ear, with the bottom towards your mouth. 9
  • Страница 10 из 97
    Air Bags Do not place a phone in the area over an air bag or in the air bag deployment area. Store the phone safely before driving your vehicle. Seizures/Blackouts The phone can produce a bright or flashing light. Repetitive Motion Injuries To minimize the risk of RSI when texting or playing games
  • Страница 11 из 97
    • Take lots of breaks to stretch and relax. Emergency Calls This phone, like any wireless phone, operates using radio signals, which cannot guarantee connection in all conditions. Therefore, you must never rely solely on any wireless phone for emergency communications. Loud Noise This phone is
  • Страница 12 из 97
    Connection to a Car Seek professional advice when connecting a phone interface to the vehicle electrical system. Faulty and Damaged Products Do not attempt to disassemble the phone or its accessory. Only qualified personnel should service or repair the phone or its accessory. If your phone or its
  • Страница 13 из 97
    Hearing Aids People with hearing aids or other cochlear implants may experience interfering noises when using wireless devices or when one is nearby. The level of interference will depend on the type of hearing device and the distance from the interference source, increasing the separation between
  • Страница 14 из 97
    this must be enabled prior to boarding an aircraft. Interference in Cars Please note that because of possible interference to electronic equipment, some vehicle manufacturers forbid the use of mobile phones in their vehicles unless a hands-free kit with an external antenna is included in the
  • Страница 15 из 97
    Contents 1 Quick Start ............................................................21 1.1 1.2 1.3 1.4 1.5 1.6 1.7 1.8 1.9 1.10 1.11 2 Phone Overview....................................................... 21 Before Getting Started............................................ 22 Powering On/Off Your
  • Страница 16 из 97
    2.3 3 Entering Text ....................................................... 38 3.1 3.2 4 Managing Contacts .................................................40 4.1.1 Creating a Contact .....................................40 4.1.2 Searching for a Contact.............................40 4.1.3
  • Страница 17 из 97
    6.2 6.3 7 6.1.3 Wi-Fi...............................................................54 Browsing the Internet .............................................56 6.2.1 Browsing Options .......................................56 6.2.2 Opening Links in Web Pages .................... 57 6.2.3 Using
  • Страница 18 из 97
    7.4 7.5 7.6 8 Google Applications ............................................73 8.1 8.2 8.3 8.4 8.5 8.6 9 Playing Your Videos ................................................70 Gallery .........................................................................71 Sound Recorder
  • Страница 19 из 97
    9.2 9.3 9.4 9.5 9.1.2 Display Settings ...........................................80 9.1.3 Sound Settings............................................. 81 9.1.4 Language Settings.......................................84 9.1.5 Mobile Network Services...........................84 Security Settings
  • Страница 20 из 97
    10.3 10.4 10.5 10.6 Note pad....................................................................92 Stopwatch .................................................................92 Task Manager ...........................................................93 SIM Tookit
  • Страница 21 из 97
    1 1.1 Quick Start Phone Overview 21
  • Страница 22 из 97
    1.2 Before Getting Started 1. Remove the battery cover. 2. Install the SIM card. 22
  • Страница 23 из 97
    3. Install the microSD card. 23
  • Страница 24 из 97
    4. Install the battery. 1 2 5. Replace the battery cover. 6. Charge the battery. 24
  • Страница 25 из 97
    1.3 Powering On/Off Your Phone Make sure that your SIM card is installed and the battery is charged. 1. Hold Power Key to power on your phone. 2. To power off your phone, hold Power Key to get the phone options. Select Power off, and then tap OK. 3. To switch your phone to sleep mode, press Power
  • Страница 26 из 97
    1.4 Your Home Screen 1.5 Widgets and Google Services Widgets A widget works as a shortcut to let you preview or use an application. You can stick widgets on your desktop as icons or preview windows. Besides the default widgets installed on your phone, you can also download more from Android Market.
  • Страница 27 из 97
    Google Services Google provides you various excellent services, such as Talk, Google Mail, Market, Maps, etc. 27
  • Страница 28 из 97
    1.6 Using Figure Gestures You can use finger gestures to control your phone. The controls on your touch screen change dynamically depending on the tasks you are performing. 1. Tap the buttons, icons, or applications to select items or to open applications. 2. Hold a certain item to get available
  • Страница 29 из 97
    Tips: • During a call, you can tap Home Key or Back Key to hide the active call display and use other apps. To reopen it, tap Dialer from Home Screen and select Return to call in progress. • Please see the Phone Calls chapter for detailed information. 1.9 Contacts Select > Contacts from Home
  • Страница 30 из 97
    Tips: For detailed information, please see the Contacts chapter. 1.10 Messages You can use messages at your fingertips-text, multimedia, IM, email, and Gmail. > Messages. • SMS/MMS: Tap Home Key > • IM: Tap Home Key > > Talk. • Email: Tap Home Key > > Email. • Gmail: Tap Home Key > > Gmail. 30
  • Страница 31 из 97
    1.11 Media See it, listen to it, share it! You can even have time to relax to some music. • Camera: Tap Home Key > > Camera, and then tap to take your photo. • Camcorder: Tap Home Key > > Camcorder, and / to start/stop recording. then tap • Videos: Tap Home Key > > Videos, you can see the all of
  • Страница 32 из 97
    2 Phone Calls 2.1 2.1.1 Making a Call Making a Call from Dialer 1. Tap Home Key > > Dialer. 2. Enter the phone number or the contact name you want to call. Tap to erase wrong entry; hold this key to clear all digits. Your phone automatically lists the matching to hide the keypad and to see
  • Страница 33 из 97
    You can also open Call log by tapping the Call log tab from from the Contacts Screen, or by tapping Dialer. next to the number you want to call. 2. Tap 2.1.4 Making a Call from a Text Message If a message text contains a phone number that you want to call, you can make the call while viewing the
  • Страница 34 из 97
    4. While you are connected to the second number, tap Menu Key > Merge calls. 5. To add another party, tap Add call. 6. Dial the number, and when connected, tap Menu Key > Merge calls. 7. Continue as above until you have everybody you want on the call. 2.1.6 Making an Emergency Call 1. Enter the
  • Страница 35 из 97
    2.2.2 Rejecting an Incoming Call Drag to the left to reject the call. 2.2.3 Muting a Call During a call, you can mute your microphone so that the person with whom you are speaking cannot hear you, but you can still hear him or her. Tap Mute to turn your microphone off. The mute icon will appear on
  • Страница 36 из 97
    2.3 Call Settings You can adjust the call settings of your phone. To open the call settings menu, press Menu Key > Settings > Call settings from Home Screen. Fixed Dialing Numbers Restrict outgoing calls to a fixed set of numbers. To enable this feature you must know your SIM card’s PIN2 code.
  • Страница 37 из 97
    Call waiting Choose whether to be notified of new incoming calls while you are already on a call. Call barring Forbid certain types of calls. settings 37
  • Страница 38 из 97
    3 3.1 Entering Text Using the On-screen Keyboards When you enter a field that needs text or numbers, an on-screen keyboard appears automatically. Tap and hold the input box and select Input method from the pop-up menu to change input method. Android Keyboard The Android Keyboard provides a layout
  • Страница 39 из 97
    3.2 Touch Input Settings You can configure the touch input settings by tapping Menu Key > Settings > Language & keyboard from Home Screen. Android keyboard • Vibrate on keypress/Sound on keypress: Enables vibration/sound feedback as you touch on the keyboard. • Auto-capitalization: Select the check
  • Страница 40 из 97
    4 Contacts You can save contacts to your phone memory or your SIM. More information can be saved on the phone memory for a contact than on the SIM. For instance, IM, postal addresses, organization, etc. > Contacts to enter Contacts Screen. Tap Home Key > 4.1 Managing Contacts 4.1.1 Creating a
  • Страница 41 из 97
    microSD card. Import contacts from the SIM card or export to the card 1. Tap Menu Key > Import/Export from Contacts. 2. Select to import or export contacts. Your XCD35 will automatically read the contacts. 3. Tap the contacts you want to import/export. Or, just tap Menu Key > Select all. 4. Tap
  • Страница 42 из 97
    5 5.1 Messaging Messages Your SMS (text message) and MMS (multimedia messaging > service) files are located in Messages (Home Key > Messages). When you receive a new message, you can open it from the Notification Panel, or from the Messages Screen. Simply tap on the new message to read it. Your
  • Страница 43 из 97
    5.1.2 Sending an MMS • Tap Home Key > > Messages. • Tap New message. 5. Enter the recipient’s number and, if necessary, message text, just like you do with a text message. 6. Tap Menu Key > Add subject to enter the subject of your MMS. 7. Tap Menu Key > Attach if you want to add an attachment to
  • Страница 44 из 97
    5.1.3 Managing Messages and Their ‘Threads’ Reply to a Message 1. Tap the message thread you want to reply to from the Messages Screen. 2. Tap Type to compose and type your message. 3. Tap Send. Delete a Message (Thread) 1. Tap Menu Key > Delete threads from the Messages Screen. 2. Select the
  • Страница 45 из 97
    • Multimedia/Text message limit: Set the maximum number of multimedia/text messages saved in a single conversation thread. Text message (SMS) settings • Delivery reports: Request a delivery report for each SMS message you send. • Manage SIM card messages: Manage the messages saved in your SIM card.
  • Страница 46 из 97
    Notification settings • Notifications: Select to display message notifications in status bar. • Select ringtone: Select a ringtone for your incoming messages. • Vibrate: Select to make your phone vibrate when receiving a new message. 5.2 Using Email Tap Home Key > > Email, you can setup your Email
  • Страница 47 из 97
    2. Select the type of your account (POP3/IMAP/Exchange). Edit the incoming server settings, and then tap Next. 47
  • Страница 48 из 97
    Your phone will check the incoming server settings and finish the setup automatically. If you are notified that setup could not be finished, you might need to correct some settings to finish it. 3. Edit the outgoing server settings and tap Next. 48
  • Страница 49 из 97
    Your phone will check the outgoing server settings and finish the setup automatically. 4. Set the Email checking frequency; select whether to use this account by default or be notified when Email arrives, and then tap Next. 5. Give your account a name and set a name displayed on outgoing message,
  • Страница 50 из 97
    5.2.2 Composing an Email After creating an Email account, you can compose and send Email messages. 1. Tap Menu Key > Compose from Email Screen. 2. Tap the To field and enter the recipient’s address. The phone will search for and display matching addresses in your Contacts as you type. You can tap
  • Страница 51 из 97
    5.2.3 Replying to or forwarding an Email 1. Tap the Email account from Email Screen to open the Email inbox. 2. Tap the Email you want. 3. Tap Reply /Reply all to reply to the Email, or tap Menu Key > Forward to forward the Email. 5.2.4 Email Settings Tap the account you want to set in Email and
  • Страница 52 из 97
    Notification settings • Email notifications: Select to be notified in status bar when Email arrives. • Select ringtone: Select the ringtone for incoming Email notification. • Vibrate: Select to be notified by vibration with ringtones when Email arrives. Server settings • Incoming settings: Set the
  • Страница 53 из 97
    6 Getting Connected 6.1 6.1.1 Connecting to the Internet Ways of Connecting to the Internet Your phone’s networking capabilities allow you to access the Internet or your corporate network via the mobile network’s GPRS/EDGE/3G connection or Wi-Fi. 6.1.2 GPRS/EDGE/3G You will need a data plan to use
  • Страница 54 из 97
    2. Tap Menu Key > New APN. 3. Tap Name to enter you APN name displayed in the APN list (You can name it as you like). 4. Tap APN to enter the APN obtained from your operator. 5. Tap other items to enter all the necessary parameters. 6. Tap Menu Key > Save. Notes: If you want to set the APNs to
  • Страница 55 из 97
    ¾ If you selected a secured network, you will need to input the correct password. Checking the Connection Status You can check the Wi-Fi network status from the status bar and wireless controls. 1. Open the notifications panel (see Getting Started - Getting around Your Phone - Status and
  • Страница 56 из 97
    6.2 Browsing the Internet You can use your phone to get on the Internet. Your phone automatically creates an EDGE or GPRS/3G connection while you browse web pages. Some of them might not be displayed properly as certain internet programs, such as Flash, are not supported by the default browser. >
  • Страница 57 из 97
    • • • • • • Copy: Menu Key > More > Select text and slide your finger on the page to select the text you want to copy. Your phone automatically copies the selected text to the clipboard. Share pages: Menu Key > More > Share page to send a page by Google Mail or Messages. Downloads/page info: Menu
  • Страница 58 из 97
    • • • • Bookmark link Save link Share link (by Email, Gmail or Messages) Copy link URL 6.2.3 Using Bookmarks To bookmark a web page, open it and tap or Menu Key > Bookmarks. Then tap Add or Add bookmark. Give the bookmark a name and tap OK. TIPS: You can press Menu Key > List view/Thumbnail view to
  • Страница 59 из 97
    3. Select an item you want to delete and hold on it until the shortcut menu pops up. 4. Select Delete bookmark and tap OK to confirm. 6.2.4 Browser Settings You can set the browser text size, home page etc. by tapping Menu Key > More > Settings from a browser window. Page content settings • Text
  • Страница 60 из 97
    • • Enable plug-ins: Select to enable plug-ins. Open in background: Select the check box to open new windows behind the current one. • Set home page: Select to edit the home page web site. Privacy settings • Clear cache: Delete all the cached page contents. • Clear history: Clear the browser
  • Страница 61 из 97
    Advanced settings • Website settings: View advanced settings for individual web sites. Only available for some web sites. • Reset to default: Clear all browser data and reset all settings to default. 6.3 Bluetooth Bluetooth is a short-range wireless communication technology. Phones with Bluetooth
  • Страница 62 из 97
    Bluetooth, you need to make your phone ‘visible’ to them. 1. Tap Home Key > > Settings > Wireless & networks > Bluetooth settings. 2. Select the Bluetooth check box if needed. 3. Select the Discoverable check box to make your phone visible. 6.3.3 Changing Your Phone’s Name When your phone is
  • Страница 63 из 97
    Your phone will display all reachable Bluetooth devices in the Bluetooth devices section. 3. Tap the device you want to pair with. 4. If necessary, type your PIN to pair and tap OK. Tips: If a PIN is required, the same PIN should be entered on the other device. 63
  • Страница 64 из 97
    7 Experiencing Multimedia 7.1 Camera and Camcorder Your phone comes with a 3.2-megapixel camera that lets you capture sharp pictures and videos. Use Camera or Camcorder to take pictures and videos. 7.1.1 Opening Camera or Camcorder Tap Home Key > > Camera/Camcorder. Notes: You can switch between
  • Страница 65 из 97
    ¾ Tap Menu Key > Gallery to view all of your video clips. 7.1.4 Camera Settings By tapping Menu Key > Settings in Camera Screen, you can adjust the camera settings. Camera settings • White balance: Tap to adjust the white balance. White balance enables the camera to capture colors more accurately
  • Страница 66 из 97
    • Saturation: Tap to adjust the saturation. Restore to default settings Tap Restore to default settings to reset the camera or camcorder settings. 7.1.5 Camcorder Settings By tapping Menu Key > Settings in Camcorder Screen, you can adjust the camcorder settings. Camcorder settings • Video quality:
  • Страница 67 из 97
    7.2.1 Opening FM Radio Tap Home Key > > FMRadio to open the application. The radio is turned on automatically, and you will see the icon in the status bar. 7.2.2 z z z z Listening to FM Radio Tap or to scan for the previous or next channel. Tap Menu Key > Adjust, and then tap / to fine tune the
  • Страница 68 из 97
    z z 7.3 Tap Menu Key > Sleep to set the FM radio sleep timer. Tap to turn off the FM radio. Playing Your Music You can play digital audio files from your phone’s memory card in Music. 1. Tap Home Key > > Music to open the Music Screen. 2. Select Artists/Albums/Songs/Playlists to see the songs you
  • Страница 69 из 97
    7.3.1 Creating Playlists Playlists help you organize your music files: 1. Select a music file you want to add to a new playlist. 2. Tap and hold on the file until a shortcut menu pops up. 3. Tap Add to playlist. 4. Tap New. 5. Type the playlist name and tap Save. 7.3.2 Managing Your Playlists 1.
  • Страница 70 из 97
    Tips: You can also set a song as ringtone when it is being played back. Tap Menu Key > Use as ringtone. 7.4 Playing Your Videos To play a video file, tap Home Key > > Videos. This will open the Videos Screen and show the video files saved to your memory card. Tap a video file and the video player
  • Страница 71 из 97
    7.5 Gallery Galley helps you view pictures and play back videos. For pictures, you can do some basic editing, such as cropping and rotation. You can also set them as your wallpaper or contact icon, and share with your friends. 7.6 Sound Recorder Sound Recorder enables you to record your voice memos
  • Страница 72 из 97
    7.6.1 Opening Sound Recorder Tap Home Key > > Sound Recorder. Notes: You need to install a memory card to use Sound Recorder. 7.6.2 Recording a Voice Memo 1. 2. 3. 4. 5. Get the microphone near the speaker. Tap to start recording. Tap to stop recording. Tap to play back the voice recording. Tap OK
  • Страница 73 из 97
    8 Google Applications 8.1 Signing in to Your Google™ Account Signing in to your Google account enables you use various Google services on the phone, such as Gmail, Calendar, and Google Talk. > Settings > Accounts & sync. 1. Tap Home Key > 2. Tap Add account > Google. 3. Follow the on-screen prompt
  • Страница 74 из 97
    8.2.2 Creating and Sending a Gmail Message 1. In the Inbox, press Menu Key > Compose. 2. Enter the message recipient’s Email address in the To field. If you are sending the Email to several recipients, separate each Email address with a comma. 3. Enter the Email subject, and then compose your
  • Страница 75 из 97
    Tips: Tap and hold an empty time slot in Calendar’s Day, Week, or Month view to quickly add a new event scheduled in that time slot. 8.3.3 Viewing Calendar Events You can check your schedules in Day, Week, Month, or Agenda view. Tap Menu Key and choose Day, Week, Month, or Agenda to change the
  • Страница 76 из 97
    3. Enter the Google Talk ID or Email address of the friend you want to add. 4. Tap Send invitation. 8.4.3 Viewing and Accepting an Invitation 1. In Friends list, press Menu Key > Invites. All pending invitations, both sent and received, are displayed. 2. Tap a pending invitation that you received,
  • Страница 77 из 97
    8.5 Places Google Places helps you find all kinds of businesses near you. 1. Tap Home Key > > Settings > Location & security and select the Use GPS satellites or Use assisted GPS check box. > Places. Wait while you are being 2. Tap Home Key > located. Your location, when found, is shown at the
  • Страница 78 из 97
    Each time you launch Maps application, your location will be determined using GPS and your Latitude status will be updated. You can tap Menu Key > Latitude in Maps or > Latitude to see your status as well as Home Key > that of your selected friends. In Latitude, tap Menu Key to refresh friends
  • Страница 79 из 97
    9 9.1 9.1.1 Phone Settings Basic Settings Setting Time and Date 1. Tap Home Key > Menu Key > Settings > Date & time. 2. Clear the Automatic tick box if you want to set the time and date by yourself. 3. Tap Set date. Adjust the date, and tap Set to save it. 4. Tap Select time zone and tap where you
  • Страница 80 из 97
    9.1.2 Display Settings By tapping Menu Key > Settings > Sound & display from Home Screen, you can configure the display settings, such as orientation, animation, brightness, screen timeout, and calibration. Adjusting Screen Brightness 1. Select Brightness from the Display settings section. 2.
  • Страница 81 из 97
    9.1.3 Sound Settings By tapping Menu Key > Settings > Sound & display from Home Screen, you can configure the sound settings, such as ringtones and notifications. Setting the Ringtone 1. Tap Phone ringtone from the Sound settings section. 2. Select the ringtone you want to use from the pop-up list.
  • Страница 82 из 97
    The silent icon will appear in the status bar. Switching to Vibration Mode Select the Phone vibrate check box from Sound & display settings. If the phone is already in silent mode, the vibration icon will appear in the status bar. Adjusting Ringer Volume If you want to set the ringer volume, make
  • Страница 83 из 97
    Tips: You can adjust the ringer volume quickly by pressing Volume Keys from any screen. Notes: If you want to adjust the notification volume together with ringer volume, select the Use incoming call volume for notifications check box. Adjusting Media Volume You can adjust the media volume for FM
  • Страница 84 из 97
    SD Card Notifications You can set your phone to play sound for microSD card notifications, such as when the card is mounted or unmounted. Select the SD card notifications check box from Sound & display settings. 9.1.4 Language Settings You can change the system language of your phone. > Settings >
  • Страница 85 из 97
    Switching Network Mode 1. Tap Home Key > > Settings > Wireless & networks > Mobile networks > Network Mode. 2. Select the network mode you prefer. You can also tap the Use only 2G networks check box to save battery power. Switching Network Operators 1. Tap Home Key > > Settings > Wireless &
  • Страница 86 из 97
    2. Read the instructions and tap Next. 3. Watch the sample pattern and tap Next. 4. Draw your own pattern and tap Continue. 5. Draw your pattern again and tap Confirm. Locking the Screen Press Power Key to lock the screen. To unlock the screen, press Power Key and draw the pattern. 9.2.2 Protecting
  • Страница 87 из 97
    2. Select the Enable/disable SIM PIN check box. 3. Enter the PIN and tap OK. Changing the SIM PIN Before changing the PIN, you need to enable it. 1. Tap Home Key > > Settings > Location & security > Set up SIM/RUIM card lock. 2. Tap Change SIM/RUIM PIN. 3. Enter the old PIN and tap OK. 4. Enter the
  • Страница 88 из 97
    3. Select the Use secure credentials check box. Deleting Credentials 1. Tap Home Key > > Settings > Location & security. 2. Tap Clear storage to clear credentials. 9.3 9.3.1 Managing Memory Checking Space Information Tap Home Key > > Settings > SD card, USB Mass Storage & phone storage. You can
  • Страница 89 из 97
    9.4 9.4.1 Application Settings Viewing Applications Installed on Your Phone Tap Home Key > > Settings > Applications > Manage applications. Your phone will show you the applications in a list. 9.4.2 Allowing the Installation of Non-Market Applications Besides downloading and installing applications
  • Страница 90 из 97
    before installing it. 1. Tap Home Key > > Filer, and open the folder where the application is. 2. Tap the application to start installation. 3. Read the installation instructions that come with the application and follow it to complete the setup. 9.4.4 Removing an Application 1. Tap Home Key > >
  • Страница 91 из 97
    Setting Searchable Items Tap Home Key > > Settings > Search > Searchable items. When you search for an item on your phone, only the selected items will be searched. 9.5.2 1. 2. 3. 4. Resetting the Phone Tap Home Key > > Settings > Privacy. Tap Factory data reset. Tap Reset phone. Tap Erase
  • Страница 92 из 97
    10 Other Applications 10.1 Calculator Tap Home Key > > Calculator. Tips: Tap Menu Key > Advanced panel to use scientific calculation. 10.2 Docs To Go You can use this application suite to open word, excel, powerpoint, or PDF files. Read the on-screen instructions for detailed information. 10.3 Note
  • Страница 93 из 97
    10.5 Task Manager You can use Task Manager to view and stop running tasks and applications. Tap a task in the Task tab to switch to its screen, abort it, or see its detail. Tap Resource to view real-time allocation of system resources. 10.6 SIM Tookit SIM Tookit appears in the main menu only if
  • Страница 94 из 97
    11 Appendix 11.1 Specifications Dimensions Approx. 114 mm × 56.5 mm × 11.8 mm Weight Approx. 130g (with battery) Bearer GSM/WCDMA support Main display dimension, resolution 3.5 inches 800*480 Sensor type Back Still image Camera capture resolution CMOS Internal memory ROM: 512MB, RAM: 512MB
  • Страница 95 из 97
    11.2 Declaration of RoHS Compliance To minimize the environmental impacts and take more responsibilities to the earth we live on, this document shall serve as a formal declaration that the XCD35 manufactured by DELL CORPORATION is in compliance with the Directive 2002/95/EC of the European
  • Страница 96 из 97
    11.3 Disposal of Your Old Appliance • • • When this crossed-out wheeled bin symbol is attached to a product, it means the product is covered by the European Directive 2002/96/EC. All electrical and electronic products should be disposed of separately from the municipal waste stream via designated
  • Страница 97 из 97