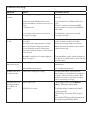
Symptom
Cause
Corrective Action
The flame effect will
not start.
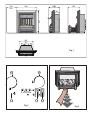
Mains plug is not plugged in.
Switch A is in the ‘ON’
(I)
position, but
mode Switch B has not been pressed. (See
Fig.2)
Low water level.
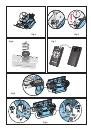
Low voltage connector not connected
properly. (See Fig.8)
Check plug is connected to wall socket
correctly.
Press Switch B once for flame effect.(See
Fig.2)
Check ‘Low water level’ warning LED ‘E’
under canopy hood. (See Fig.2). If ‘ON’ fill
water tank.
Check that the connector is inserted
correctly. (See Fig.8)
The flame effect is
too low.
Flame effect control knob is set too low.
(See Fig.2)
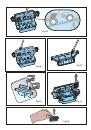
The water in the sump may be too high
due to the drawer being opened and
closed a number of times, water tank
removed a number of times, or the fire has
been moved.
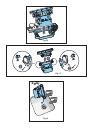
Metal Disc at the base of Sump might be
dirty (See Fig.13)
Increase level of flame by turning Control
knob C clockwise slowly. (See Fig.2)
If water level in the sump is more than
40mm, the sump should be removed and
emptied in the sink.
Clean Metal Discs with soft brush supplied.
(See Fig.13) See ‘Maintenance.’ for a step by
step procedure.
Unpleasant smell
when unit is used.
Dirty or stale water.
Using unfiltered tap water.
Clean the unit as described under
maintenance.
Use only filtered tap water.
The flame effect has
too much smoke.
Flame effect setting is too high.
Turn the flame effect Control knob C
anticlockwise to minimum and slowly turn
clockwise, about ¼ a turn, at a time. Give
the flame generator some time to adjust
before increasing. (See Fig.2)
Main lamps are not
working and there
are no flames or
smoke.
LED ‘E’ Fig.2 is Lit.
LED ‘E’ Fig.2 is not Lit.
Follow instructions under
Mainte-
nance
, ‘Filling the water tank’.
Check the plug is connected to wall
socket correctly.
Switch ‘A’ Fig. 2 is in the ‘ON’ (
I
) posi-
tion.
Press switch ‘B’ Fig.2 until you can hear
one beep only, for flame effect.
Troubleshooting


Инструкции и руководства похожие на DIMPLEX Alexandria Cavendish (74901775)


Другие инструкции и руководства из категории каминокомплект