Installation Instructions
This section describes how to set up your
fi
re.
BEFORE YOU START
1. Ensure that all packing items are removed (read any warning labels carefully) and retain all packing for possible
future use e.g. in the event of moving house or returning the appliance to your supplier.
2. Before connecting the appliance, check that the supply voltage is the same as that stated on the heater.
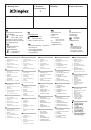
Connecting the Transducer Unit + Lamps
1. Release the two red tabs by turning them by 90 degrees (Fig 2)
2. Lift out the Sump Nozzle (Fig 3)
3. Insert lamps into lamp holders (Fig 4), carefully locating the pins into the holes (Fig 4a)
4. Push lamps
fi
rmly into place
5. Place the Transducer Unit into the sump and join the cable to the connector on the sump (Fig 5)
6. To ensure that the Transducer Unit is correctly placed in the sump, the tab on the Transducer Unit should be lined
up with the moulded recess in the sump (Fig 5a).
7. Ensure that the cable is not placed above the disc on the Transducer Unit (Fig 5b). To prevent the cable becoming
pinched between the nozzle and the sump, place the cable in the slot in the wall of the sump.
8. Replace the Sump Nozzle and secure it by turning the two red tabs by 90 degrees (Fig 6)
Filling the Water Tank
9. Place Water Tank in sink and remove cap (turn anti-clockwise to open) (Fig 7)
10. Fill Water Tank with
fi
ltered tap water only
. This is necessary to prolong the life of the
fl
ame and smoke
producing unit. The water should be
fi
ltered through a conventional domestic water
fi
lter unit and the
fi
lter should
be replaced regularly. Distilled water must
not
be used.
11. Screw the cap back on –
do not overtighten
.
12. Place the Water Tank in the Sump, with the tank cap facing down and the
fl
at side of the tank facing outward (Fig 8)
Assembling the
fi
re
13. Place the Fuelbed on top of the Water Tank and Mist Nozzle (Fig 9)
Operating the Fire
This section describes how to activate your
fi
re using either the manual controls or remote control.
MANUAL CONTROLS
The manual controls are located beneath the hinged
fl
ap. (Fig.10 for Manual Control lay out)
Switch ‘A’:- Controls the electricity supply to the Fire.
Note: This switch must be in the ‘ON’ (
I
) position for the Fire to operate either with or without heat.
Switch ‘B’:- Press
once to turn on the
fl
ame effect. This will be indicated by an audible beep. Although the main
lights operate immediately it will take a further 30 seconds before the
fl
ame effect starts.
Press
again to give
fl
ame effect and half heat. This will be indicated by two beeps.
Press
again to give
fl
ame effect and full heat. This will be indicated by three beeps.
Press
again to return to
fl
ame effect only. This will be indicated by one beep.
Press
to put
fi
re in to standby mode. This will be indicated by one beep.
Control Knob ‘C’:- Controls the Thermostat setting.
Turning the control knob to the left will decrease the temperature setting, turning the control knob
to the right will increase the temperature setting.
Control Knob ‘D’:- Controls the intensity of the
fl
ame effect.
Turning the control knob to the left increases the
fl
ame effect, turning the control knob to the right will
decrease
the
fl
ame effect.
SETTING THE THERMOSTAT
Ensure the
fi
re is plugged in and switch it on to the full heat setting. Turn the Control Knob ‘C’ fully to the right (max
temperature setting) to warm the room rapidly. When the room temperature has reached the desired level, turn
the thermostat knob back slowly until you hear the thermostat just click off. The heater will then maintain the room
temperature at the chosen level.
2


Инструкции и руководства похожие на DIMPLEX California Engine 56-600 (64909021)


Другие инструкции и руководства из категории каминокомплект