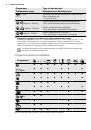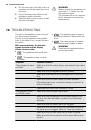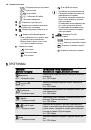
Problem
Possible solution
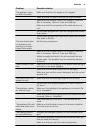
The appliance does
not drain the water.
Make sure that the sink spigot is not clogged.
Make sure that the drain hose has no kinks or bends.
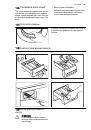
Make sure that the drain filter is not clogged. Clean the
filter, if necessary. Refer to 'Care and cleaning'.
Make sure that the connection of the drain hose is cor-
rect.
Set the drain programme if you set a programme without
drain phase.
Set the drain programme if you set an option which ends
with water in the tub.
The spin phase does
not operate or the
washing cycle lasts
longer than usually.
Set the spin programme.
Make sure that the drain filter is not clogged. Clean the
filter, if necessary. Refer to 'Care and cleaning'.
Adjust manually the items in the tub and start the spin
phase again. This problem may be caused by balance
problems.
There is water on the
floor.
Make sure that the couplings of the water hoses are tight
and there is not water leakages.
Make sure that the drain hose have no damages.
Make sure you use the correct detergent and the correct
quantity of it.
You cannot open the
appliance door.
Make sure that the washing programme is finished.
Set the drain or the spin programme if there is water in
the drum.
The appliance makes
an unusual noise.
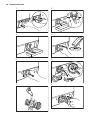
Make sure the levelling of the appliance is incorrect. Re-
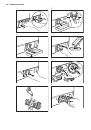
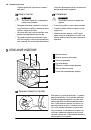
fer to 'Installation'.
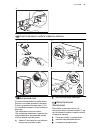
Make sure that the packaging and/or the transit bolts are
removed. Refer to 'Installation'.
Add more laundry in the drum. The load may be too
small.
The appliance fills with
water and drain imme-
diately.
Make sure that the drain hose is in the correct position.
The hose may be too low.
The washing results
are not satisfactory.
Increase the detergent quantity or use a different deter-
gent.
Use special products to remove the stubborn stains be-
fore you wash the laundry.
Make sure that you set the correct temperature.
ENGLISH
21