36
USB Memory (optional item)
The USB memories can be used to save stitch data and
transfer the embroidery designs between the
MC 350E and your PC.
The USB memory is available at camera shops, PC
supplies stores etc. in various sizes and forms.
Open the small door under the card slot.
Insert the USB memory into the USB socket on the MC350E.
q
Small door
w
USB memory (optional item)
e
USB socket
CAUTION:
Do not turn the power off or disconnect the USB memory
while the warning sign or hourglass is
displayed.
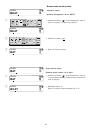
Opening the designs on USB memory
Press the
USB memory
tab.
The folder list is displayed in the window.
Press the desired
Folder selection
key to select it.
r
Folder selection key
The designs contained in the selected folder will be
displayed on the
Pattern selection
keys.
Press the
Pattern selection
key to select the desired
pattern.
MyDesign
Mode
USB Memory Stick
A Z
Mode
USB Memory Stick
A Z
A-001
B-002
C-003
Cancel
q
w
e
r
42
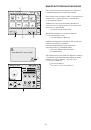
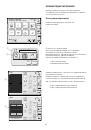
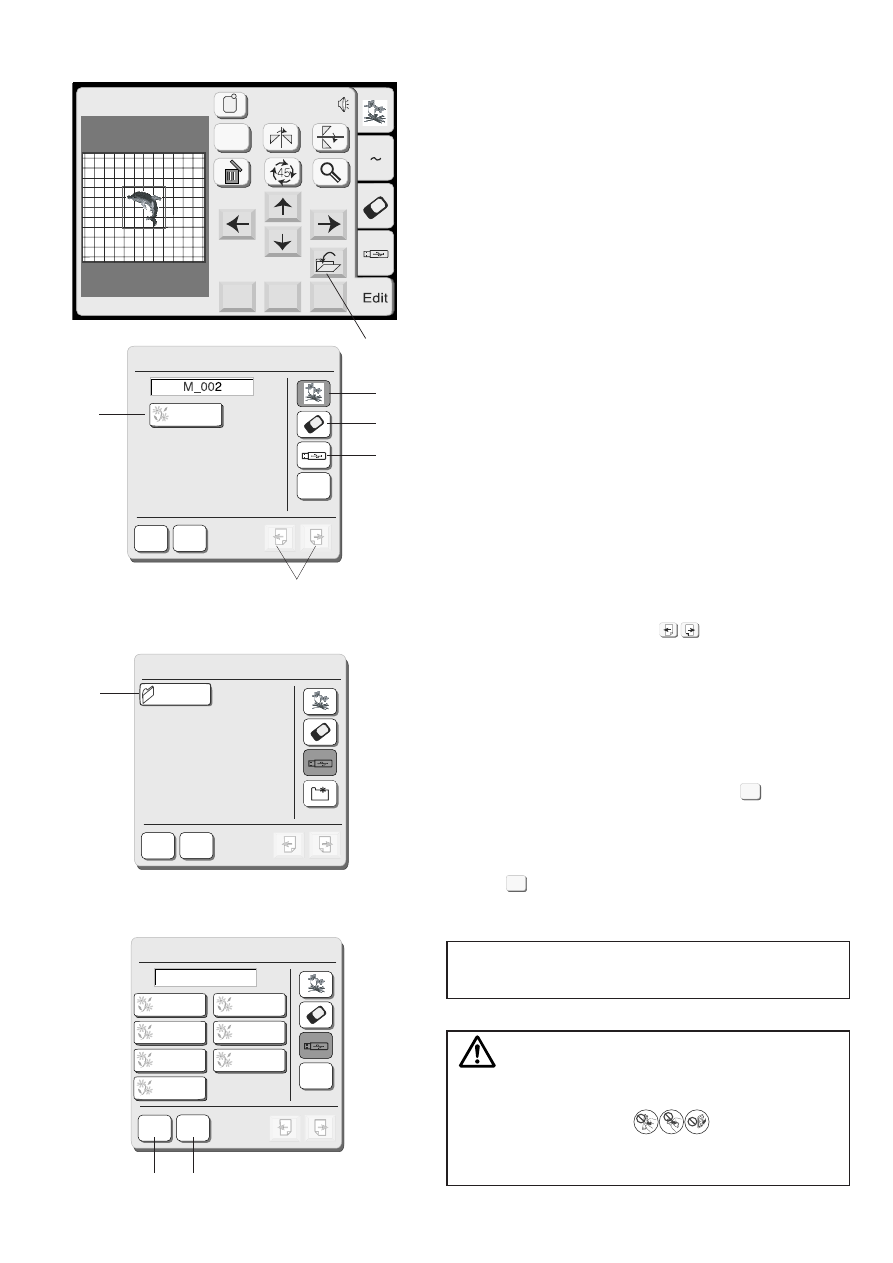
SAVING A FILE
When you press the
Save file
key, the
Save file
dialog
box will open.
q
Save file key
You can select a memory location from Built-in memory,
ATA PC card or USB memory.
Press one of the following keys to select the desired
location to where you wish to save the file.
w
Built-in memory key
e
ATA PC card key
r
USB memory key
The
File list
will open if you press the Built-in memory
key, while the
Folder list
will open if you press the PC
card key or USB memory key.
t
File list
y
Folder list
When you press the
Page
keys, you will be able
to see the saved files in the previous and next pages.
u
Page keys
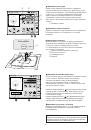
Select the desired folder and the file list of the selected
folder will open.
Press the
OK
key to save the file and the screen will
return to the original screen.
If you do not want to save the file, press the
Cancel
key to return to the previous window.
i
OK key
o
Cancel key
NOTE:
The file name will be automatically assigned starting
from M_001 in order.
CAUTION:
Do not turn the power off or eject the card when the
warning sign or hourglass is showing on
the visual touch screen. Otherwise, the data stored in
the memory may be lost or damaged.
OK
Cancel
OK
Name
Save File (Built-in)
Cancel
M_001
Edit
A(F): 126x110mm
Mode
Cancel
OK
Size
A Z
OK
Name
Save File
Cancel
M_008
M_001
M_002
M_003
M_004
M_005
M_006
M_007
q
w
e
r
t
y
i
o
Save File
Cancel
ABC
OK
u
42
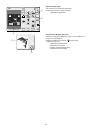
SAVING A FILE
When you press the
Save file
key, the
Save file
dialog
box will open.
q
Save file key
You can select a memory location from Built-in memory,
ATA PC card or USB memory.
Press one of the following keys to select the desired
location to where you wish to save the file.
w
Built-in memory key
e
ATA PC card key
r
USB memory key
The
File list
will open if you press the Built-in memory
key, while the
Folder list
will open if you press the PC
card key or USB memory key.
t
File list
y
Folder list
When you press the
Page
keys, you will be able
to see the saved files in the previous and next pages.
u
Page keys
Select the desired folder and the file list of the selected
folder will open.
Press the
OK
key to save the file and the screen will
return to the original screen.
If you do not want to save the file, press the
Cancel
key to return to the previous window.
i
OK key
o
Cancel key
NOTE:
The file name will be automatically assigned starting
from M_001 in order.
CAUTION:
Do not turn the power off or eject the card when the
warning sign or hourglass is showing on
the visual touch screen. Otherwise, the data stored in
the memory may be lost or damaged.
OK
Cancel
OK
Name
Save File (Built-in)
Cancel
M_001
Edit
A(F): 126x110mm
Mode
Cancel
OK
Size
A Z
OK
Name
Save File
Cancel
M_008
M_001
M_002
M_003
M_004
M_005
M_006
M_007
q
w
e
r
t
y
i
o
Save File
Cancel
ABC
OK
u
42
Сохранение файла
При нажатии на клавишу сохранения файла появится
окно сохранения файла.
Клавиша сохранения файла
Теперь надо выбрать, куда сохранить файл:
во встроенную память машины, на АТА РС карту
или память USB.
Нажмите на одну из клавиш для выбора места
сохранения файла.
Клавиша встроенной памяти машины
Клавиша АТА РС карты
Клавиша USB
При нажатии на клавишу встроенной памяти машины,
откроется список файлов. Если нажать на клавиши
АТА РС карты или USB, откроется список
существующих папок.
Список файлов
Список папок
Нажав на клавиши Страницы , можно увидеть
сохраненные файлы на предыдущей и следующей
страницах.
Клавиши страниц
Выберите желаемую папку, откроется список
сохраненных файлов.
Нажмите подтверждающую клавишу ОК
для сохранения файла, экран вернётся
к первоначальному виду.
Если Вы не хотите сохранять файл, нажмите клавишу
отмены и вернитесь к первоначальному окну.
Подтверждающая клавиша ОК
Клавиша отмены
ПРИМЕЧАНИЕ:
Имя файлам будет автоматически присваиваться,
начиная от М_001 и далее по порядку.
ВНИМАНИЕ:
Не отключайте питание и не вытаскивайте карту
из машины, если на экране появился
предупреждающий знак или курсор
в форме песочных часов. В противном случае вся
информация в памяти может исчезнуть или будет
повреждена.
42
SAVING A FILE
When you press the
Save file
key, the
Save file
dialog
box will open.
q
Save file key
You can select a memory location from Built-in memory,
ATA PC card or USB memory.
Press one of the following keys to select the desired
location to where you wish to save the file.
w
Built-in memory key
e
ATA PC card key
r
USB memory key
The
File list
will open if you press the Built-in memory
key, while the
Folder list
will open if you press the PC
card key or USB memory key.
t
File list
y
Folder list
When you press the
Page
keys, you will be able
to see the saved files in the previous and next pages.
u
Page keys
Select the desired folder and the file list of the selected
folder will open.
Press the
OK
key to save the file and the screen will
return to the original screen.
If you do not want to save the file, press the
Cancel
key to return to the previous window.
i
OK key
o
Cancel key
NOTE:
The file name will be automatically assigned starting
from M_001 in order.
CAUTION:
Do not turn the power off or eject the card when the
warning sign or hourglass is showing on
the visual touch screen. Otherwise, the data stored in
the memory may be lost or damaged.
OK
Cancel
OK
Name
Save File (Built-in)
Cancel
M_001
Edit
A(F): 126x110mm
Mode
Cancel
OK
Size
A Z
OK
Name
Save File
Cancel
M_008
M_001
M_002
M_003
M_004
M_005
M_006
M_007
q
w
e
r
t
y
i
o
Save File
Cancel
ABC
OK
u
42
SAVING A FILE
When you press the
Save file
key, the
Save file
dialog
box will open.
q
Save file key
You can select a memory location from Built-in memory,
ATA PC card or USB memory.
Press one of the following keys to select the desired
location to where you wish to save the file.
w
Built-in memory key
e
ATA PC card key
r
USB memory key
The
File list
will open if you press the Built-in memory
key, while the
Folder list
will open if you press the PC
card key or USB memory key.
t
File list
y
Folder list
When you press the
Page
keys, you will be able
to see the saved files in the previous and next pages.
u
Page keys
Select the desired folder and the file list of the selected
folder will open.
Press the
OK
key to save the file and the screen will
return to the original screen.
If you do not want to save the file, press the
Cancel
key to return to the previous window.
i
OK key
o
Cancel key
NOTE:
The file name will be automatically assigned starting
from M_001 in order.
CAUTION:
Do not turn the power off or eject the card when the
warning sign or hourglass is showing on
the visual touch screen. Otherwise, the data stored in
the memory may be lost or damaged.
OK
Cancel
OK
Name
Save File (Built-in)
Cancel
M_001
Edit
A(F): 126x110mm
Mode
Cancel
OK
Size
A Z
OK
Name
Save File
Cancel
M_008
M_001
M_002
M_003
M_004
M_005
M_006
M_007
q
w
e
r
t
y
i
o
Save File
Cancel
ABC
OK
u
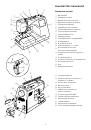
35
OPTIONAL ITEMS
PC Cards (optional item)
Inserting and ejecting a PC card
Insert the PC card into the slot with the front side facing
toward you.
Push the card in until it clicks, the eject button will pop
out.
q
PC card
w
Eject button
NOTE:
When the card is properly set, the red bar on the eject
button will show.
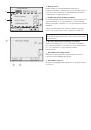
Ejecting the PC card
Press the Eject Button to eject the PC card.
Take out the PC card from the machine.
NOTE:
When the power is turned on with a PC card inserted in
the machine, it will take a few moments to get the
machine booted up.
Selecting the PC card designs
Press the
PC card
tab. The designs contained in the
card are displayed on the pattern selection keys.
Press the
Pattern selection
key to select the design
you wish to sew.
The
Ready to Sew
screen will appear.
CAUTION:
Do not turn the power off or eject the card while the
warning sign or hourglass is displayed.
A Z
PC Card
Hoop Size A(F):126x110mm
Mode
2
1
3
4
q
w
w