177
СИ
СТ
ЕМ
А
БЕ
ЗО
ПА
СН
ОС
ТИ
СО
ВЕ
ТЫ
ВО
ДИ
ТЕ
ЛЮ
АВ
ТО
МО
БИ
ЛЯ
УС
ТР
АН
ЕН
ИЕ
НЕ
ИС
ПР
АВ
НО
СТ
ЕЙ
ТЕ
ХН
ИЧ
ЕС
КО
Е
ОБ
СЛ
УЖ
ИВ
АН
ИЕ
ТЕ
ХН
ИЧ
ЕС
КИ
Е
ХА
РА
КТ
ЕР
ИС
ТИ
КИ
ПР
ЕД
МЕ
ТН
ЫЙ
УК
АЗ
АТ
ЕЛ
Ь
КО
НТ
РО
ЛЬ
НЫ
Е
ЛА
МП
Ы
И
СО
ОБ
ЩЕ
НИ
Я
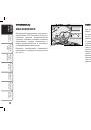
ПР
ИБ
ОР
Ы
И О
РГ
АН
Ы
УП
РА
ВЛ
ЕН
ИЯ
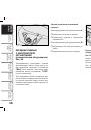
ЕСЛИ ПЕРЕГОРЕЛА ЛАМ
-
ПА ВНУТРЕННЕГО ОСВЕ
-
ТИТЕЛЬНОГО ПРИБОРА
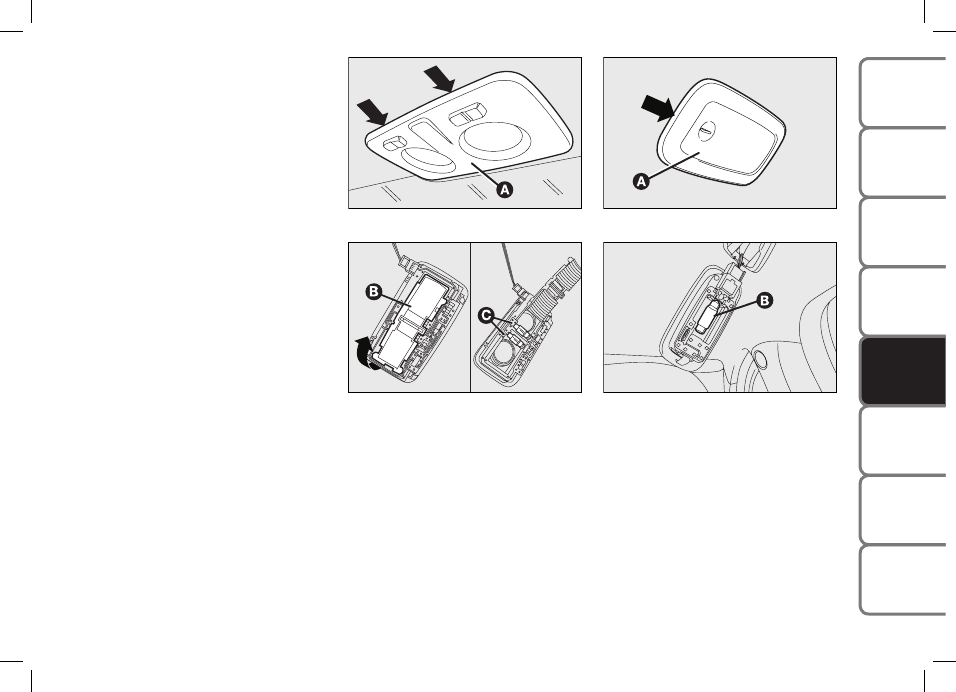
Для определения типа и мощности ус
-
тановленной лампы смотрите параграф
"ЗАМЕНА ЛАМП".
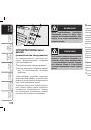
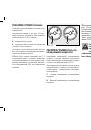
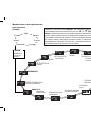
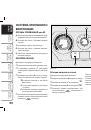
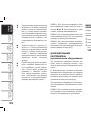
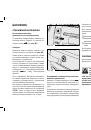
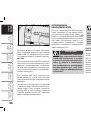
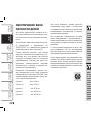
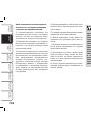
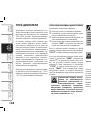
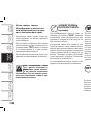
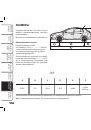
ПЕРЕДНИЙ ПОТОЛОЧНЫЙ СВЕ
-
ТИЛЬНИК
Для замены лампы действуйте следую
-
щим образом:
нажмите в местах, указанных стрелка
-
ми, и снимите плафон
A, рис
.
36
;
откройте защитную крышку
B
,
рис
.
37
;
освободив лампы
С
из боковых кон
-
тактов замените их. Убедитесь, что
новые лампы надежно закреплены
между контактами;
закройте защитную крышку
B
,
рис
.
37
,
и установите плафон
A, рис
.
36
на мес
-
то, надежно закрепив его.
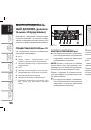
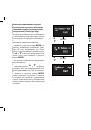
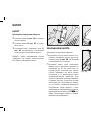
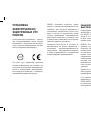
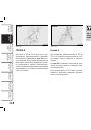
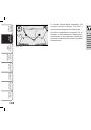
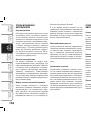
Лампа заднего потолочного
светильника
Версии без люка в крыше
Для замены лампы действуйте следую
-
щим образом:
снимите рассеиватель
A, рис
.
38
, на
-
жав в месте, указанном стрелкой;
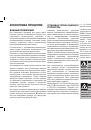
извлеките лампу
B
,
рис. 39
, из боковых
контактов и замените ее, проверьте,
что новая лампа надежно закреплена
между контактами.
175
SAFETY DEVICES
CORRECT USE OF THE CAR
W
ARNING
LIGHTS AND MESSAGES
CA
R
MA
IN
TE
NA
NC
E
TE
CH
NI
CA
L
SP
EC
IFI
CA
TIO
NS
INDEX
DA
SH
BO
AR
D
AN
D
CO
NT
RO
LS
IN AN
EMERGENCY
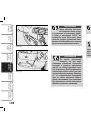
IF AN INTERIOR LIGHT
BURNS OUT
For the type of bulb and power rating, see
“When needing to change a bulb”.
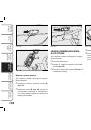
FRONT CEILING LIGHT
To replace the bulbs proceed as follows:
❒
work in the points shown by the ar-
rows and remove light A-fig. 36;
❒
open the protection lid B-fig. 37;
❒
replace bulbs C releasing them from
the side contacts; make sure that new
bulbs are correctly clamped between
contacts;
❒
re-close the lid B-fig. 37 and secure
light A-fig. 36 into its housing locking
it properly.
fig. 36
F0Q0720m
fig. 37
F0Q0721m
REAR CEILING LIGHT
Versions without sunroof
To replace the bulbs proceed as follows:
❒
remove the light unit A-fig. 38 lever-
ing in the point shown by the arrow;
❒
replace the bulb B-fig. 39 releasing it
from the side contacts making sure that
the new bulb is correctly clamped be-
tween the contacts.
fig. 38
F0Q0723m
fig. 39
F0Q0722m
155-190 BRAVO GB 10-05-2007 9:19 Pagina 175
Рис. 36
175
SAFETY DEVICES
CORRECT USE OF THE CAR
W
ARNING
LIGHTS AND MESSAGES
CA
R
MA
IN
TE
NA
NC
E
TE
CH
NI
CA
L
SP
EC
IFI
CA
TIO
NS
INDEX
DA
SH
BO
AR
D
AN
D
CO
NT
RO
LS
IN AN
EMERGENCY
IF AN INTERIOR LIGHT
BURNS OUT
For the type of bulb and power rating, see
“When needing to change a bulb”.
FRONT CEILING LIGHT
To replace the bulbs proceed as follows:
❒
work in the points shown by the ar-
rows and remove light A-fig. 36;
❒
open the protection lid B-fig. 37;
❒
replace bulbs C releasing them from
the side contacts; make sure that new
bulbs are correctly clamped between
contacts;
❒
re-close the lid B-fig. 37 and secure
light A-fig. 36 into its housing locking
it properly.
fig. 36
F0Q0720m
fig. 37
F0Q0721m
REAR CEILING LIGHT
Versions without sunroof
To replace the bulbs proceed as follows:
❒
remove the light unit A-fig. 38 lever-
ing in the point shown by the arrow;
❒
replace the bulb B-fig. 39 releasing it
from the side contacts making sure that
the new bulb is correctly clamped be-
tween the contacts.
fig. 38
F0Q0723m
fig. 39
F0Q0722m
155-190 BRAVO GB 10-05-2007 9:19 Pagina 175
Рис. 37
175
SAFETY DEVICES
CORRECT USE OF THE CAR
W
ARNING
LIGHTS AND MESSAGES
CA
R
MA
IN
TE
NA
NC
E
TE
CH
NI
CA
L
SP
EC
IFI
CA
TIO
NS
INDEX
DA
SH
BO
AR
D
AN
D
CO
NT
RO
LS
IN AN
EMERGENCY
IF AN INTERIOR LIGHT
BURNS OUT
For the type of bulb and power rating, see
“When needing to change a bulb”.
FRONT CEILING LIGHT
To replace the bulbs proceed as follows:
❒
work in the points shown by the ar-
rows and remove light A-fig. 36;
❒
open the protection lid B-fig. 37;
❒
replace bulbs C releasing them from
the side contacts; make sure that new
bulbs are correctly clamped between
contacts;
❒
re-close the lid B-fig. 37 and secure
light A-fig. 36 into its housing locking
it properly.
fig. 36
F0Q0720m
fig. 37
F0Q0721m
REAR CEILING LIGHT
Versions without sunroof
To replace the bulbs proceed as follows:
❒
remove the light unit A-fig. 38 lever-
ing in the point shown by the arrow;
❒
replace the bulb B-fig. 39 releasing it
from the side contacts making sure that
the new bulb is correctly clamped be-
tween the contacts.
fig. 38
F0Q0723m
fig. 39
F0Q0722m
155-190 BRAVO GB 10-05-2007 9:19 Pagina 175
Рис. 38
175
SAFETY DEVICES
CORRECT USE OF THE CAR
W
ARNING
LIGHTS AND MESSAGES
CA
R
MA
IN
TE
NA
NC
E
TE
CH
NI
CA
L
SP
EC
IFI
CA
TIO
NS
INDEX
DA
SH
BO
AR
D
AN
D
CO
NT
RO
LS
IN AN
EMERGENCY
IF AN INTERIOR LIGHT
BURNS OUT
For the type of bulb and power rating, see
“When needing to change a bulb”.
FRONT CEILING LIGHT
To replace the bulbs proceed as follows:
❒
work in the points shown by the ar-
rows and remove light
A-fig. 36
;
❒
open the protection lid
B-fig. 37
;
❒
replace bulbs
C
releasing them from
the side contacts; make sure that new
bulbs are correctly clamped between
contacts;
❒
re-close the lid
B-fig. 37
and secure
light
A-fig. 36
into its housing locking
it properly.
fig. 36
F0Q0720m
fig. 37
F0Q0721m
REAR CEILING LIGHT
Versions without sunroof
To replace the bulbs proceed as follows:
❒
remove the light unit
A-fig. 38
lever-
ing in the point shown by the arrow;
❒
replace the bulb
B-fig. 39
releasing it
from the side contacts making sure that
the new bulb is correctly clamped be-
tween the contacts.
fig. 38
F0Q0723m
fig. 39
F0Q0722m
155-190 BRAVO GB 10-05-2007 9:19 Pagina 175
Рис. 39
 1
1
 2
2
 3
3
 4
4
 5
5
 6
6
 7
7
 8
8
 9
9
 10
10
 11
11
 12
12
 13
13
 14
14
 15
15
 16
16
 17
17
 18
18
 19
19
 20
20
 21
21
 22
22
 23
23
 24
24
 25
25
 26
26
 27
27
 28
28
 29
29
 30
30
 31
31
 32
32
 33
33
 34
34
 35
35
 36
36
 37
37
 38
38
 39
39
 40
40
 41
41
 42
42
 43
43
 44
44
 45
45
 46
46
 47
47
 48
48
 49
49
 50
50
 51
51
 52
52
 53
53
 54
54
 55
55
 56
56
 57
57
 58
58
 59
59
 60
60
 61
61
 62
62
 63
63
 64
64
 65
65
 66
66
 67
67
 68
68
 69
69
 70
70
 71
71
 72
72
 73
73
 74
74
 75
75
 76
76
 77
77
 78
78
 79
79
 80
80
 81
81
 82
82
 83
83
 84
84
 85
85
 86
86
 87
87
 88
88
 89
89
 90
90
 91
91
 92
92
 93
93
 94
94
 95
95
 96
96
 97
97
 98
98
 99
99
 100
100
 101
101
 102
102
 103
103
 104
104
 105
105
 106
106
 107
107
 108
108
 109
109
 110
110
 111
111
 112
112
 113
113
 114
114
 115
115
 116
116
 117
117
 118
118
 119
119
 120
120
 121
121
 122
122
 123
123
 124
124
 125
125
 126
126
 127
127
 128
128
 129
129
 130
130
 131
131
 132
132
 133
133
 134
134
 135
135
 136
136
 137
137
 138
138
 139
139
 140
140
 141
141
 142
142
 143
143
 144
144
 145
145
 146
146
 147
147
 148
148
 149
149
 150
150
 151
151
 152
152
 153
153
 154
154
 155
155
 156
156
 157
157
 158
158
 159
159
 160
160
 161
161
 162
162
 163
163
 164
164
 165
165
 166
166
 167
167
 168
168
 169
169
 170
170
 171
171
 172
172
 173
173
 174
174
 175
175
 176
176
 177
177
 178
178
 179
179
 180
180
 181
181
 182
182
 183
183
 184
184
 185
185
 186
186
 187
187
 188
188
 189
189
 190
190
 191
191
 192
192
 193
193
 194
194
 195
195
 196
196
 197
197
 198
198
 199
199
 200
200
 201
201
 202
202
 203
203
 204
204
 205
205
 206
206
 207
207
 208
208
 209
209
 210
210
 211
211
 212
212
 213
213
 214
214
 215
215
 216
216
 217
217
 218
218
 219
219
 220
220
 221
221
 222
222
 223
223
 224
224
 225
225
 226
226
 227
227
 228
228
 229
229
 230
230
 231
231
 232
232
 233
233
 234
234
 235
235
 236
236
 237
237
 238
238
 239
239
 240
240
 241
241
 242
242
 243
243
 244
244
 245
245
 246
246
 247
247
 248
248