Доступность: Бесплатно как и все руководства на сайте. Без регистрации и SMS.
Дополнительно: Чтение инструкции онлайн
www.goclever.com
Страница: (30 из 30)
навигация
1
2
3
4
5
6
7
8
9
10
11
12
13
14
15
16
17
18
19
20
21
22
23
24
25
26
27
28
29
30
Оглавление инструкции
Страница 1 из 31 QUICK START GUIDE ENGLISH | POLSKI | ITALIANO FONE 450Q www.goclever.com
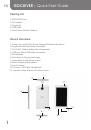
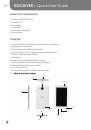
Страница 2 из 31 EN GOCLEVER | Quick Start Guide Packing List 1. GOCLEVER Fone 2. AC Adapter 3. Earphone 4. USB Cable 5. Quick Start Guide 6. Battery Device Overview 1. Power Turn on/off the device; Suspend/Activate the device. 2. Earphone Jack Earphones connection. 3. Vol +\ Vol - Button Adjust the volume level 4.
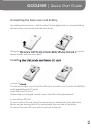
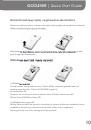
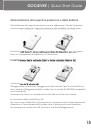
Страница 3 из 31 GOCLEVER | Quick Start Guide Uninstalling the back cover and battery Uninstalling the back cover: hold the side of device tightly with one hand and lift up the back cover at its buckle with the other hand. Taking out the battery: hold the side of device tightly with one hand and pull up the battery
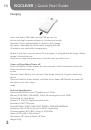
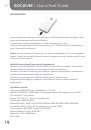
Страница 4 из 31 EN GOCLEVER | Quick Start Guide Charging Insert one end of USB cable into the USB port on the device and plug the power adapter to the electrical socket. Normally it takes approximately 3.5 hours to fully charge the device. Operating the device while charging with the AC adapter may extend the
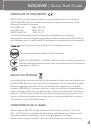
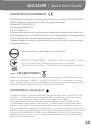
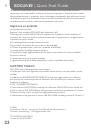
Страница 5 из 31 GOCLEVER | Quick Start Guide CERTIFICATE OF CONFORMITY GOCLEVER Ltd. hereby declares under our sole responsibility that the product GOCLEVER FONE 450Q is in conformity with the essential requirements of the following Directives is declared: EMC DIRECTIVE 2004 / 108 / EC LVD DIRECTIVE 2006 / 95 / EC
Страница 6 из 31 EN GOCLEVER | Quick Start Guide tions. Outdoor only channels 1 to 6 are allowed. This means that in Peer-to-Peer, the WLAN feature can only be used outside if the peer sets up the communication on an authorized channel (i.e., between 1 & 6). In infrastructure mode, please make sure the access point
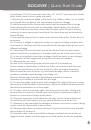
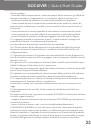
Страница 7 из 31 GOCLEVER | Quick Start Guide of production TFT LCD screens with sizes from 3,5” to 10,1” may have up to 5 faulty pixels (white, black or the so-called sub-pixels). 7. Warranty for accessories added to the device (e.g. holders, cables, etc.) is limited to 12 month from the date of sale and excludes
Страница 8 из 31 EN GOCLEVER | Quick Start Guide 20. The legal relations between the buyer and the device and the Guarantor is governed exclusively by the provisions of this warranty. Claims for compensation going further than that are excluded unless they result from mandatory provisions of law.. 21. This warranty
Страница 9 из 31 GOCLEVER | Quick Start Guide Central Service 4a Sianowska Street 60-431 Poznan, POLAND email: serwis@goclever.com tel.: +48 618488767 Technical Support UK tel.: 0844 8566848 email: uk@goclever.com Technical Support Ireland email: ireland@goclever.com Technical Support Spain tel: 902104953 email:
Страница 10 из 31 PL GOCLEVER | Quick Start Guide Zawartość opakowania 1. Telefon GOCLEVER Fone 2. Adapter AC 3. Słuchawki 4. Kabel USB 5. Podręcznik skrócony 6. Akumulator Przegląd 1. Przycisk zasilania Włączanie / wyłączanie urządzenia; tryb uśpienia / aktywacji. 2. Złącze słuchawek Złącze słuchawek. 3. Przycisk
Страница 11 из 31 GOCLEVER | Quick Start Guide Demontaż pokrywy tylnej i wyjmowanie akumulatora Demontaż pokrywy tylnej: mocno przytrzymać jedną ręką bok urządzenia i podnieść drugą ręką pokrywę tylną przy zatrzasku. Wyjmowanie akumulatora: mocno przytrzymać jedną ręką bok urządzenia i wyciągnąć drugą ręką
Страница 12 из 31 PL GOCLEVER | Quick Start Guide Ładowanie Włożyć jeden koniec kabla USB do gniazda USB w urządzeniu, po czym włożyć adapter do gniazda elektrycznego. Pełne naładowanie akumulatora trwa około 3,5 godziny. Używanie urządzenia podczas ładowania za pomocą adaptera AC, może wydłużyć czas ładowania.
Страница 13 из 31 GOCLEVER | Quick Start Guide CERTYFIKAT ZGODNOŚCI – KRAJE UE Niniejszym GOCLEVER Sp. z o.o. oświadcza, że urządzenie GOCLEVER FONE 450Q jest zgodne z zasadniczymi wymaganiami oraz innymi stosownymi postanowieniami poniżej wymienionych dyrektyw: DYREKTYWA EMC 2004 / 108 / EC DYREKTYWA LVD 2006 / 95
Страница 14 из 31 PL GOCLEVER | Quick Start Guide • Francja: Produkt może być użytkowany bez ograniczeń tylko wewnątrz pomieszczeń. Funkcja WLAN może być używana na zewnątrz jedynie w momencie ustawienia komunikacji na autoryzowane kanały (tj. między 1 i 6). Zatem przed rozpoczęciem konfiguracji połączenia
Страница 15 из 31 GOCLEVER | Quick Start Guide 8. Wady ujawnione w okresie gwarancji będą usuwane bezpłatnie w możliwie najkrótszym terminie nieprzekraczającym 21 dni roboczych od przyjęcia urządzenia na serwis. W przypadku konieczności sprowadzenia części zamiennych z zagranicy, termin powyższy może ulec
Страница 16 из 31 PL GOCLEVER | Quick Start Guide 20.Gwarant nie odpowiada za szkody powstałe w wyniku utraty danych na nośnikach magnetycznych, informujemy również, że mapy przywracane będą zgodne ze stanem produkcyjnym. 21. Stosunek prawny pomiędzy nabywcą urządzenia i Gwarantem regulowany jest wyłącznie
Страница 17 из 31 GOCLEVER | Quick Start Guide Central Service 4a Sianowska Street 60-431 Poznan, POLAND email: serwis@goclever.com tel.: +48 618488767 Technical Support UK tel.: 0844 8566848 email: uk@goclever.com Technical Support Ireland email: ireland@goclever.com Technical Support Spain tel: 902104953 email:
Страница 18 из 31 IT GOCLEVER | Quick Start Guide Contenuto della confezione 1. MultiPhone GOCLEVER Fone 2. Adattatore CA 3. Auricolare 4. Cavo USB 5. Guida di avvio rapido 6. Batteria Panoramica del dispositivo 1. Accensione Accende/spegne il dispositivo; Sospende/attiva il dispositivo. 2. Presa per auricolari
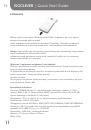
Страница 19 из 31 GOCLEVER | Quick Start Guide Disinstallazione del coperchio posteriore e della batteria Disinstallazione del coperchio posteriore: tenere saldamente il lato del dispositivo con una mano e sollevare il coperchio posteriore alla sua fibbia con l’altra mano. Estrazione della batteria: tenere saldamente
Страница 20 из 31 IT GOCLEVER | Quick Start Guide Caricamento Inserire un’estremità del cavo USB nella porta USB sul dispositivo e collegare l’adattatore di alimentazione alla presa elettrica. Il caricamento totale del dispositivo richiede solitamente 3,5 ore. L’utilizzo del dispositivo durante il caricamento con
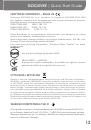
Страница 21 из 31 GOCLEVER | Quick Start Guide CERTIFICATO DI CONFORMITA’ GOCLEVER dichiara sotto la propria responsabilità che il prodotto GOCLEVER FONE 450Q è conforme ai requisiti essenziali delle seguenti direttive: Direttiva EMC 2004/108 / EC LVD direttiva 2006/95 / EC R & TTE 1999/5 / EC Il documento completo
Страница 22 из 31 IT GOCLEVER | Quick Start Guide GARANZIA 1. GOCLEVER SP. Z O.O. con sede legale a Poznań (60-431), in ul. 4A Sianowskiej, di seguito denominato garante, assicura che il prodotto a marchio GoClever è privo di difetti di progettazione e di materiali, che potrebbero compromettere la sua funzionalità
Страница 23 из 31 GOCLEVER | Quick Start Guide del suo impiego; - danni derivanti da cause esterne, come ad esempio: danni meccanici, gli effetti dei fenomeni atmosferici, l’inquinamento, le inondazioni, sbalzi di tensione, ecc - malfunzionamento del software non autorizzato installato sul dispositivo - i danni
Страница 24 из 31 IT GOCLEVER | Quick Start Guide Le spese di trasporto da e per il Centro di Assistenza sono a carico del cliente e comunque non rimborsabili, anche per interventi in garanzia. Eventuali danni subiti dal prodotto durante il trasporto, o per imballaggio inadeguato, non potranno essere considerati in
Страница 25 из 31 GOCLEVER | Quick Start Guide Central Service 4a Sianowska Street 60-431 Poznan, POLAND email: serwis@goclever.com tel.: +48 618488767 Technical Support UK tel.: 0844 8566848 email: uk@goclever.com Technical Support Ireland email: ireland@goclever.com Technical Support Spain tel: 902104953 email:
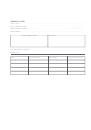
Страница 26 из 31 WARRANTY CARD DATE OF SOLD: ........................................................................................................................................................................... DATE OF MANUFACTURED:
Страница 27 из 31 KARTA GWARANCYJNA DATA SPRZEDAŻY: ....................................................................................................................................................................... DATA PRODUKCJI:
Страница 28 из 31 SCHEDA DI GARANZIA DATA ACQUISTO: ....................................................................................................................................................................... DATA FABBRICAZIONE: