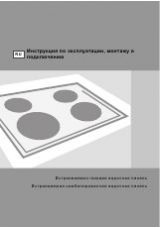
Страница 2 из 31 GB RU UA Dear customer, You have purchased a product of our new series of electric ranges. We wish that our product would do you a good turn. We recommend you to study these instructions and to operate this product according to instructions. Уважаемый покупатель! Вы приобрели изделие из новой серии
Страница 3 из 31 and prolong the range service life. • Плита предназначена только для теплового • When detecting a flaw on the appliance compartment, приготовления пищи. Недопустимо использовать плиту с целью отапливания помещения, так как do not repair it by yourself but put the appliance out of это может привести
Страница 4 из 31 BEFORE FIRST USE РЕКОМЕНДАЦИИ ДЛЯ ПЕРВОГО ПРИМЕНЕНИЯ ПЛИТЫ ВКАЗІВКИ ЩО ДО ПЕРШОГО ЗАСТОСУВАННЯ ПЛИТИ • Before using the appliance for the first time, remove • Снимите с плиты упаковку. protective and packing material from the cooker. • Различные части и компоненты упаковки могут • Various parts and
Страница 5 из 31 requires supervision. • The baking plate in grooves can be loaded up to 3 kg as maximum. The gridiron with a pan or baking plate can be loaded up to 7 kg as maximum. • The baking plates and pans are not designed for a long-term storage of foodstuffs (longer than 48 hours). For longer storage, store
Страница 6 из 31 BASIC RULES FOR USING OF GLASS CERAMIC HOBS • Use the pots with flat base without impurities which could scretch glass ceramic hob. • Pot base should have a diameter at least equal to that of cooking zones, in other case thermo – limiter of cooking zone will be operate. • When cooking cover pots if
Страница 7 из 31 электрическую мощность электроварочной зоны регулируйте так, чтобы не нужно было сдвигать или снимать крышку. IMPORTANT ВНИМАНИЕ! Cooking zones must not be used without pots, kettle Завод-изготовитель не несёт ответственность за could be destroyed дефекты стеклокерамической панели, которые возникли
Страница 8 из 31 OVEN FUNCTIONS AND APPLICATIONS ОПИСАНИЕ ФУНКЦИЙ ДУХОВКИ Oven illumination being on in setting up all the oven Освещение духовки, включено в functions. следующих положений переключателя каждом ФУНКЦІЇ ДУХОВКИ из Освітлення духовки, що світить під час наставляння усіх функцій духовки Static oven
Страница 9 из 31 The temperature selector can be set anywhere from 50°C - 250°C. Tip: The function is suitable for baking on two levels at the same time, especially if you need the same temperature on both levels. Поток тёплого воздуха создаст равномерную температуру по всему объёму духовки. Термостат можно
Страница 10 из 31 the cleaning of oven. Youwill find details in the section использоваться также при очистке духовки. Cleaning and maintenance. Подробности в связи с очисткой можете прочитать в главе «Уход и обслуживание». BAKING AND ROASTING CHART Требуемое время и температура, необходимые для Below are some
Страница 11 из 31 turned towards you. духовки так, чтобы та часть решётки, на которой кількістю поперечин було спрямовано вперед. расположено меньше перемычек, была впереди. • Slide a shallow baking pan filled with water one level • Для збирання стікаючого соку слід у нижчі пази у below the grid to catch the
Страница 12 из 31 MINUTE MINDER МЕХАНИЧЕСКИЙ ТАЙМЕР МЕХАНІЧНИЙ ТАЙМЕР TIMER OPERATION • Turn the timer in clockwise direction to the maximum position, and then come back to the required time setting (max. 120 minutes). • When the preset cooking time has elapsed, the oven is automatically switched off. • With the
Страница 13 из 31 CONTROL OF OVEN WITH HELP OF DIGITAL PROGRAMMER УПРАВЛЕНИЕ ДУХОВКОЙ ПРИ ПОМОЩИ ЭЛЕКТРОННОГО ПРОГРАММАТОРА УПРАВЛІННЯ ДУХОВКОЮ ЗА ДОПОМОГОЮ ЕЛЕКТРОННОГО ПРОГРАМАТОРА The digital programmer - timer is designed for oven's switching off in the in advance set time. The switched off or switched on state
Страница 14 из 31 ДУХОВКА РАБОТАЕТ В ДВУХ РЕЖИМАХ ДУХОВКА ПРАЦЮЄ В ДВОХ РЕЖИМАХ THE BAKING OVEN CAN WORK IN TWO REGIMES • Without use of digital programmer (the pot symbol (8) • Без применения электронного программатора (в • Без застосування електронного програматора (у такому разі на дисплеї повинен горіти символ
Страница 15 из 31 USE OF SEMIAUTOMATIC REGIME Example for easier understanding: The requested duration of operation is 1 hour and 20 minutes (1.20). The duration setting up: • Press the button 2 (the display shows 0.00 and the symbol 8) and then press the button 5 so long, as the value 1.20 is achieved. The symbol 6
Страница 16 из 31 USE OF AUTOMATIC REGIME Example for easier understanding: The duration of operation is 1 hour and 20 minutes (1.20), the time of finishing should be at 13.52 (in 24 hour time description, e.g. 01.52 p.m.) Check, whether the clock is adjusted to accurate day time. The duration setting up: • Press
Страница 17 из 31 STOPWATCH ТАЙМЕР ТАЙМЕР The stopwatch is another function of digital programmer, which can be activated with pressing of button 1. The display will show 0.00. The requested time period we can adjust with the buttons 4 and 5. The symbol 7 will glow on the display. The set up time can be checked any
Страница 18 из 31 MAINTENANCE AND CLEANING OF THE COOKER УХОД ЗА ПЛИТОЙ ЧИЩЕННЯ ПЛИТИ ТА ДОГЛЯД ЗА НЕЮ Keep to the following principles while cleaning or maintaining the range: • Set all knobs in off position. • The main curcuit - breaker placed before appliance must be in OFF position. • Wait until the range is
Страница 19 из 31 LIGHT IMPURITIES НЕБОЛЬШОЕ ЗАГРЯЗНЕНИЕ Use damp sponge, after cleaning dry up the устраните влажной тряпкой. Остатки моющего surface.Water stains caused by boiling over can be средства смойте холодной водой, а всю поверхность femoved by lemon or vinegar. панели тщательно вытрите. Следы,
Страница 20 из 31 OVEN Clean the oven walls with a damp sponge with detergent. If there are baked ends on the wall, use a special detergent for enamel. Following cleaning, carefully dry up the oven. Clean the oven only when cold. Never use abrasive means scratching the enamelled surface. Wash the oven appurtenances
Страница 21 из 31 NOTE: For illumination it is necessary to use a bulb T 300°C, E14, 230 - 240 V, 25 W. 1 - Glass cover 2 - Lamp 3 - Sleeve 4 - Oven rear wall 20 ПРИМЕЧАНИЕ: Для освещения духовки применяется лампа T 300°, E14, 230/240 B, 25 Bт. 1. Плафон 2. Лампа 3. Патрон 4. Задняя стенка духовки ПРИМІТКА: Для
Страница 22 из 31 CLAIMS РЕКЛАМАЦИЯ РЕКЛАМАЦІЇ In case of any defects of the appliance during warranty period, do not attempt to repair it by yourself. Make a claim at an authorised dealer or place of purchase and ensure that you are in possesion of the Certificate of warranty. Beware that in the absence of duly
Страница 23 из 31 INSTALLATION INSTRUCTIONS AND SETTINGS РУКОВОДСТВО ПО МОНТАЖУ И ТЕХНИЧЕСКОМУ ОБСЛУЖИВАНИЮ ІНСТРУКЦІЯ ПО УСТАНОВЦІ ТА НАЛАГОДЖЕННЮ CONNECTION OF THE RANGE TO THE ELECTRIC MAINS A device disconnecting the appliance from mains, whose off contacts of all poles are in a minimum distance of 3 mm, must be
Страница 24 из 31 For the range connection we advise using a connecting cable: - Cu 3 x 4 mm2 as minimum - for single-phase connection (circuit breaker 35 – 38 A to the type) - Cu 5 x 1.5 mm2 as minimum - for three-phase connection (circuit breaker 3x16A) 23 Для подключения плиты рекомендуем использовать питающий
Страница 25 из 31 IMPORTANT NOTICE At any electric range disassembly or assembly besides its current use it is necessary to disconnect the appliance from mains and to keep it out of service. In installation of the appliance, it is necessary to do in the light of its duty chiefly the following: • Verification of the
Страница 26 из 31 LOCATION МЕСТО УСТАНОВКИ ПЛИТЫ The appliance is designed for location in the kitchen line. Плита должна быть установлена и подключена в The range can be set in the normal areas. The range can соответствии с нормами и правилами, действующими from the point of view of thermal resistance be positioned
Страница 27 из 31 LEVELING THE APPLIANCE РЕГУЛИРОВКА ВЫСОТЫ ПЛИТЫ ВСТАНОВЛЕННЯ ПЛИТИ ПО ВИСОТІ (certain models only) Установка плиты в горизонтальное положение или Cooker hob must be leveled in horizontal position by регулировка её по высоте выполняется с помощью 4means of 4 leveling screws supplied with the
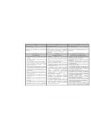
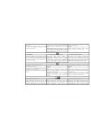
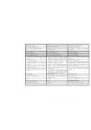
Страница 28 из 31 TECHNICAL DATA Electric Cooker ТЕХНИЧЕСКИЕ ДАННЫЕ Электрическая плита ТЕХНІЧНІ ДАНІ ЕЛЕКТРИЧНА ПЛИТА E 55203 A EC 55320 A EC 55320 AX Dimensions: Размеры плиты: Розміри: Height / Depth / Weight (mm) высота - ширина / глубина ( мм) Висота/Ширина/Глибина ( мм) Cooking plate Electric hot plates Стол
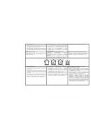
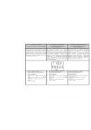
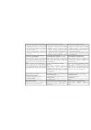
Страница 29 из 31 GB RU UA INFORMATION TABLE ИНФОРМАЦИОННЫЙ ЛИСТОК ІНФОРМАЦІЙНИЙ ЛИСТ Manufacturer Изготовитель Model Модель Виробник Модель A – More efficient B C D E F G – Less efficient A – Самой эффективной B C D E F G – Наименее эффективной А -Економна B C D E F G – Менш економна Energy consuption Time to cook