14
NOTICE:
•
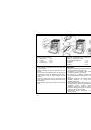
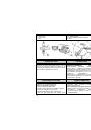
When grilling large roasts (e.g. chicken) make sure
that the food fixed on the roasting spit is well
balanced, so that the spit rotates with ease.
•
When grilling with the oven door opened, always use
the protection sheet to shield the control panel,
otherwise the control knobs might get damaged.
ВНИМАНИЕ!
•
При гриле на поворотном вертеле с открытой
дверцей духовки обязательно должна быть
установлена защитная пластина ручек,
расположенных на панели управления, чтобы не
произошло их повреждение.
•
При гриле на поворотном вертеле с прикрытой
дверцей духовки нужно обязательно открутить
пластмассовую рукоятку вертела и установить
защитную пластину ручек.
•
При гриле объёмных продуктов (куры и др.)
следите за тем, чтобы продукты на вертеле были
размещены равномерно и вертел мог свободно
вращаться.
ПРИМІТКА:
•
При смаженні великих шматків м’яса (наприклад,
курча) упевніться, що м’ясо добре збалансовано
на рожні, який повинен обертатися невимушено.
•
При смаженні на грилі з відкритими дверцятами
духовки завжди користуйтеся захисним щитом,
щоб захистити панель управління від
пошкодження.
CLEANING
AND MAINTENANCE
УХОД
ЗА ПЛИТОЙ
ТЕХНІЧНЕ ОБСЛУГОВУВАННЯ
ТА ЧИЩЕННЯ
Before attempting any cleaning or maintenance set all
gas control knobs and temperature selectors to “OFF”
position and let the cooker cool down completely.
При любой манипуляции с плитой, помимо
повседневного применения, закройте кран подачи
газа, расположенный на газопроводе, и отключите
плиту от электросети.
Перед чищенням або технічним обслуговуванням
приладу вимкніть його з електромережі та
встановіть усі ручки конфорок та регулятор
температури в положення „ВИМК.” (“OFF”) та дайте
охолонути плиті повністю.
CLEANING THE CABINET
•
Clean the exterior with a damp sponge and some
detergent.
•
Fat stains can be removed with warm water and
special detergent for enamel.
•
Never clean enameled surfaces with abrasive agents
as they may permanently damage the surface of the
appliance.
ОЧИСТКА ВНЕШНЕЙ ПОВЕРХНОСТИ
•
Поверхность плиты очищайте при помощи мокрой
тряпки или губки с поверхностно-активным
моющим средством. Затем вытрите насухо.
•
Жирные пятна устраните тёплой водой со
специальным чистящим средством для эмали.
•
Никогда не пользуйтесь абразивными средствами,
которые разрушают поверхность эмали и других
применённых материалов.
ЧИЩЕННЯ КОРПУСУ
•
Зовнішню частину приладу необхідно чистити
вологою ганчіркою і миючим засобом.
•
Жирові плями необхідно видалити теплою водою
та спеціальним миючим засобом для емалі.
•
Ніколи не можна чистити емальовані поверхні
абразивними засобами, оскільки може
пошкодитися поверхня приладу.
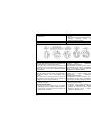
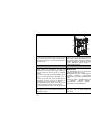
HOB GRID
•
Remove the cooking grid from the hob and wash it
separately or place it into the dishwasher. After
washing replace it to fit the appropriate groves in the
hob.
•
Remove burner parts (cover, distributor) from the hob
and soak them in warm water with added detergent
for 10 minutes.
•
After washing dry the burner parts carefully and check
whether all burner notches are clean, then return
them back to their position.
ОЧИСТКА ВАРОЧНОГО СТОЛА
•
Снимите решётку с варочного стола и вымойте с
поверхностно-активным моющим средством.
•
Крышки и рассекатели пламени горелок снимите и
положите на 10 минут в тёплую воду с моющим
средством.
•
Затем вымойте их, проверьте чистоту прорезей в
рассекателе пламени, тщательно всё осушите и
установите.
РЕШІТКА КОНФОРКИ
•
Зніміть решітку з варильної поверхні та помийте
окремо або помістіть в посудомийну машину.
Після миття установіть її на варильну поверхню
відповідним чином.
•
Зніміть частини конфорок (кришку, розсіювач) та
замочіть в теплій воді з миючим засобом на 10
хвилин.
•
Після миття ретельно висушіть частини конфорок
та перевірте чи усі зубці конфорок чисті, помістіть
на попереднє положення.¨