10
English
MOUNTING AND DISMOUNTING THE SAW
BLADE
CAUTION
To avoid serious accident, ensure the switch is in the
OFF position, and the power source is disconnected.
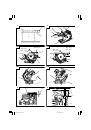
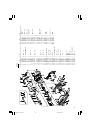
1. Dismounting the saw blade
(1) Set the cutting volume at maximum, and place the
Circular Saw as shown in
Fig. 8
.
(2) Depress the lock lever, lock the spindle, and remove
the hexagonal-socket bolt with the Hex. bar wrench.
(3) While holding the lower guard lever to keep the
lower guard fully retracted into the saw cover,
remove the saw blade.
2. Mounting the Saw Blade
(1) Thoroughly remove any sawdust which has
accumulated on the spindle, bolt and washers.
(2) As shown in
Fig. 9
, the side of Washer (A) with
a projected center the same diameter as the inner
diameter of the saw blade and the concave side
of Washer (B) must be fitted to the saw blade sides.
*
Washer (A) is supplied for 2 types of saw blades
with the hole diameters of 16 mm and 30 mm.
(When buying the Circular Saw, one type of
washer (A) is supplied.)
In case the hole diameter of your saw blade
does not correspond to that of washer (A), please
contact the shop where you purchased the
Circular Saw.
(3) To assure proper rotation direction of the saw blade,
the arrow direction on the saw blade must coincide
with the arrow direction on the saw cover.
(4) Using the fingers, tighten the hexagonal-socket bolt
retaining the saw blade as much as possible. Then
depress the lock lever, lock the spindle, and
thoroughly tighten the bolt.
CAUTION
After having attached the saw blade, reconfirm that the
lock lever is firmly secured in the prescribed position.
MAINTENANCE AND INSPECTION
1. Inspecting the saw blade
Since use of a dull saw blade will degrade efficiency
and cause possible motor malfunction, sharpen or
replace the saw blade as soon as abrasion is noted.
2. Inspecting the mounting screws
Regularly inspect all mounting screws and ensure
that they are properly tightened. Should any of the
screws be loose, retighten them immediately. Failure
to do so could result in serious hazard.
3. Inspecting the carbon brushes (Fig. 10)
The motor employs carbon brushes which are
consumable parts. Since an excessively worn carbon
brush can result in motor trouble, replace the carbon
brushes with new ones having the same carbon
brush No. shown in the figure when it becomes
worn to or near the “wear limit”. In addition, always
keep carbon brushes clean and ensue that they
slide freely within the brush holders.
CAUTION
䡬
When replacing the new carbon brushes, always
use genuine Hitachi carbon brushes with the number
specified in the drawing.
䡬
For models C6BU2 and C7BU2, the brake may not
work if other than the specified carbon brushes are
used.
When the brake becomes ineffective, replace the
carbon brushes with new ones.
4. Replacing carbon brushes
Disassemble the brush caps with a slotted-head
screwdriver. The carbon brushes can then be easily
removed.
5. Maintenance of the motor
The motor unit winding is the very “heart” of the
power tool.
Exercise due care to ensure the winding does not
become damaged and/or wet with oil or water.
6. Adjusting the base and saw blade to maintain
perpendicularity
The angle between the base and the saw blade has
been adjusted to 90°, however should this
perpendicularity be lost for some reason, adjust in
the following manner:
(1) Turn the base face up (
Fig. 11
) and loosen the wing-
nut and wing-bolt (
Fig. 4 (A)
,
Fig. 4 (B)
).
(2) Apply a square to the base and the saw blade and
turning the slotted set screw with a slotted-head
screwdriver, shift the position of the base to produce
the desired right angle.
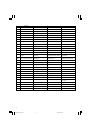
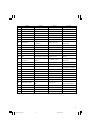
7. Service parts list
A: Item No.
B: Code No.
C: No. Used
D: Remarks
CAUTION
Repair, modification and inspection of Hitachi Power
Tools must be carried out by an Hitachi Authorized
Service Center.
This Parts List will be helpful if presented with the
tool to the Hitachi Authorized Service Center when
requesting repair or other maintenance.
In the operation and maintenance of power tools,
the safety regulations and standards prescribed in
each country must be observed.
MODIFICATIONS
Hitachi Power Tools are constantly being improved
and modified to incorporate the latest technological
advancements.
Accordingly, some parts (i.e. code numbers and/or
design) may be changed without prior notice.
GUARANTEE
We guarantee Hitachi Power Tools in accordance with
statutory/country specific regulation. This guarantee does
not cover defects or damage due to misuse, abuse, or
normal wear and tear. In case of complaint, please send
the Power Tool, undismantled, with the GUARANTEE
CERTIFICATE found at the end of this Handling
instruction, to a Hitachi Authorized Service Center.
NOTE
Due to HITACHI’s continuing program of research and
development, the specifications herein are subject to
change without prior notice.
01Eng_C6U2_EE
11/5/08, 12:05
10