11
English
NOTE
Be sure to pull out the battery from the charger
after use, and then keep it.
How to make the batteries perform longer
(1) Recharge the batteries before they become
completely exhausted.
When you feel that the power of the tool becomes
weaker, stop using the tool and recharge its battery.
If you continue to use the tool and exhaust the
electric current, the battery may be damaged and
its life will become shorter.
(2) Avoid recharging at high temperatures.
A rechargeable battery will be hot immediately after
use. If such a battery is recharged immediately after
use, its internal chemical substance will deteriorate,
and the battery life will be shortened. Leave the
battery and recharge it after it has cooled for a
while.
CAUTION:
䡬
When the battery charger has been continuously
used, the battery charger will be heated, thus
constituting the cause of the failures. Once the
charging has been completed, give 15 minutes rest
until the next charging.
䡬
If the battery charger does not work while the
battery is mounted correctly, it is probable that the
battery or charger is malfunctioning. Take it to your
authorized Service Center.
PRIOR TO OPERATION
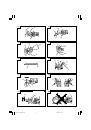
1. Mounting the blade
This unit employs a detachable mechanism that
enables mounting and removal of saw blades
without the use of a wrench or other tools.
(1) Turn on and off the switching trigger several times
so that the lever can jump out of the housing
completely. Thereafter, turn off the switch and
remove the battery (
Fig. 6
).
CAUTION
Be absolutely sure to keep the switch turned off
and the battery removed to prevent any accident.
(2) Push the lever in the direction of the arrow mark
shown in
Fig. 7
marked on the lever (
Fig. 7
).
(3) Insert the saw blade all the way into the small slit
of the plunger tip with the lever pushing. You can
mount this blade either in the upward or downward
direction (
Fig. 8
,
Fig. 9
).
(4) When you release the lever, the spring force will
return the lever to the correct position automatically
(
Fig. 10
).
(5) Pull the back of the saw blade two or three times
by hand and check that the blade is securely
mounted. When pulling the blade, you will know
it is properly mounted if it clicks and the lever
moves slightly (
Fig. 11
).
CAUTION
When pulling the saw blade, be absolutely sure to
pull it from the back. Pulling other parts of the blade
will result in an injury.
2. Dismounting the blade
(1) Turn on and off the switching trigger several times
so that the lever can jump out of the housing
completely. Thereafter, turn off the switch and
remove the battery (
Fig. 6
).
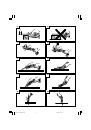
APPLICATIONS
䡬
Cutting pipe and angle steel.
䡬
Cutting various lumbers.
䡬
Cutting mild steel plates and aluminum plates.
䡬
Cutting synthetic resins, such as phenol resin and
vinyl chloride.
For details refer to the section entitled “SELECTION OF
BLADES”.
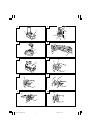
BATTERY REMOVAL/INSTALLATION
CAUTION
Be sure to keep the switch turned off and the lock-
off button moved to right position (lock position)
(See
Fig. 18
).
1. Battery removal
Hold the housing tightly and push the battery latches
to remove the battery (see
Figs. 1
and
2
).
CAUTION
Never short-circuit the battery.
2. Battery installation
Insert the battery while observing its polarities (see
Fig. 2
).
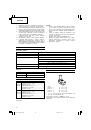
CHARGING
Before using the power tool, charge the battery as
follows.
1. Connect the charger power cord to the receptacle
2. Insert the battery in the charger
Position the battery so that the nameplate faces
toward the nameplate of the charger and press in
the battery until it comes into contact with the
bottom plate (See
Fig. 3
).
Inserting the battery will turn on the charger (the
pilot lamp lights up).
CAUTION
If the pilot lamp does not light up, pull out the
power cord from the receptacle and check the
battery mounting condition.
The pilot lamp goes off to indicate that the battery
is fully charged.
CAUTION
If the battery is heated due to direct sunlight,
etc., just after operation, the charger pilot lamp
may not light. At that time cool the battery first,
then start charging.
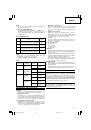
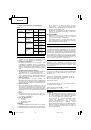
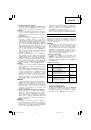
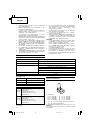
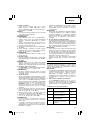
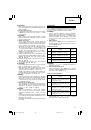
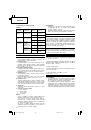
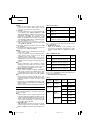
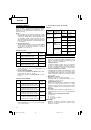
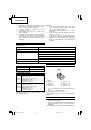
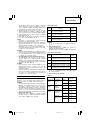
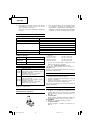
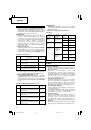
䡬
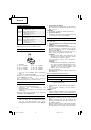
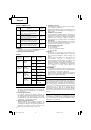
Regarding recharging time
Table 1
shows the recharging time required
according to the type of battery.
NOTE:
The recharging time may vary according to the
ambient temperature.
3. Disconnect the charger’s power cord from the
receptacle.
4. Hold the charger firmly and pull out the battery.
Table 1
Recharging time (approx. min.) at 20°C
Battery capacity (Ah)
1.5 Ah
BCL1015
40 min.
01Eng_CR10D_EE
6/24/09, 11:07
11