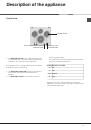
Инструкция для HOTPOINT-ARISTON 7HPC 604

(скачивание инструкции бесплатно)
Формат файла: PDF
Доступность: Бесплатно как и все руководства на сайте. Без регистрации и SMS.
Дополнительно: Чтение инструкции онлайн
background image

GB

3

!

 Before operating your new appliance please read 

this instruction booklet carefully. It contains important 
information for safe use, installation and care of the 
appliance.

!

 Please keep these operating instructions for future 

reference. Pass them on to possible new owners of the 
appliance.

Positioning

!

 Keep packaging material out of the reach of children. 

It can become a choking or suffocation hazard (

see 

Precautions and tips

).

!

 The appliance must be installed by a qualified 

professional according to the instructions provided. 
Incorrect installation may cause harm to people and 
animals or may damage property.

Fitting the appliance

It is possible to instal them next to furniture which is 
higher than the working board. For a correct installation 
of the cooking top the following precautions must be 
followed:

•  Kitchen cabinets adjacent to the appliance and taller 

than the top of the hob must be at least 600 mm 
from the edge of the hob.

•  Hoods must be installed according to their relative 

installation instruction manuals and at a minimum 
distance of 650 mm from the hob.

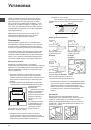
•  Place the wall cabinets 
adjacent to the hood at a 

minimum height of 420 mm 
from the hob (

see figure

).

•  If the hob is installed beneath 

a wall cabinet, the latter must 
be situated at a minimum of 700 
mm above the hob (

see figure

).

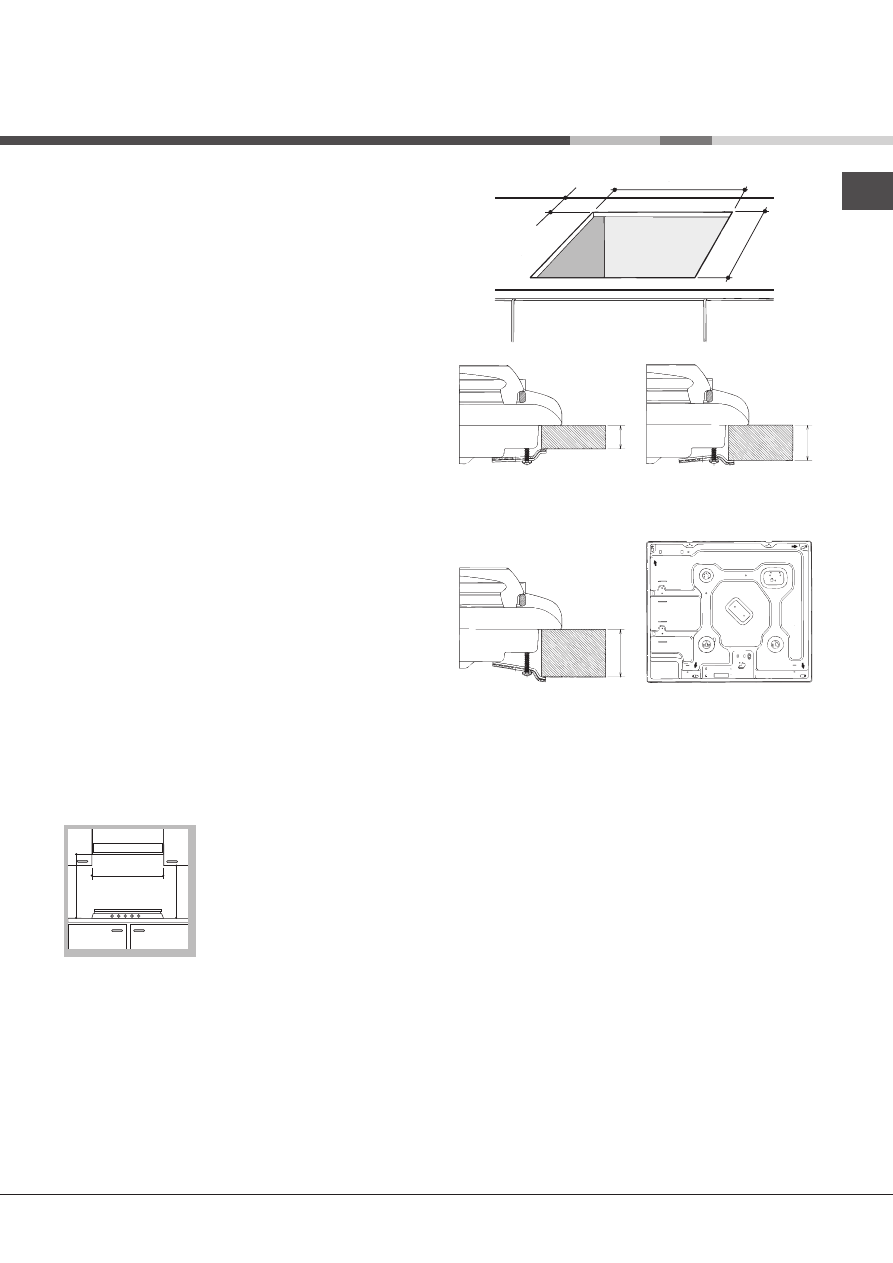
•  The installation cavity should have the dimensions 

indicated in the figure.

  Fastening hooks are provided, allowing you to fasten 

the hob to tops that are between 20 and 40 mm 
thick. To ensure the hob is securely fastened to the 
top, we recommend you use all the hooks provided.

555 mm

55 mm

475 mm

Hook fastening diagram

20


30

Hooking position 


Hooking position 

for top

 H=20 mm


for top 

H=30 mm


Front

40


Hooking position

 Back

for top

 H=40 mm

!

 Use the hooks contained in the “accessory pack”

•  Where the hob is not installed over a built-in oven, a 

wooden panel must be installed as insulation. This 
must be placed at a minimum distance of 20 mm 
from the lower part of the hob.

Ventilation

To ensure adequate ventilation, the back panel of 
the cabinet must be removed. It is advisable to install 
the oven so that it rests on two strips of wood, or on a 
completely flat surface with an opening of at least 45 x 
560 mm (

see diagrams

).

Installation

600mm min.

420mm min.

650mm min.

1
2
3
4
5
6
7
8
9
10
11
12
13
14
15
16
Оглавление инструкции
  • Страница 1 из 17
    Operating Instructions HOB GB Contents GB English, 1 RS   Warnings, 2 Installation, 3-4 Positioning Electrical connections Description of the appliance, 5 Overall view Precautions and tips, 6 General safety Disposal Practical Advice on Using the Electric Hot Plates Maintenance and care, 7
  • Страница 2 из 17
    Warnings GB WARNING: The appliance and its accessible parts become hot during use. Care should be taken to avoid touching heating elements. Children less than 8 years of age shall be kept away unless continuously supervised. This appliance can be used by children aged from 8 years and above and
  • Страница 3 из 17
    Installation GB 555 mm 55 m m 475 mm ! Before operating your new appliance please read this instruction booklet carefully. It contains important information for safe use, installation and care of the appliance. ! Please keep these operating instructions for future reference. Pass them on to
  • Страница 4 из 17
    GB 560 mm . 1 2 380-400V 2N~ H05RR-F 4x1.5 CEI-UNEL 35363 1 2 220-230V 1N~ H05RR-F 3x2.5 CEI-UNEL 35363 1 2 380-400V 3N~ H05RR-F 5x1.5 CEI-UNEL 35363 45 m m. Where a hob is installed above an oven without a forced ventilation cooling system, adequate ventilation must be provided inside the cabinet
  • Страница 5 из 17
    Description of the appliance GB Overall view ELECTRIC PLATE Control knobs for the cook-top ELECTRIC PLATE • The ELECTRIC PLATE vary in diameter and power: “normal” and “fast”. The latter can be identified by a red boss in the center of the hot plate itself. ! The position of the corresponding
  • Страница 6 из 17
    Precautions and tips GB ! This appliance has been designed and manufactured in compliance with international safety standards. The following warnings are provided for safety reasons and must be read carefully. General safety • This manual is for a class 3 built-in cooktop. • These instructions are
  • Страница 7 из 17
    Maintenance and care GB Switching the appliance off Assistance Disconnect your appliance from the electricity supply before carrying out any work on it. ! Never use the services of an unauthorised technician. Cleaning the appliance ! Do not use abrasive or corrosive detergents, stain removers,
  • Страница 8 из 17
       RS       RS                          
  • Страница 9 из 17
                                          
  • Страница 10 из 17
     !                               555 mm m m mm 55 475 !   
  • Страница 11 из 17
                                 
  • Страница 12 из 17
      RS                      !              
  • Страница 13 из 17
       !                             
  • Страница 14 из 17
        RS              !                 
  • Страница 15 из 17
    RS 15
  • Страница 16 из 17
    05/2013 - 195114027.00 XEROX FABRIANO RS 16
  • Страница 17 из 17