Инструкция для HOTPOINT-ARISTON 7OFH 837 C IX RU/HA

(скачивание инструкции бесплатно)
Формат файла: PDF
Доступность: Бесплатно как и все руководства на сайте. Без регистрации и SMS.
Дополнительно: Чтение инструкции онлайн
background image

12

GB

Maintenance


and


care

S

witchin

g


the


a

pp

liance


off

Disconnect your appliance from the electricity supply

before carrying out any work on it.

C

le

a

nin

g


t

h

e


a

pp

l

i

a

nc

e

• The stainless-steel or enamel-coated external parts as

well as the rubber seals may be cleaned using a

sponge that has been soaked in lukewarm water and

neutral soap. If these stains are difficult to remove,

use only specialised products. After cleaning, rinse

and dry thoroughly. Do not use abrasive powders or

corrosive substances.

• Ideally, the inside of the oven should be cleaned after

each use, when it is still lukewarm. Use hot water and

detergent, rinse and dry with a soft cloth. Do not use

abrasive products.

• All accessories - with the exception of the sliding

racks - can be washed like everyday crockery, and

are even dishwasher safe.

 Never use steam cleaners or pressure cleaners on

the  appliance.

C

le

a

nin

g


t

h

e


o

v

e

n

 d

oo

r

Clean the glass part of the oven door using a sponge

and a non-abrasive cleaning product, then dry

thoroughly with a soft cloth. Do not use rough abrasive

material or sharp metal scrapers as these could scratch

the surface and cause the glass to crack.

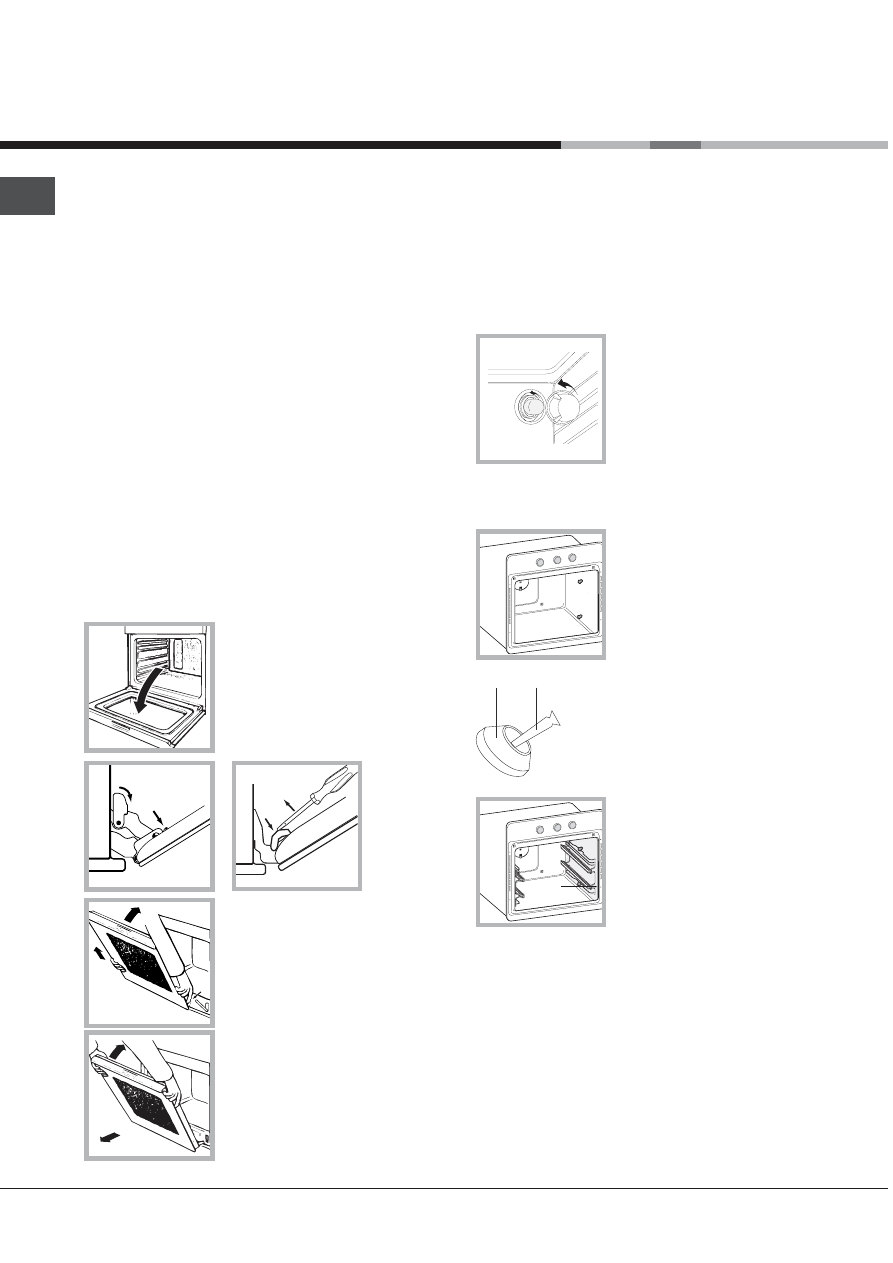
To clean more thoroughly, you

can remove the oven door.

1. Open the oven door fully

(

see diagram

).

2. Use a screwdriver to lift up

and turn the small levers 

.

located on the two hinges (

see

diagram

).

3. Grip the door on the two

external sides and close it

approximately half way. Unlock

the door by pressing on the

clamps 

.

, then pull the door

towards you lifting it out of its

seat (

see diagram

).*

3. Grip the door on the two

outer sides and close it

approximately  half  way.  Pull

the door towards you lifting it

out of its seat (

see diagram

).*

To replace the door, reverse

this  sequence.

I

ns

p

ecting


t

h

e


sea

l

s

Check the door seals around the oven periodically. If

the seals are damaged, please contact your nearest

After-sales Service Centre (

see Assistance

). We

recommend not using the oven until the seals have

been replaced.

R

e

p

l

a

cin

g


t

h

e


l

i

g

h

t


b

u

l

b

To replace the oven light bulb:

1. Remove the glass cover of

the lamp-holder.

2. Remove the light bulb and

replace it with a similar one:

Wattage 25 W, cap E 14.

3. Replace the glass cover (

see

diagram

).

S

l

i

d

in

g


R

a

c

k K

it


a

ss

e

m

b

l

y

To assemble the sliding racks:

1. Loosen the two screws A

(

see diagram

). If the oven is

fitted with self-cleaning panels,

these will have to be temporarily

disassembled.

2. Replace the screws A with the

screws and spacers (B + C) supplied

with the kit.

3. Tighten the new screws B and the

corresponding spacers C, fitting the

self-cleaning panels on again.

4. Secure the two joints D of the

guide rail in the holes provided

on the oven walls (

see diagram

).

The holes for the left guide rail

are situated at the top, while the

holes for the right one are at the

bottom.

5. Finally, fit the guide rail on the spacer C.

Do not place the sliding racks in position 5.

F

F

F

B

C

D

A

A

*

 Only on certain models

1
2
3
4
5
6
7
8
9
10
11
12
13
14
15
16
17
18
19
20
21
22
23
24
25
26
27
28
Оглавление инструкции
  • Страница 1 из 29
    Operating Instructions OVEN Contents GB English,1 RS Ðóññêèé, 13 Installation, 2-3 Positioning Electrical connections Description of the appliance, 4 Overall view Control panel Start-up and use, 5 Starting the oven Using the cooking timer Data plate The electronic cooking programmer, 6 7OFH 837 C
  • Страница 2 из 29
    Installation  Before placing your new appliance into operation please read these operating instructions carefully. They contain important information for safe use, for installation and for care of the appliance.  Please keep these operating instructions for future reference. Pass them on to
  • Страница 3 из 29
    Centring and fixing* Connecting the supply cable to the mains 1. Position brackets “A” against oven support “B”. 2. Position tabs “C” against brackets “A”. If the thickness of the cabinet side panel: • is 16 mm thick: place the tab so that the number 16 written on it is facing you; • is 18 mm
  • Страница 4 из 29
    Description of the appliance GB Overall view GUIDES for the sliding racks Control panel position 5 position 4 position 3 position 2 position 1 GRILL DRIPPING PAN Control panel SELECTOR Knob Indicator light THERMOSTAT THERMOSTAT Knob •• •• ELECTRONIC Programmer* ANALOGUE PROGRAMMER * knob SELECTOR
  • Страница 5 из 29
    Start-up and use ! The first time you use your appliance, heat the empty oven with its door closed at its maximum temperature for at least half an hour. Ensure that the room is well ventilated before switching the oven off and opening the oven door. The appliance may produce a slightly unpleasant
  • Страница 6 из 29
    The electronic cooking programmer Programming cooking GB  A cooking mode must be selected before programming can take place. DISPLAY END OF COOKING icon DURATION icon •• •• DECREASE TIME button CLOCK icon Programming the cooking duration TIMER icon 1. Press the button several times until the icon
  • Страница 7 из 29
    Analogue Programmer Programming cooking* GB Programming a cooking duration with immediate start 1. Press the PROGRAMMER knob and turn it in a clockwise direction to set the correct time.  The clock can only be set if the oven is connected to the electricity mains. In the event of a power failure,
  • Страница 8 из 29
    Cooking modes GB Cooking modes ! A temperature value can be set for all cooking modes between 60°C and Max, except for • BARBECUE (recommended: set only to MAX power level); • GRATIN (recommended: do not exceed 200°C). / / BAKING mode The rear heating element and the fan come on, guaranteeing the
  • Страница 9 из 29
    Practical cooking advice GB ! Do not place racks in position 1 and 5 during fanassisted cooking. Excessive direct heat can burn temperature sensitive foods. ! In the BARBECUE and GRATIN cooking modes, particularly when using the rotisserie, place the dripping pan in position 1 to collect cooking
  • Страница 10 из 29
    GB Cooking advice table Cooking modes Foods Leavening process of dough made with yeast or baking powder (brioches, bread, sugar pie, croissants, etc.) Duck Traditional Roast veal or beef Pork roast Oven Biscuits (short pastry) Tarts Tarts Fruit cakes Plum cake Sponge cake Baking Stuffed pancakes
  • Страница 11 из 29
    Precautions and tips ! The appliance was designed and manufactured in compliance with international safety standards. The following warnings are provided for safety reasons and must be read carefully. General safety • The appliance was designed for domestic use inside the home and is not intended
  • Страница 12 из 29
    Maintenance and care GB Switching the appliance off Inspecting the seals Cleaning the appliance Check the door seals around the oven periodically. If the seals are damaged, please contact your nearest After-sales Service Centre (see Assistance). We recommend not using the oven until the seals have
  • Страница 13 из 29
    Èíñòðóêöèè ïî ýêñïëóàòàöèè ÄÓÕÎÂÎÉ ØÊÀÔ Ñîäåðæàíèå GB English,1 RS Ðóññêèé, 13 Ìîíòàæ, 14-15 Ðàñïîëîæåíèå Ýëåêòðè÷åñêîå ïîäêëþ÷åíèå Îïèñàíèå èçäåëèÿ, 16 Îáùèé âèä Êîíñîëü óïðàâëåíèÿ Âêëþ÷åíèå è ýêñïëóàòàöèÿ, 17 Âêëþ÷åíèå äóõîâîãî øêàôà Ïðîãðàììèðîâàíèå îêîí÷àíèÿ ïðèãîòîâëåíèÿ ïðè ïîìîùè òàéìåðà
  • Страница 14 из 29
    Ìîíòàæ  Âàæíî ñîõðàíèòü äàííîå ðóêîâîäñòâî äëÿ åãî ïîñëåäóþùèõ êîíñóëüòàöèé.  ñëó÷àå ïðîäàæè, ïåðåäà÷è èçäåëèÿ èëè ïðè ïåðååçäå íà íîâîå ìåñòî æèòåëüñòâà íåîáõîäèìî ïðîâåðèòü, ÷òîáû ðóêîâîäñòâî îñòàâàëîñü âìåñòå ñ èçäåëèåì, äëÿ òîãî ÷òîáû åãî íîâûé âëàäåëåö ìîã îçíàêîìèòüñÿ ñ ïðàâèëàìè
  • Страница 15 из 29
    ñíÿòü òîëüêî ïðè ïîìîùè ñïåöèàëüíîãî èíñòðóìåíòà. Öåíòðîâêà è êðåïëåíèå* 1. Óñòàíîâèòü ñêîáû “A” â êðàé ê äóõîâîìó øêàôó “B”. 2. Óñòàíîâèòü óãîëêè “C” â êðàé ê ñêîáàì “A”.  ÷àñòíîñòè, åñëè òîëùèíà áîêîâîé ïàíåëè ìåáåëüíîãî ýëåìåíòà: • 16 ìì: ïðèêðåïèòü óãîëîê òàêèì îáðàçîì, ÷òîáû ïðîñòàâëåííûé íà
  • Страница 16 из 29
    Îïèñàíèå èçäåëèÿ RS Îáùèé âèä ВЫДВИЖНЫЕ НАПРАВЛЯЮЩИЕ для противеней и решеток Панель управления положение 5 положение 4 положение 3 положение 2 положение 1 РЕШЕТКА ПРОТИВЕНЬ Êîíñîëü óïðàâëåíèÿ •• •• * Рукоятка АНАЛОГОВОГО ПРОГРАММЕРА* Рукоятка ПРОГРАММ Индикатор РАБОТЫ ДУХОВКИ* * Èìååòñÿ òîëüêî â
  • Страница 17 из 29
    Âêëþ÷åíèå è ýêñïëóàòàöèÿ  Ïðè ïåðâîì âêëþ÷åíèè äóõîâîãî øêàôà ðåêîìåíäóåì ïðîêàëèòü åãî ïðèìåðíî â òå÷åíèå ÷àñà ïðè ìàêñèìàëüíîé òåìïåðàòóðå ñ çàêðûòîé äâåðöåé. Çàòåì âûêëþ÷èòå äóõîâîé øêàô, îòêðîéòå äâåðöó è ïðîâåòðèòå ïîìåùåíèå. Çàïàõ, êîòîðûé âû ìîæåòå ïî÷óâñòâîâàòü, âûçâàí èñïàðåíèåì âåùåñòâ,
  • Страница 18 из 29
    Ýëåêòðîííûé òàéìåð ïðîãðàììèðîâàíèÿ âûïå÷êè RS •• •• Ïðîãðàììèðîâàíèå ÷àñîâ  ×àñû ìîæíî íàñòðîèòü êàê ïðè âûêëþ÷åííîì äóõîâîì øêàôó, òàê è ïðè âêëþ÷åííîì, ïðè óñëîâèè ÷òî íå áûëî çàäàíî âðåìÿ îêîí÷àíèÿ âûïå÷êè. Ïîñëå ïîäêëþ÷åíèÿ ê ýëåêòðè÷åñêîé ñåòè èëè ïîñëå îòêëþ÷åíèÿ ýëåêòðîýíåðãèè, íà÷íåò
  • Страница 19 из 29
    Àíàëîãîâûé ïðîãðàììåð Ïðîãðàììèðîâàíèå ïðèãîòîâëåíèÿ* RS Ïðîãðàììèðîâàíèå ïðîäîëæèòåëüíîñòè ïðèãîòîâëåíèÿ ñ ìãíîâåííûì íà÷àëîì Íàñòðîéêà ÷àñîâ* 1. Íàæìèòå ðóêîÿòêó ÏÐÎÃÐÀÌÌÅÐÀ è ïîâåðíèòå åå ïî ÷àñîâîé ñòðåëêå âïëîòü äî óñòàíîâêè çíà÷åíèÿ òåêóùåãî âðåìåíè.  Íàñòðîéêà ÷àñîâ âîçìîæíà, òîëüêî åñëè
  • Страница 20 из 29
    Ïðîãðàììû RS Ïðîãðàììû ïðèãîòîâëåíèÿ  Äëÿ âñåõ ïðîãðàìì ìîæíî çàäàòü òåìïåðàòóðó îò 60°C äî ÌÀÊÑ êðîìå: • ÃÐÈËÜ (ðåêîìåíäóåòñÿ óñòàíàâëèâàòü òîëüêî ÌÀÊÑ. òåìïåðàòóðó); • ÇÀÏÅÊÀÍÊÀ (ðåêîìåíäóåòñÿ íå ïðåâûøàòü òåìïåðàòóðó 200°C). / Ïðîãðàììà ÐÀÑÑÒÎÉÊÀ Äóõîâêà íàãðåâàåòñÿ è ïîääåðæèâàåò òåìïåðàòóðó
  • Страница 21 из 29
    Ïðàêòè÷åñêèå ñîâåòû ïî ïðèãîòîâëåíèþ RS !  ðåæèìå âåíòèëèðóåìîãî ïðèãîòîâëåíèÿ íå èñïîëüçóéòå 1-ûé è 5-ûé óðîâíè: îíè ïîäâåðãàþòñÿ ïðÿìîìó âîçäåéñòâèþ ãîðÿ÷åãî âîçäóõà, êîòîðûé ìîæåò ñæå÷ü äåëèêàòíûå ïðîäóêòû. ! Ïðè èñïîëüçîâàíèè ÃÐÈËÜ è ÇÀÏÅÊÀÍÊÀ, îñîáåííî ñ ôóíêöèåé âåðòåëà, ïîìåñòèòå ïðîòèâåíü
  • Страница 22 из 29
    RS Òàáëèöà ïðèãîòîâëåíèÿ Ïðîãðàììû Ðàññòîéêà Òðàäèöèîíàëüíàÿ äóõîâêà Êîíäèòåðñêàÿ âûïå÷êà Áûñòðîå ïðèãîòîâëåíèå Îäíîâðåìåííîå ïðèãîòîâëåíèå Ïèööà ÃÐÈËÜ Gratin (Ïîäðóìÿíèâàíèå) 22 Ïðîäóêòû Ðàññòîéêà äðîææåâîãî òåñòà (áóëî÷êè, õëåá, òîðòû, êðóàññàíû è ò.ä.) Óòêà Æàðêîå èç òåëÿòèíû èëè ãîâÿäèíû Æàðêîå
  • Страница 23 из 29
    Ïðåäîñòîðîæíîñòè è ðåêîìåíäàöèè  Èçäåëèå ñïðîåêòèðîâàíî è èçãîòîâëåíî â ñîîòâåòñòâèè ñ ìåæäóíàðîäíûìè íîðìàòèâàìè ïî áåçîïàñíîñòè. Íåîáõîäèìî âíèìàòåëüíî ïðî÷èòàòü íàñòîÿùèå ïðåäóïðåæäåíèÿ, ñîñòàâëåííûå â öåëÿõ âàøåé áåçîïàñíîñòè. Îáùèå òðåáîâàíèÿ ïî áåçîïàñíîñòè • Äàííîå èçäåëèå ïðåäíàçíà÷àåòñÿ
  • Страница 24 из 29
    Òåõíè÷åñêîå îáñëóæèâàíèå è óõîä RS Îòêëþ÷åíèå ýëåêòðîïèòàíèÿ Ïåðåä íà÷àëîì êàêîé-ëèáî îïåðàöèè ïî îáñëóæèâàíèþ èëè ÷èñòêå îòñîåäèíèòå èçäåëèå îò ñåòè ýëåêòðîïèòàíèÿ. ×èñòêà èçäåëèÿ • Íàðóæíûå ýìàëèðîâàííûå ýëåìåíòû èëè äåòàëè èç íåðæàâåþùåé ñòàëè, à òàêæå ðåçèíîâûå óïëîòíåíèÿ ìîæíî ïðîòèðàòü
  • Страница 25 из 29
    Êðåïëåíèå êîìïëåêòà âûäâèæíûõ íàïðàâëÿþùèõ Ïîðÿäîê ìîíòàæà âûäâèæíûõ íàïðàâëÿþùèõ: 1. Îòâèíòèòå äâà øóðóïà À (ñì. ðèñóíîê). Åñëè äóõîâîé øêàô îñíàùåí A ñàìî÷èñòÿùèìèñÿ ïàíåëÿìè, îíè îêàæóòñÿ âðåìåííî ñíÿòûìè. A C 2. Çàìåíèòå øóðóïû À íà øóðóïû è ðàñïîðíûå ýëåìåíòû (Â+Ñ) èç êîìïëåêòà. 3. Çàâèíòèòå
  • Страница 26 из 29
    RS 26
  • Страница 27 из 29
    RS 27
  • Страница 28 из 29
    04/2010 - 195079899.01 XEROX FABRIANO RS 28
  • Страница 29 из 29